
| Subject: | Waterleak Guide -- Rear Passenger Floor Carpet Wet/Musty Odor
and/or Spare Tire Well Wet (Apply Sealer) |
This bulletin contains repair information for the following conditions:
| • | Condition 1 -- LH and/or RH Rear Passenger Floor Carpet Wet/Musty
Odor |
| • | Condition 2 -- Spare Tire Well Wet |
Condition 1
LH and/or RH rear passenger floor carpet or foot well may be wet or
has a musty odor. Technicians may find evidence of water along the inner rocker
panel, in the rear floor pan area and in the foam backing of the rear floor
carpet.
Cause
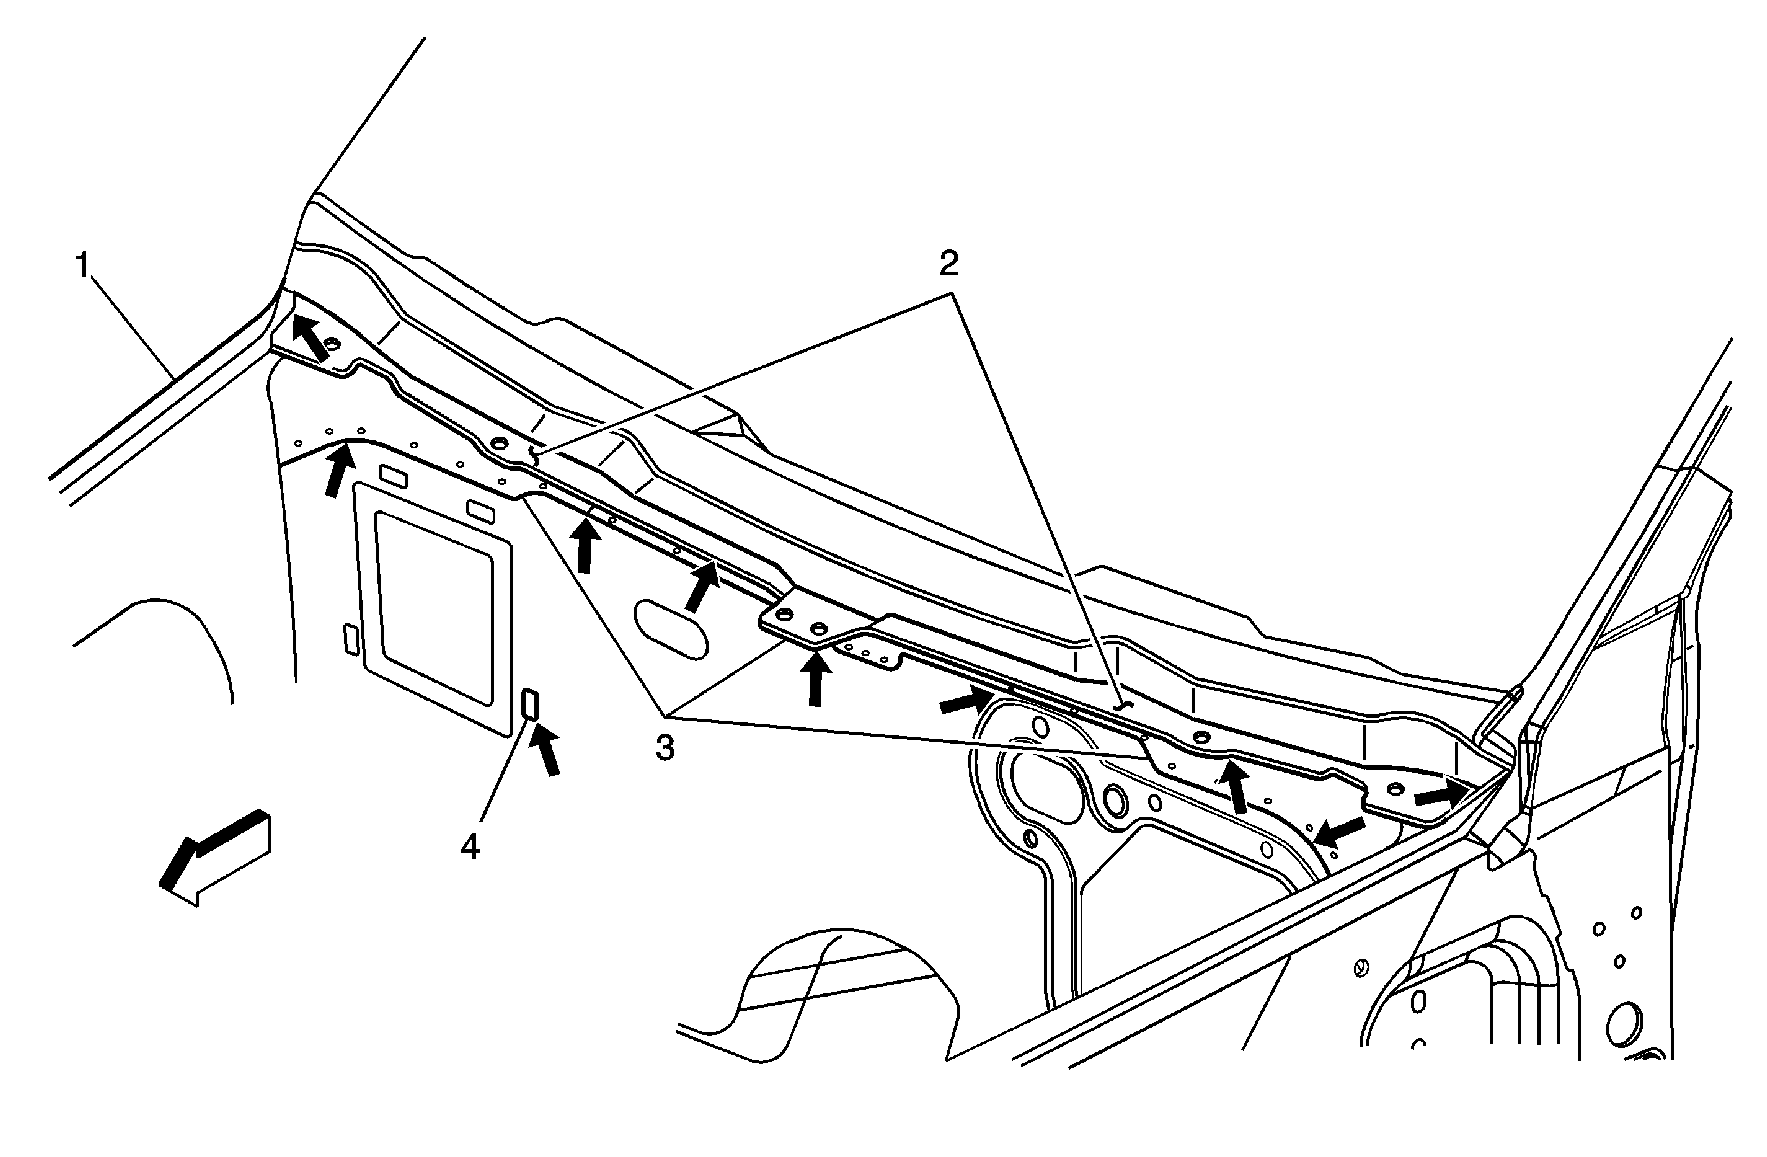
This condition may be due to excessive amounts of water passing over
the air inlet grille panels and entering the passenger compartment through
gaps, skips or missing sealant (refer to the arrows in the illustration) between
the plenum panel (2), the front of dash panels (3) and the front compartment
outer side rail panels (1).
In addition, the water leak may be due to sealant interfering with the
mating of the passenger compartment air filter box seal (4).
Correction
- Refer to the removal procedures in the Service Manual for the
following:
| 1.1. | Remove the RH and LH wiper arms. |
| 1.2. | Remove the wiper motor module assembly. |
| 1.3. | Remove the battery assembly. |
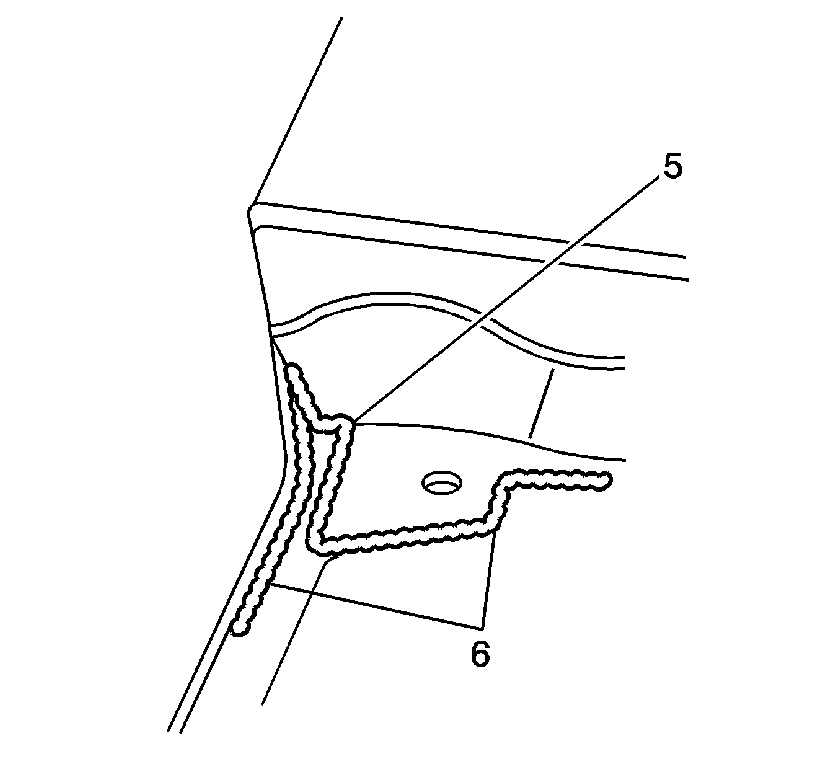
- Clean the area along the joint/seam (5)
and edges (6) of the plenum panel and front compartment outer side rail panel.
- Along the joint/seam (5) and edges (6), apply 3M® Strip-Calk,
P/N 08578, or an equivalent thumb grade sealer. Ensure all voids are
filled and the sealer is smoothed.

- Clean the area along the edges (7) and
joint/seam (8) of the plenum panel and the front of dash panel.
- Along the edges (7) and joint/seam (8), apply GM Seam-Sealer Tape,
P/N 12378196 ( in Canada, P/N 10953435), or an equivalent body
seam sealer. Ensure all voids are filled and the sealer is smoothed.
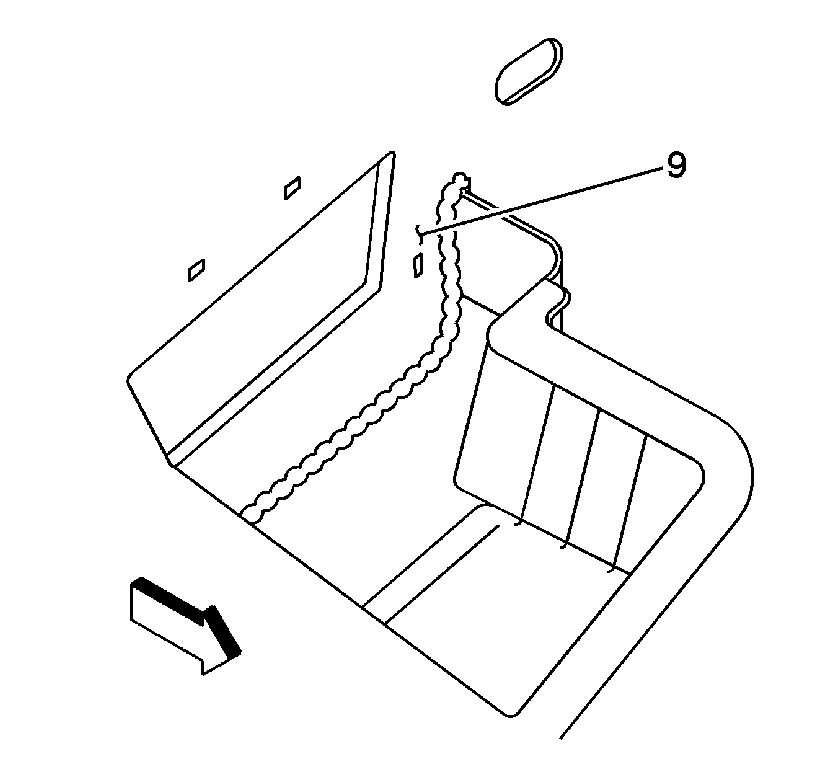
- Inspect the passenger air filter box
to ensure the retaining clips are fully seated and that the mating surface
(9) of the filter box seal is free of sealant and debris.
- Refer to the installation procedures in the Service Manual for
the following:
| 7.1. | Install the battery assembly. |
| 7.2. | Install the wiper motor module assembly. |
| 7.3. | Install the RH and LH wiper arms. |
Condition 2
The rear compartment or spare tire well may be wet.
Cause
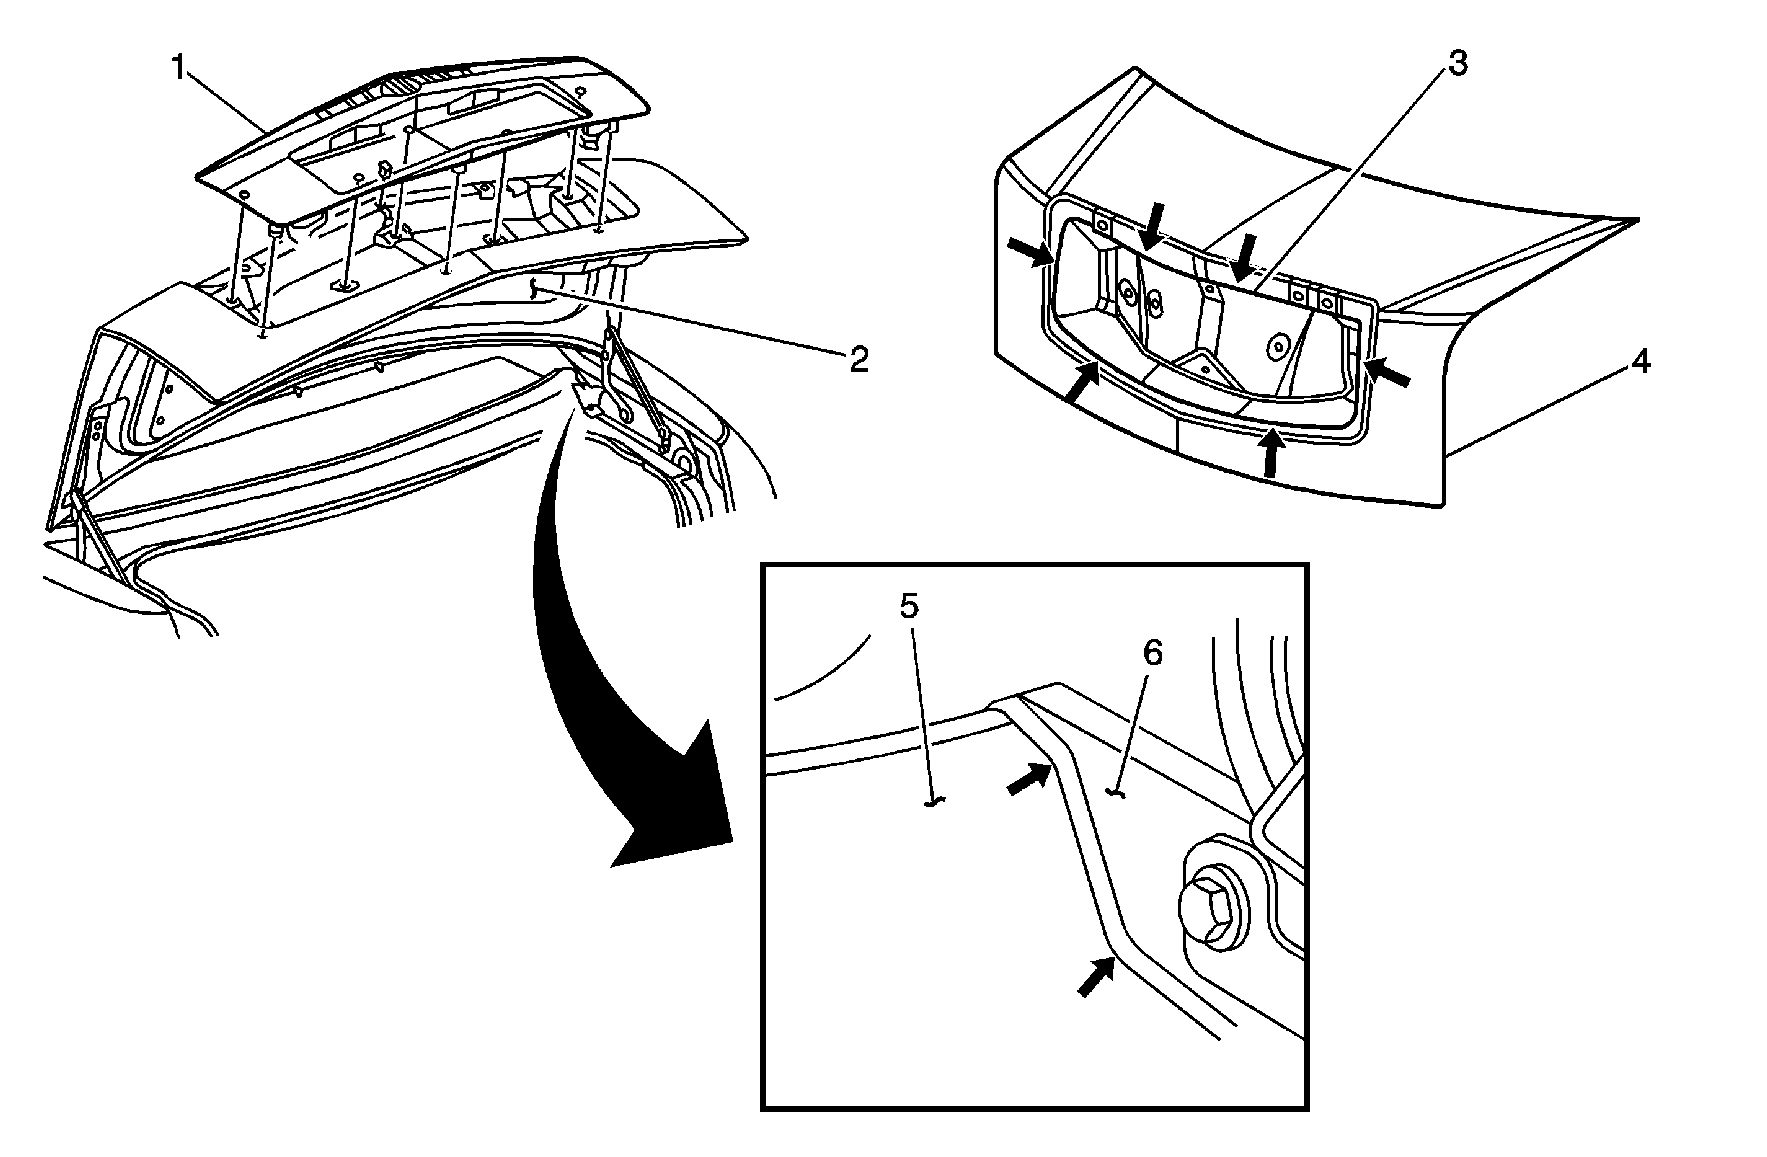
This condition may be due to water entering the rear compartment through
gaps, skips or missing sealant (refer to the arrows in the illustration) between
the rear compartment lid lower panel (3) and upper panel (4) and between the
rear window drain panel (5) and rear outer quarter panel (6).
In addition, the water leak may be due to an improperly positioned rear
compartment lid weatherstrip and/or tail lamp harness pass-through grommet.
Correction

- Open the rear compartment lid and remove the bumpers and seals
(7).
- Inspect the bumper and seal ends for evidence of water.
| • | If the ends are wet, go to Step 3. |
| • | If the ends are NOT wet, go to Step 7. |
- Refer to the removal procedures in the
Service Manual for the following:
| 3.1. | Remove the rear compartment lid inner panel trim (2). |
| 3.2. | Remove the rear compartment lid applique/high mount stop lamp
assembly (1). |
- Clean the area along the joint/seam (refer to the arrows in the
illustration) of the rear compartment lid lower panel (3) and upper panel
(4).
- Over the existing sealant, apply 3M® Ultrapro™ Urethane
Seam Sealer, P/N 08360 or 08361, or an equivalent brush-on type seam
sealer or body seam sealant. Ensure all voids are filled and the sealer is
smoothed.
- Refer to the installation procedures in the Service Manual for
the following:
| 6.1. | Install the rear compartment lid applique/high mount stop lamp
assembly. |
| 6.2. | Install the rear compartment lid inner panel trim. |
- Water test the area along the joint/seam (refer to the arrows
in the illustration) of the rear window drain panel (5) and the rear outer
quarter panel (6).
| • | If water is leaking from this area into the rear compartment,
go to Step 8. |
| • | If water is NOT leaking from this area, go to Step 10. |
- Clean the area along the joint/seam.
- Over the existing sealant, apply 3M® Strip-Calk, P/N 08578,
or an equivalent thumb grade sealant. Ensure all voids are filled and the
sealer is smoothed.
- Inspect the rear compartment lid weatherstrip to ensure the seal
has not "rolled out".
| 10.1. | Use the powder test to check for even contact. |
| 10.2. | If necessary, adjust the seal. |
Parts Information
| • | GM Seam-Sealer Tape, P/N 12378196 (in Canada, P/N 10953435) |
| • | 3M® Strip-Calk, P/N 08578 |
| • | 3M® Ultrapro™ Autobody Sealant |
| • | 3M® Ultrapro™ Urethane Seam Sealer (Brushable), P/N 08360
or 08361 |
