Air Conditioning Compressor Replacement LHD, LY7
Tools Required
J 39400-A Halogen Leak Detector
Removal Procedure
- Recover the refrigerant. Refer to Refrigerant Recovery and Recharging .
- Remove the drive belt. Refer to Air Conditioning Compressor and Power Steering Pump Belt Replacement in Engine Mechanical - 3.6L.
- Remove the air cleaner assembly. Refer to Air Cleaner Assembly Replacement in Engine Controls - 3.6L.
- Remove the intake air resonator and reposition for compressor clearance. Refer to Air Cleaner Inlet Duct Replacement in Engine Controls - 3.6L.
- Raise the vehicle. Refer to Lifting and Jacking the Vehicle in General Information.
- Remove the front air deflector. Refer to Front Air Deflector Replacement in Body Front End.
- Remove the compressor mounting bolt (3) from the compressor.
- Lower the vehicle.
- Loosen the compressor mounting bolts (1) until the threads are disengaged.
- Remove the suction line bolt at the compressor.
- Disconnect the suction line from the compressor.
- Remove and discard the O-ring seals.
- Remove the discharge line bolt at the compressor.
- Disconnect the discharge line from the compressor.
- Remove and discard the O-ring seals.
- Disconnect the electrical connector (2) from the compressor.
- Rotate the compressor. Remove the compressor from the vehicle.
- Replace the desiccant bag if the following conditions exist. Refer to Air Conditioning Refrigerant Desiccant Replacement .
- Remove the compressor mounting bolts from the compressor.
- If you are replacing the compressor, balance the compressor oil. Refer to Compressor Oil Balancing .
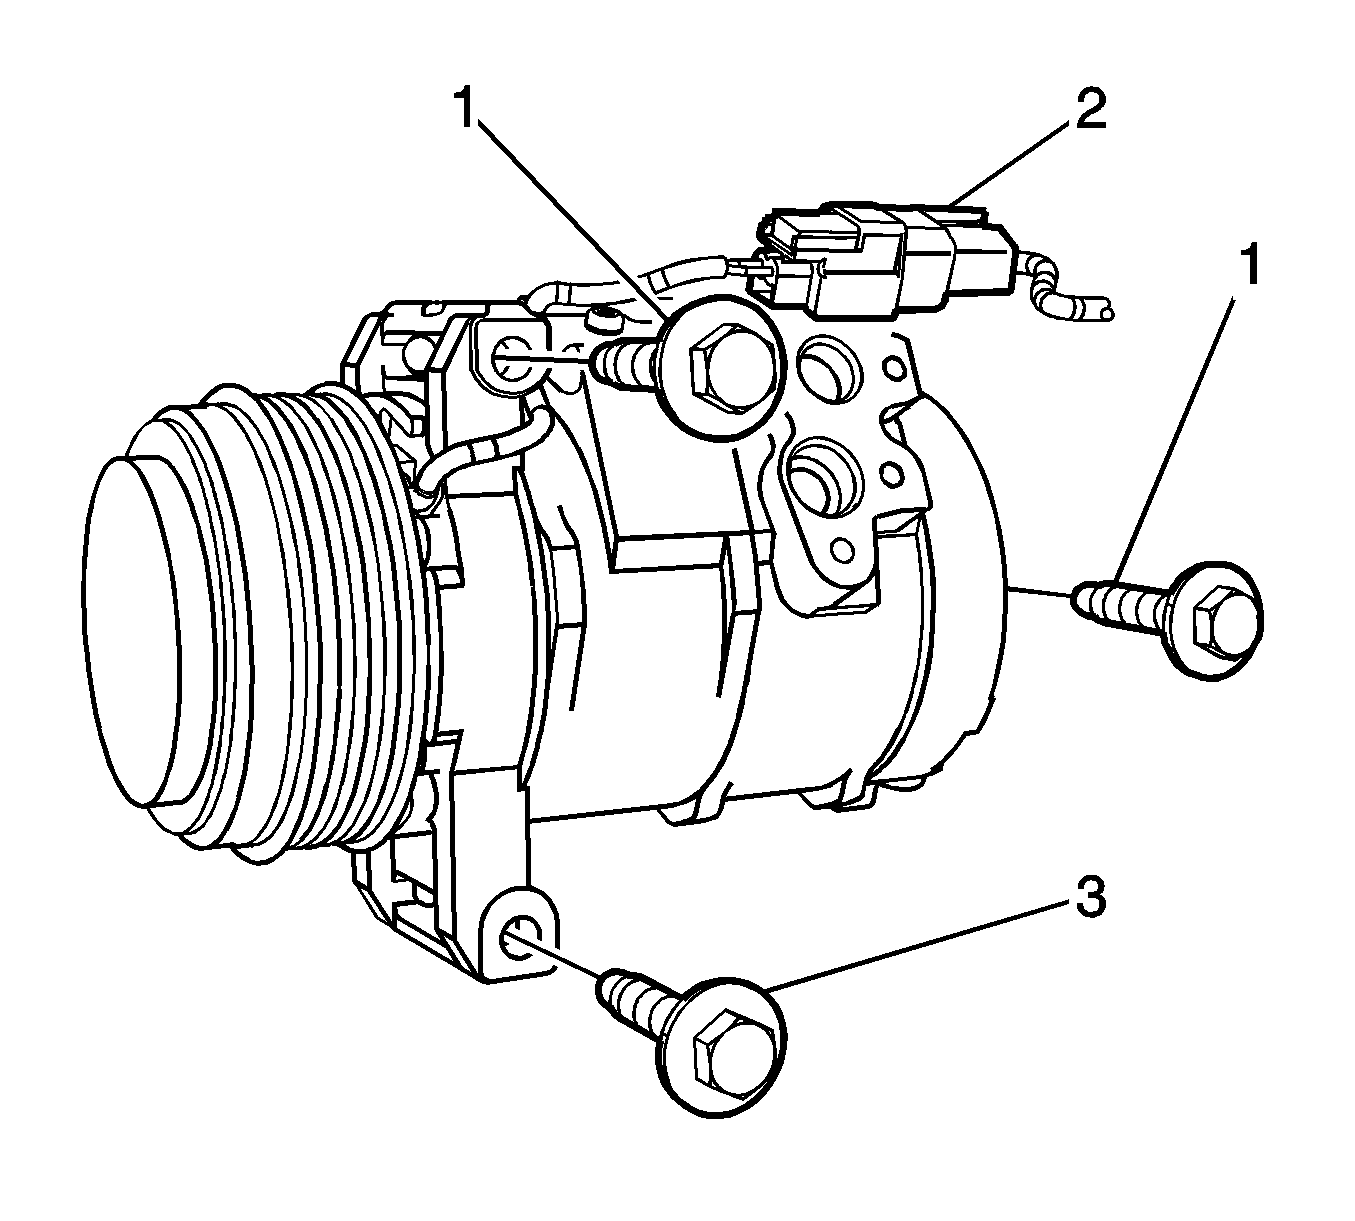
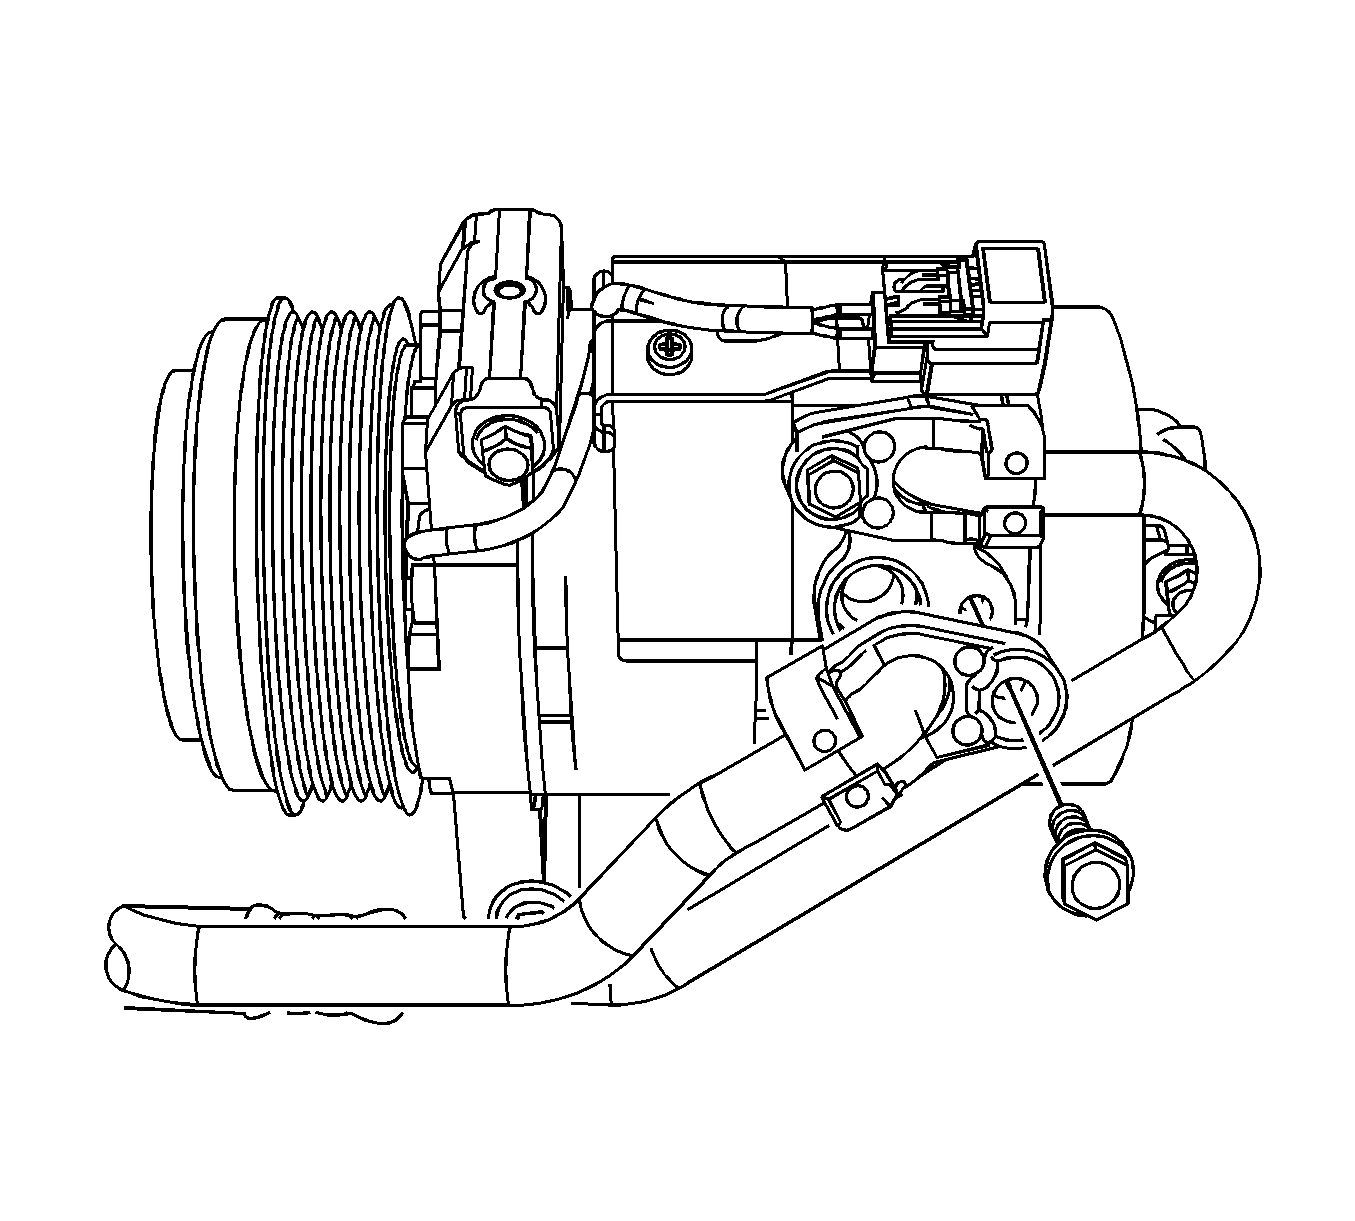
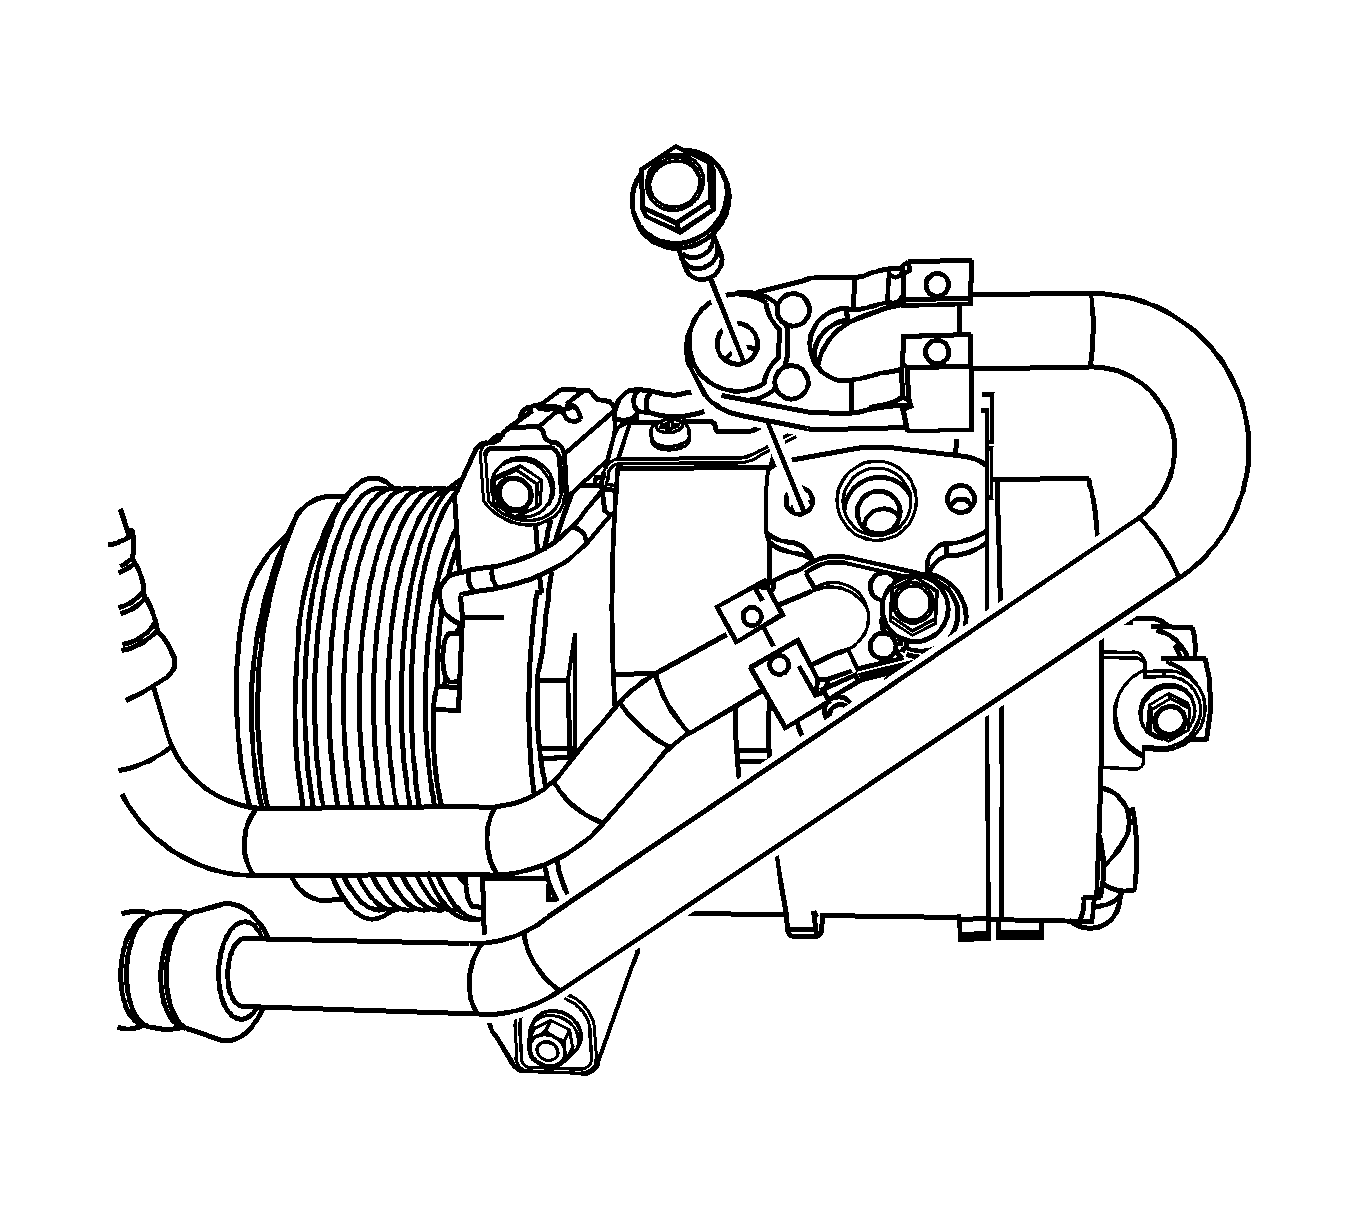

Important: While removing the compressor from the vehicle, the power steering line may need to be flexed.
| • | Color of PAG oil is brown or black |
| • | Presence of foreign substances |
Installation Procedure
- Partially install the compressor.
- Install the compressor mounting bolts (1) finger tight.
- Install the new O-ring seals to the line fittings. Refer to O-Ring Replacement .
- Install the suction line to the compressor.
- Install the suction line bolt to the compressor.
- Install the new O-ring seals to the line fittings. Refer to O-Ring Replacement .
- Install the discharge line to the compressor.
- Install the discharge line bolt to the compressor.
- Connect the electrical connector (2).
- Raise the vehicle. Refer to Lifting and Jacking the Vehicle in General Information.
- Install the compressor mounting stud (3) finger tight.
- Install the front air deflector. Refer to Front Air Deflector Replacement in Body Front End.
- Lower the vehicle.
- Reposition intake air resonator and install. Refer to Air Cleaner Inlet Duct Replacement in Engine Controls - 3.6L.
- Install the air cleaner assembly. Refer to Air Cleaner Assembly Replacement in Engine Controls - 3.6L.
- Install the engine drive belt. Refer to Air Conditioning Compressor and Power Steering Pump Belt Replacement in Engine Mechanical - 3.6L.
- Evacuate and recharge the refrigerant system. Refer to Refrigerant Recovery and Recharging .
- Leak test the fitting of the repaired or reinstalled component using the J 39400-A .

Notice: Refer to Fastener Notice in the Preface section.
Tighten
Tighten the bolts to 25 N·m (18 lb ft).

Tighten
Tighten the nut to 9.8 N·m (87 lb in).

Tighten
Tighten the nut to 9.8 N·m (87 lb in).

Tighten
Tighten the bolts to 25 N·m (18 lb ft).
Air Conditioning Compressor Replacement LS6
Tools Required
J 39400-A Halogen Leak Detector
Removal Procedure
- Recover the refrigerant. Refer to Refrigerant Recovery and Recharging .
- Remove the air cleaner assembly. Refer to Air Cleaner Assembly Replacement in Engine Controls - 5.7L.
- Remove the radiator. Refer to Radiator Replacement in Engine Cooling.
- Remove the condenser. Refer to Condenser Replacement .
- Remove the drive belt. Refer to Drive Belt Replacement - Accessory in Engine Mechanical - 5.7L.
- Remove the A/C drive belt. Refer to Air Conditioning Compressor Belt Replacement in Engine Mechanical - 5.7L.
- Loosen the upper A/C compressor mounting bolts.
- Raise the vehicle. Refer to Lifting and Jacking the Vehicle in General Information.
- Remove the front air deflector. Refer to Front Air Deflector Replacement in Body Front End.
- Disconnect the electrical connector (5) from the compressor.
- Remove the screw for the electrical connector mounting bracket.
- Remove the suction line bolt at the compressor.
- Disconnect the suction line from the compressor.
- Remove and discard the O-ring seals.
- Remove the discharge line bolt at the compressor.
- Disconnect the discharge line from the compressor.
- Remove and discard the O-ring seals.
- Remove the compressor mounting bolts (1, 2, 3, 4).
- Remove the A/C hose support bracket to oil pan bolt.
- Lower the vehicle.
- Rotate the compressor. Remove the compressor from the vehicle.
- Replace the desiccant bag if the following conditions exist. Refer to Air Conditioning Refrigerant Desiccant Replacement .
- If you are replacing the compressor, balance the compressor oil. Refer to Compressor Oil Balancing .
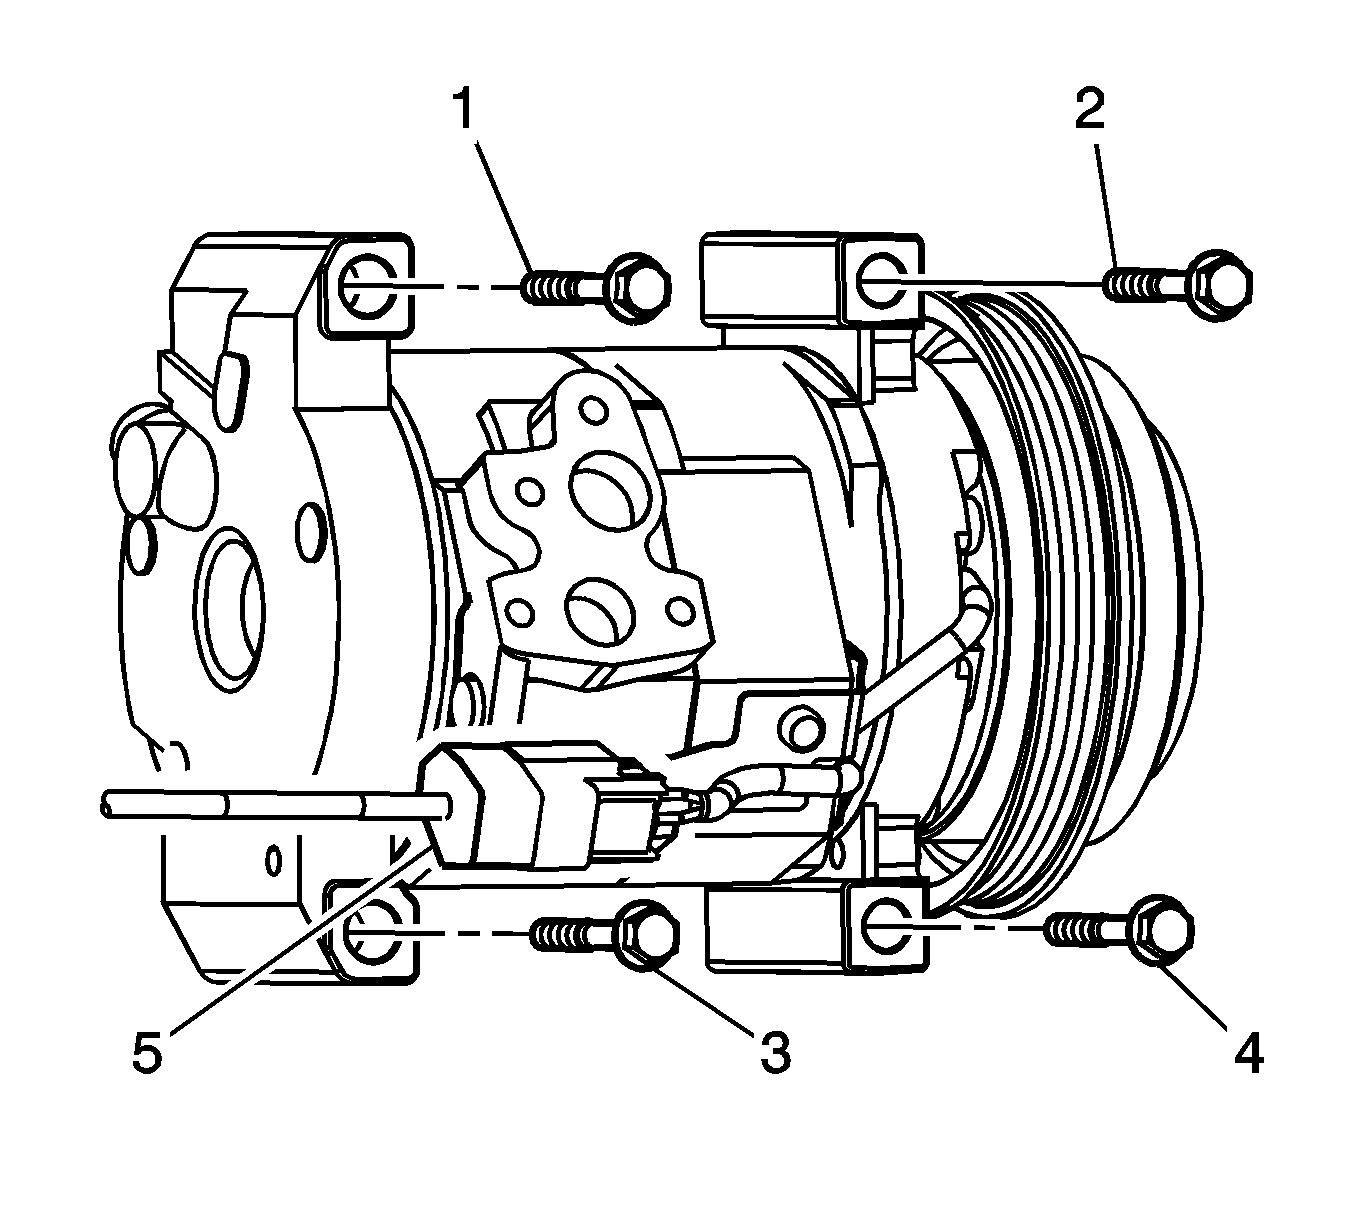
Necessary for clearance during the compressor removal.
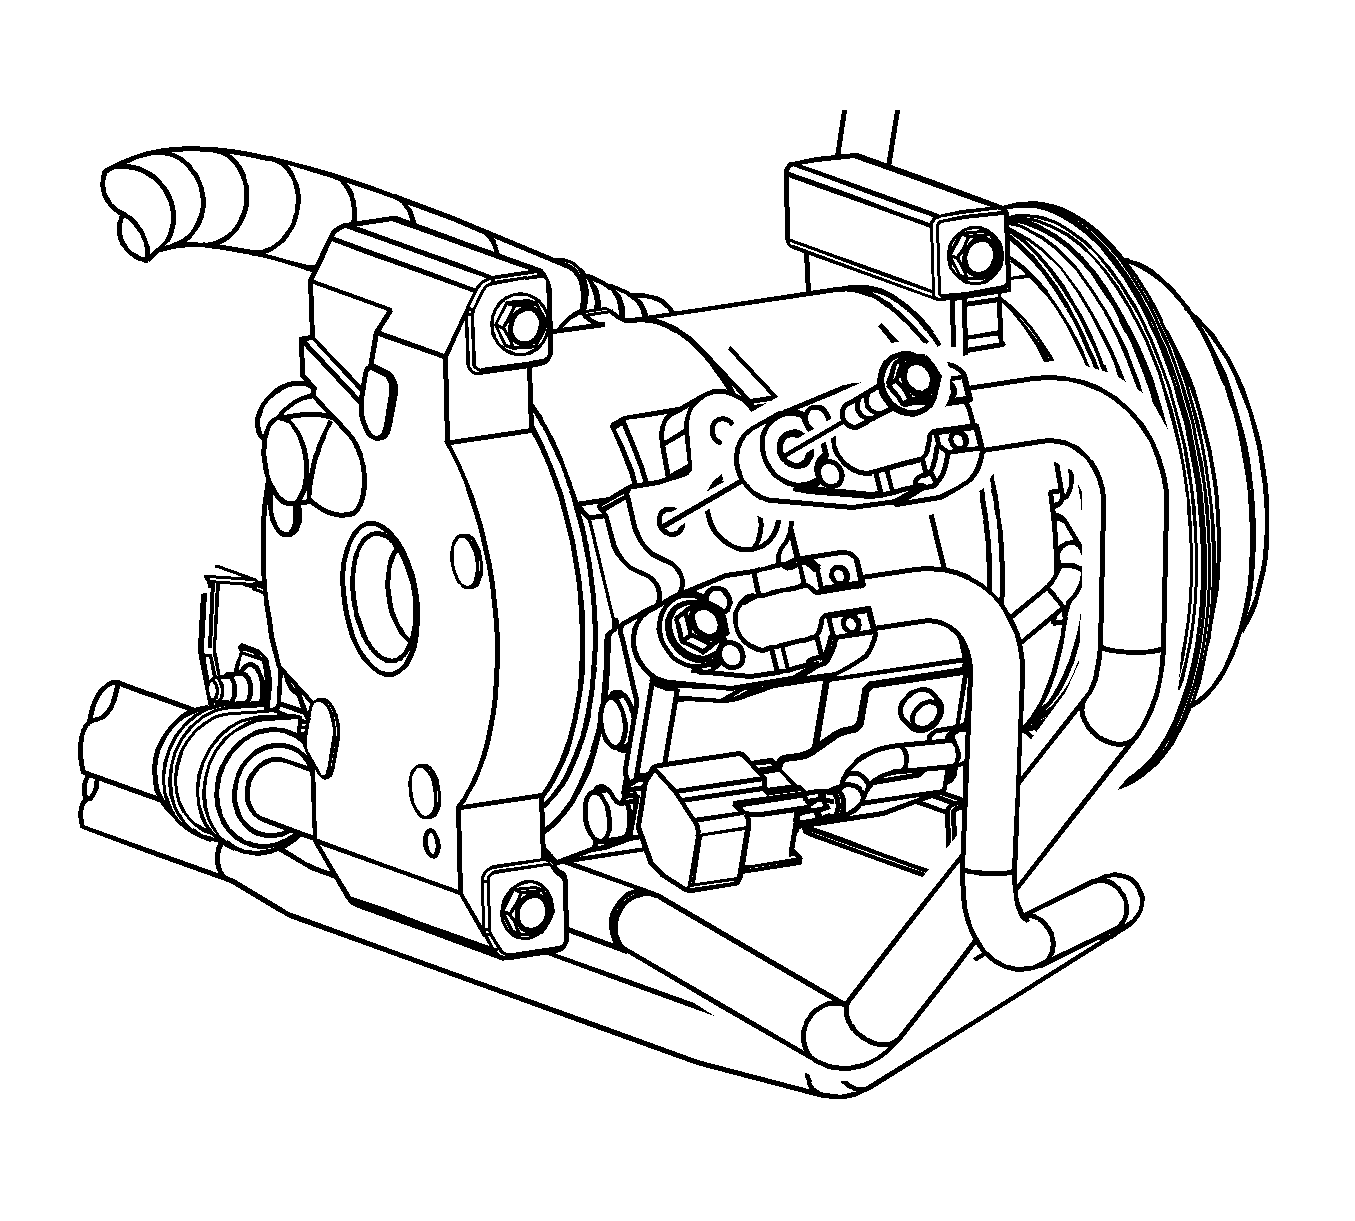
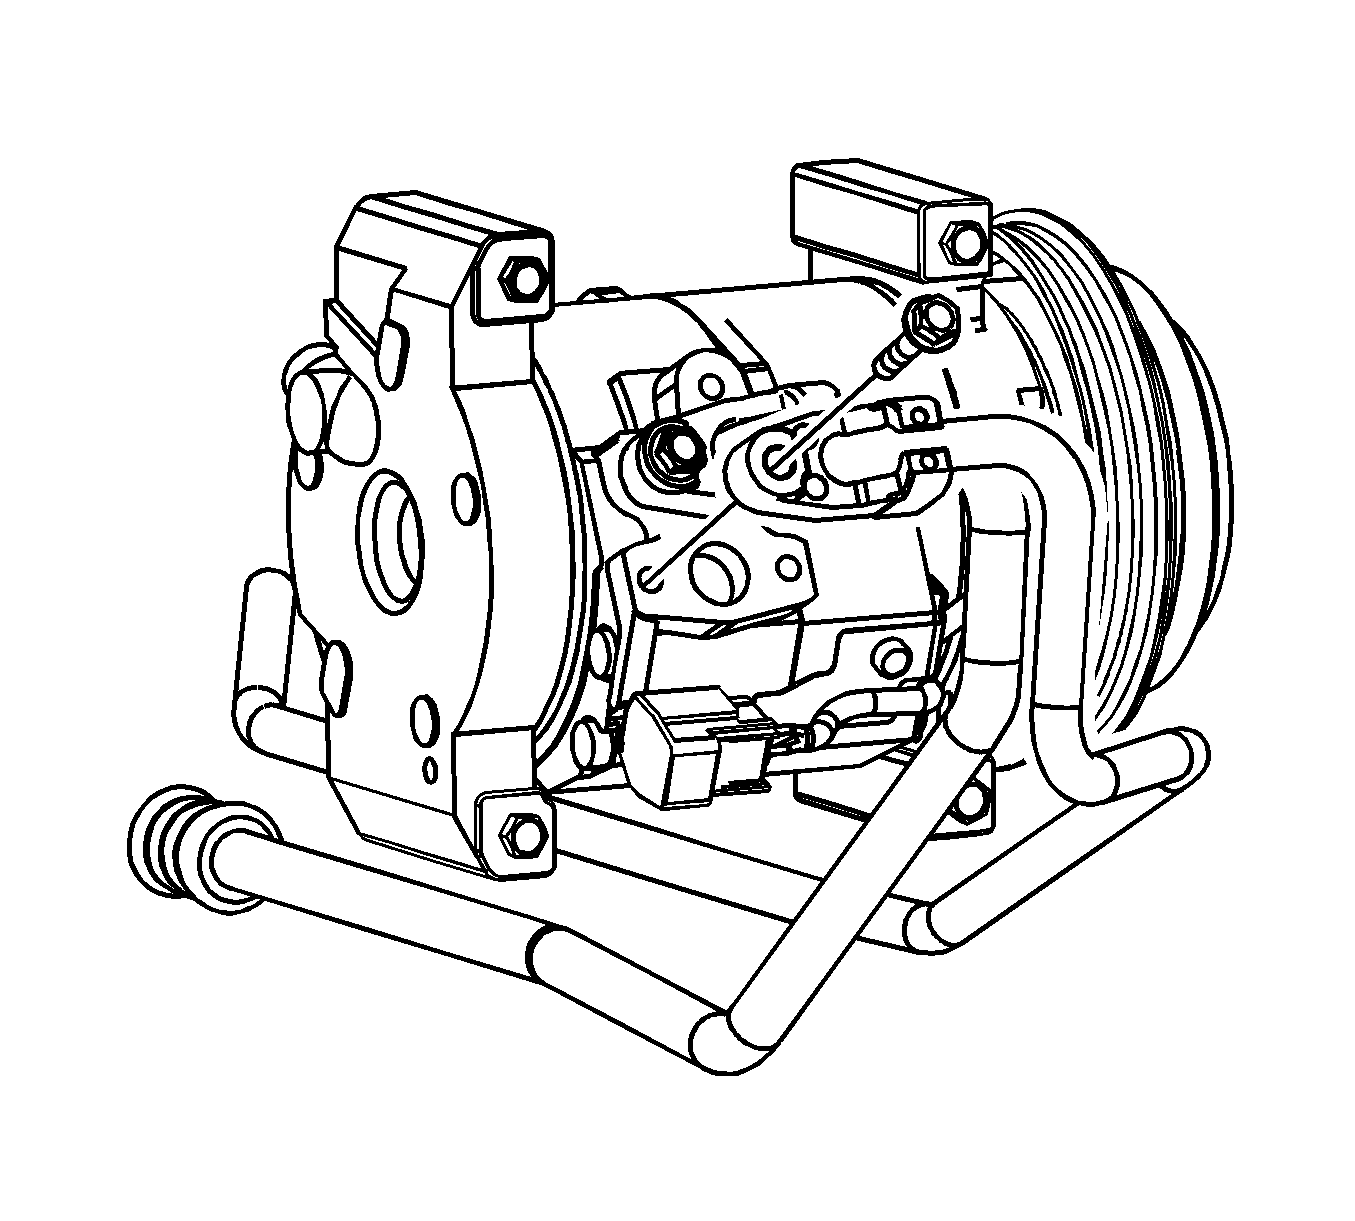

| • | Color of PAG oil is brown or black |
| • | Presence of foreign substances |
Installation Procedure
- Remove the screw for the electrical connector mounting bracket.
- Install the upper A/C compressor mounting bolts (1, 2, 3, 4) to the compressor.
- Install the A/C compressor.
- Install the upper compressor mounting bolts finger tight.
- Raise the vehicle.
- Install the lower A/C compressor mounting bolts.
- Install the electrical connector mounting bracket to the compressor.
- Install the screw for the electrical connector mounting bracket.
- Install the new O-ring seals to the line fittings. Refer to O-Ring Replacement .
- Install the suction line to the compressor.
- Install the suction line bolt to the compressor.
- Install the new O-ring seals to the line fittings. Refer to O-Ring Replacement .
- Install the discharge line to the compressor.
- Install the discharge line bolt to the compressor.
- Connect the electrical connector (2).
- Install the A/C hose support bracket to oil pan bolt.
- Install the front air deflector. Refer to Front Air Deflector Replacement in Body Front End.
- Lower the vehicle.
- Tighten the upper front compressor mounting bolt.
- Install the A/C drive belt. Refer to Air Conditioning Compressor Belt Replacement in Engine Mechanical - 5.7L.
- Install the engine drive belt. Refer to Drive Belt Replacement - Accessory in Engine Mechanical - 5.7L.
- Install the condenser. Refer to Condenser Replacement .
- Install the radiator. Refer to Radiator Replacement in Engine Cooling.
- Install the air cleaner assembly. Refer to Air Cleaner Assembly Replacement in Engine Controls - 5.7L.
- Evacuate and recharge the refrigerant system. Refer to Refrigerant Recovery and Recharging .
- Leak test the fitting of the repaired or reinstalled component using the J 39400-A .

Notice: Refer to Fastener Notice in the Preface section.
Tighten
Tighten the bolts to 25 N·m (18 lb ft).
Tighten
Tighten the bolts to 2 N·m (17 lb in).

Tighten
Tighten the nut to 9.8 N·m (87 lb in).

Tighten
Tighten the nut to 9.8 N·m (87 lb in).

Tighten
Tighten the nut to 9.8 N·m (87 lb in).
Tighten
Tighten the bolt to 25 N·m (18 lb ft).
Air Conditioning Compressor Replacement 2.8L (LP1)
Tools Required
J 39400-A Halogen Leak Detector
Removal Procedure
- Recover the refrigerant. Refer to Refrigerant Recovery and Recharging .
- Remove the drive belt. Refer to Air Conditioning Compressor and Power Steering Pump Belt Replacement in Engine Mechanical - 2.8L.
- Remove the air cleaner assembly. Refer to Air Cleaner Assembly Replacement in Engine Controls - 2.8L.
- Remove the intake air resonator and reposition for compressor clearance. Refer to Air Cleaner Inlet Duct Replacement in Engine Controls - 2.8L.
- Raise the vehicle. Refer to Lifting and Jacking the Vehicle in General Information.
- Remove the front air deflector. Refer to Front Air Deflector Replacement in Body Front End.
- Remove the compressor mounting bolt (3) from the compressor.
- Lower the vehicle.
- Loosen the compressor mounting bolts (1) until the threads are disengaged.
- Remove the suction line bolt at the compressor.
- Disconnect the suction line from the compressor.
- Remove and discard the O-ring seals.
- Remove the discharge line bolt at the compressor.
- Disconnect the discharge line from the compressor.
- Remove and discard the O-ring seals.
- Disconnect the electrical connector (2) from the compressor.
- Rotate the compressor. Remove the compressor from the vehicle.
- Replace the desiccant bag if the following conditions exist. Refer to Air Conditioning Refrigerant Desiccant Replacement .
- Remove the compressor mounting bolts from the compressor.
- If you are replacing the compressor, balance the compressor oil. Refer to Compressor Oil Balancing .


Important: While removing the compressor from the vehicle, the power steering line may need to be flexed.
| • | Color of PAG oil is brown or black |
| • | Presence of foreign substances |
Installation Procedure
- Partially install the compressor.
- Install the compressor mounting bolts (1) finger tight.
- Install the new O-ring seals to the line fittings. Refer to O-Ring Replacement .
- Install the suction line to the compressor.
- Install the suction line bolt to the compressor.
- Install the new O-ring seals to the line fittings. Refer to O-Ring Replacement .
- Install the discharge line to the compressor.
- Install the discharge line bolt to the compressor.
- Connect the electrical connector (2).
- Raise the vehicle. Refer to Lifting and Jacking the Vehicle in General Information.
- Install the compressor mounting stud (3) finger tight.
- Install the front air deflector. Refer to Front Air Deflector Replacement in Body Front End.
- Lower the vehicle.
- Reposition intake air resonator and install. Refer to Air Cleaner Inlet Duct Replacement in Engine Controls - 2.8L.
- Install the air cleaner assembly. Refer to Air Cleaner Assembly Replacement in Engine Controls - 2.8L.
- Install the engine drive belt. Refer to Air Conditioning Compressor and Power Steering Pump Belt Replacement in Engine Mechanical - 2.8L.
- Evacuate and recharge the refrigerant system. Refer to Refrigerant Recovery and Recharging .
- Leak test the fitting of the repaired or reinstalled component using the J 39400-A .

Notice: Refer to Fastener Notice in the Preface section.
Tighten
Tighten the bolts to 25 N·m (18 lb ft).

Tighten
Tighten the nut to 9.8 N·m (87 lb in).

Tighten
Tighten the nut to 9.8 N·m (87 lb in).

Tighten
Tighten the bolts to 25 N·m (18 lb ft).
