Hard Brake Pedal on Cold Starts at High Altitudes (Install Auxiliary Vacuum Pump)

| Subject: | Hard Brake Pedal on Cold Starts at High Altitudes (Install Auxiliary Vacuum Pump) |
| Models: | 2005-2006 Cadillac CTS |
| with 2.8L Engine (VIN T -- RPO LP1) |
Condition
Some customers may comment on a hard brake pedal. This condition is most apparent in the first 30 seconds to 1 minute after a cold start and at high altitudes, usually between 1219-1829 m (4000-6000 ft).
Cause
This condition may be caused by low engine vacuum during warm up.
Correction
Install auxiliary vacuum pump kit, P/N 15837490, following the procedure below.
- Disconnect the negative battery cable.
- Remove the condenser closeout panel.
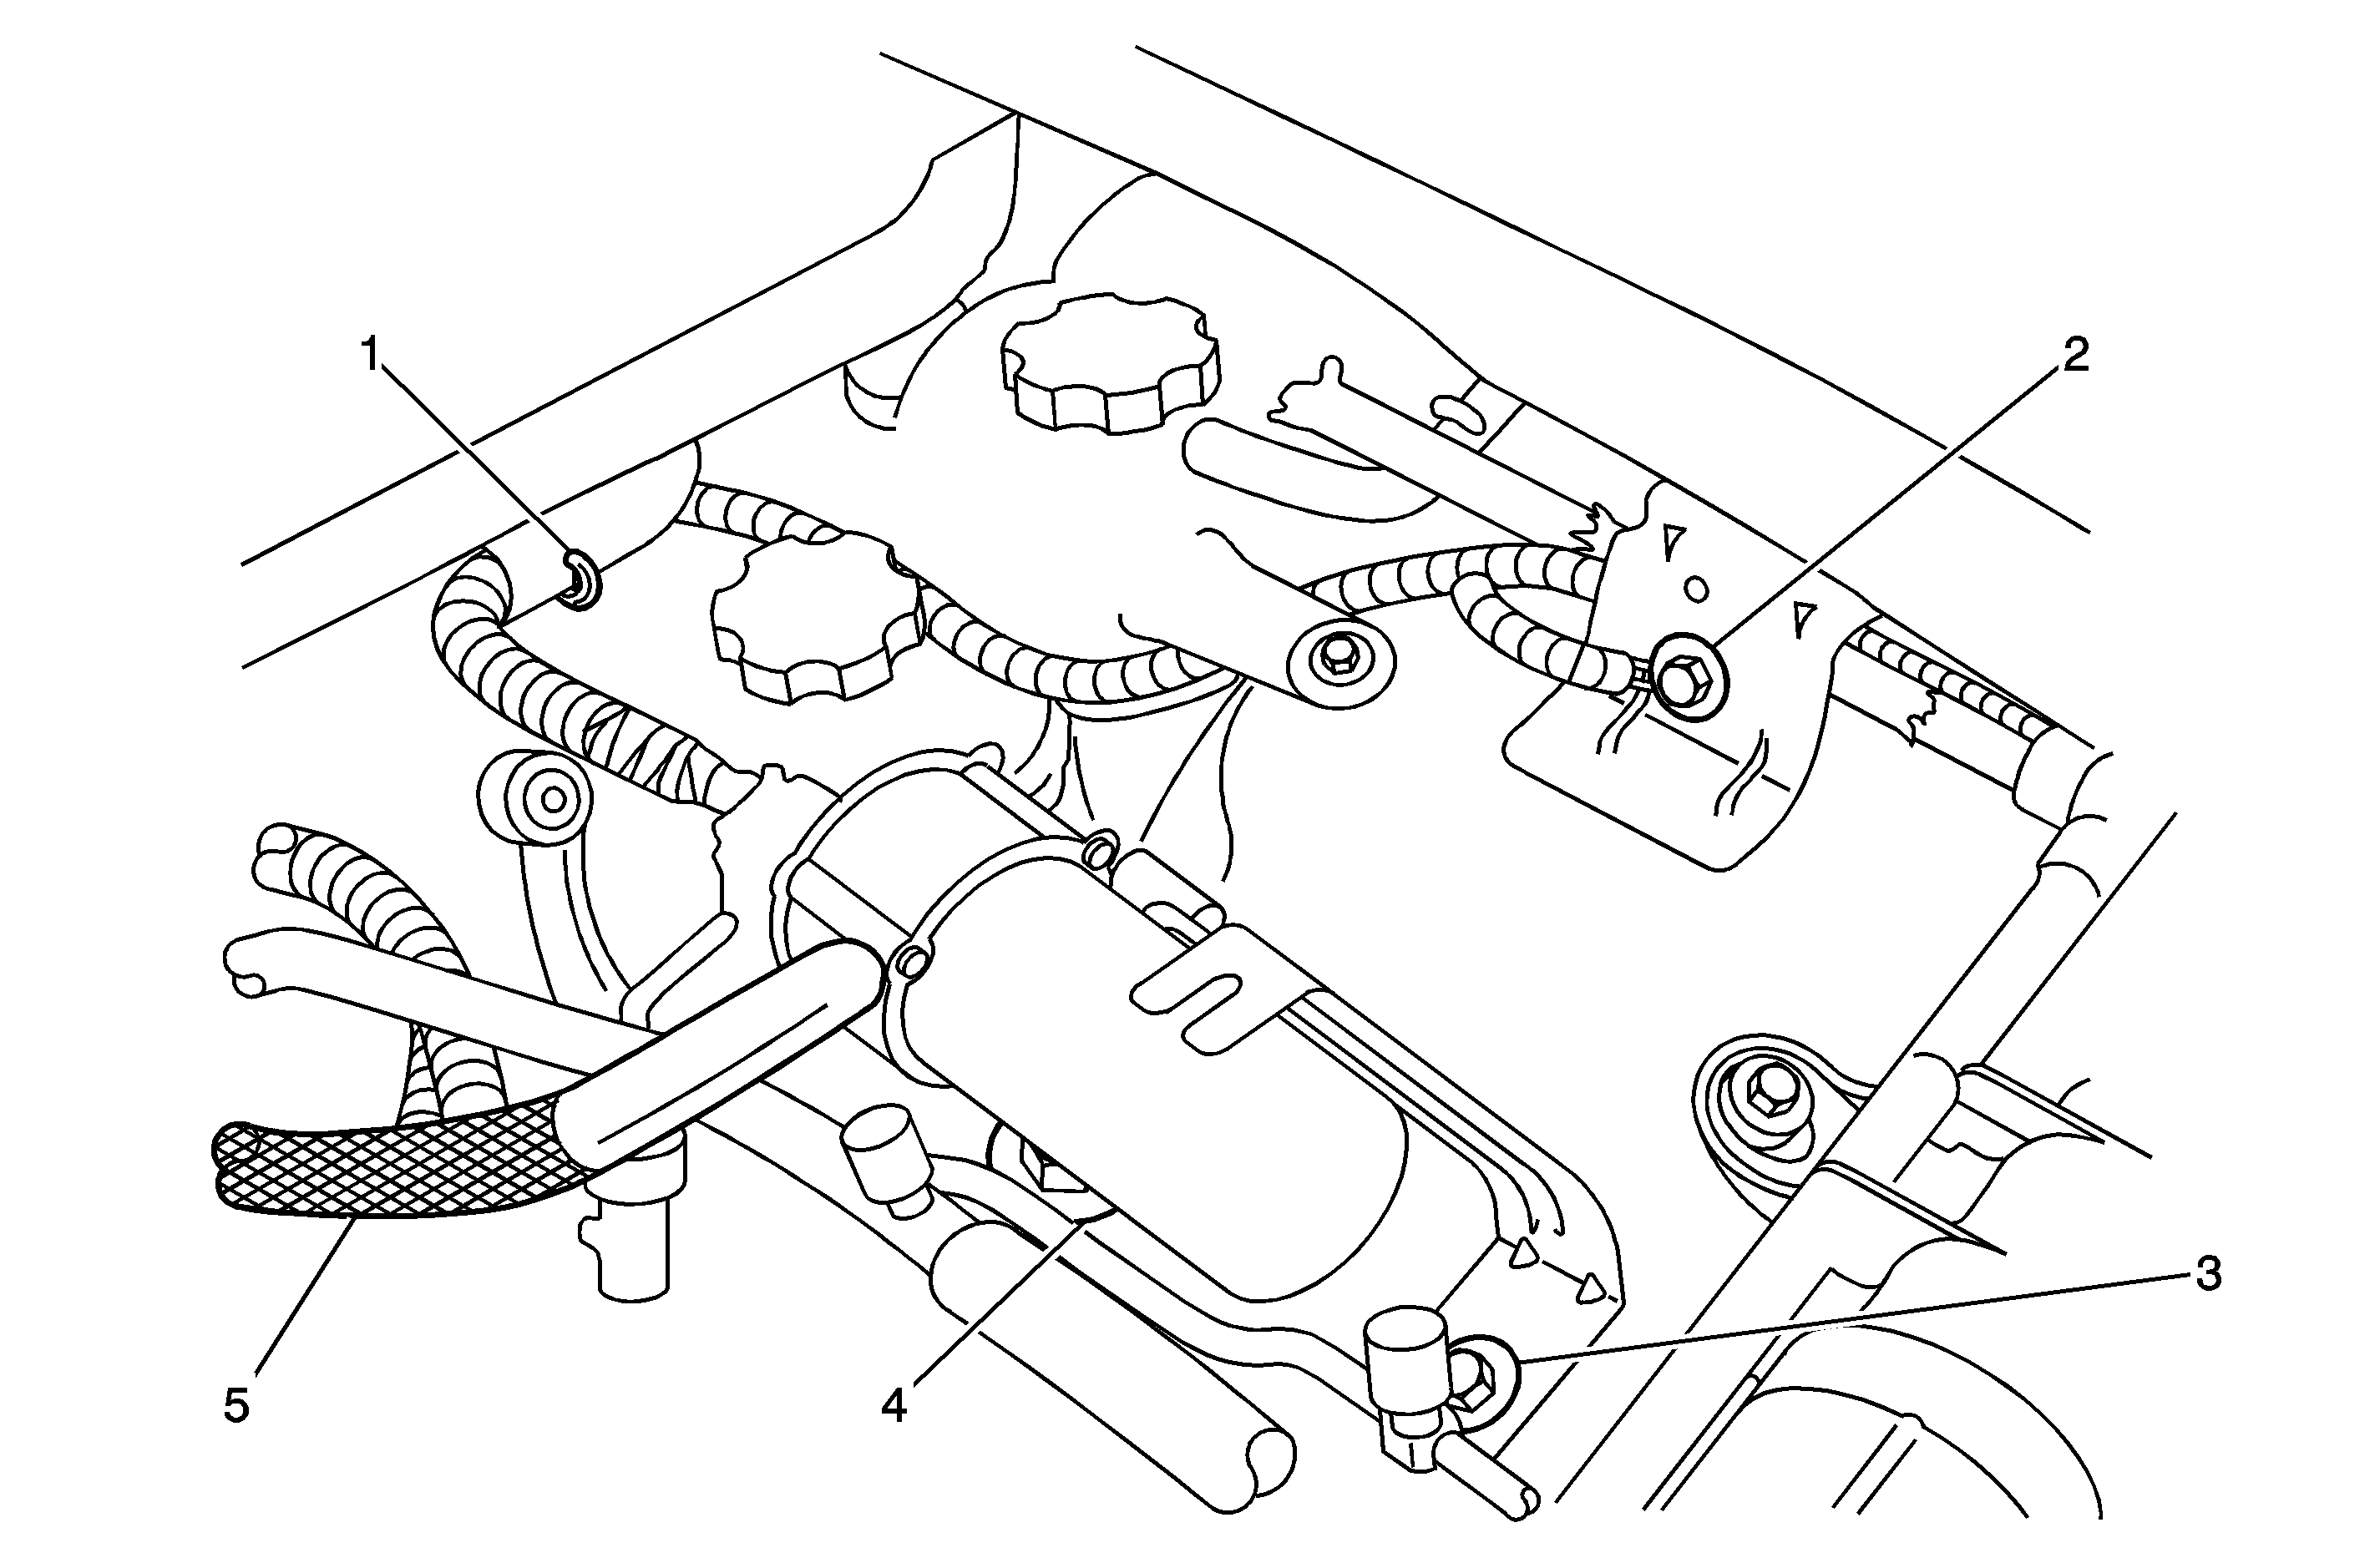
- Remove and discard the existing brake booster vacuum hose. Leave the check valve connected to the booster.
- Without disconnecting the A/C lines, carefully remove the A/C pressure line (small diameter) from the plastic shock tower clip and carefully position out of the way.
- Remove the shock module upper mounting bolt (3).
- For 2005 model year vehicles, loosen the shock module upper mounting bolt (4) until a 5-6 mm (1/8 in) gap exists. For 2006 model year vehicles, remove the shock module upper mounting stud (4) and replace with a new bolt (provided in kit) until a 5-6 mm (1/8 in) gap exists.
- Obtain from stock a 275 mm (10.827 in) long piece of 12 mm (15/32 in) I.D. reinforced rubber vacuum hose.
- Install the two hose clamps (provided in kit) to the hose.
- Install one end of the hose to the vacuum pump port that will face down and secure with a clamp.
- Install the vacuum pump to the shock tower.
- Install the bolt that was previously removed.
- Carefully install the A/C pressure line to the plastic shock tower clip.
- Install the other end of the vacuum hose to the check valve on the brake booster and secure with a clamp.
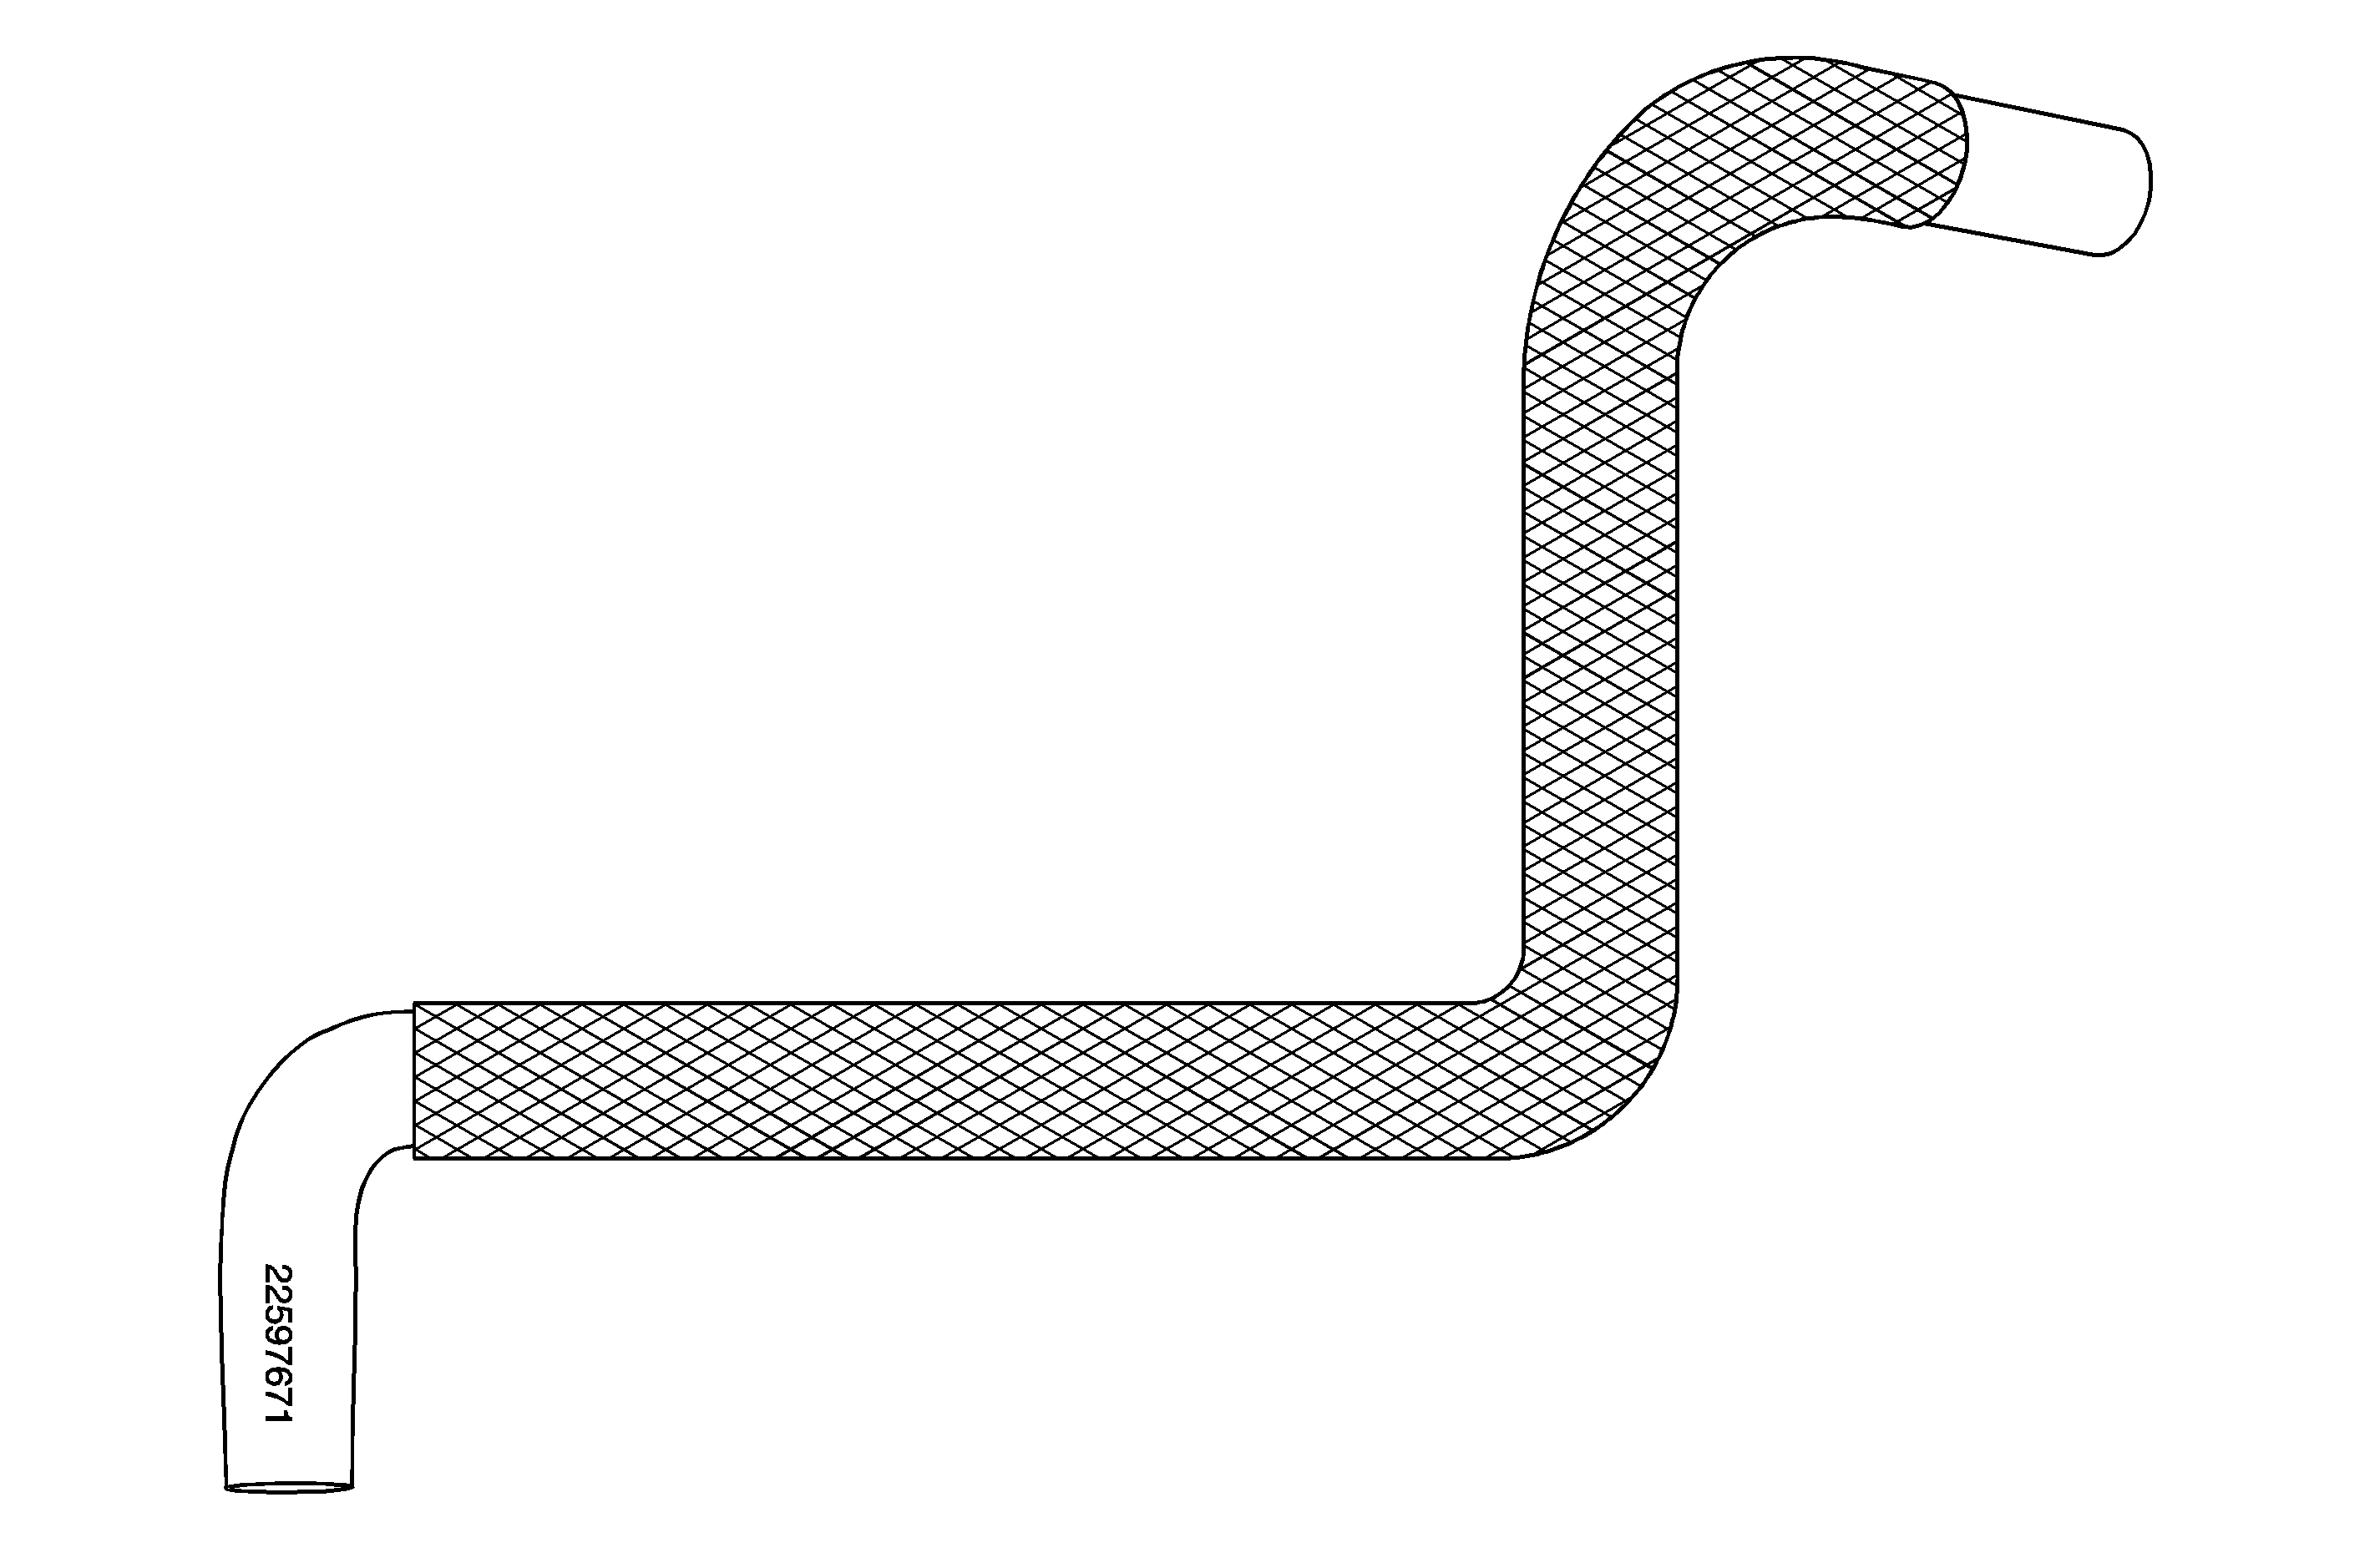
- On the new vacuum pump hose (P/N 22597671 provided in kit), remove 25 mm (1 in) from the end that does not have the part number printed on it. This will shorten the hose and is needed for proper clearance.
- Install the two hose clamps (provided in kit) to the hose.
- Install the end of the hose that was shortened to the engine vacuum port.
- Install the other end of the hose to the vacuum pump port that faces the engine.
- Position the hose (5) so that it leaves the vacuum pump and routes rearward at an angle that is 45 degrees down from horizontal. This will ensure proper clearance to the A/C lines.
- Move both hose clamps into position and secure the hose to the vacuum pump and engine port.
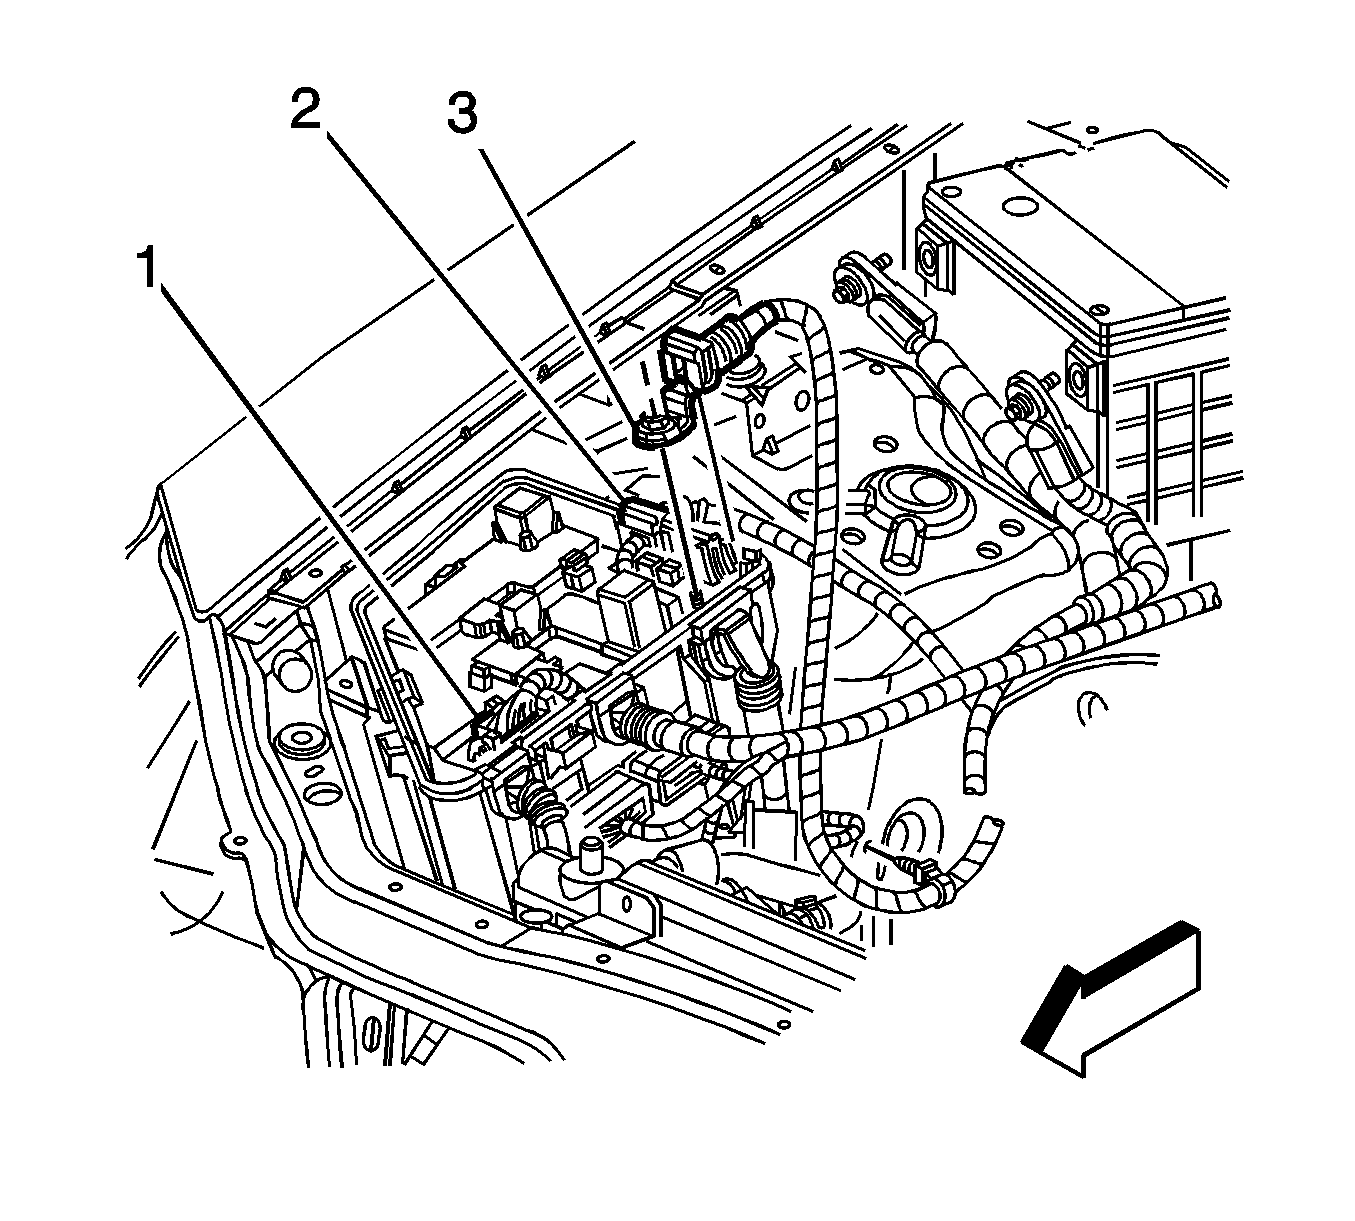
- Tap the unthreaded weld nut on the left front shock tower to fender bracket with M10 x 1.5 threads. This will be used for the vacuum pump ground bolt (2).
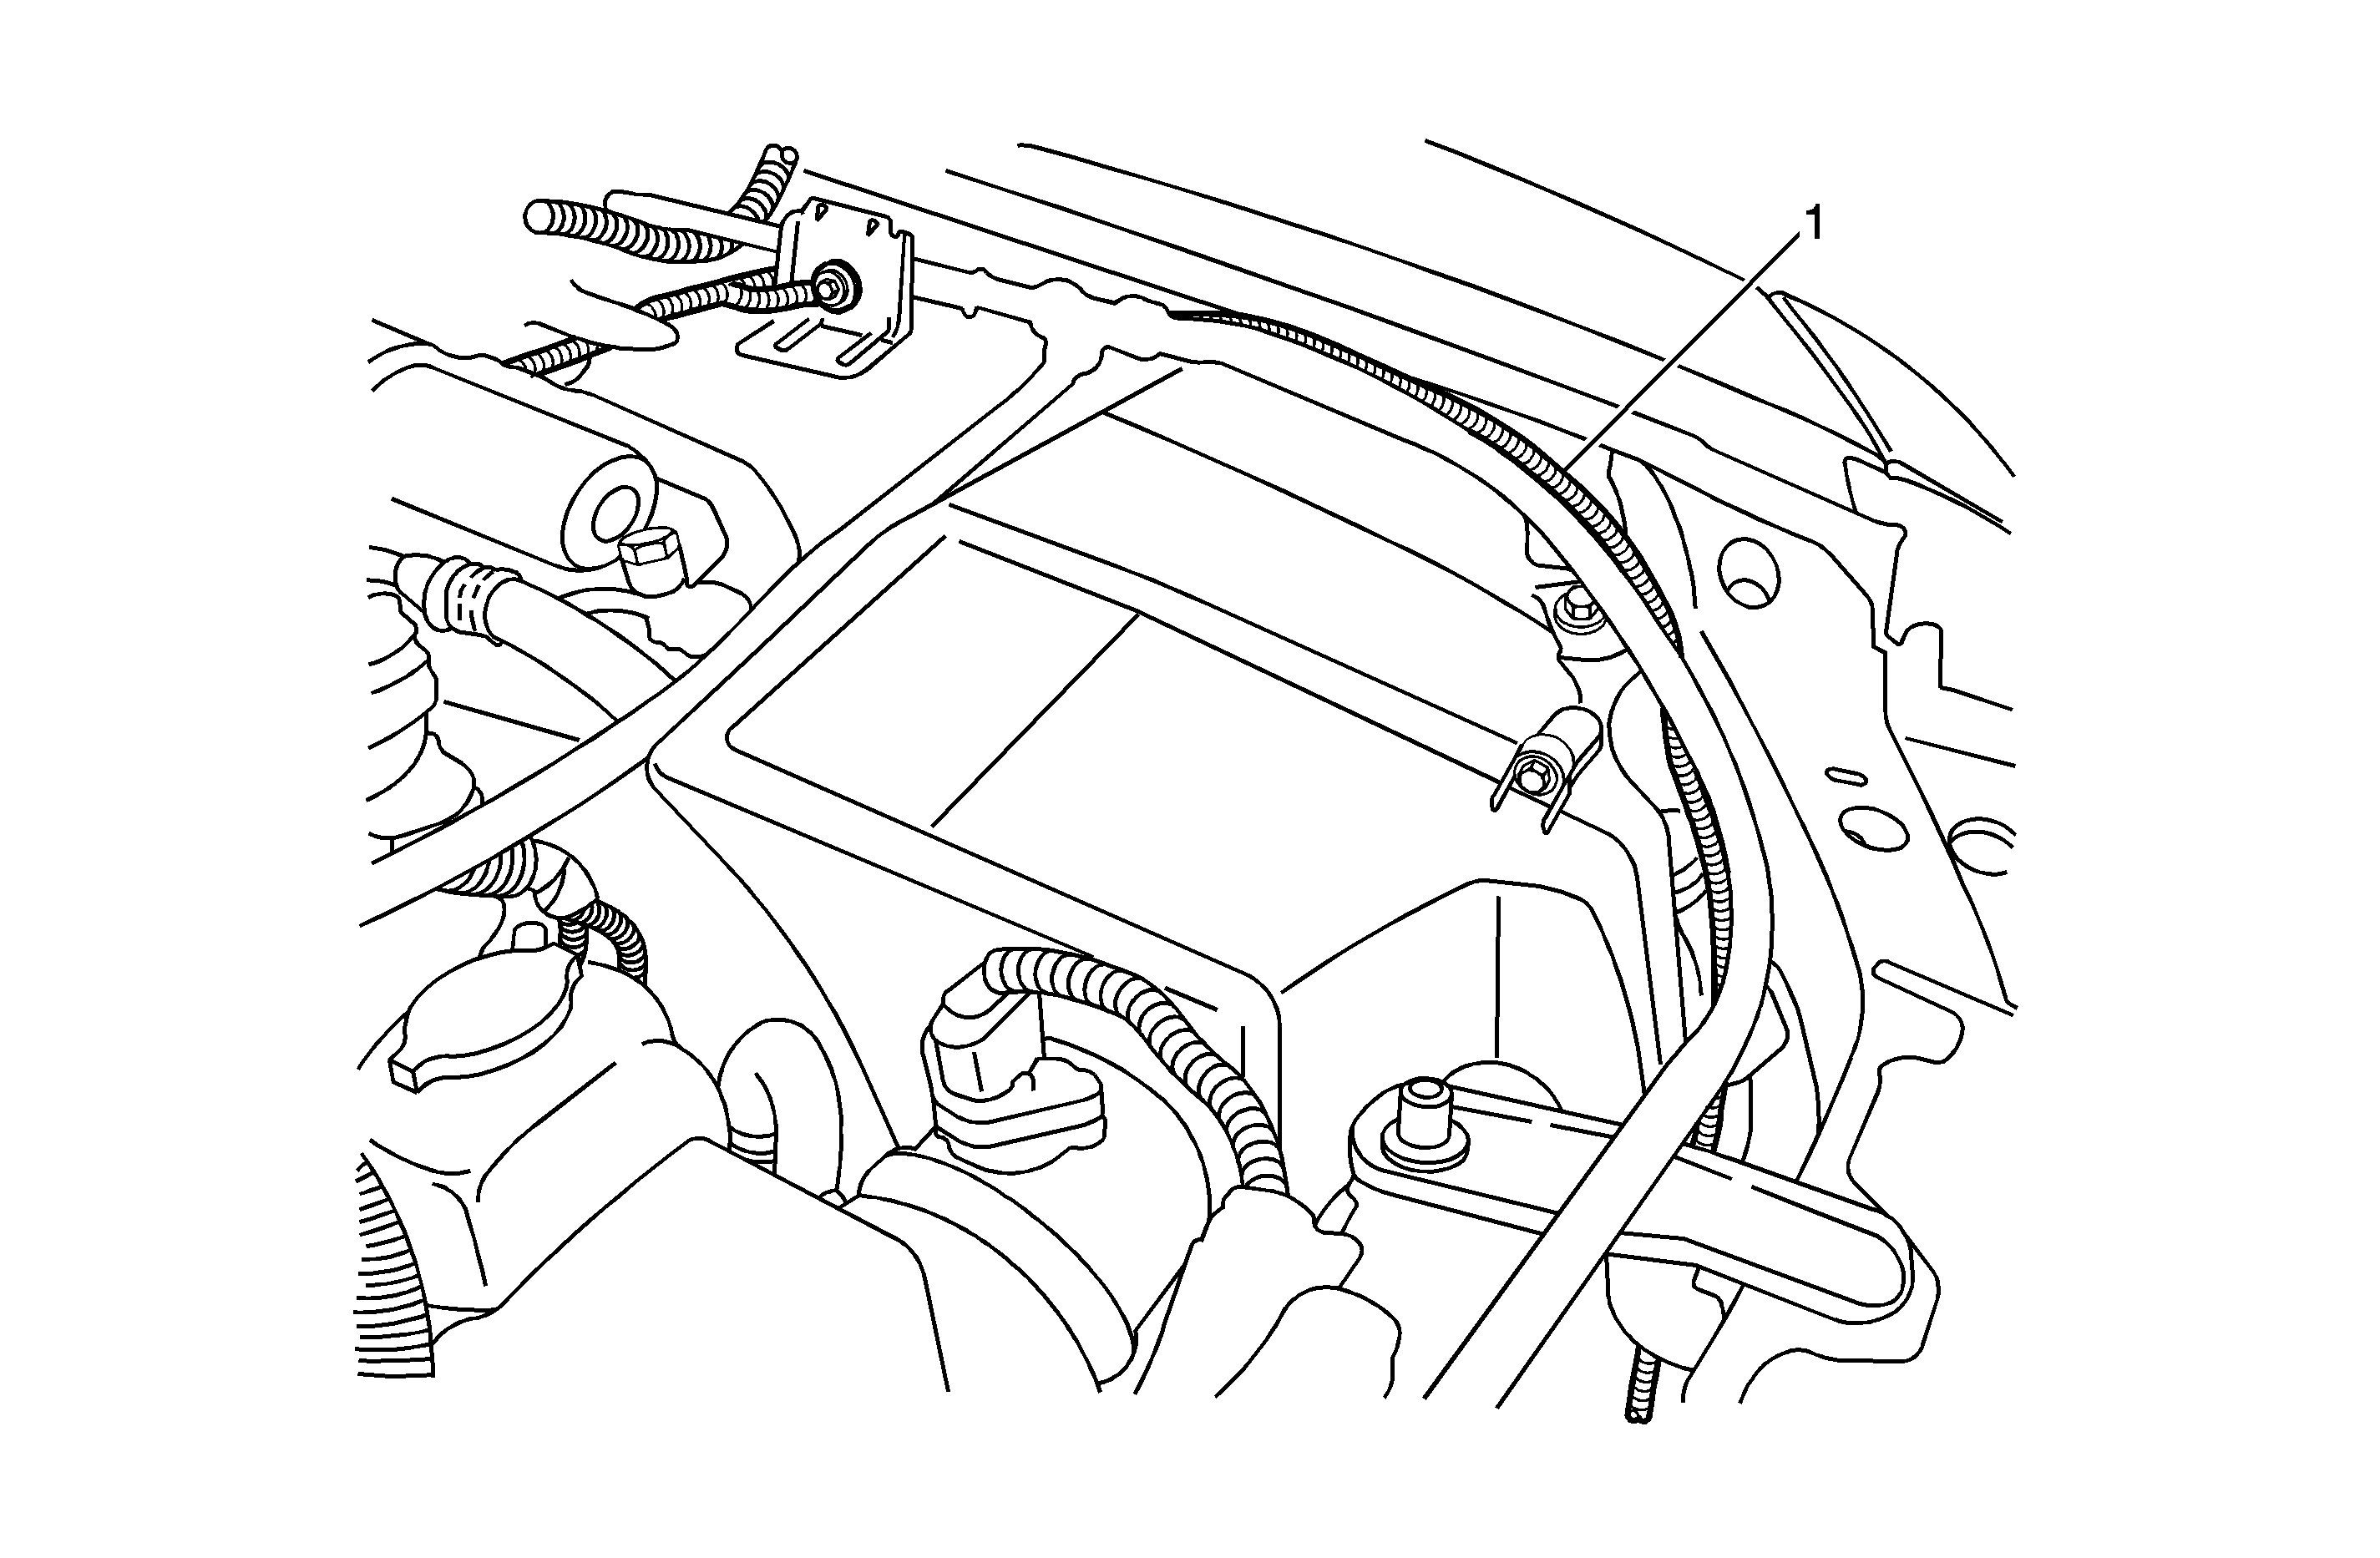
- Connect the vacuum pump wire harness to the vacuum pump and route the loose end of the harness under the coolant surge tank attachment leg. Route the ground pig tail to the shock tower and the remaining wiring harness behind the shock tower to fender bracket.
- Using the M10 x 1.5 bolt (provided in kit), connect the ground breakout wire from the vacuum pump wire harness to the fender to shock tower bracket.
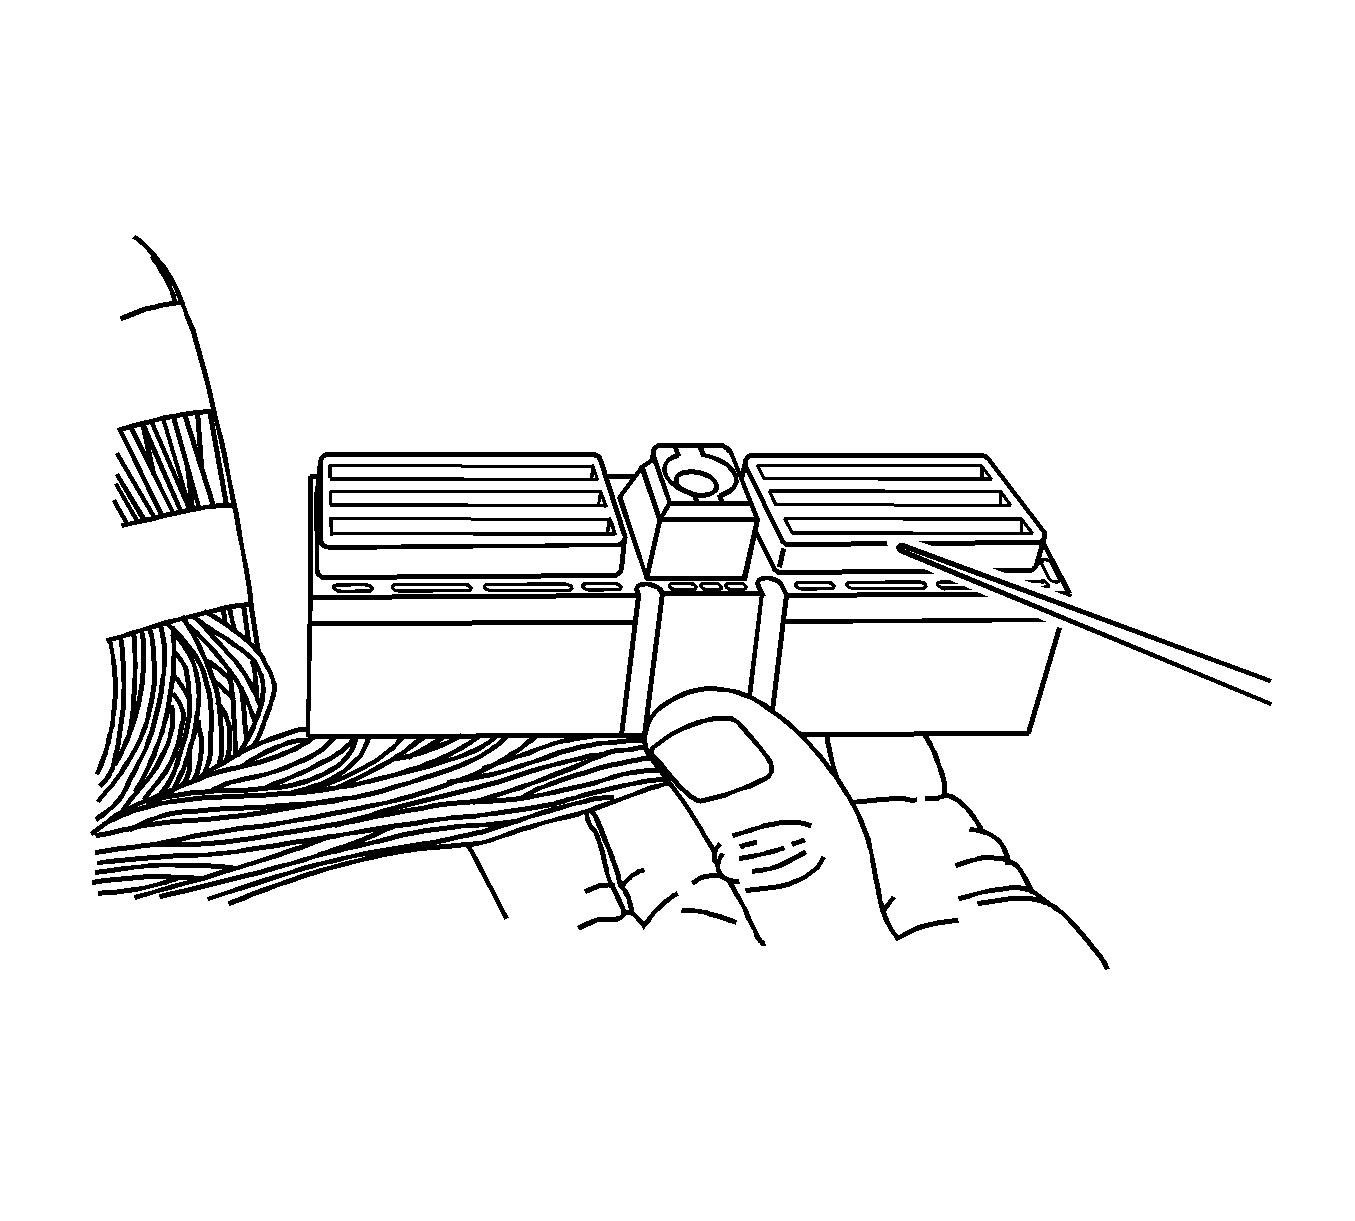
- Route the vacuum pump wire harness behind the black plastic rear hood seal support extension and secure the wire harness to the extension with a tie-strap (1).
- Route the loose end of the wire harness (1) to follow the surge tank hose toward the radiator.
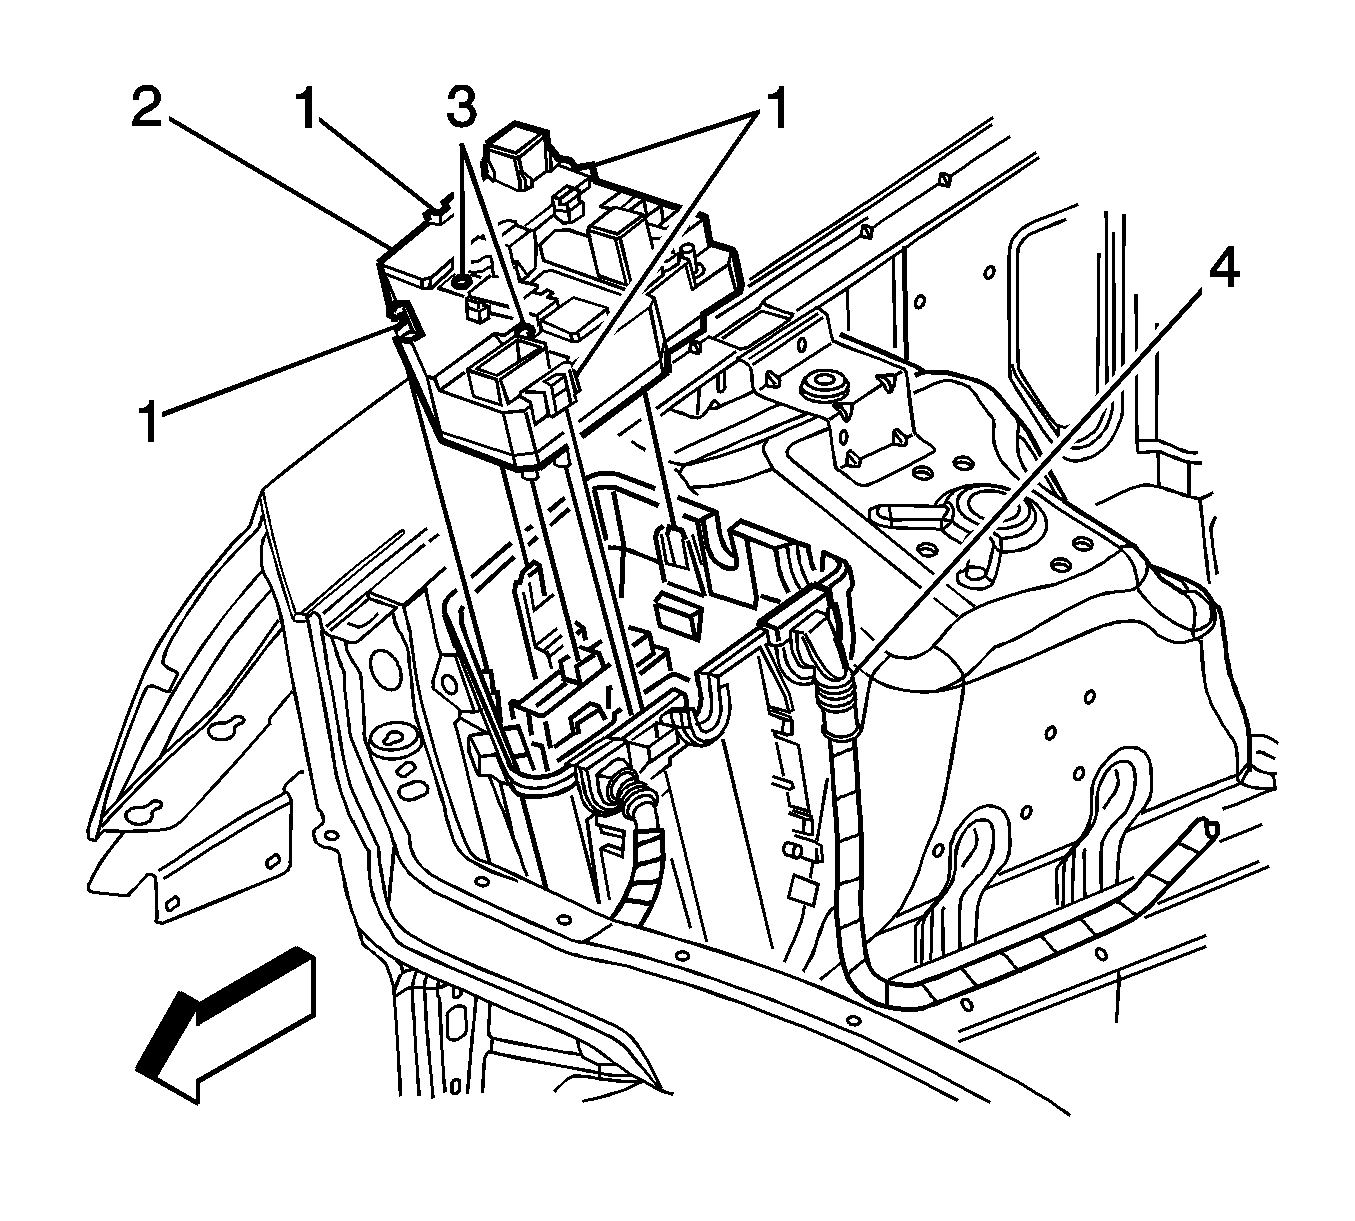
- Continue routing the harness along the upper tie-bar to the underhood electrical center. Secure with tie straps (1) to the hole in the upper tie bar and to the air bag sensor wiring harness (2).
- Install the condenser closeout panel.
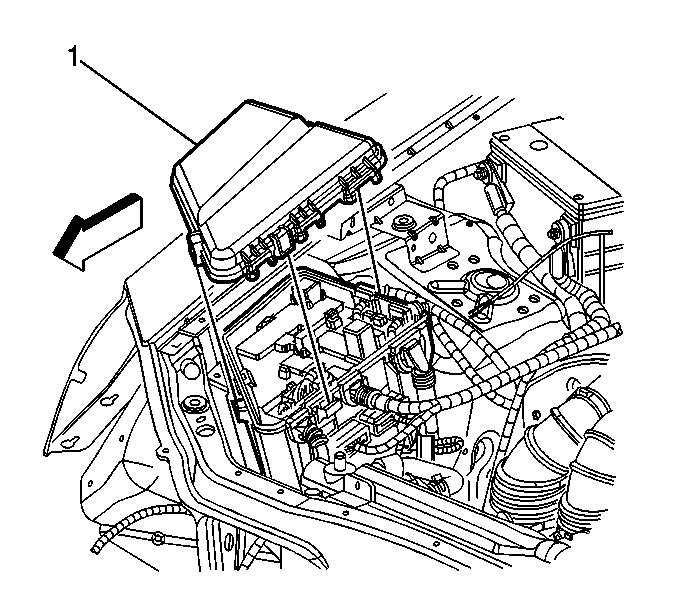
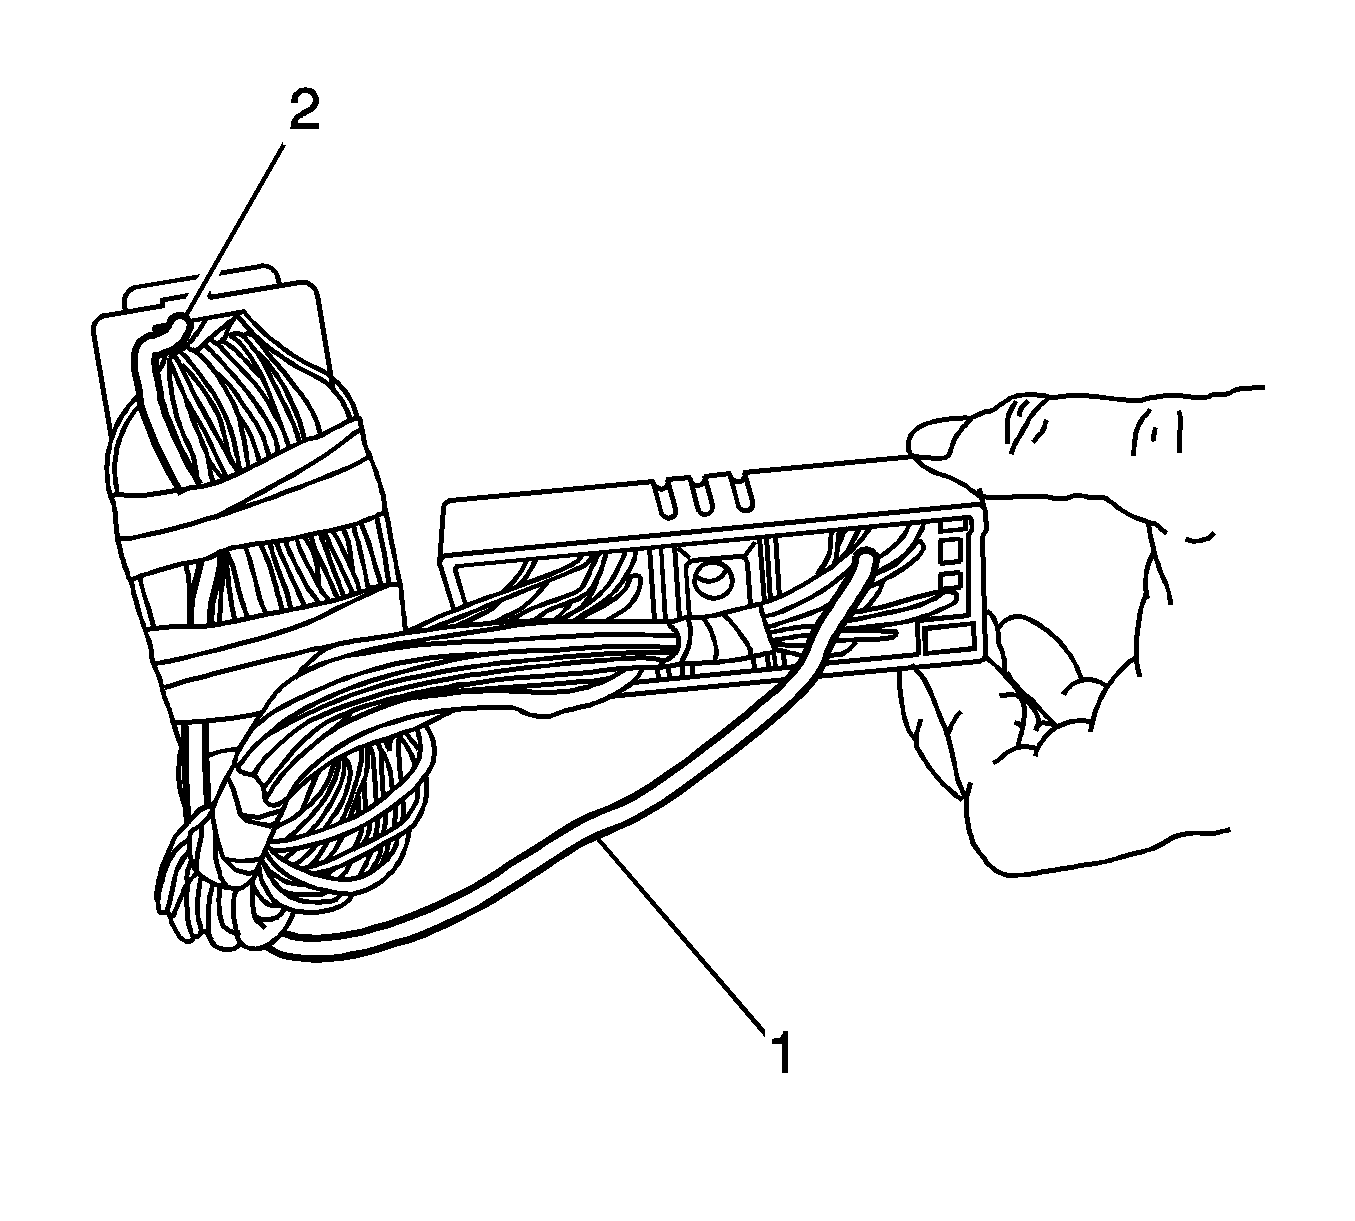
- Remove the cover (1) from the underhood electrical center.
- Remove the nut securing the positive battery cable to the electrical center.
- Remove the positive battery cable and pass-thru grommet (3) from the electrical center.
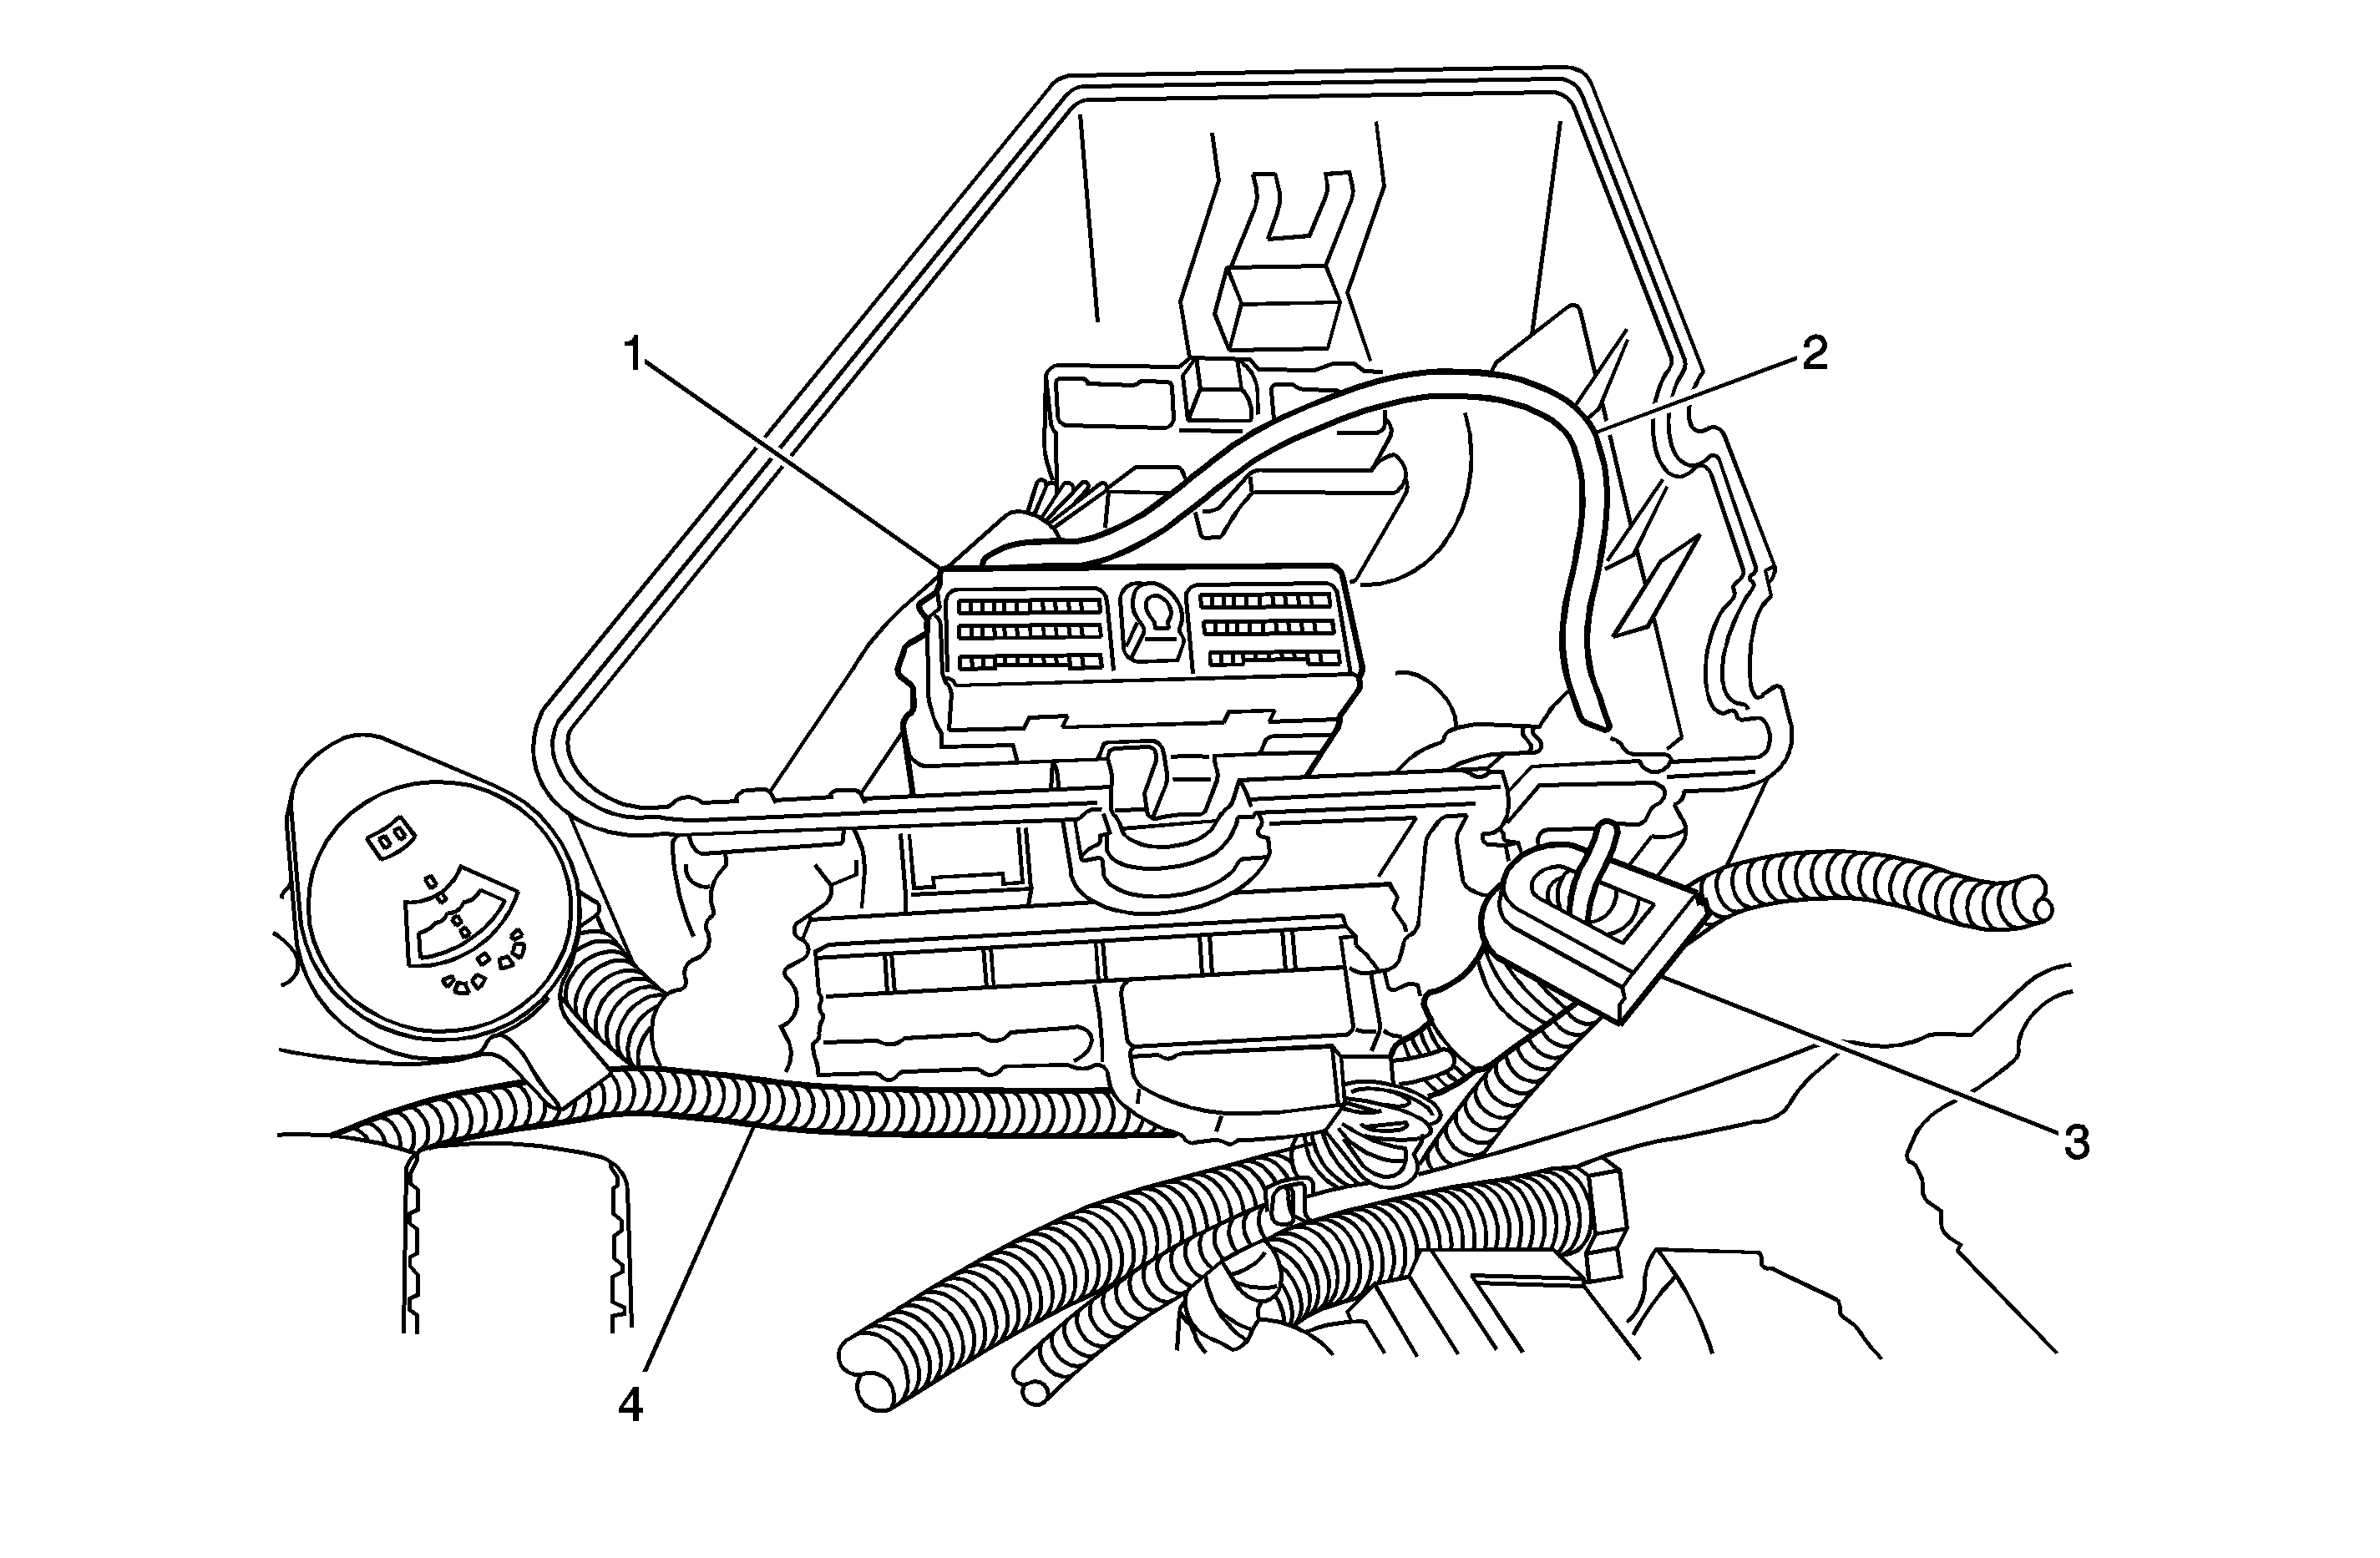
- Disconnect both body wire harness connectors from the electrical center.
- Remove the body wire harness and pass-thru grommet (2) from the electrical center.
- Disconnect the engine wire harness connector (1) from the electrical center.
- Remove the engine wire harness and pass-thru grommet from the electrical center.
- Loosen both electrical center screws (3).
- Carefully release the four retention tabs (1) holding the electrical center and remove the electrical center (2).
- Remove the electrical tape that seals the I/P harness rubber pass-thru grommet (4) to the corrugated conduit interface.
- Route the vacuum pump power wire (2,4) into the I/P harness rubber pass-thru grommet to the electrical center.
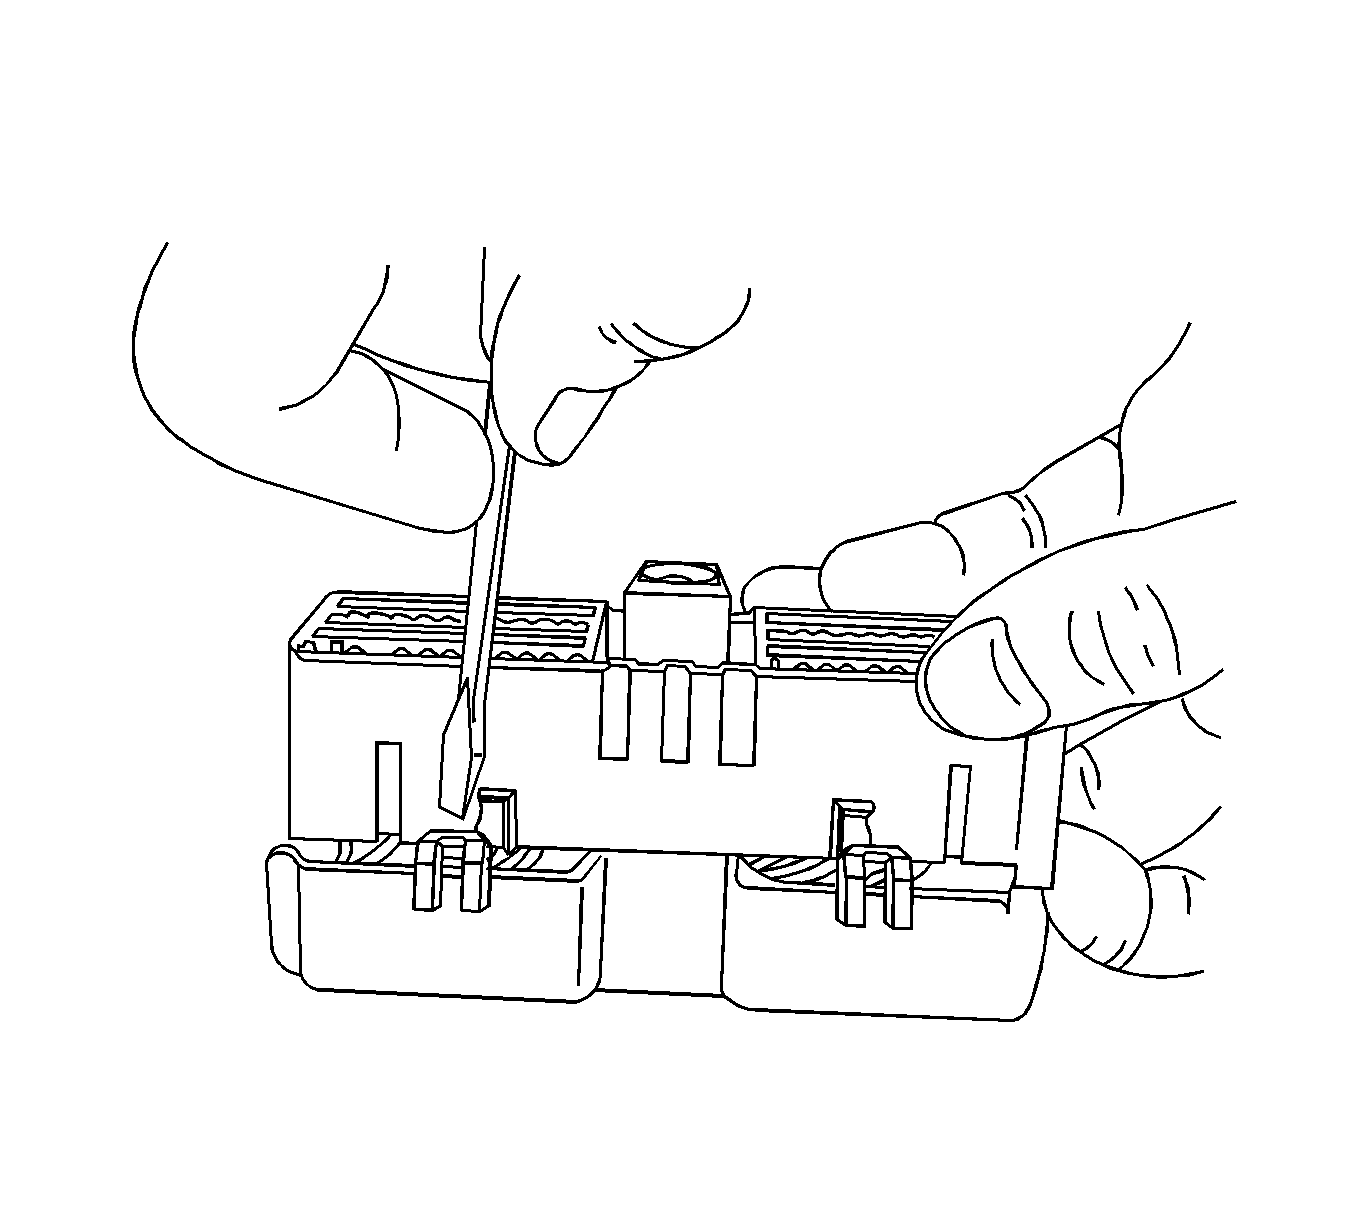
- Remove the 68-way I/P harness connector (1) from the underhood electrical center.
- Carefully release the four tabs and remove the white plastic cover from the 68-way I/P harness electrical center connector.
- Release the connector terminal lock.
- Route the vacuum pump power wire with the I/P harness wires (2) and carefully insert the vacuum pump power wire terminal into cavity 30 (1) of the I/P harness connector.
- Install the terminal lock.
- Tape the vacuum pump power wire to the I/P harness wires to ensure that it will not get pinched.
- Install the white plastic I/P harness connector cover.
- Reseal the I/P harness rubber pass-thru grommet to the corrugated conduit interface using electrical tape.
- Install the electrical center and screws.
- Connect the engine harness to the electrical center.
- Connect the body harness to the electrical center.
- Connect the positive battery cable to the electrical center.
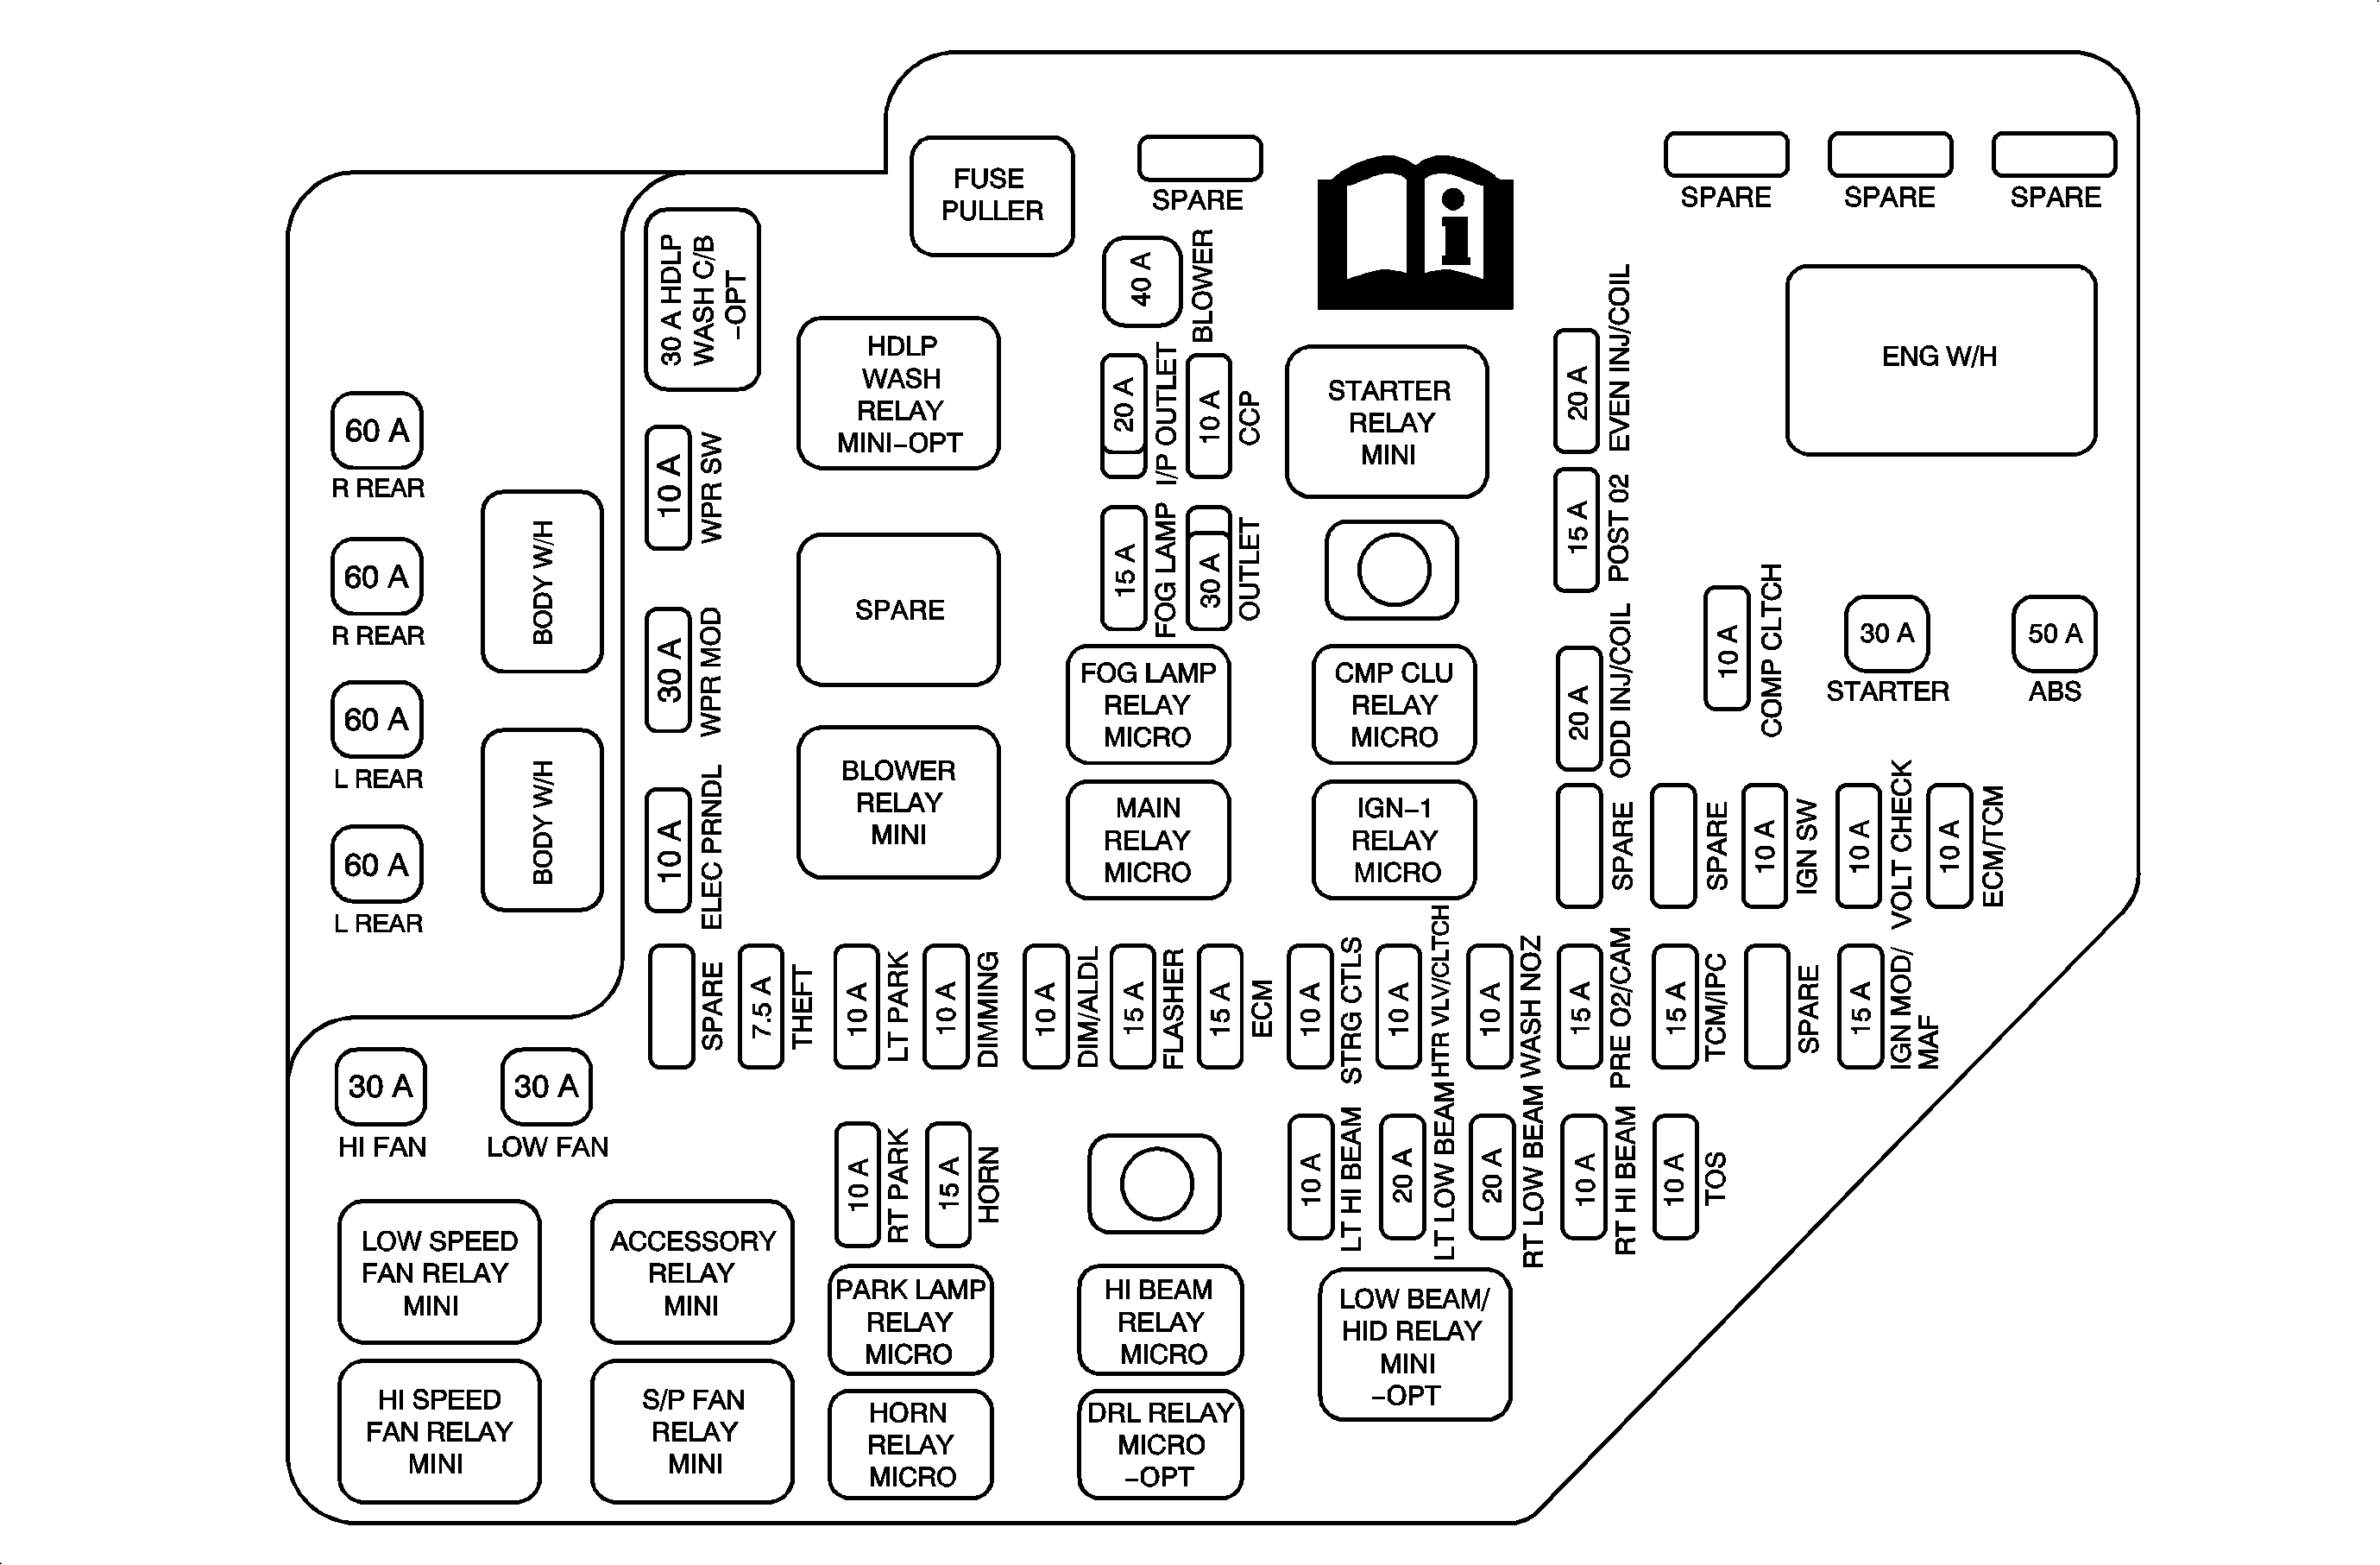
- Install a 15 amp fuse (not provided) in the empty (spare) location next to IGN-1 RELAY MICRO.
- Install the electrical center cover.
- Connect the negative battery cable.
- With the engine off, perform the following steps:
Tighten
Tighten both bolts to 112N·m(83 lb ft).
Tighten
Tighten the bolt to 45N·m(33 lb ft).

Tighten
Tighten the screws to 9 N·m (80 lb in).
Tighten
Tighten the nut to 15N·m(11 lb ft).
Tighten
Tighten the cable to 17 N·m (13 lb ft).
| 53.1. | Pump the brake pedal 5 times to ensure that the vacuum brake booster is depleted. |
| 53.2. | Turn the ignition to the RUN position. |
| 53.3. | After 5 seconds the vacuum pump should cycle on and off. |
Parts Information
Part Number | Description | Material Allowance |
|---|---|---|
15837490 | Power Brake Booster Pump Kit | -- |
-- | Vacuum Hose | $5.00 |
-- | 15 Amp Fuse | $2.50 |
Warranty Information
For vehicles repaired under warranty, use:
Labor Operation | Description | Labor Time |
|---|---|---|
H9716* | Install Power Brake Booster Pump Kit | 0.7 hr |
*This is a unique labor operation number for bulletin use only. This number will not be published in the Labor Time Guide. | ||
