Press the DEST key to access the Select Destination screen. From this screen, select from several options to plan a route by entering destinations.
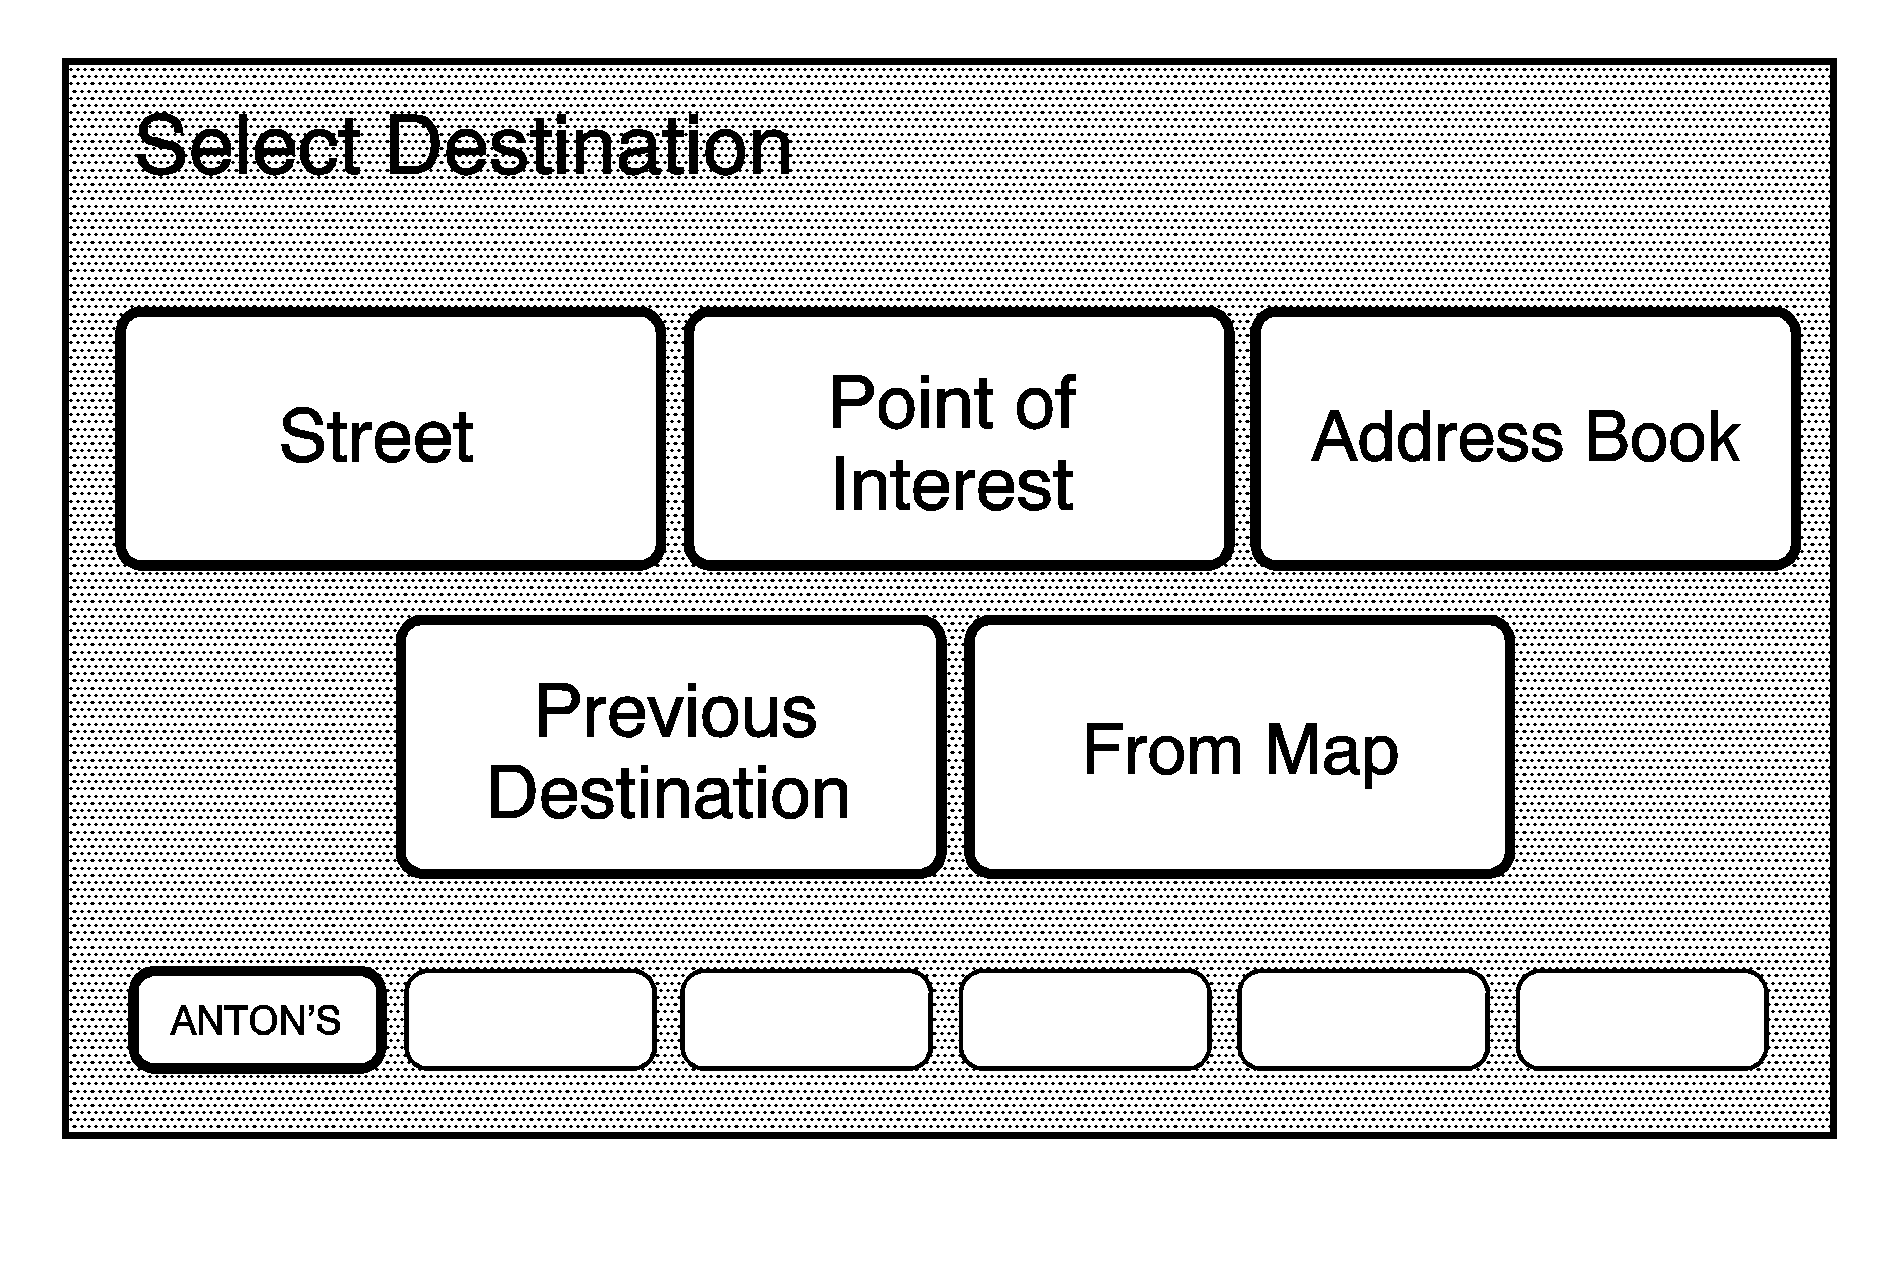
Address Entry
Street: The address entry destination method allows entry of an address by providing the system with a street name, a city name, or the name of a state or province.If having trouble finding a city or a street name:
| • | Enter the street name first instead of the city name, or vice versa. |
| • | Enter more characters or reduce the amount of characters to reduce or expand the available options. |
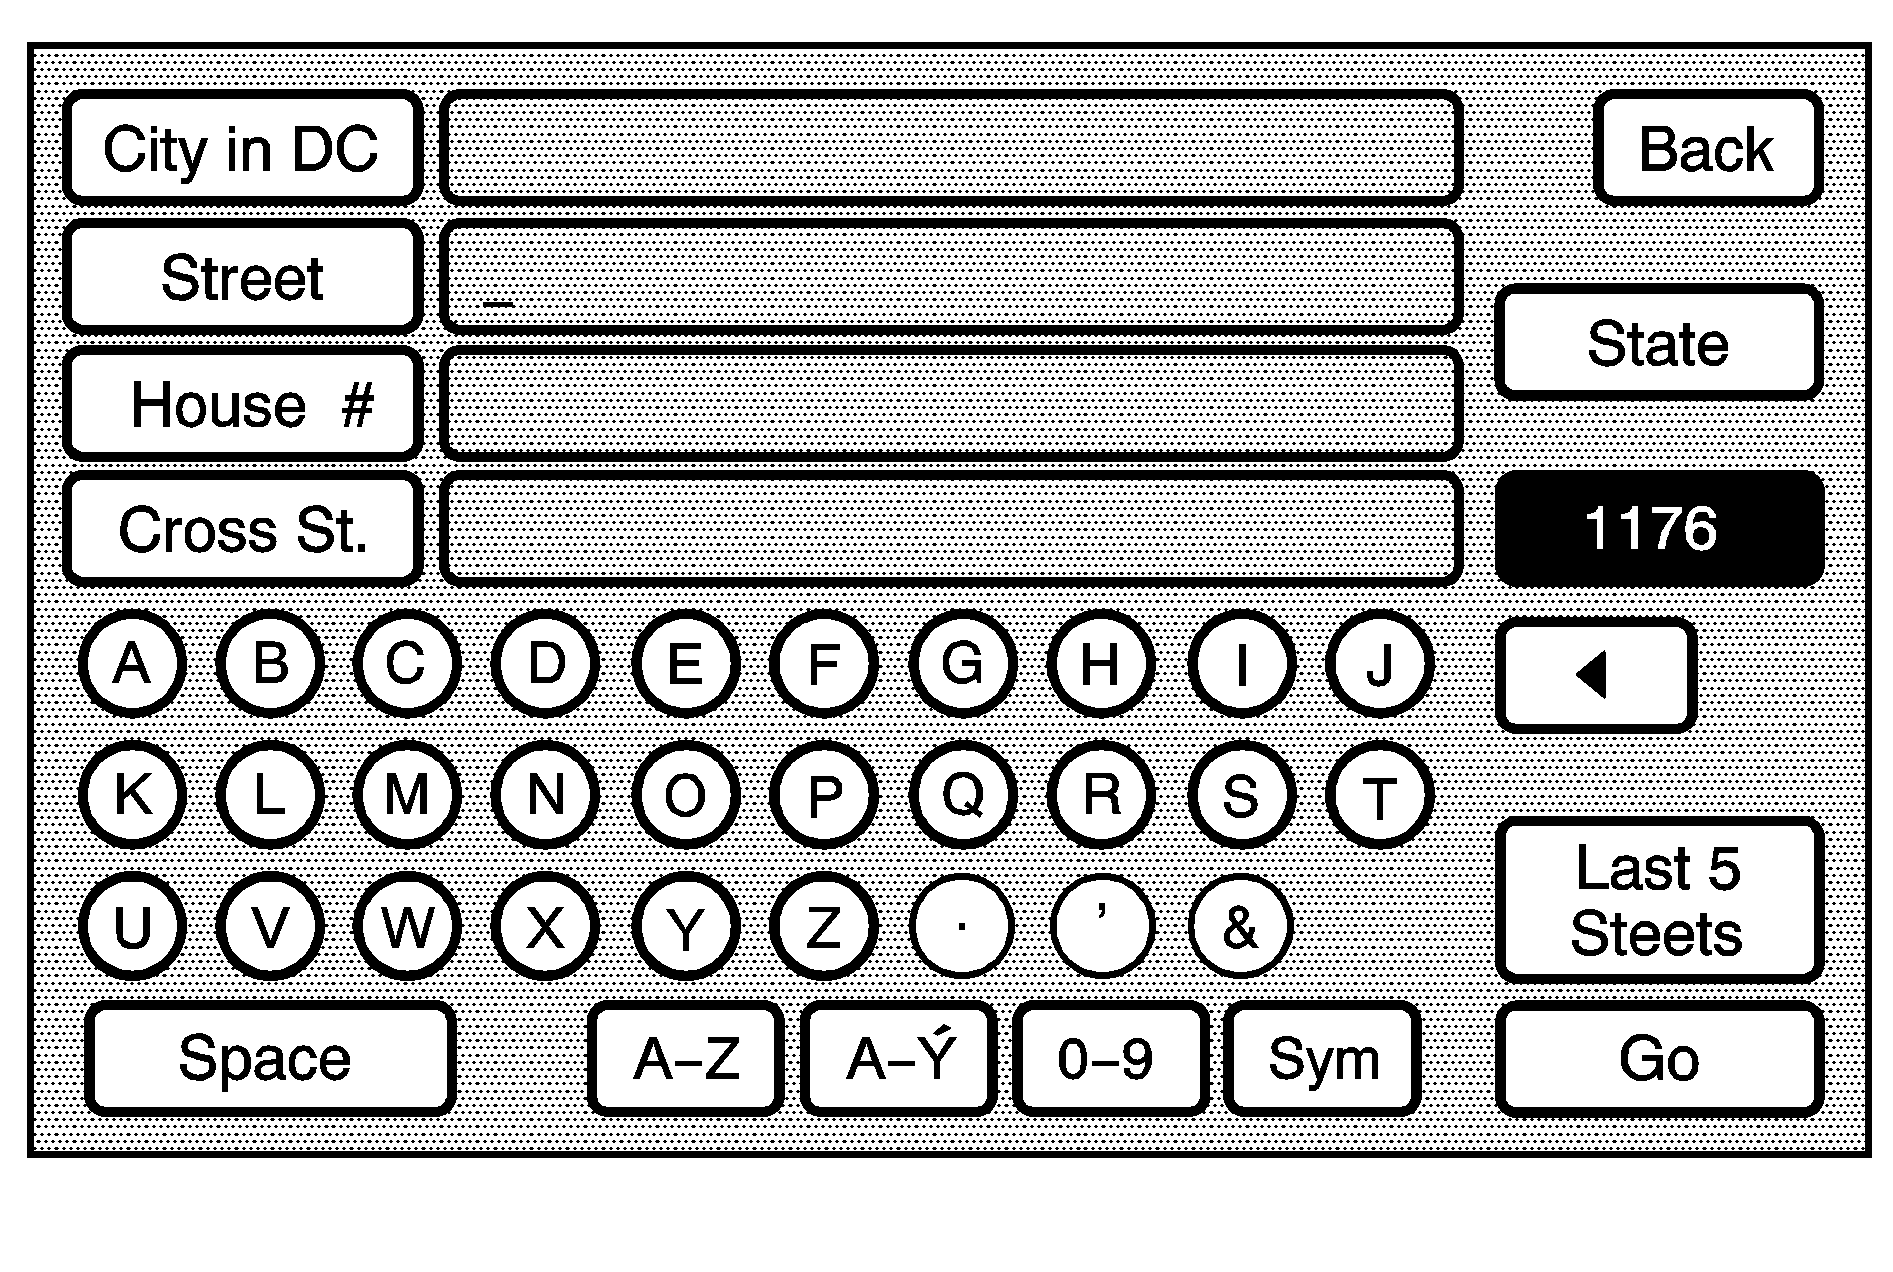
Entering the Street Name First
- Press the DEST hard key.
- Select the Street screen button.
- The Street category is automatically selected for entry. Start entering the street name.
- Select the street name.
- Enter the house number. The system displays the house number range that is available for the street.
- If there is more than one city, the list of cities that have that street address displays. Select a city from the list.
- A confirmation screen displays with the address. If the address is correct, select the Go screen button. The system calculates the route.
- Select the route preference (Fastest, Shortest, or Easy). The system highlights the route.
- Select the Start Guidance screen button. The route is now ready to be started.
It is recommended that directional information or street type is not entered. Use the Space screen button between street or city names. For example, the street name N. Royal Oak Rd. should be entered as royal(Space screen button)oak. Use the backspace ( ) screen button if an incorrect character has been entered.
If four or less names are available for the entered characters, a list displays. If more than four are available, there is a match counter with a number in it, it represents the number of available streets. Select the List button to view the list and select a street.
While the Street name category is empty, there is a Last 5 Streets screen button that displays the last five selected streets. Press this button to select a street from the list.
See "Getting Started on Your Route" later in this section.
Entering the City Name First
- Press the DEST hard key.
- Select the Street screen button.
- Select the City screen button and start entering the city name.
- Start entering the street name.
- Select the street name.
- Once a street has been selected, the numeric keyboard displays, allowing entry of the house number. The system displays the house number range that is available for the street.
- A confirmation screen displays with the address. If the address is correct, select the Go screen button. The system calculates the route.
- Select the route preference (Fastest, Shortest, or Easy). The system highlights the route.
- Select the Start Guidance screen button. The route is now ready to be started.
If four or less names are available for the entered characters, a list displays. If more than four are available, there is a match counter with a number in it, it represents the number of available cities. Select the List button to view the list and select a city.
It is recommended that directional information or street type is not entered. Use the Space screen button between street or city names. For example, the street name N. Royal Oak Rd. should be entered as royal(Space screen button)oak. Use the backspace ( ) screen button if an incorrect character has been entered.
If four or less names are available for the entered characters, a list displays. If more than four are available, there is a match counter with a number in it, it represents the number of available streets. Select the List button to view the list and select a street.
While the Street name category is empty, there is a Last 5 Streets screen button that displays the last five selected streets. Press this button to select a street from the list.
See "Getting Started on Your Route" later in this section.
Entering the State or Province First
- Press the DEST hard key.
- Select the Street screen button.
- Select the State screen button and select the state or province from the list.
- Select the City screen button and start entering the city name.
- Start entering the street name.
- Select the street name.
- Once a street has been selected, the numeric keyboard displays, allowing entry of the house number. The system displays the house number range that is available for the street.
- A confirmation screen displays with the address. If the address is correct, select the Go screen button. The system calculates the route.
- Select the route preference (Fastest, Shortest, or Easy). The system highlights the route.
- Select the Start Guidance screen button. The route is now ready to be started.
Do not enter directional information or street type, and use the Space screen button between street or city names. For example, the street name N. Royal Oak Rd. should be entered as royal(Space screen button)oak. Use the backspace screen button if an incorrect character has been entered.
If four or less names are available for the entered characters, a list displays. If more than four are available, there is a match counter with a number in it, it represents the number of available cities. Select the List button to view the list and select a city.
While the Street name category is empty, there is a Last 5 Streets screen button that displays the last five selected streets. Press this button to select a street from the list.
See "Getting Started on Your Route" later in this section.
Point of Interest (POI)
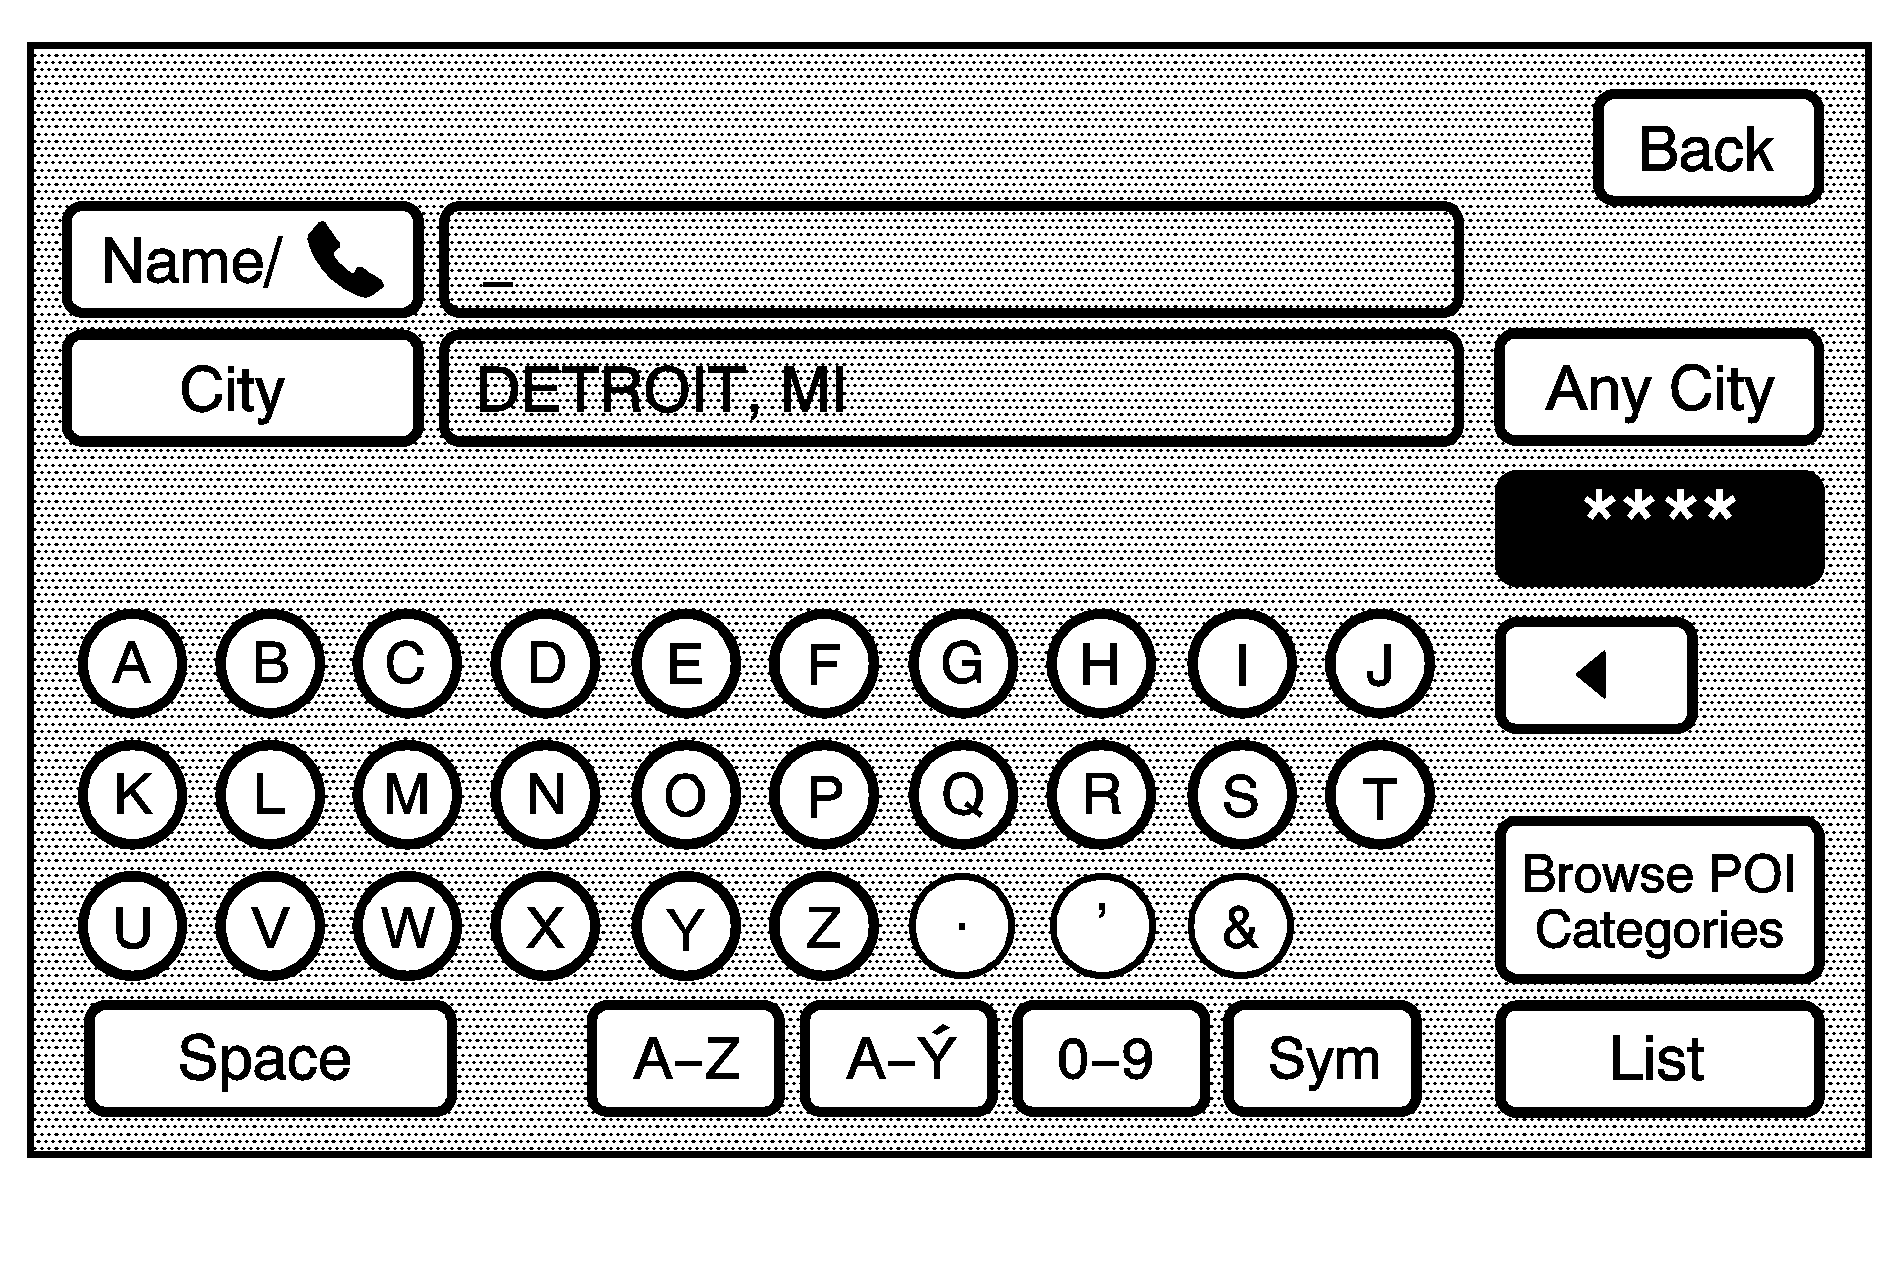
Point of Interest: The Point of Interest (POI) destination entry method allows selection of a destination by providing the system with a POI name, a city name, or selecting the POI from the POI list.
Entering the POI Name/Phone Number
- Press the DEST hard key.
- Select the Point of Interest screen button.
- The Name / category is automatically selected for entry. Start entering the name or select the 0-9 screen button to enter the phone number.
- Select the POI name from the list.
- A confirmation screen displays with the POI information. If the POI information is correct, select the Go screen button. The system calculates the route.
- Select the route preference (Fastest, Shortest, or Easy). The system highlights the route.
- Select the Start Guidance screen button. The route is now ready to be started.
If four or less names are available, a list displays. If more than four are available, there is a match counter with a number in it, it represents the number of available POI names. Select the List button to view the list.
See "Getting Started on Your Route" later in this section.
Entering the City Name First
- Press the DEST hard key.
- Select the Point of Interest screen button.
- Select the City screen button and start entering the city name.
- Select the Name / screen button and start entering the name or select the 0-9 screen button to enter the phone number.
- Select the POI name from the list.
- A confirmation screen displays with the POI information. If the POI information is correct, select the Go screen button. The system calculates the route.
- Select the route preference (Fastest, Shortest, or Easy). The system highlights the route.
- Select the Start Guidance screen button. The route is now ready to be started.
If four or less names are available, a list displays. If more than four are available, there is a match counter with a number in it, it represents the number of available cities. Select the List button to view the list and select a city.
If four or less names are available, a list displays. If more than four are available, there is a match counter with a number in it, it represents the number of available POI names. Select the List button to view the list.
See "Getting Started on Your Route" later in this section.
Selecting a POI Category
- Press the DEST hard key.
- Select the Point of Interest screen button.
- Select the Browse POI Categories screen button.
- Select a category, and then a sub-category.
- Select the POI name from the list.
- A confirmation screen displays with the POI information. If the POI information is correct, select the Go screen button. The system calculates the route.
- Select the route preference (Fastest, Shortest, or Easy). The system highlights the route.
- Select the Start Guidance screen button. The route is now ready to be started.
The system will display available POI names in the selected sub-category.
See "Getting Started on Your Route" later in this section.
Address Book
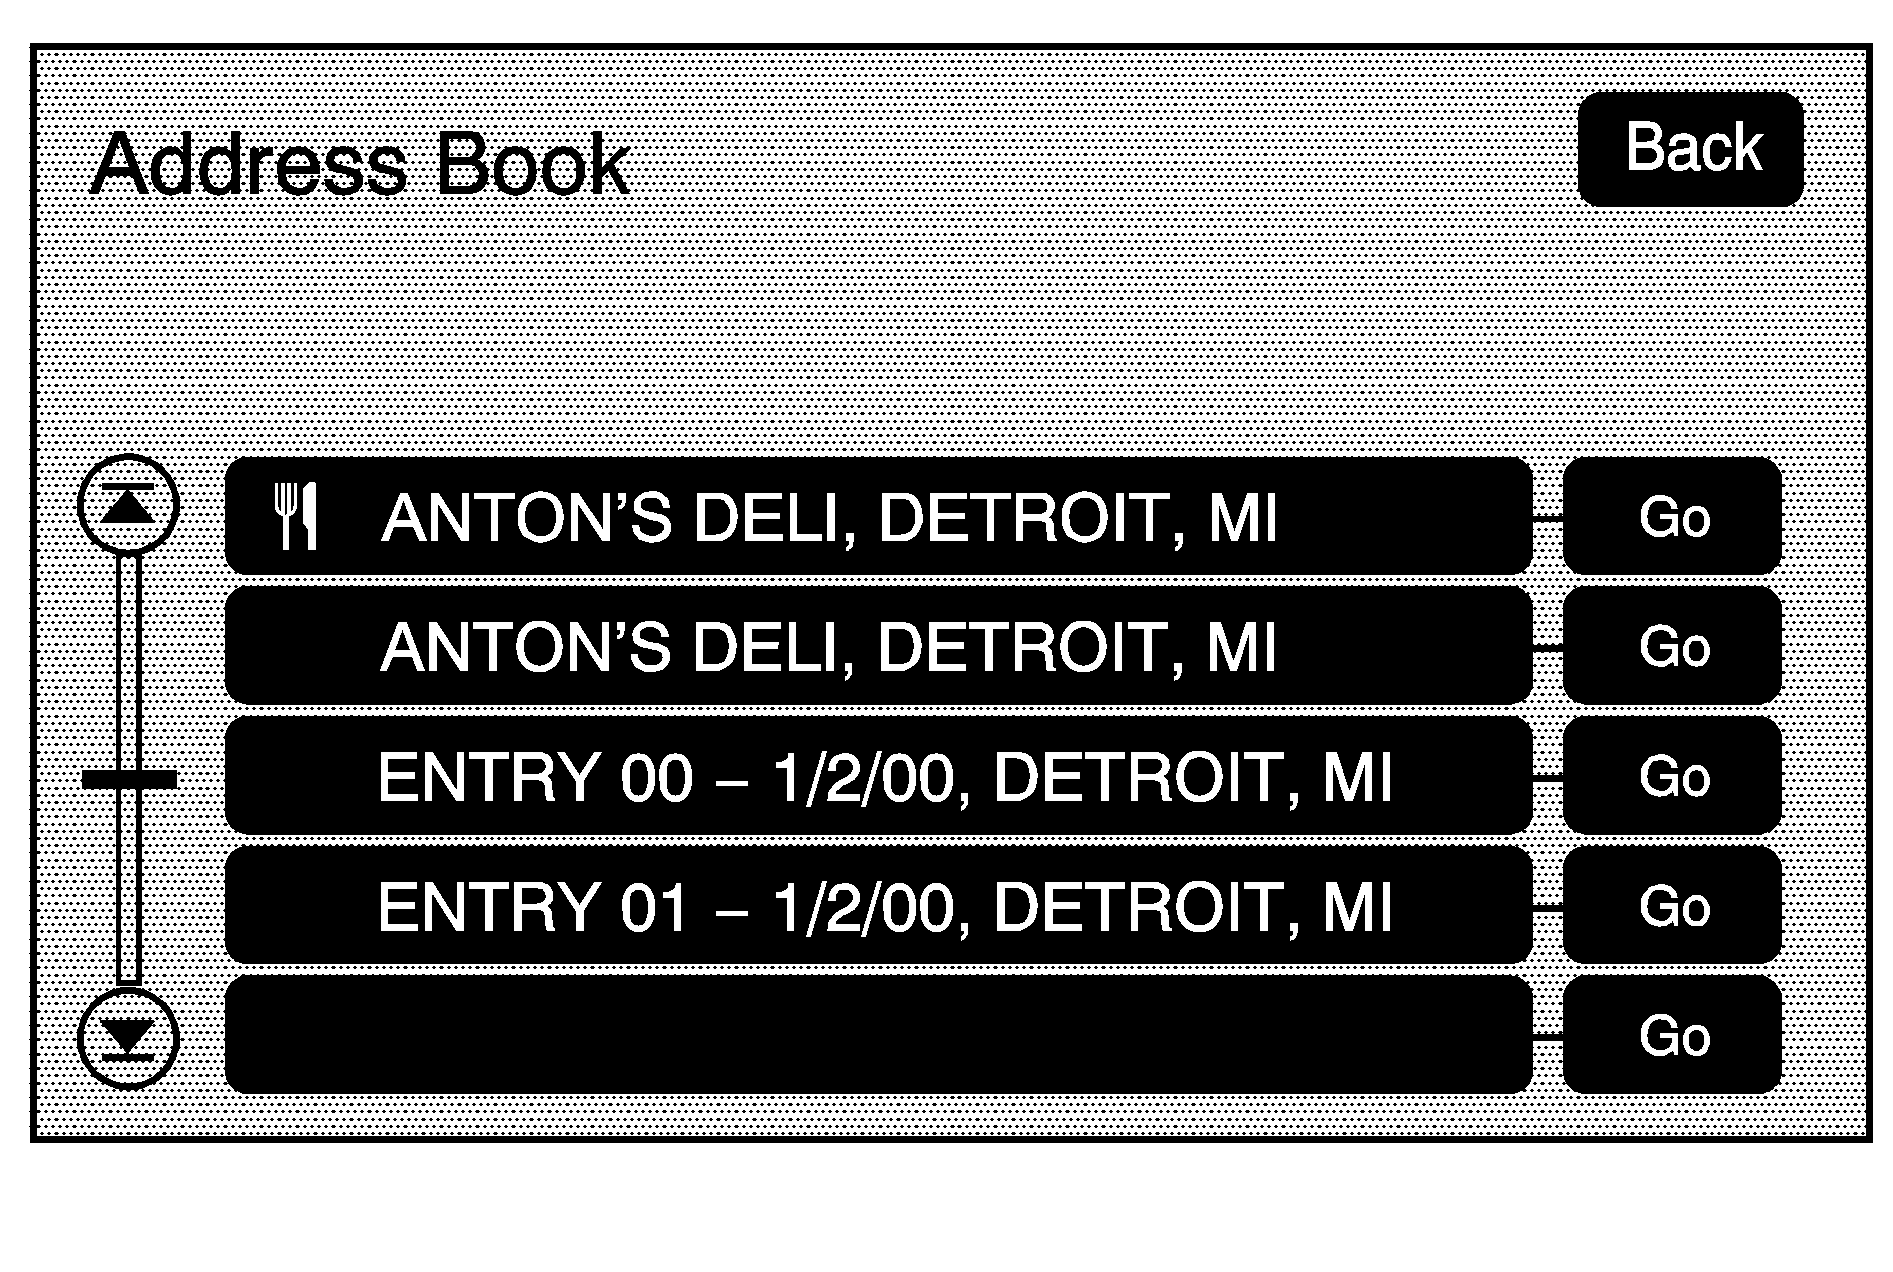
Address Book: The address book entry method allows you to select a destination by selecting an address that has been stored in your address book.
- Press the DEST hard key.
- Select the Address Book screen button.
- Select the Go screen button next to the destination. The system calculates the route.
- Select the route preference (Fastest, Shortest, or Easy). The system highlights the route.
- Select the Start Guidance screen button. The route is now ready to be started.
A list of your address book addresses display. Use the scroll arrows to the left to scroll through the list.
See "Getting Started on Your Route" later in this section for more information.
See "Adding Destinations to the Address Book" later in this section.
Previous Destination
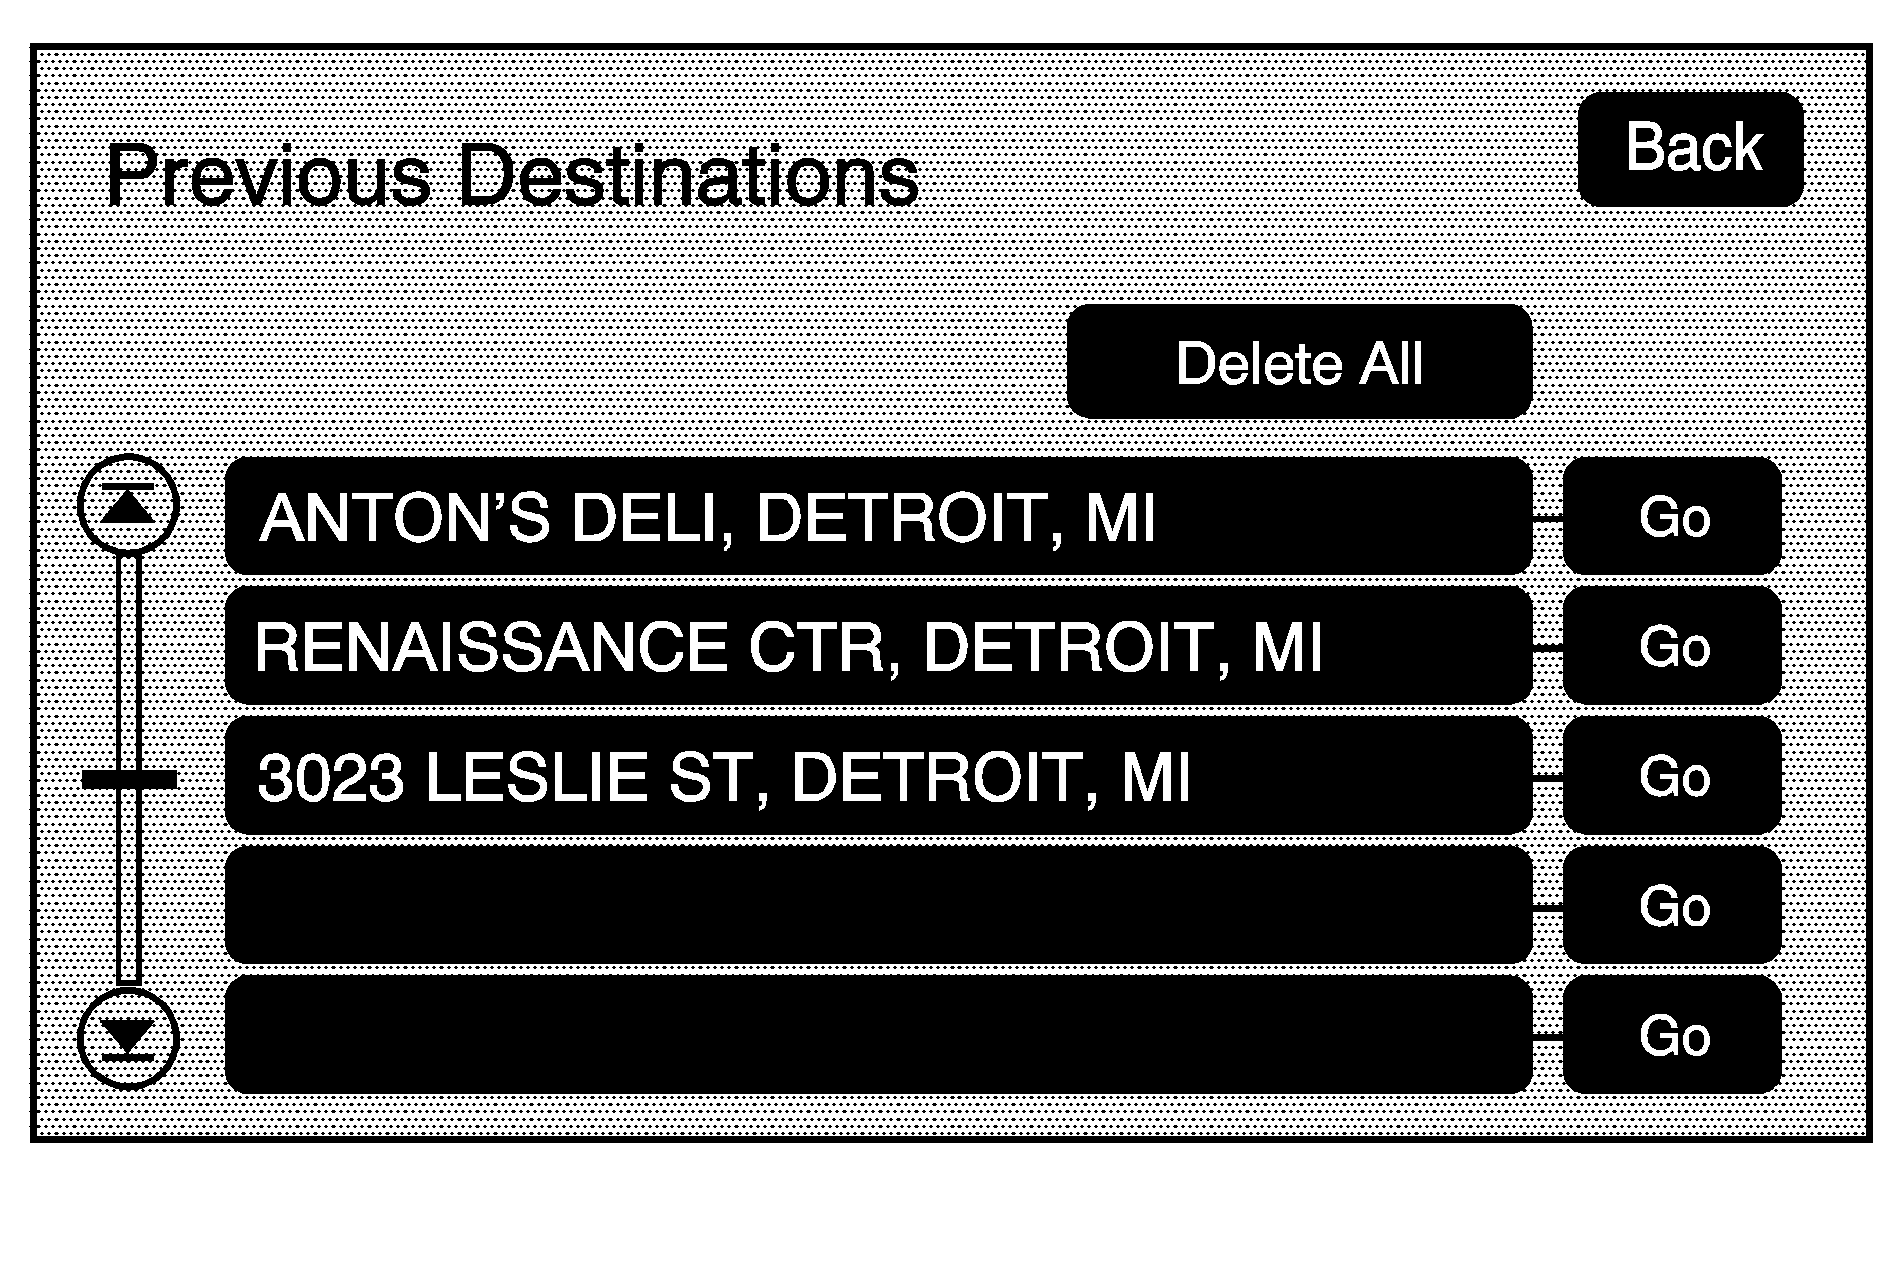
Previous Destination: The previous destination entry method allows selection of a destination from a list of previous destinations. The system stores up to 15 points that have been previously entered. As new destinations are entered, the system automatically deletes the oldest destinations and adds the new destinations if the list is full.
- Press the DEST hard key.
- Select the Previous Destination screen button.
- Select the Go screen button next to the destination. The system calculates the route.
- Select the route preference (Fastest, Shortest, or Easy). The system highlights the route.
- Select the Start Guidance screen button. The route is now ready to be started.
A list of the previous destinations display. Use the scroll arrows to the left to scroll through the list.
See "Getting Started on Your Route" later in this section for more information.
From Map
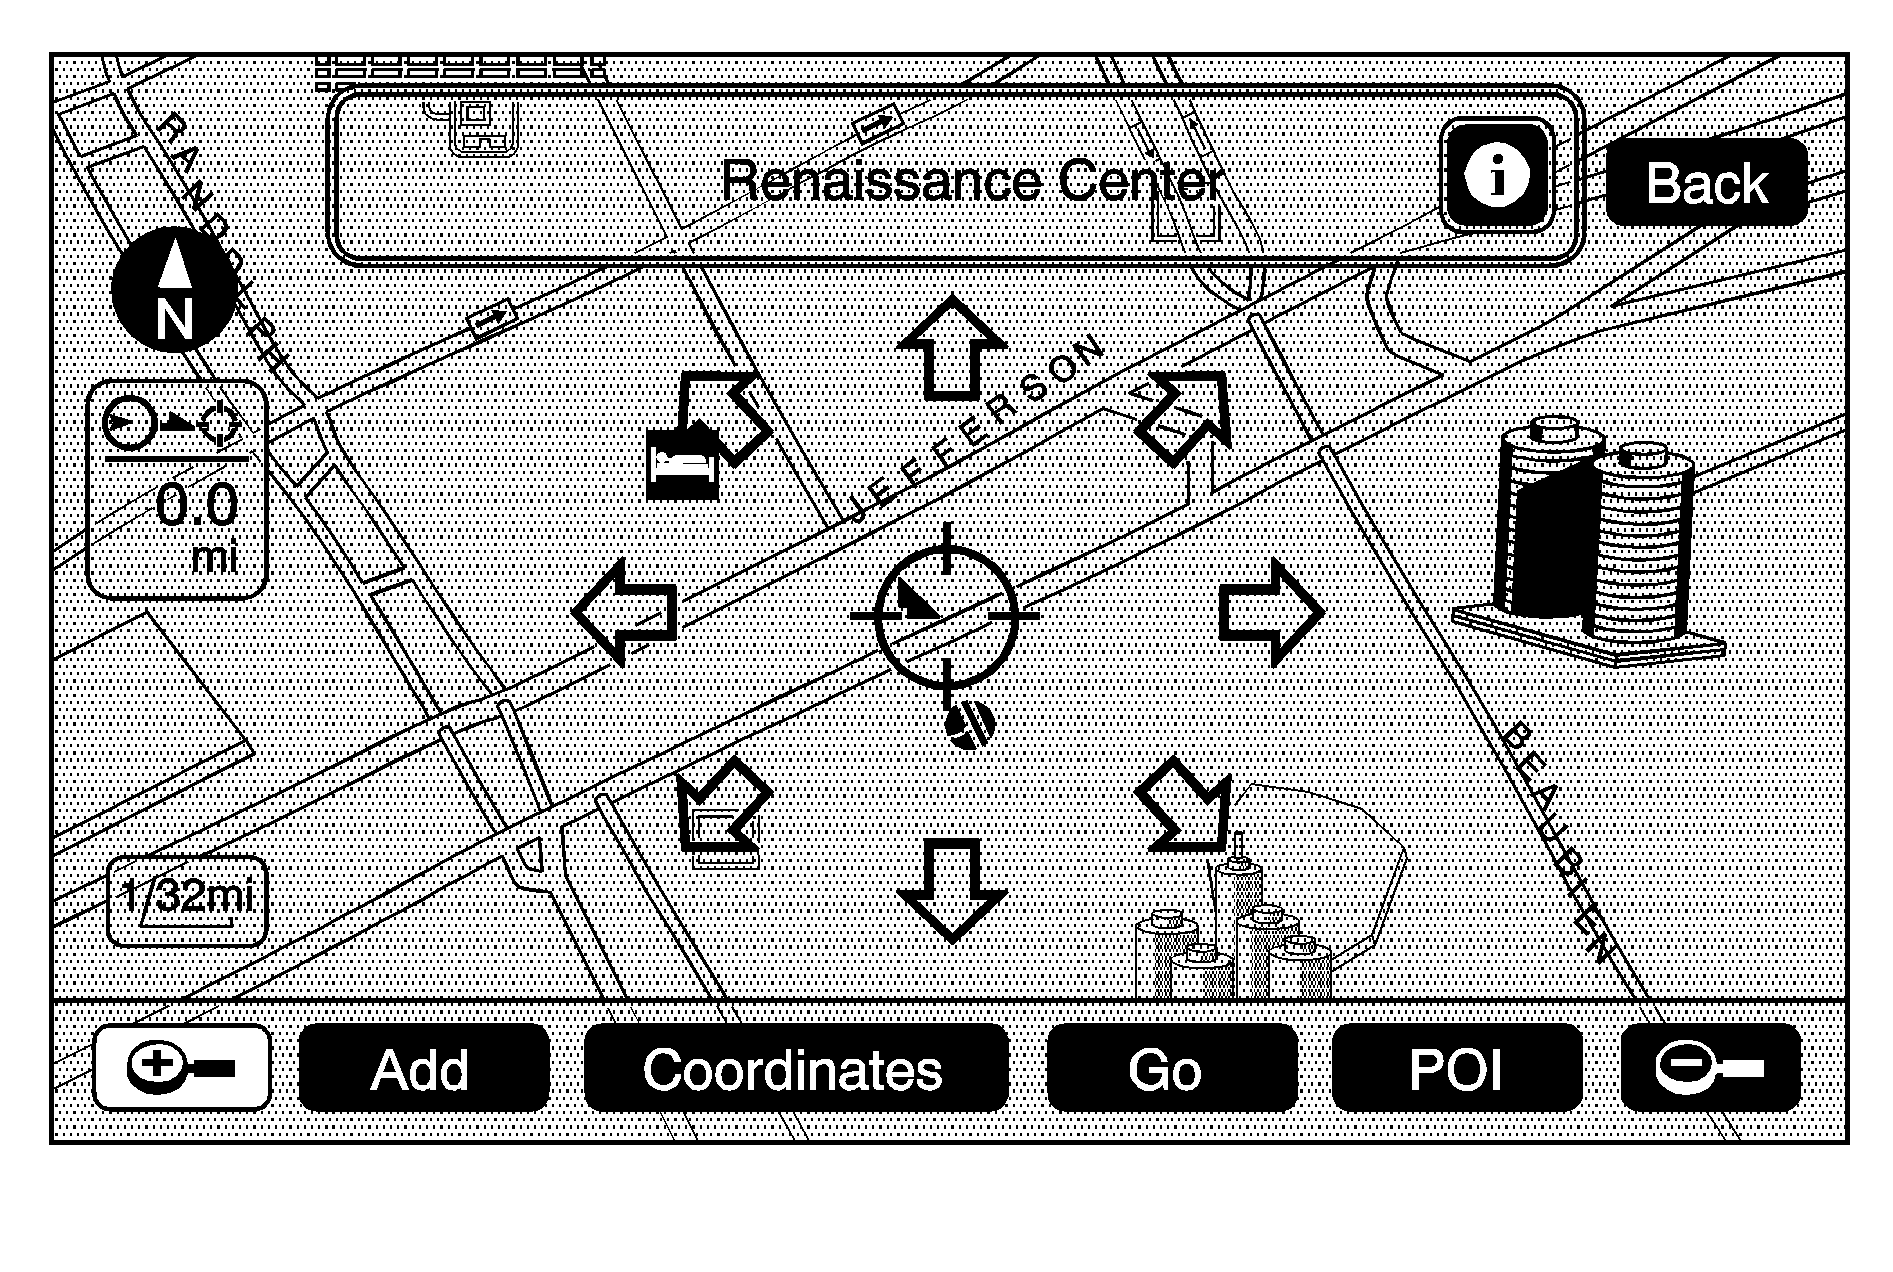
From Map: This destination entry method allows selecting of a destination by scrolling on the map.
- Press the DEST hard key.
- Select the From Map screen button. A map screen with the scrolling symbol displays.
- Use the / screen buttons and touch on the map to find the area selected as the destination.
- Press the i button and the map screen displays the address information of the scrolled location.
- A confirmation screen displays with the address. If the address is correct, select the Go screen button. The system calculates the route.
- Select the route preference (Fastest, Shortest, or Easy). The system highlights the route.
- Select the Start Guidance screen button. The route is now ready to be started.
Pressing, holding, and dragging your finger on the map activates fast scrolling.
See "Getting Started on Your Route" later in this section.
Coordinates
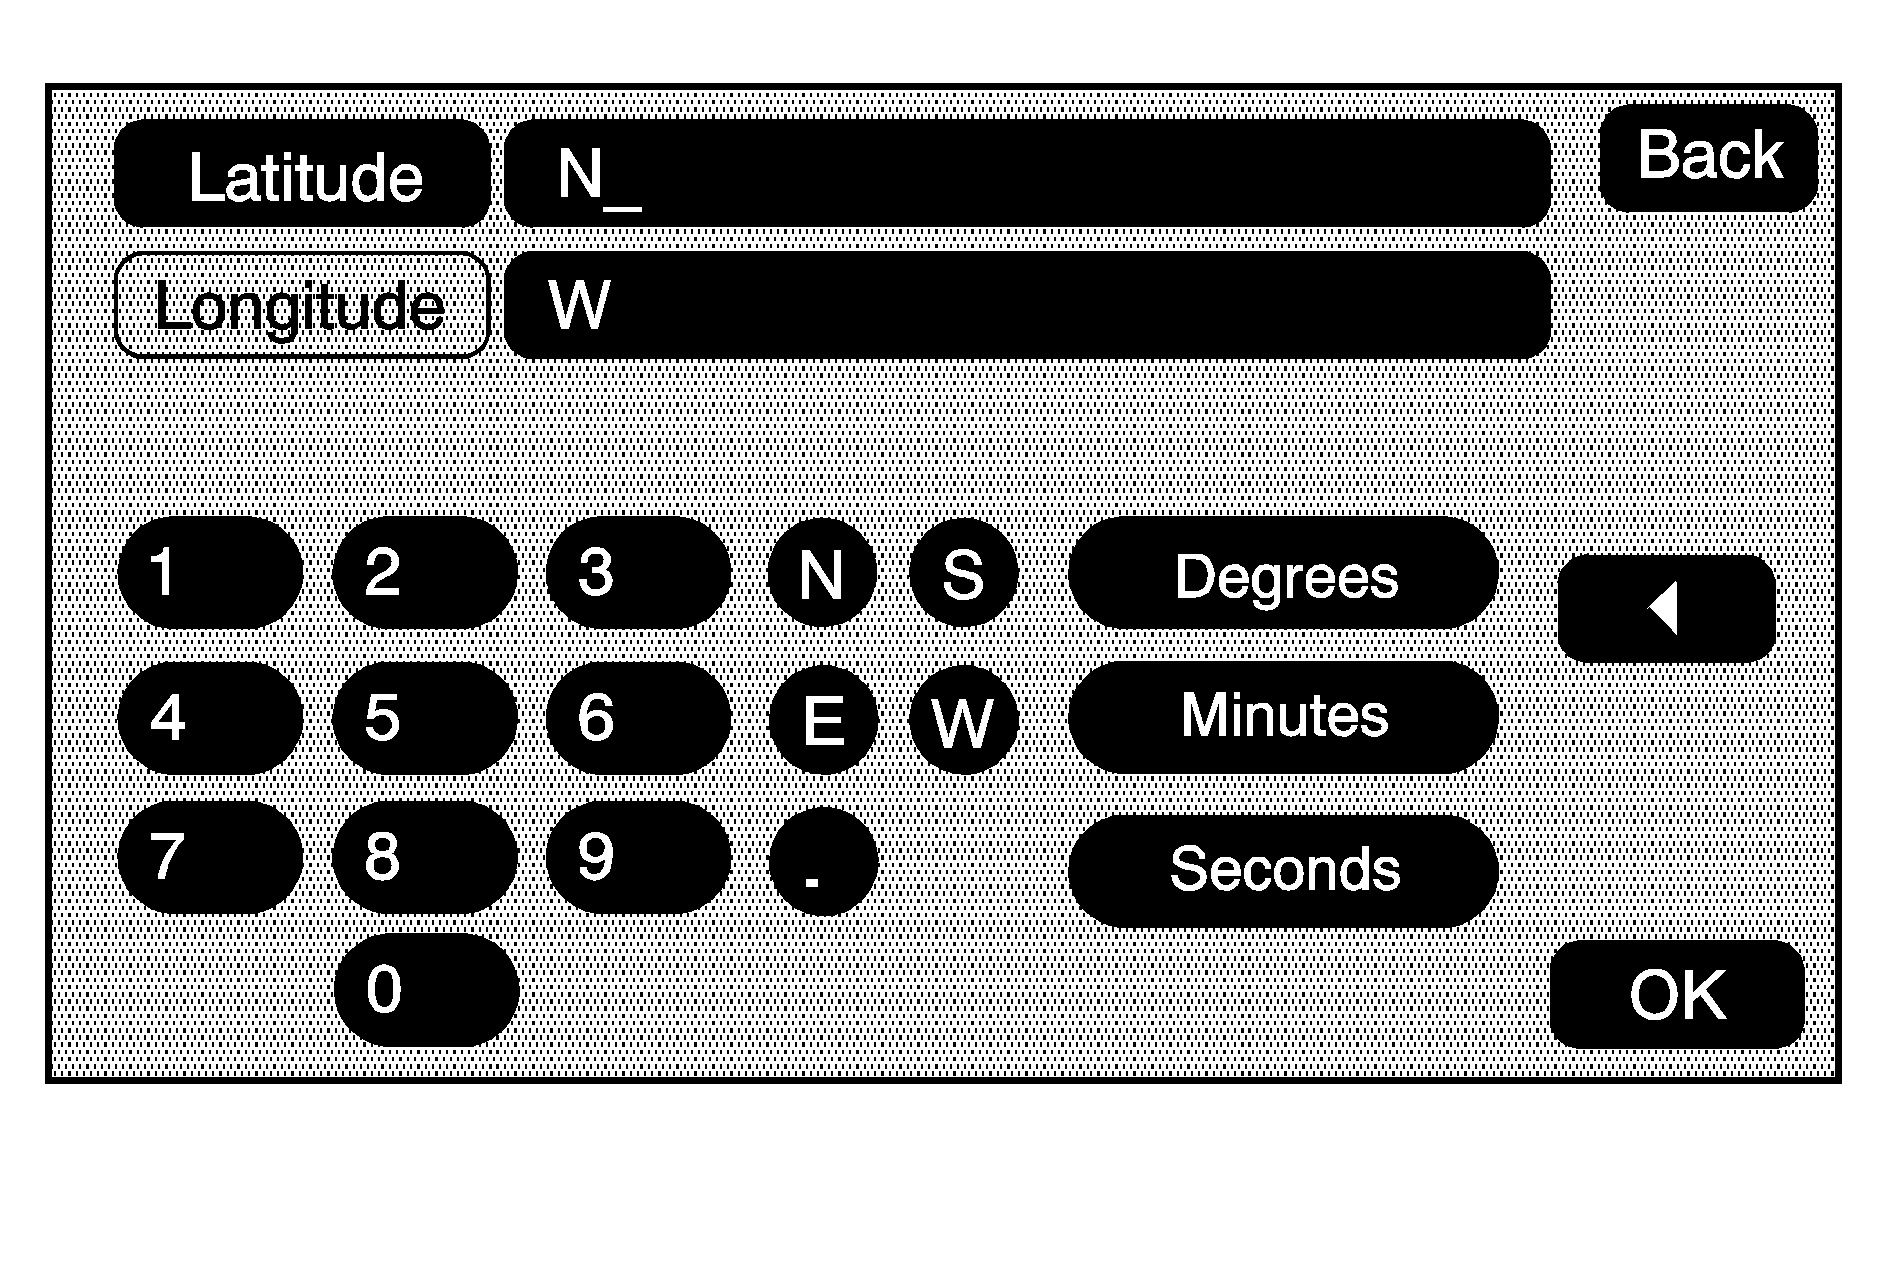
Coordinates: The coordinates destination entry method allows selection of a destination by entering latitude and longitude coordinates.
- Press the DEST hard key.
- Select the From Map screen button.
- Select the Coordinates screen button, then enter the numeric portion of the latitude and longitude coordinate.
- Once both coordinates are entered, select the OK screen button. The map screen, with the scrolled location, displays.
- Select the Go screen button.
If the coordinate is near a street or POI, the system calculates a route to that street or POI.
The system provides straight-line direction to the coordinate if there is no street or POI nearby.
See "Getting Started on Your Route" later in this section.
Preset Destination

The preset destination entry method allows setting a destination by selecting from one of six previously stored destinations. Besides voice tagged destinations, these are the only destinations available to set while the vehicle is moving. If a destination is not set for one of the screen buttons, the button is dimmed and not available for use. See "Adding or Changing Preset Destinations" later in this section for information on how to add a preset destination.
- Press the DEST hard key.
- Select the desired preset destination screen button. The screen buttons are labeled with the name that was selected for the destination when it was stored. The system calculates the route.
- Select the route preference (Fastest, Shortest, or Easy). The system highlights the route.
- Select the Start Guidance screen button. The route is now ready to be started.
See "Getting Started on Your Route" later in this section.
Getting Started on Your Route
Once a destination has been entered there are several functions that can be performed. Press the DEST hard key to access the Route screen.
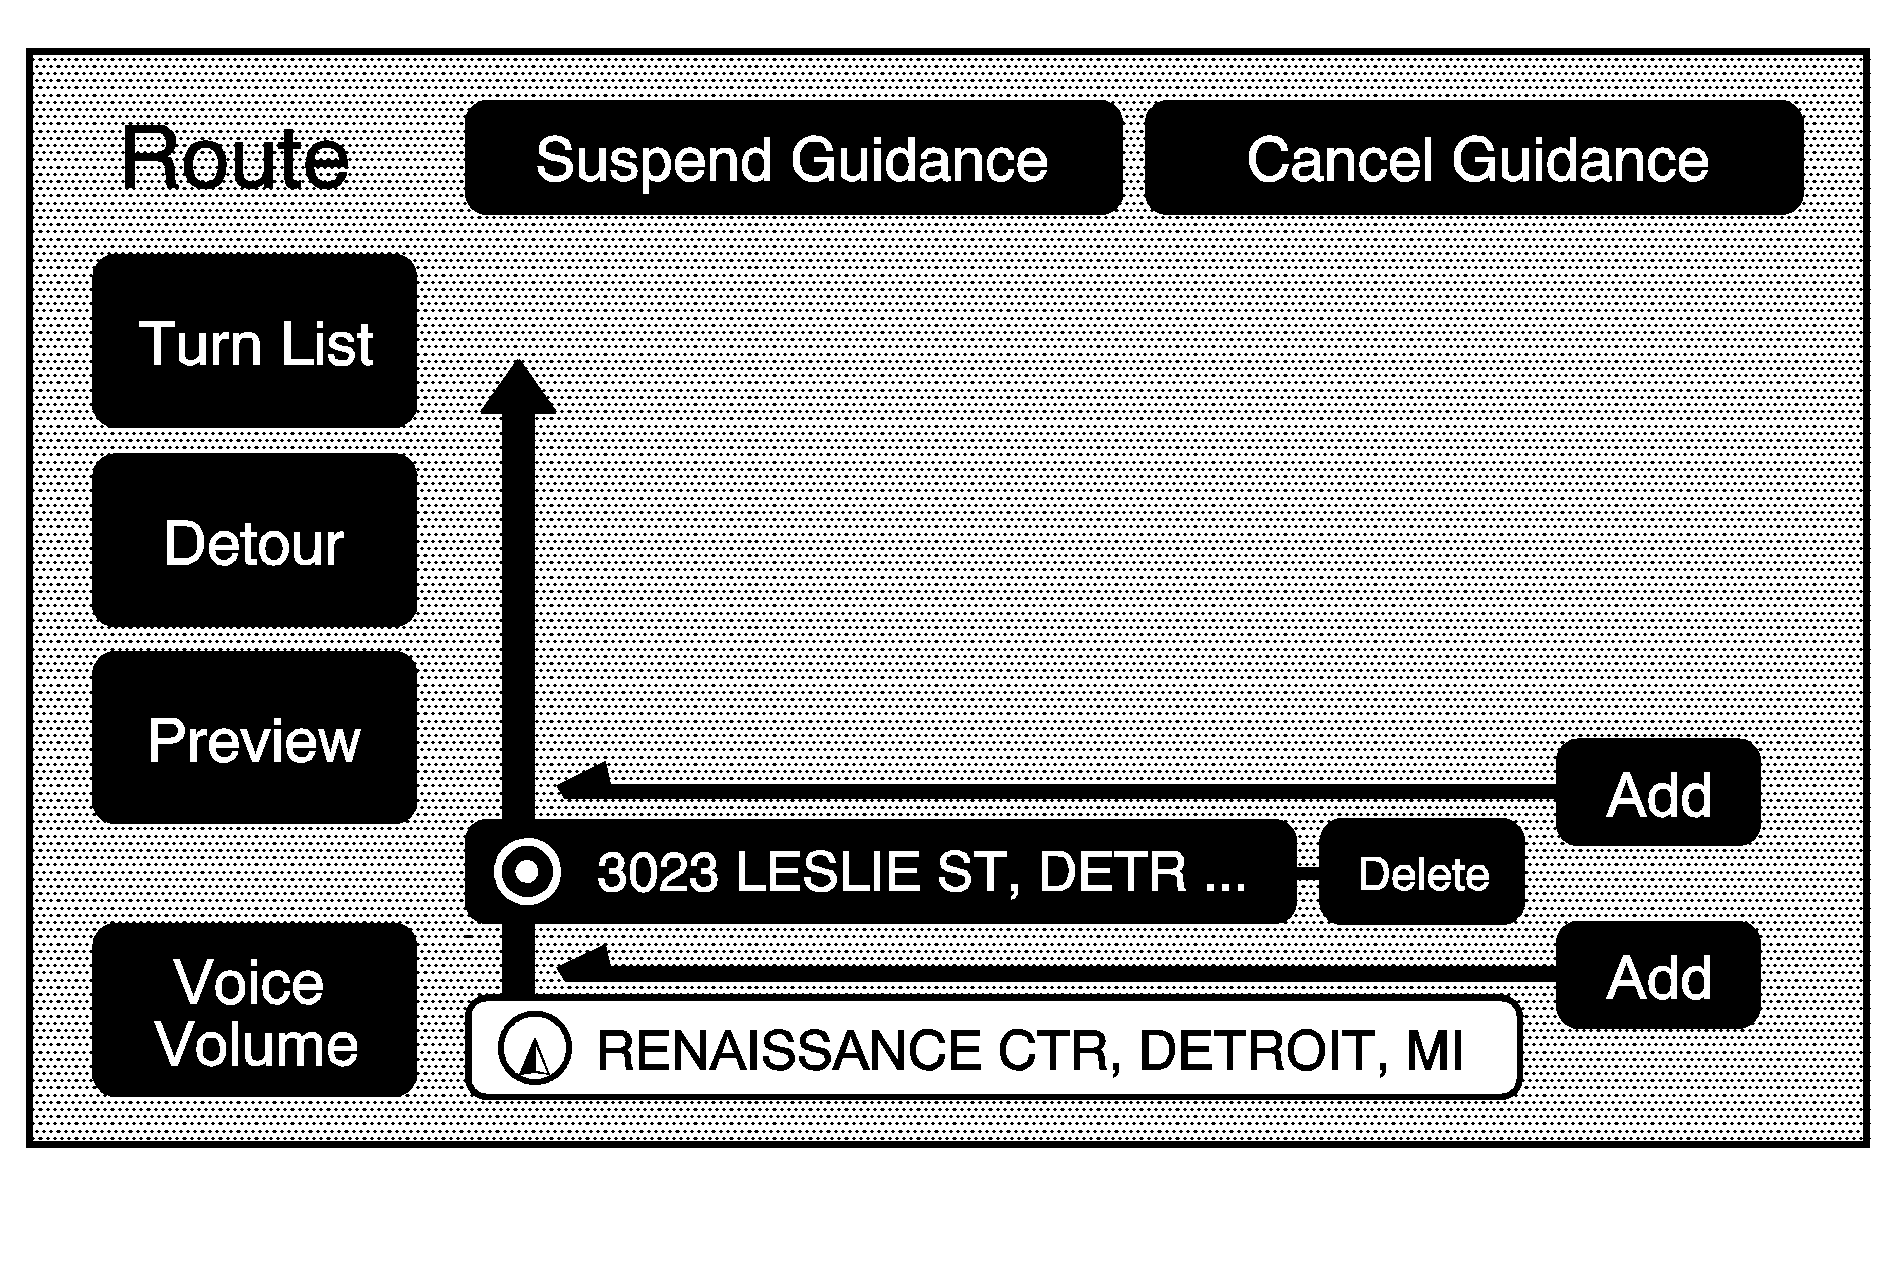
Turn List
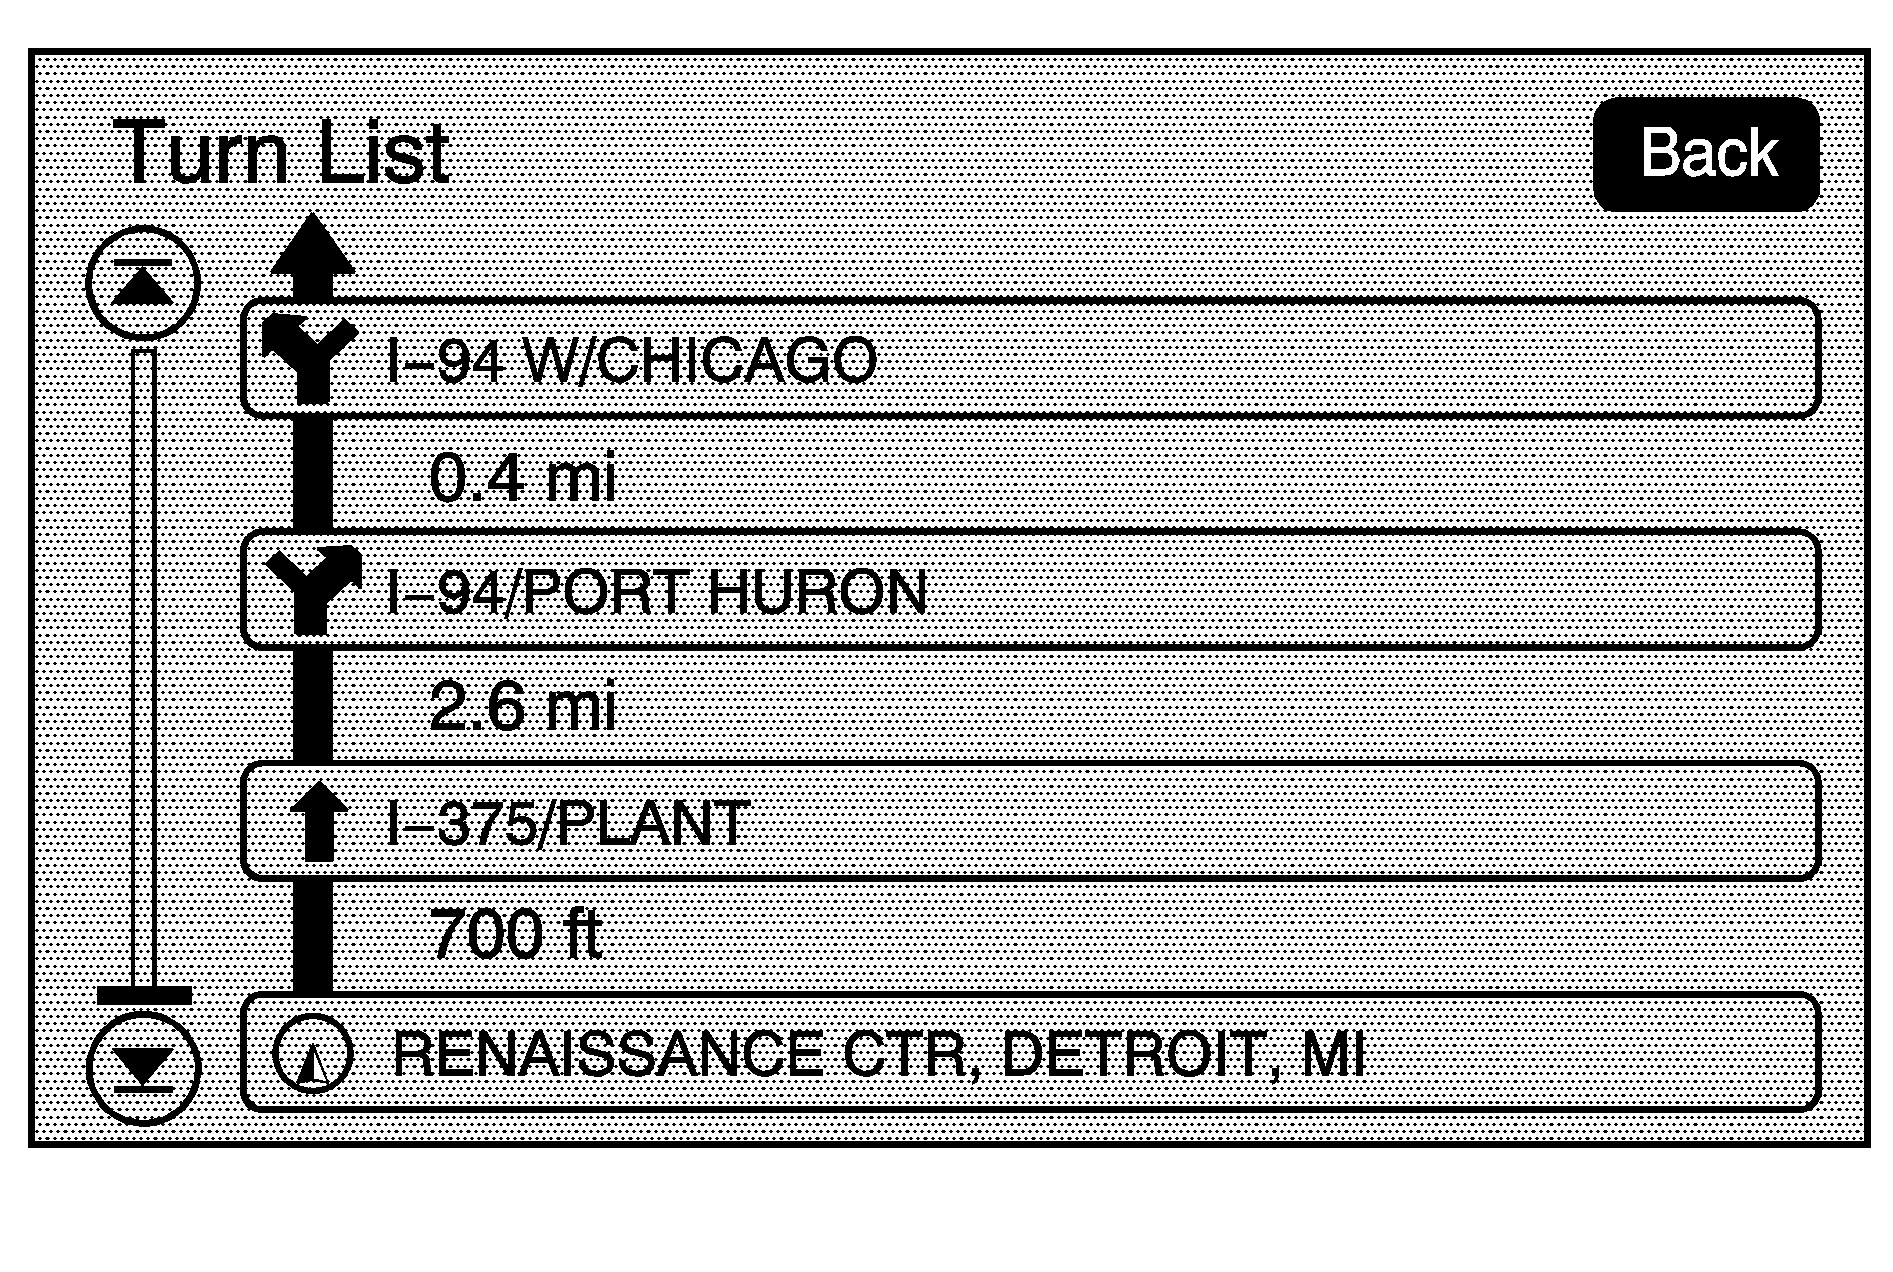
Turn List: Select this screen button, from the Route screen, to view the list of maneuvers for the entire route.
Route Preview
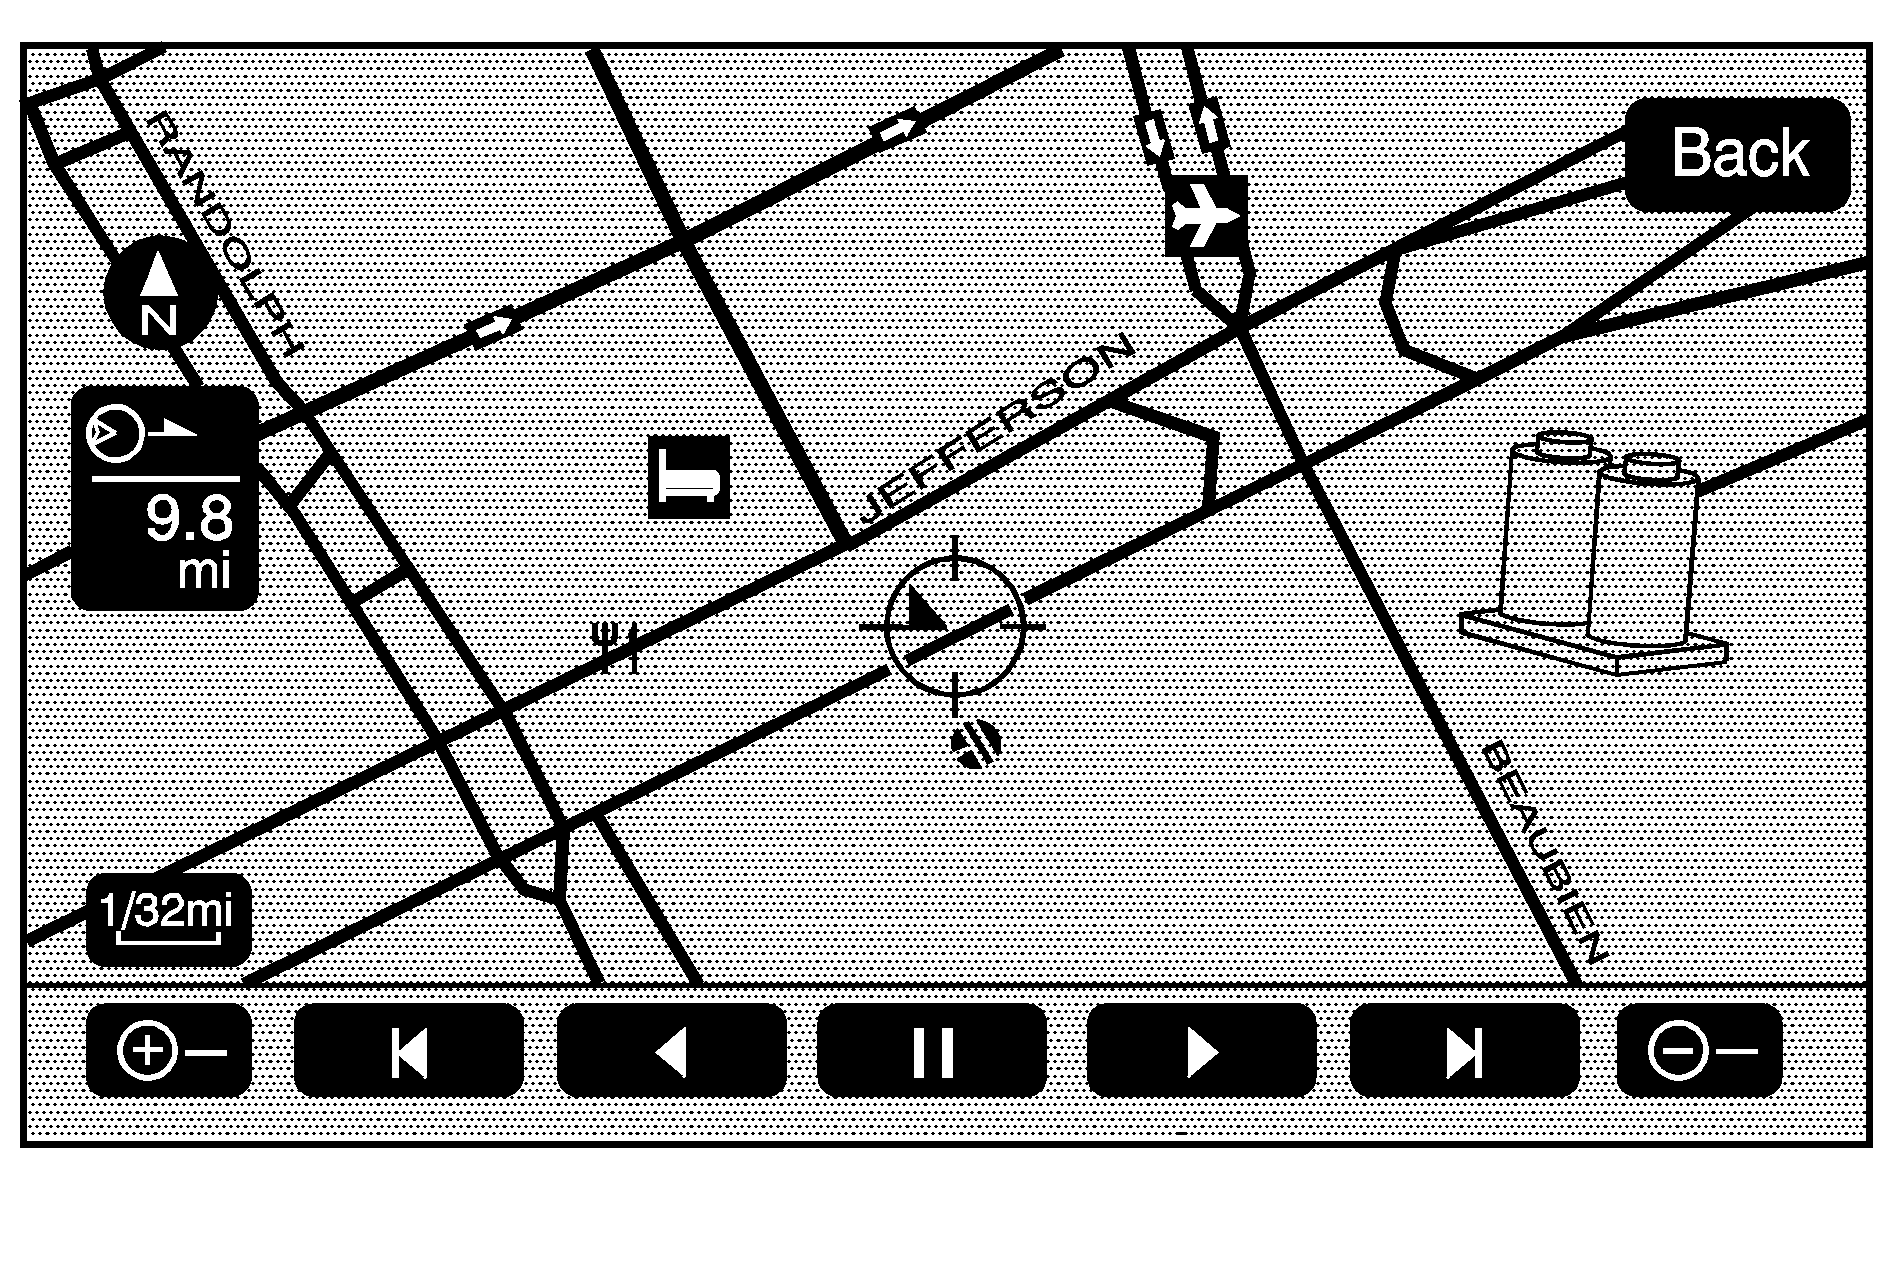
Route Preview: Select this screen button, from the Route screen, to preview the entire route in either direction.
(Reverse Skip) : Select to go back to the start point.
(Reverse Scroll): Select to reverse scroll to the start point.
(Fast Reverse Scroll): Select to fast reverse scroll to the start point. This button displays once the reverse scroll button has been selected.
(Pause): Select to pause the route preview, while in reverse, fast reverse, forward, or fast forward scroll.
(Forward Scroll): Select to forward scroll to the final destination.
(Fast Forward Scroll): Select to fast forward scroll to the final destination. This button displays once the forward scroll button has been selected.
(Fast Forward Skip): Select to go to the final destination.
Detour
Detour: Select this screen button from the Route screen, then select to detour 1, 3, 5, 15, or 25 miles (2, 5, 10, 20, or 40 km) around the current route. Select Entire Route to detour the entire route. This option is only available while driving on a route.Voice Volume
Select this screen button from the Route screen to change the volume of voice prompts. Select the Voice Guidance, Traffic Event Voice Prompt, Speech Recognition Prompt, and Speech Confirmation Prompt screen buttons to turn voice prompts on or off for each voice category. See "Nav" under Configure Menu for more information.
Add Waypoint

Add: Select this screen button from the Route screen. This feature allows up to three waypoints to be added to the current route, between one start point and final destination. Once a waypoint has been added, the points can be edited or deleted.
To add a waypoint:
- Press the DEST hard key.
- Select the Add screen button. This button only appears if a route has been calculated.
- Using the desired method of entering a destination, enter the waypoint. See "Destination" previously for more information. The system calculates and highlights the route. The route is now ready to be started.
- To add more waypoints, press the DEST hard key, then select the Add screen button, where the next waypoint should fall on the route. The system calculates and highlights the route. The route is now ready to be started.
To delete a waypoint:
- Press the DEST hard key.
- Select the Delete screen button next to the waypoint to be deleted.
- The system displays a pop-up confirmation message. Select Yes to delete the waypoint; select No to cancel this operation. The system calculates and highlights the route. The route is now ready to be started.
Suspend Guidance
Press this screen button, from the Route screen, to put the current route on hold.
Resume Guidance
Press this screen button, from the Route screen, to resume guidance on the current route.
Cancel Guidance
Press this screen button, from the Route screen, to cancel the current route. A confirmation window displays. Select Yes to cancel; No to cancel this operation.
Preset Destinations -- Adding or Changing
This feature allows addition or changes to one of six preset destinations. When a destination has been added as a preset destination, it is available to select from the Select Destination screen. See "Preset Destination" previously for information on how to select a preset destination as a final destination.
Storing the Current Destination
To store the current final destination as a preset destination:
- Select the Add screen button from the map screen. The Address Book screen appears.
- Select the Name screen button. An alpha-keyboard displays. Enter the name.
- Press and hold one of the six screen buttons at the bottom of the screen until the text within the button changes.
The name appears in that preset destination screen button and is now available to select from the Select Destination screen.
Adding or Changing Destinations
- Press the DEST hard key.
- Select the Address Book screen button.
- Select the address book entry to add or change.
- Press and hold one of the six screen buttons at the bottom of the screen until the text within the button changes.
The name appears in that preset destination screen button and is now available to select from the Select Destination screen.
Address Book -- Storing Destinations
To store the current final destination to the address book, press the Add screen button from the map screen while scrolled to the final destination. The system automatically saves the final destination information in the address book.
Address Book -- Editing and Deleting Entries
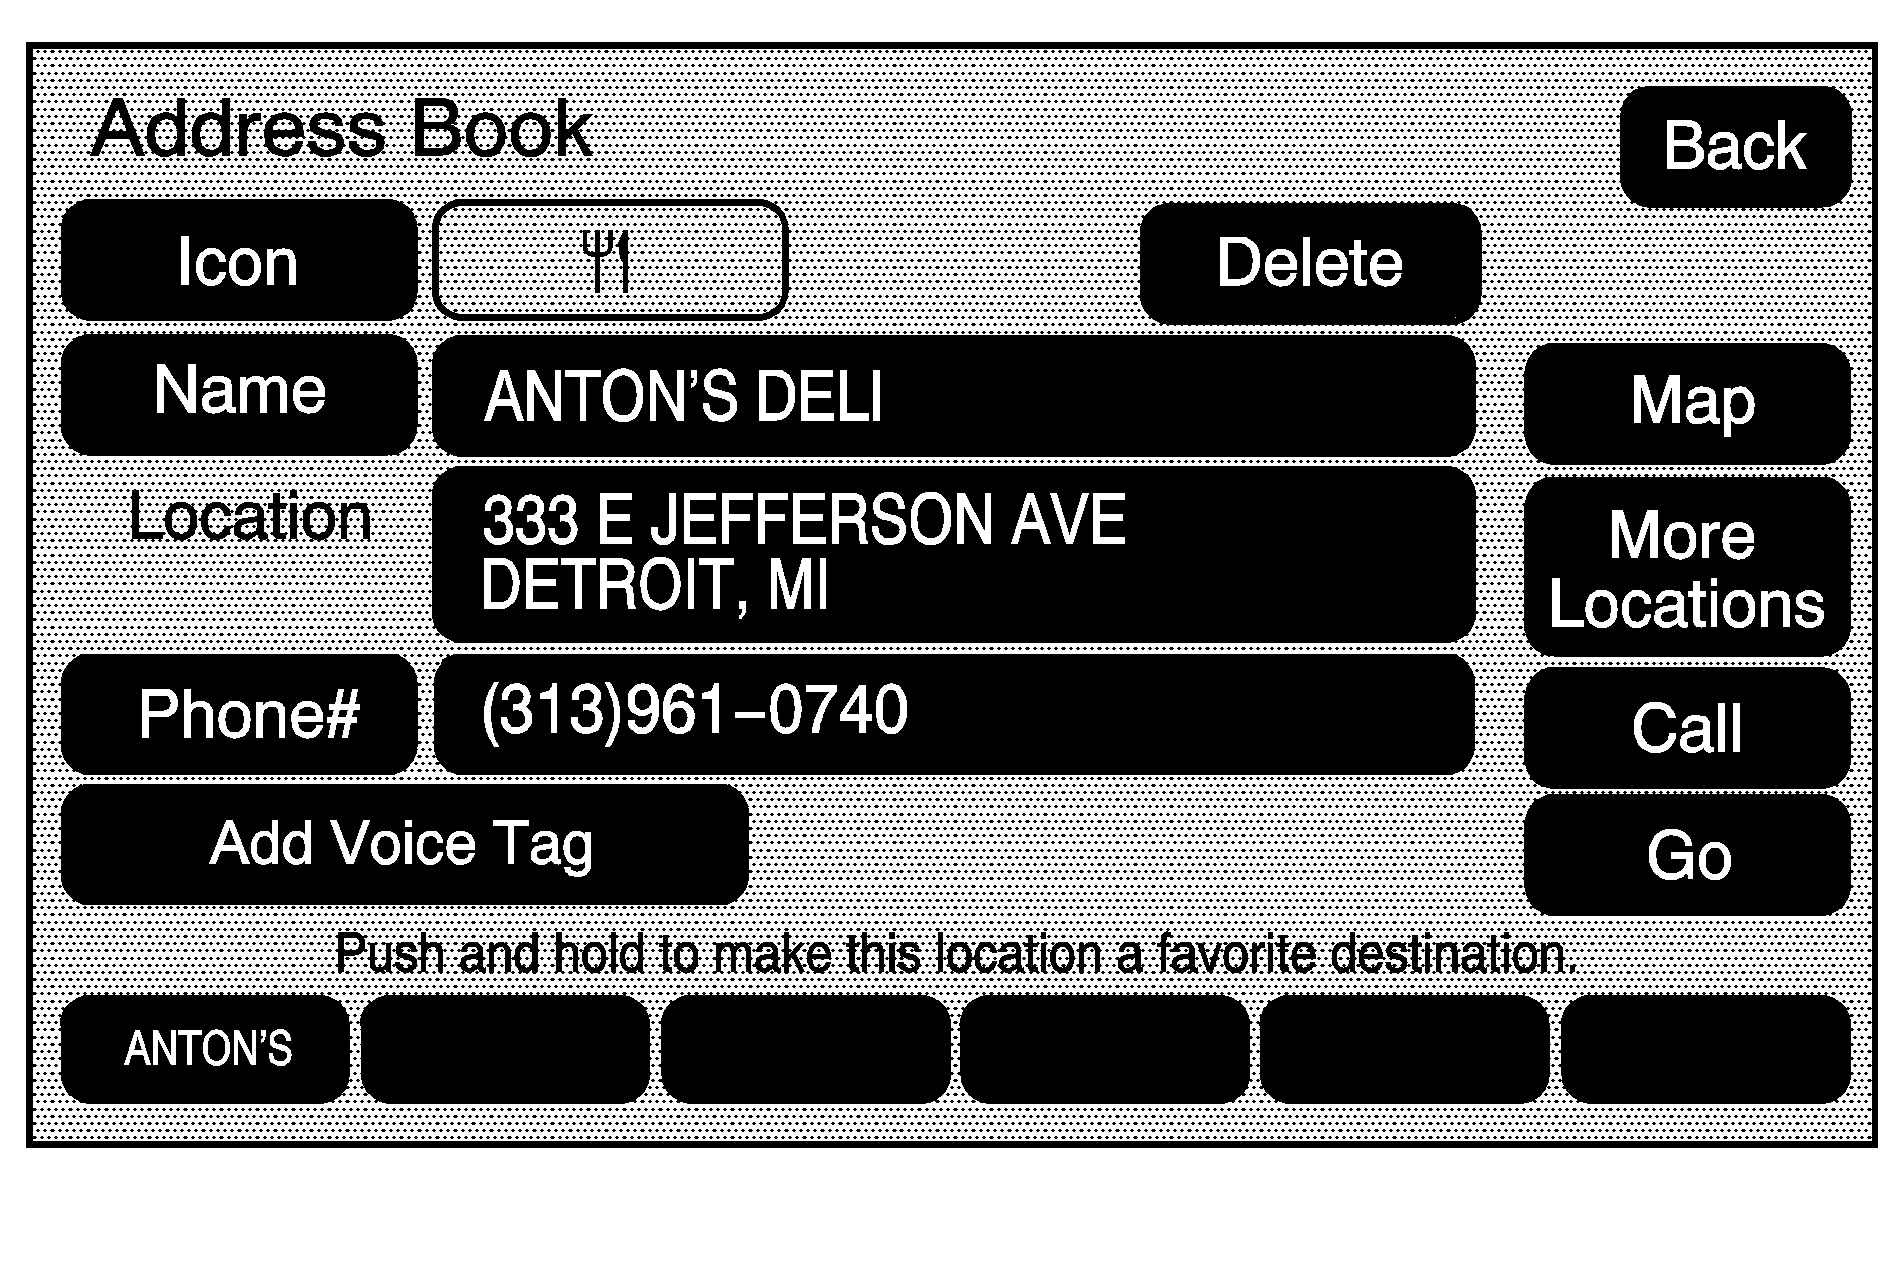
To edit the name of an address book:
- Press the DEST hard key.
- Select the Address Book screen button. A list of address book entries will display. Use the scroll arrows to the left to scroll through the list.
- Select the address book entry to change.
- Touch the Name screen button and use the alpha keyboard to edit or add the name.
- Touch the OK screen button to save the changes.
To add or change the phone number of an address book entry:
- Press the DEST hard key.
- Select the Address Book screen button. A list of address book entries display. Use the scroll arrows to the left to scroll through the list.
- Select the address book entry to change.
- Touch the Phone # screen button and use the numeric keyboard to enter or change the phone number.
- Touch the OK screen button to save your changes.
To change the map icon of an address book entry:
- Press the DEST hard key.
- Select the Address Book screen button. A list of address book entries display. Use the scroll arrows to the left to scroll through the list.
- Select the address book entry to change.
- Touch the Icon screen button.
- Select an icon from the list.
To add a voice tag to an address book entry:
- Press the DEST hard key.
- Select the Address Book screen button. A list of address book entries display. Use the scroll arrows to the left to scroll through the list.
- Select the address book entry to change.
- Touch the Add Voice Tag screen button.
- The system asks that you state the name. You will have two seconds to state the name. The system responds back with the name.
To delete an address book entry:
- Press the DEST hard key.
- Select the Address Book screen button. A list of address book entries display. Use the scroll arrows to the left to scroll through the list.
- Select the address book entry to delete.
- Touch the Delete screen button to delete the address book entry. A confirmation displays.
Previous Destinations -- Deleting
To delete all previous destinations.
- Press the DEST hard key.
- Select the Previous Destination screen button.
- Touch the Delete All screen button. A confirmation window displays. Select Yes to cancel; No to cancel this operation.
