GM Service Manual Online
For 1990-2009 cars only

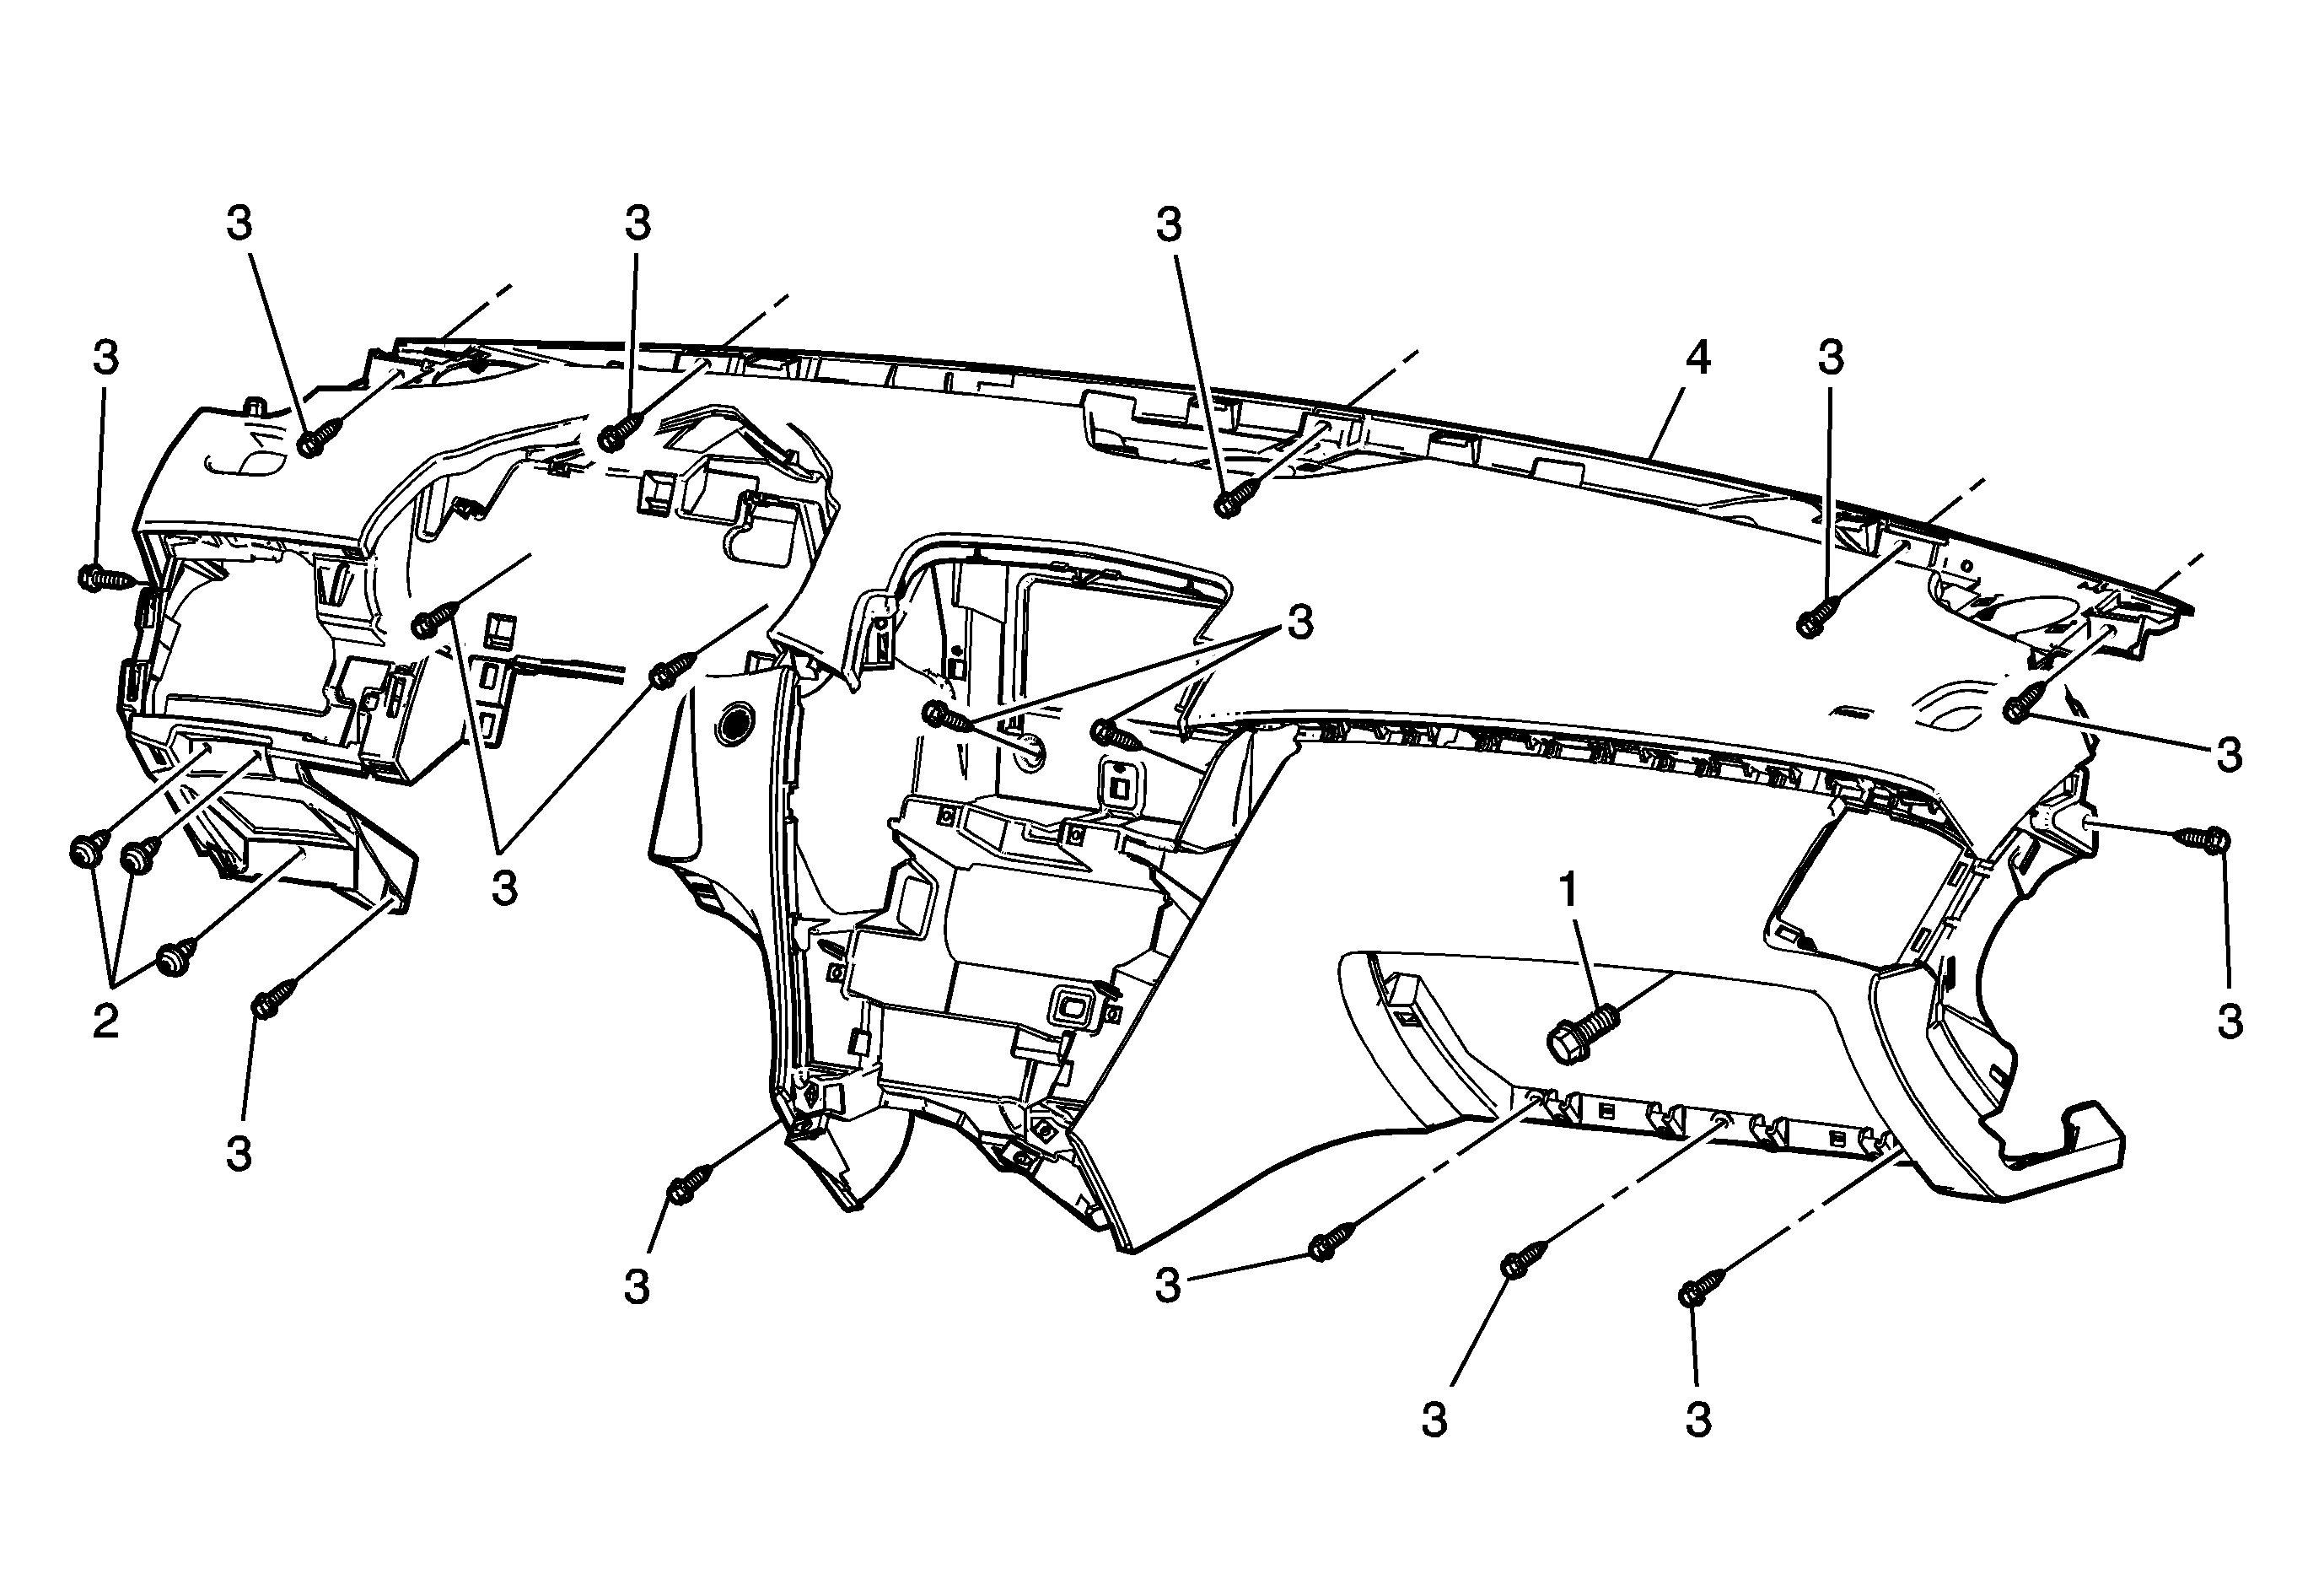
Instrument Panel Lower Trim Panel Replacement Left Hand Drive


Object Number: 1968773  Size: MF

Callout

Component Name

Preliminary Procedure

  1. Remove the front floor console assembly. Refer to Front Floor Console Replacement.
  2. Disable the SIR system. Refer to SIR Disabling and Enabling.
  3. Remove the radio front speakers. Refer to Radio Front Speaker Replacement.
  4. Remove the radio. Refer to Radio Replacement.
  5. Remove the radio, video, audio disc player, and navigation information display assembly, if equipped. Refer to Radio, Video, Audio Disc Player, and Navigation Information Display Replacement.
  6. Remove the left and right instrument panel insulators. Refer to Instrument Panel Insulator Replacement - Left Side and Instrument Panel Insulator Replacement - Right Side.
  7. Remove the steering column assembly. Refer to Steering Column Replacement.
  8. Remove the instrument panel cluster assembly. Refer to Instrument Cluster Replacement.
  9. Remove the instrument panel compartment assembly. Refer to Instrument Panel Compartment Replacement.
  10. Remove the right, left, and center instrument panel trim panel appliques. Refer to Instrument Panel Trim Plate Applique Replacement - Right Side and Instrument Panel Trim Plate Applique Replacement - Left Side and Instrument Panel Trim Plate Applique Replacement - Center.
  11. Remove the right and left instrument panel flood lamp assemblies. Refer to Instrument Panel Flood Lamp Replacement - Left Side and Instrument Panel Flood Lamp Replacement - Right Side.
  12. Remove the left and right instrument panel air outlet deflector assemblies. Refer to Instrument Panel Outer Air Outlet Deflector Replacement - Left Side and Instrument Panel Outer Air Outlet Deflector Replacement - Right Side.
  13. Prior to removal of the instrument panel lower trim panel assembly, note the routing of the instrument panel wiring harness and connector locations to ensure proper reinstallation.

1

Instrument Panel Inflatable Restraint Bolt (Qty: 1)

Caution: Refer to Fastener Caution in the Preface section.

Tighten
10 N·m (89 lb in)

2

Parking Brake Lever Bracket Reinforcement Screw (Qty: 3)

Tighten
2.5 N·m (22 lb in)

3

Instrument Panel Lower Trim Panel Bolt/Screws (Qty: 16)

Tighten
2.5 N·m (22 lb in)

4

Instrument Panel Lower Trim Panel Assembly

Procedure

  1. Disconnect the instrument panel wiring harness from the instrument panel lower trim panel assembly and position out of the way.
  2. When replacing the instrument panel lower trim panel assembly, transfer all necessary components.

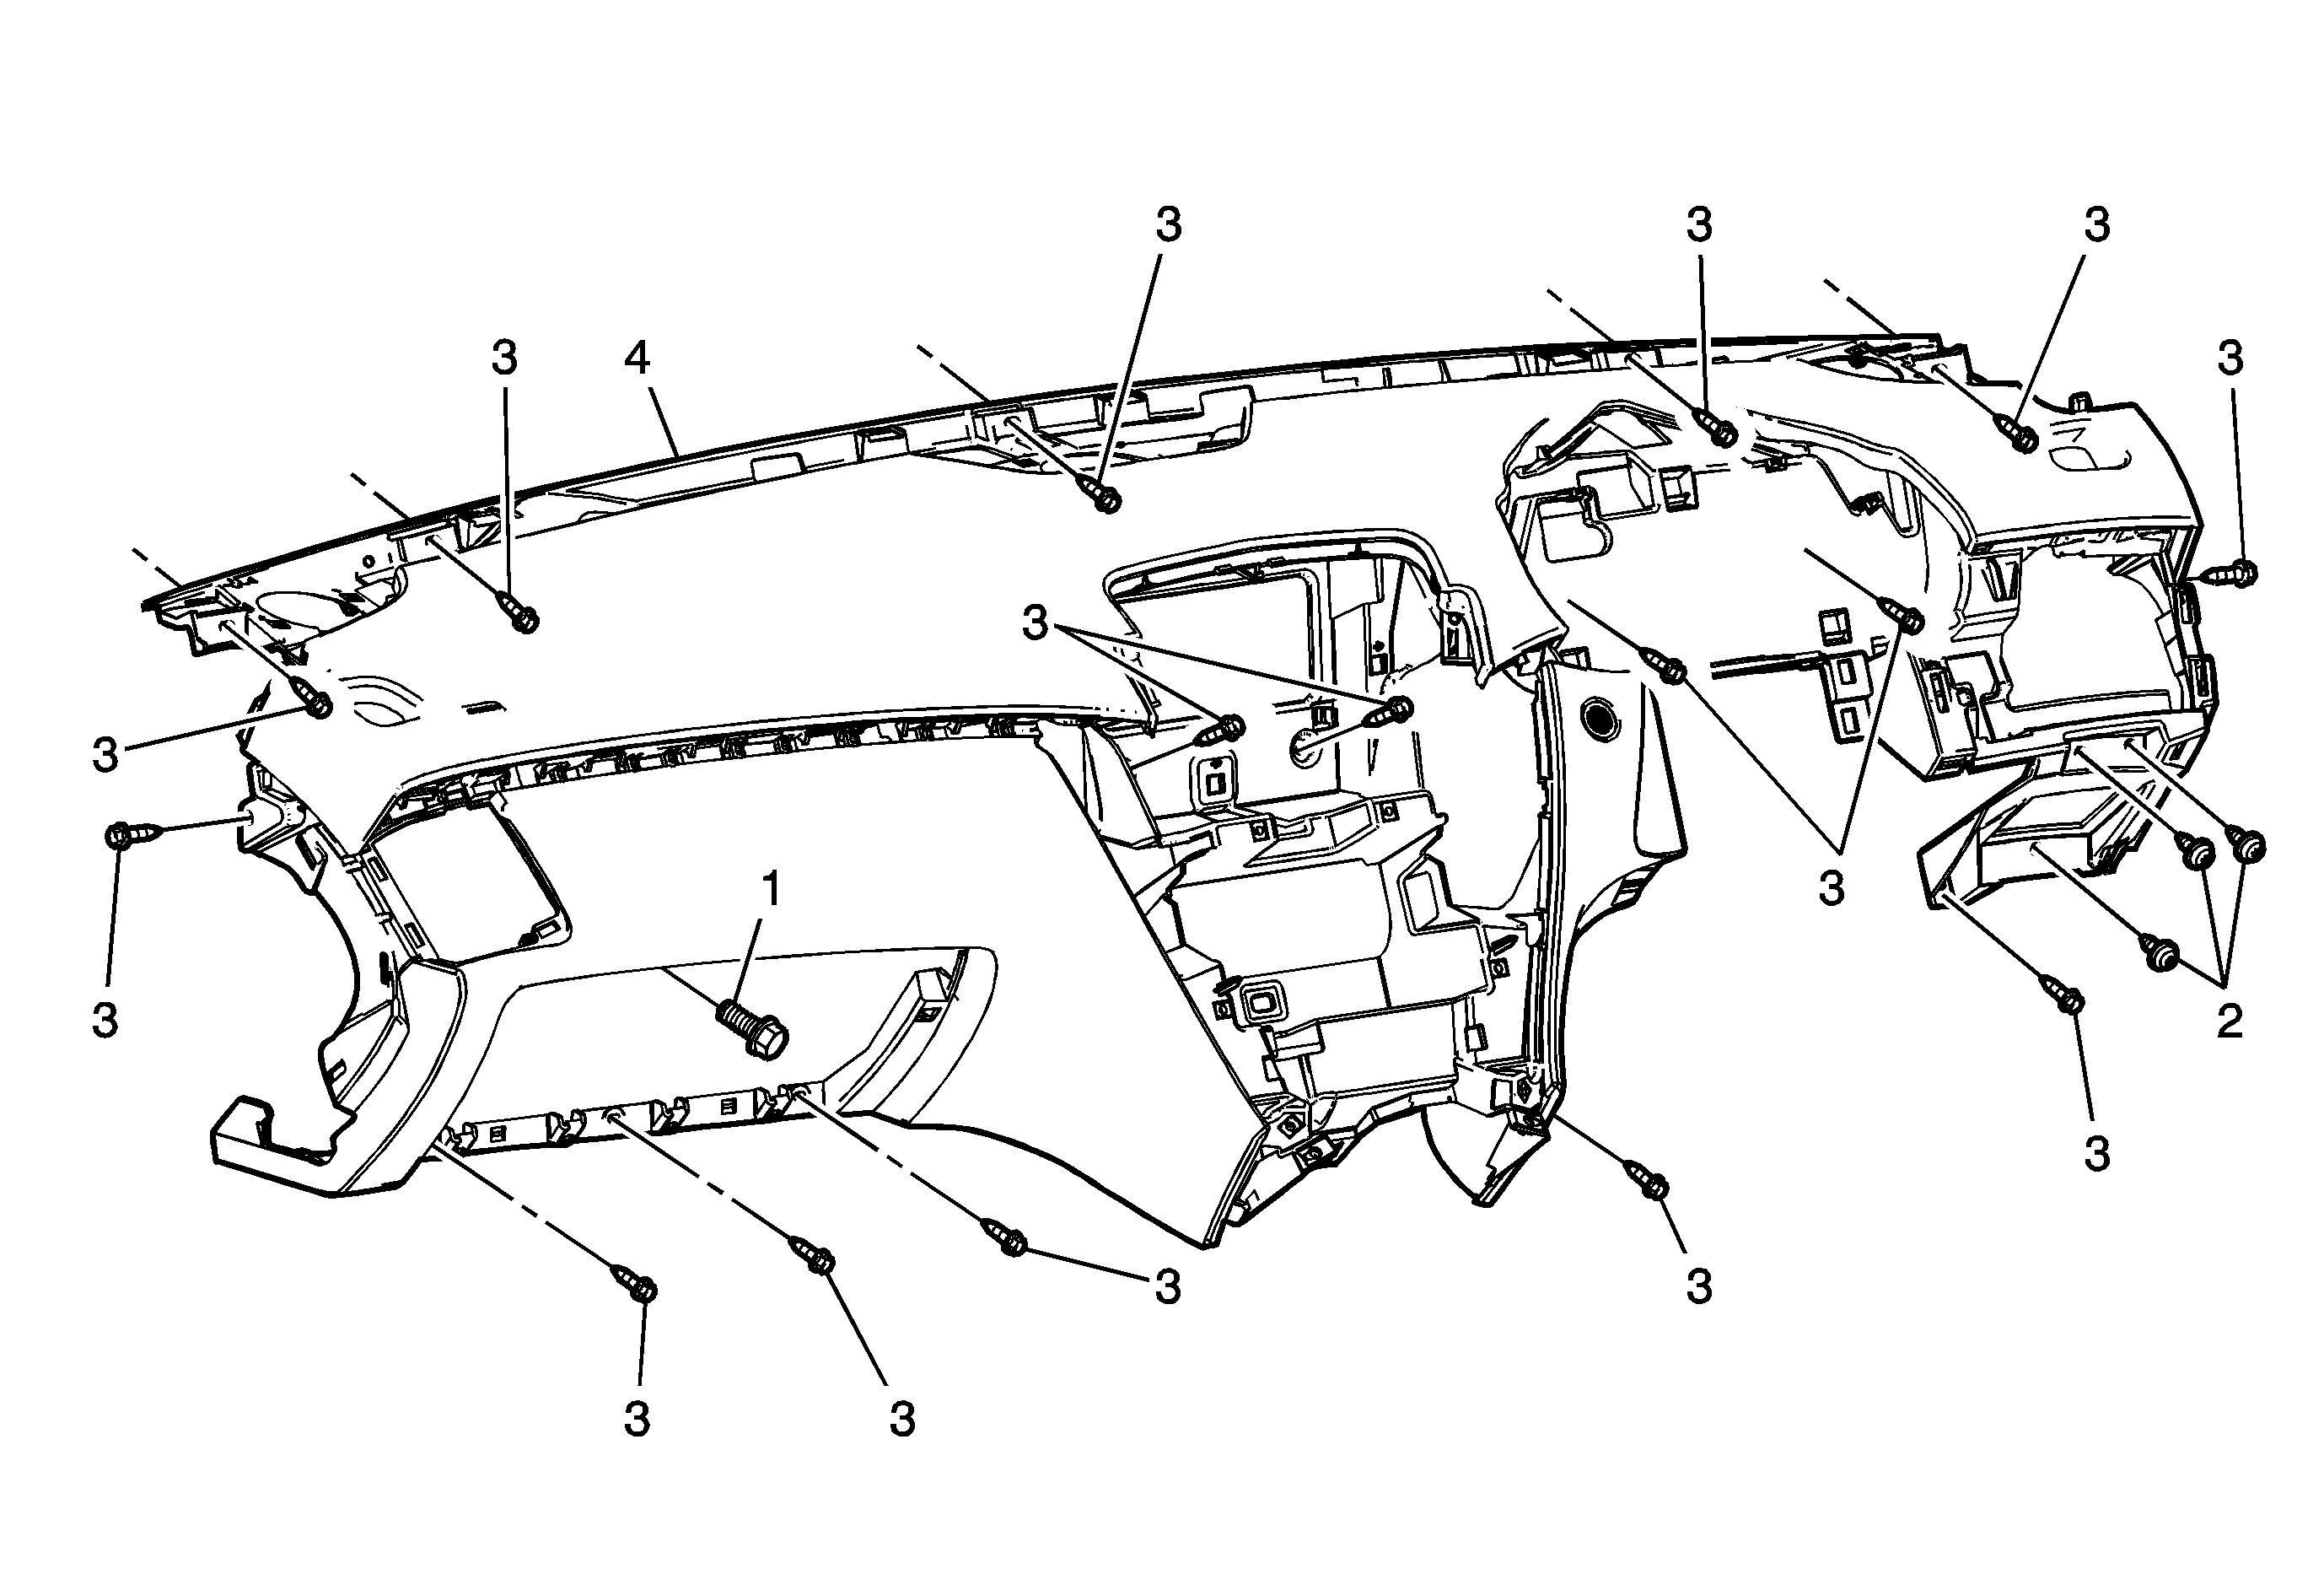
Instrument Panel Lower Trim Panel Replacement Right Hand Drive


Object Number: 2099239  Size: MF

Callout

Component Name

Preliminary Procedure

  1. Remove the front floor console assembly. Refer to Front Floor Console Replacement.
  2. Disable the SIR system. Refer to SIR Disabling and Enabling.
  3. Remove the radio front speakers. Refer to Radio Front Speaker Replacement.
  4. Remove the radio. Refer to Radio Replacement.
  5. Remove the radio, video, audio disc player, and navigation information display assembly, if equipped. Refer to Radio, Video, Audio Disc Player, and Navigation Information Display Replacement.
  6. Remove the left and right instrument panel insulators. Refer to Instrument Panel Insulator Replacement - Left Side and Instrument Panel Insulator Replacement - Right Side.
  7. Remove the steering column assembly. Refer to Steering Column Replacement.
  8. Remove the instrument panel cluster assembly. Refer to Instrument Cluster Replacement.
  9. Remove the instrument panel compartment assembly. Refer to Instrument Panel Compartment Replacement.
  10. Remove the right, left, and center instrument panel trim panel appliques. Refer to Instrument Panel Trim Plate Applique Replacement - Right Side and Instrument Panel Trim Plate Applique Replacement - Left Side and Instrument Panel Trim Plate Applique Replacement - Center.
  11. Remove the right and left instrument panel flood lamp assemblies. Refer to Instrument Panel Flood Lamp Replacement - Left Side and Instrument Panel Flood Lamp Replacement - Right Side.
  12. Remove the left and right instrument panel air outlet deflector assemblies. Refer to Instrument Panel Outer Air Outlet Deflector Replacement - Left Side and Instrument Panel Outer Air Outlet Deflector Replacement - Right Side.
  13. Prior to removal of the instrument panel lower trim panel assembly, note the routing of the instrument panel wiring harness and connector locations to ensure proper reinstallation.

1

Instrument Panel Inflatable Restraint Bolt (Qty: 1)

Caution: Refer to Fastener Caution in the Preface section.

Tighten
10 N·m (89 lb in)

2

Parking Brake Lever Bracket Reinforcement Screw (Qty: 3)

Tighten
2.5 N·m (22 lb in)

3

Instrument Panel Lower Trim Panel Bolt/Screws (Qty: 16)

Tighten
2.5 N·m (22 lb in)

4

Instrument Panel Lower Trim Panel Assembly

Procedure

  1. Disconnect the instrument panel wiring harness from the instrument panel lower trim panel assembly and position out of the way.
  2. When replacing the instrument panel lower trim panel assembly, transfer all necessary components.