Power Vacuum Brake Booster Replacement LHD
Special Tools
J-22805-B Brake Booster Holder
Removal Procedure
- Remove the left side instrument panel insulator panel. Refer to Instrument Panel Insulator Replacement - Left Side.
- Without disconnecting the steering column from the intermediate shaft, lower and support the steering column. Refer to Steering Column Replacement.
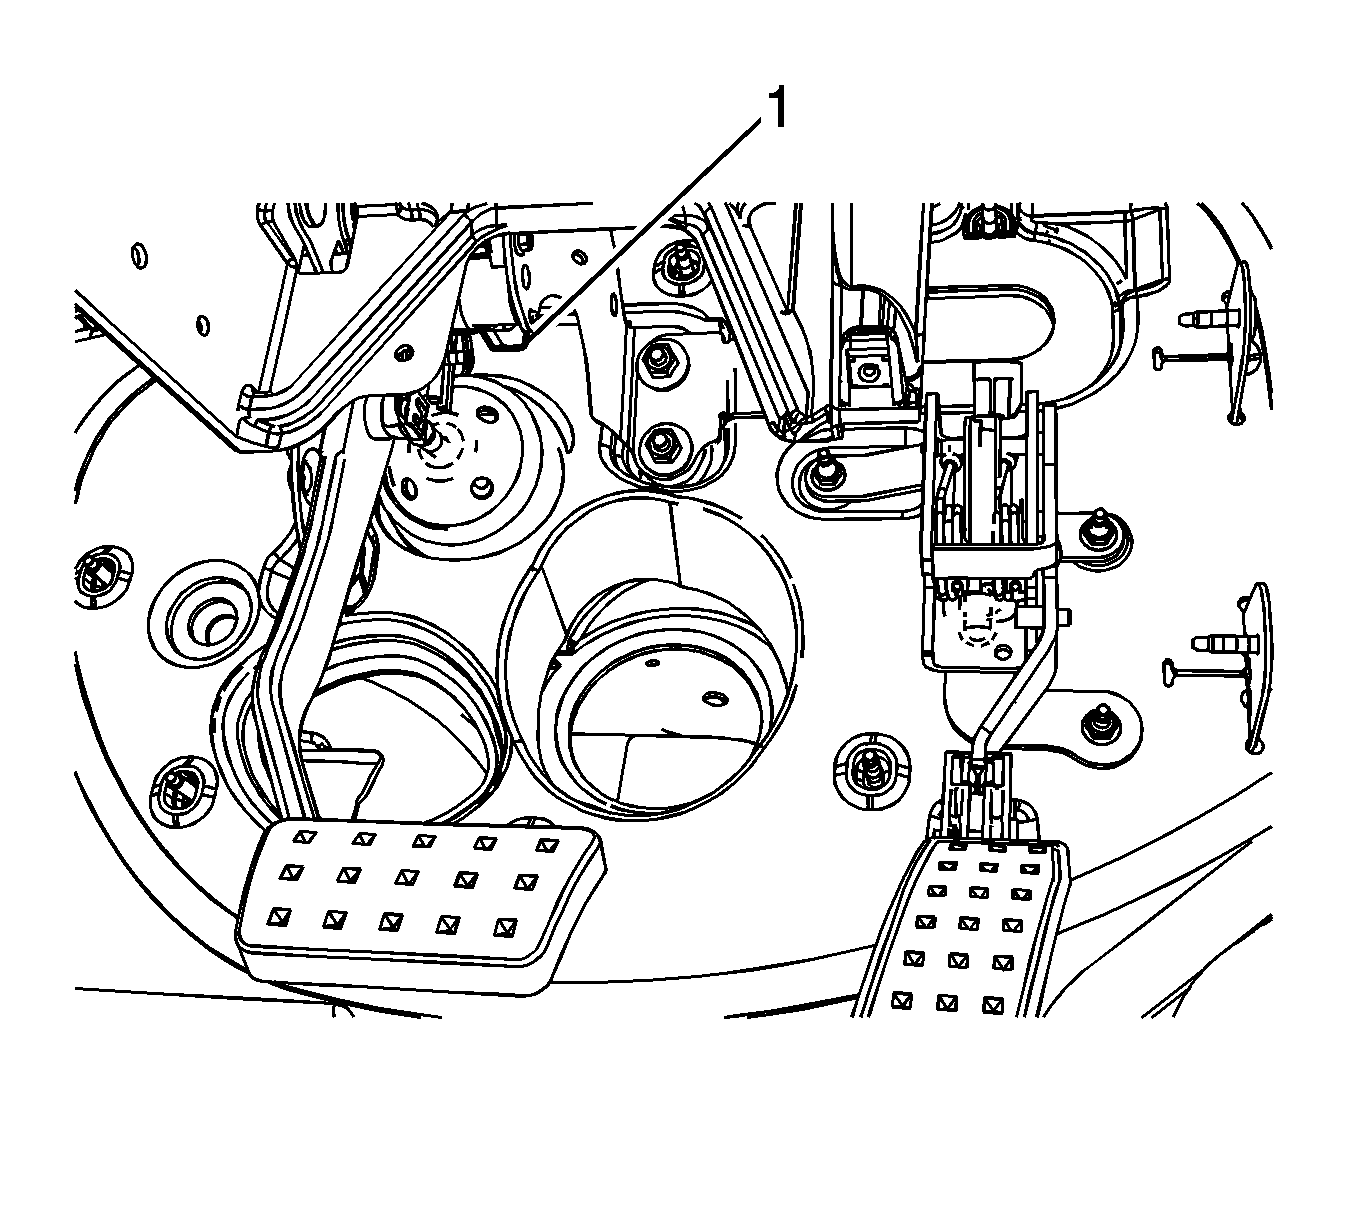
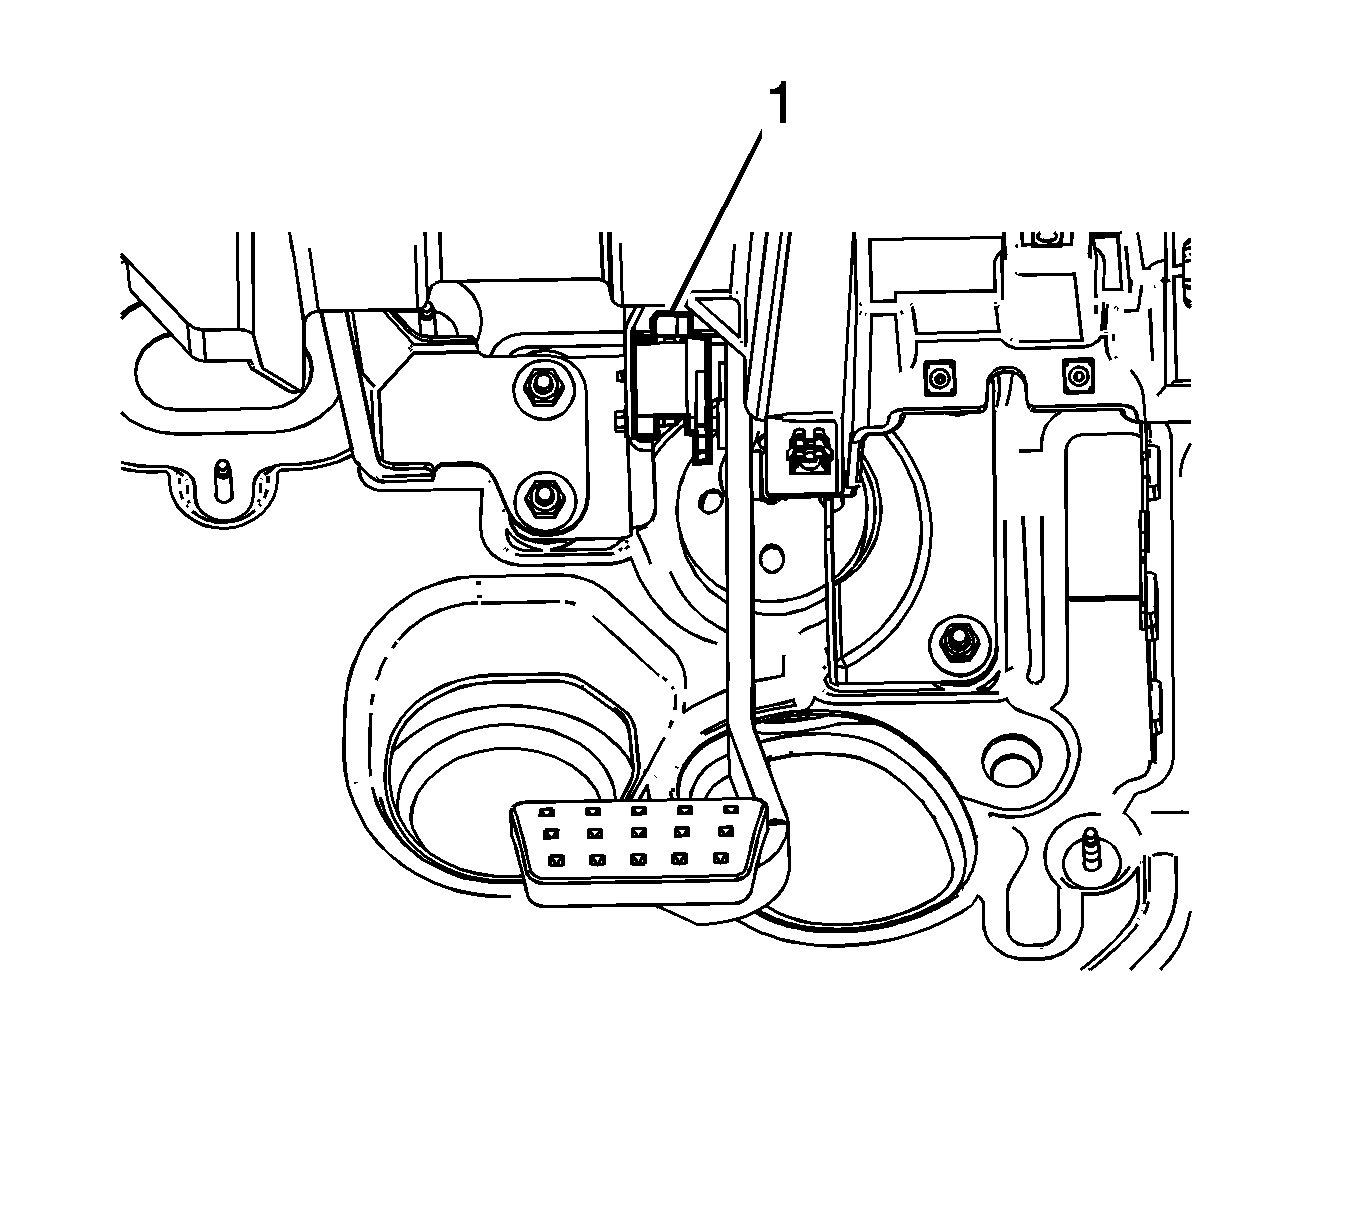
- Disconnect the brake pedal position sensor electrical connector (1).
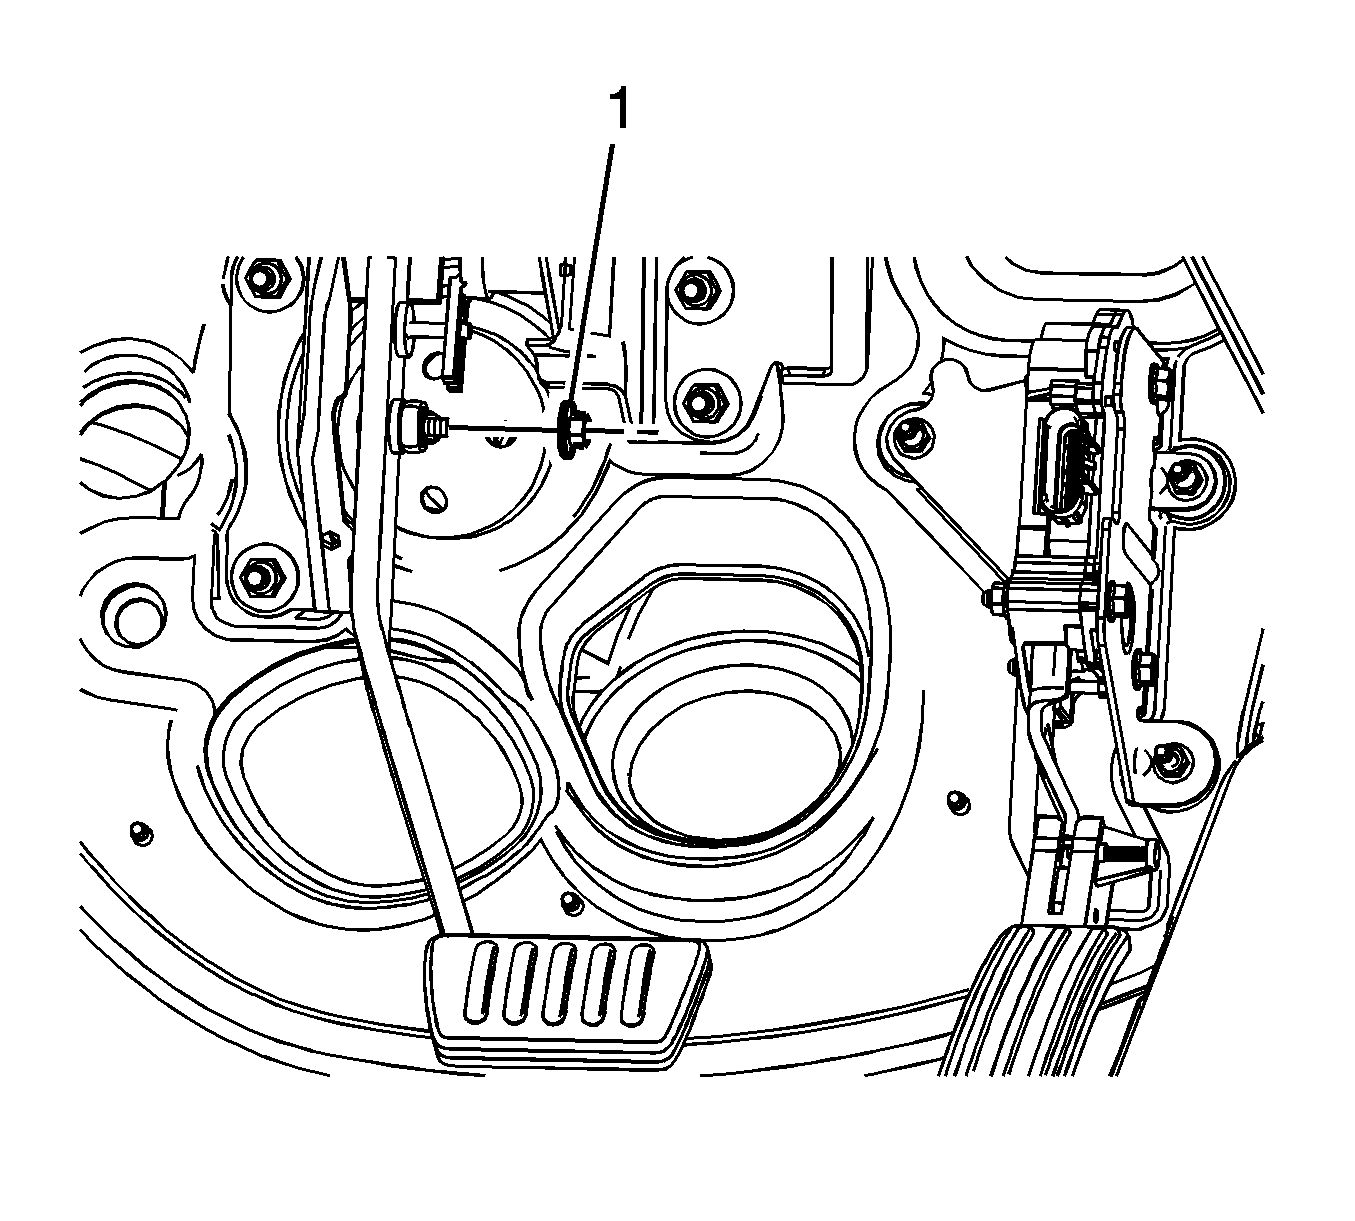
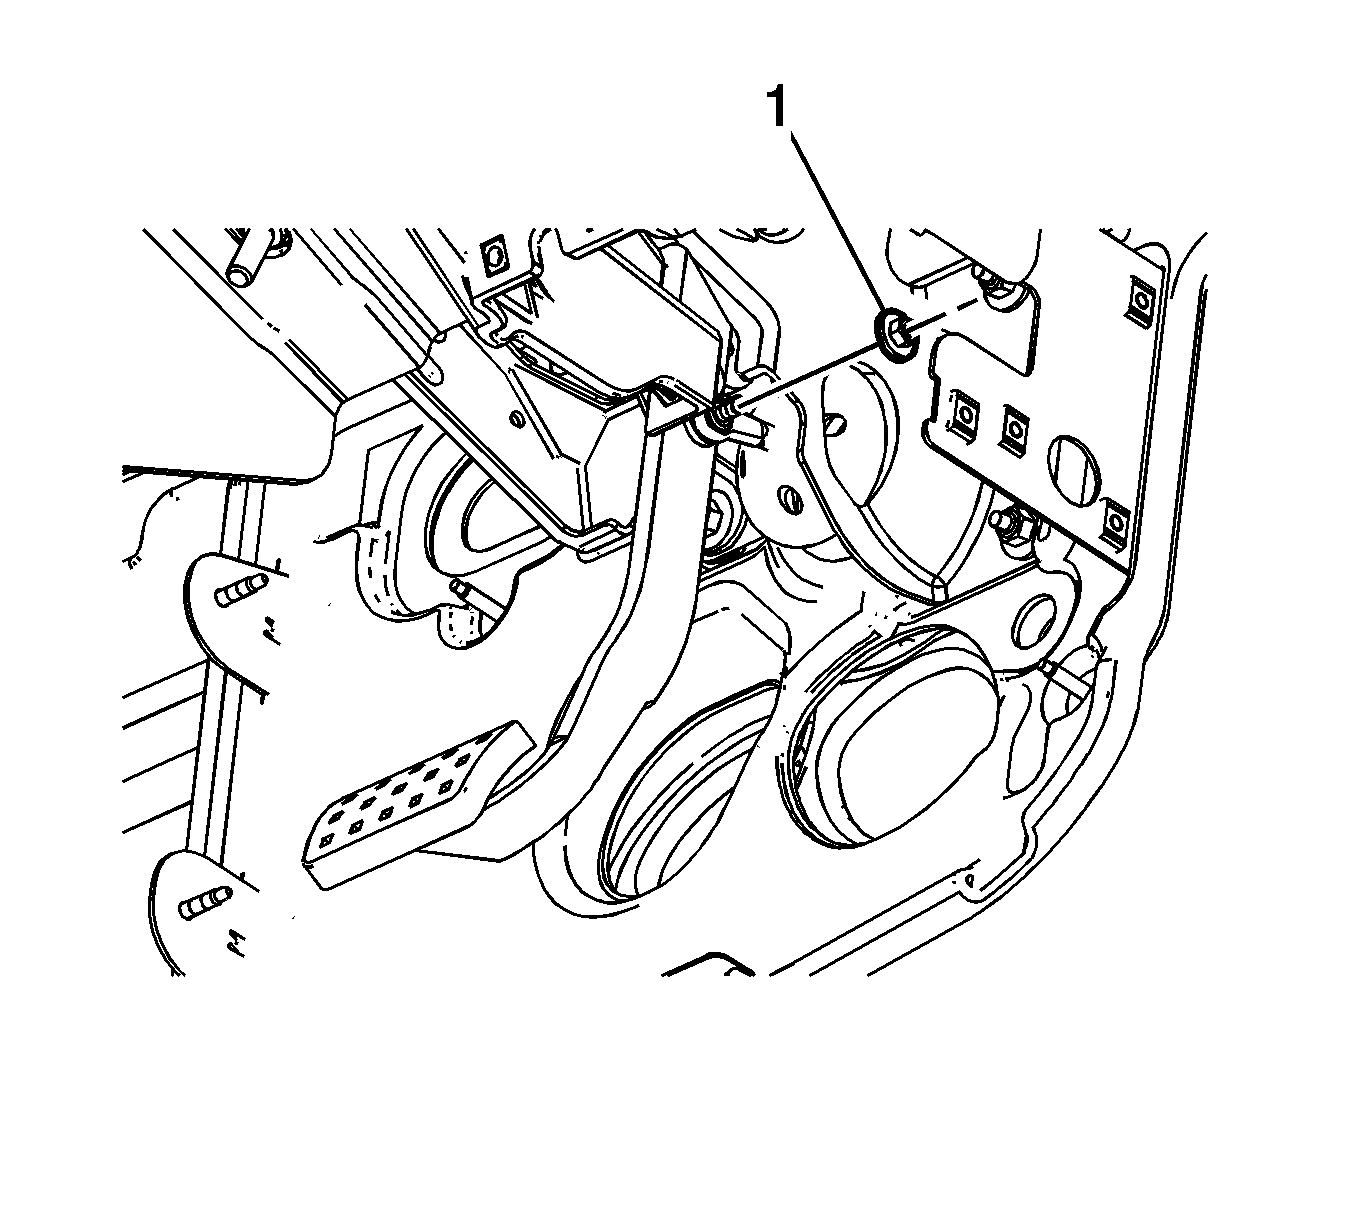
- Remove the power vacuum brake booster pushrod nut (1).
- Disconnect the power vacuum brake booster pushrod from the brake pedal pivot.
- Remove the cross vehicle brace, if equipped. Refer to Cross Vehicle Brace Replacement.
- Disconnect the brake fluid level indicator switch electrical connector.
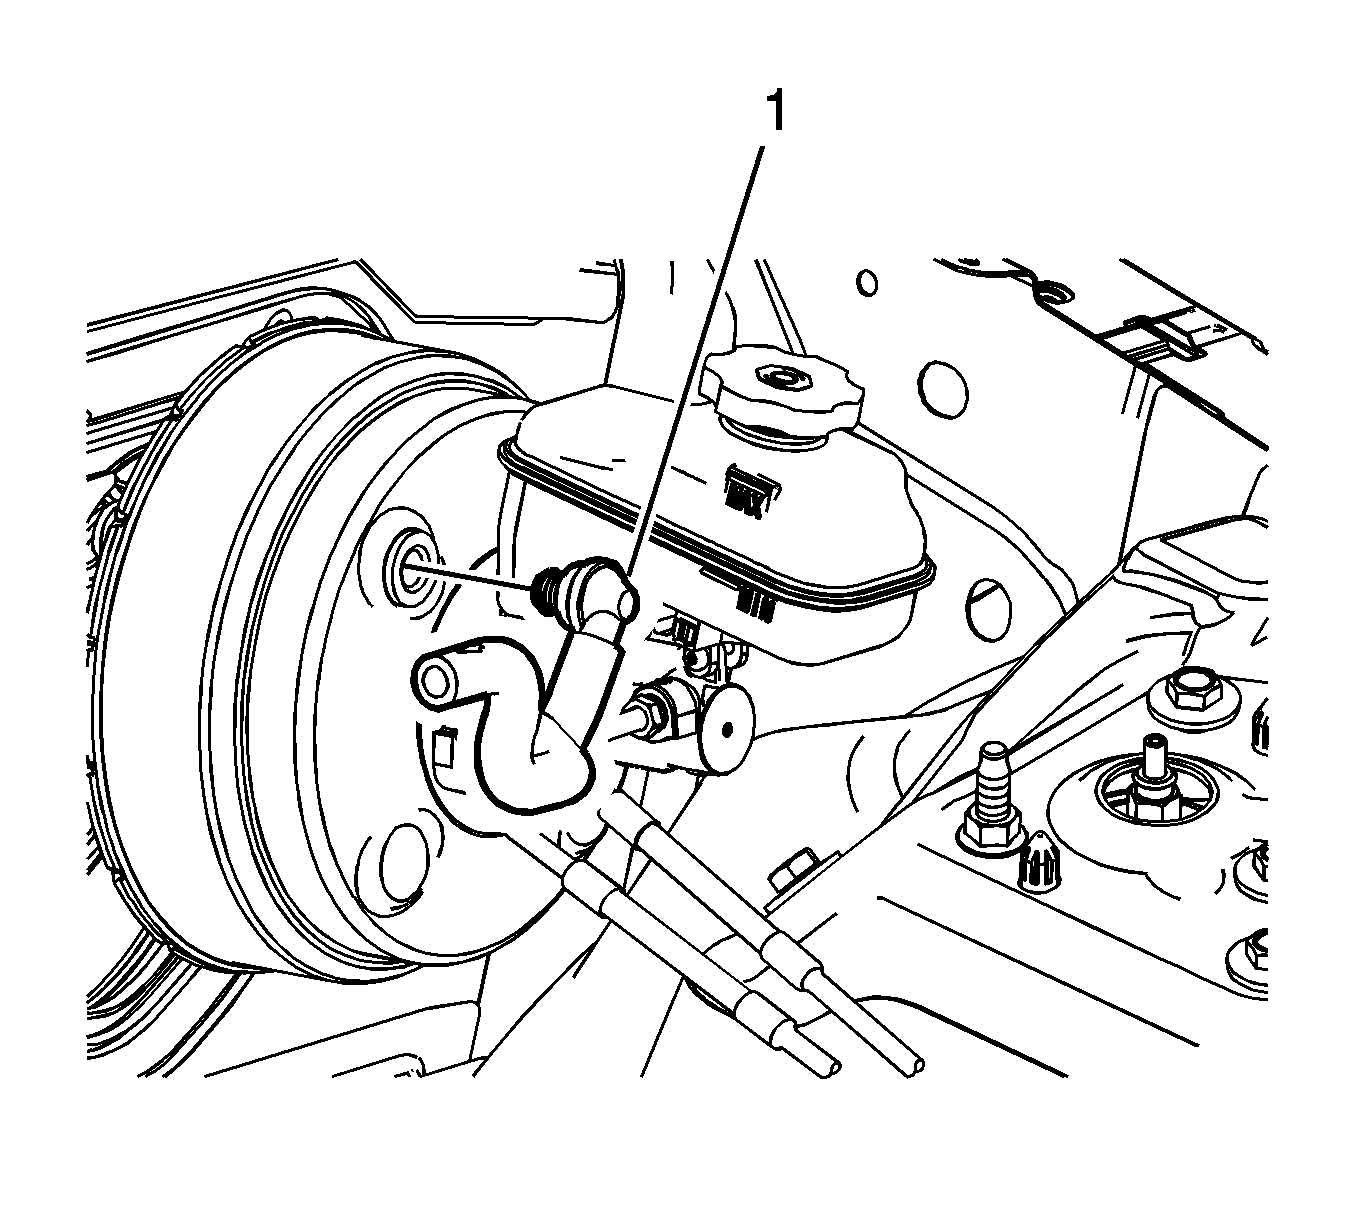
- Disconnect the power vacuum brake booster check valve and hose assembly (1).
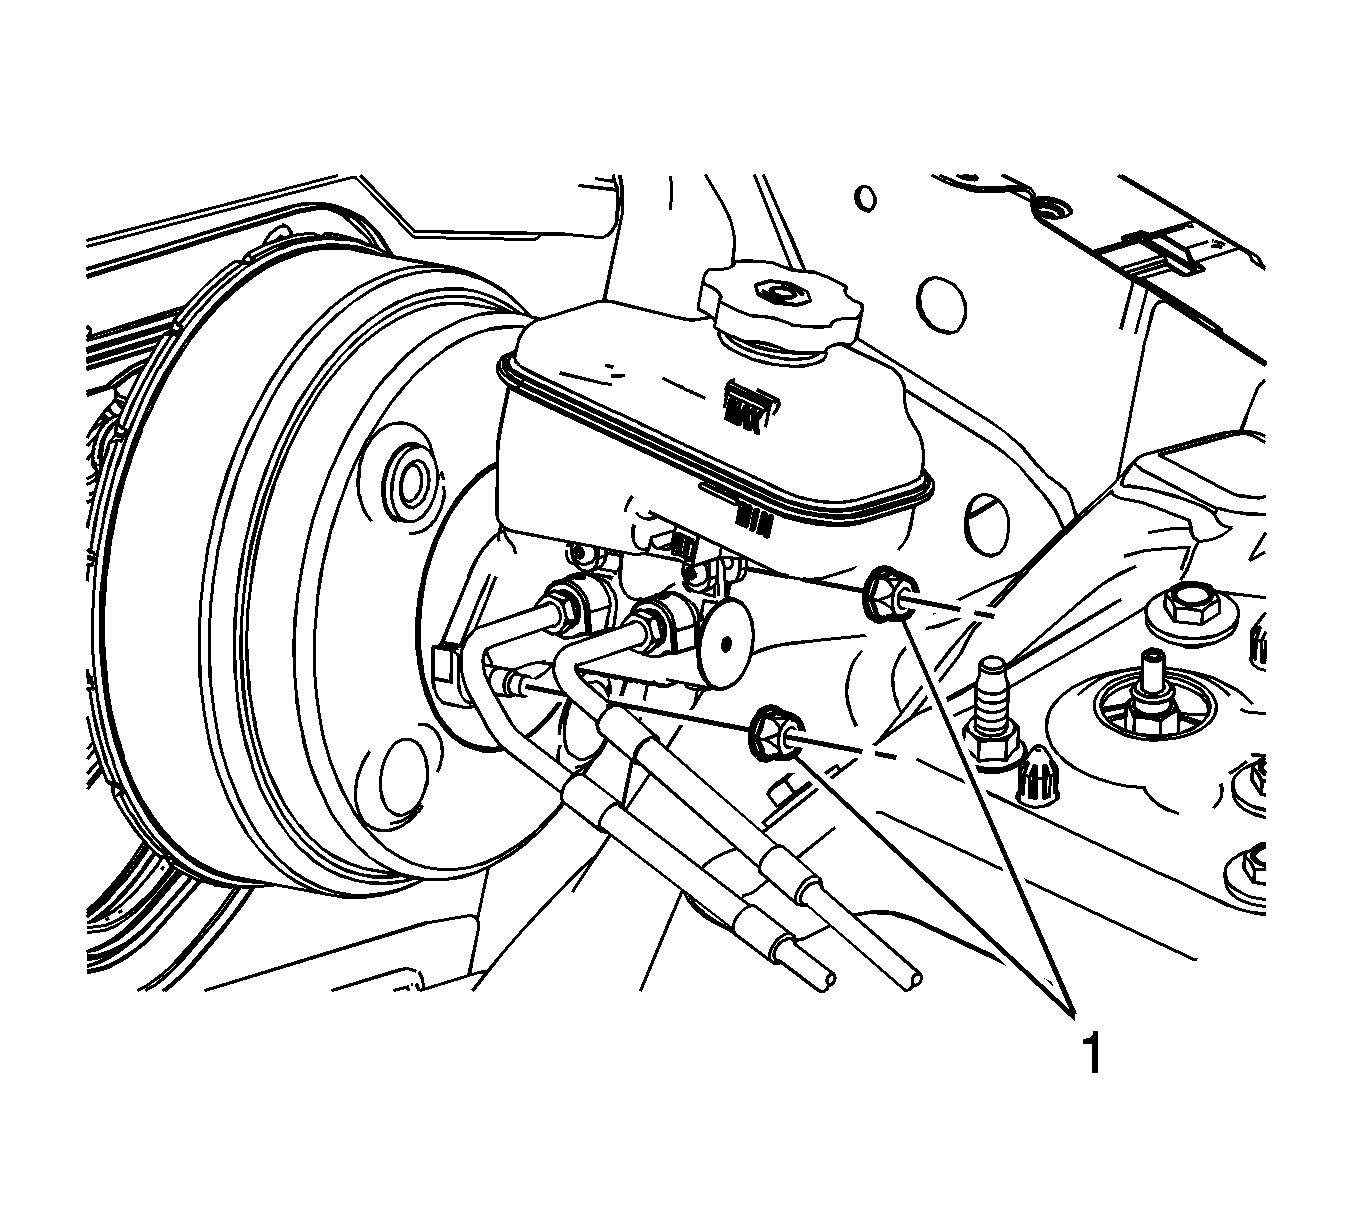
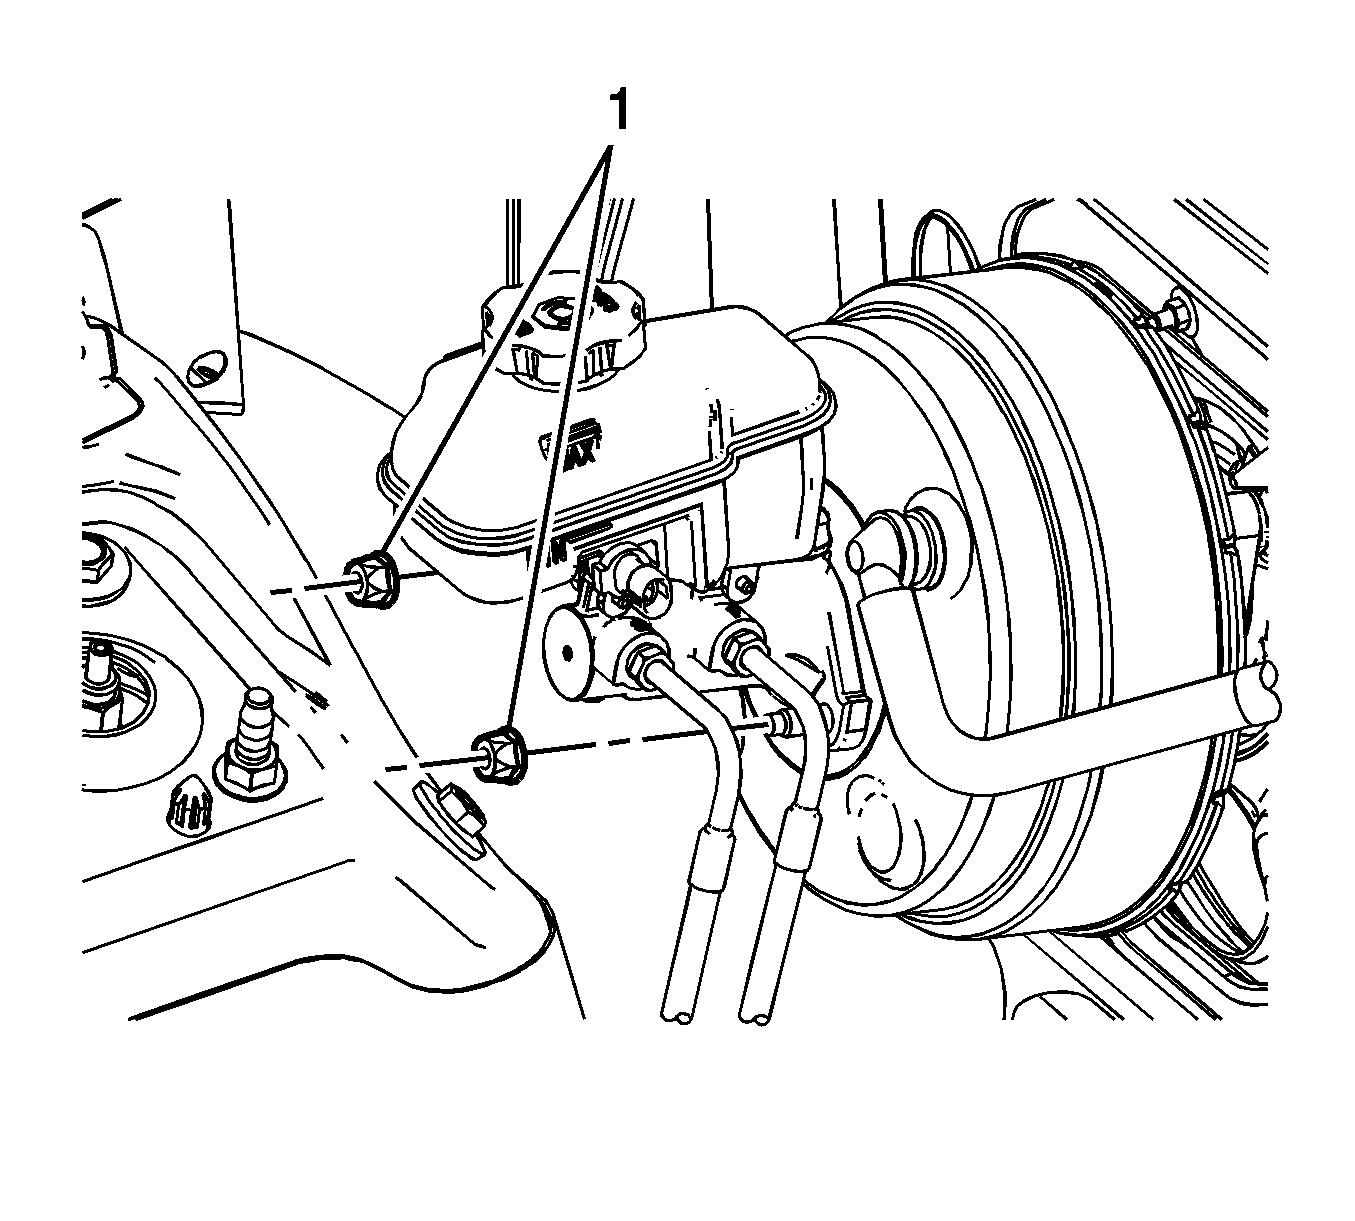
- Remove the master cylinder nuts (1).
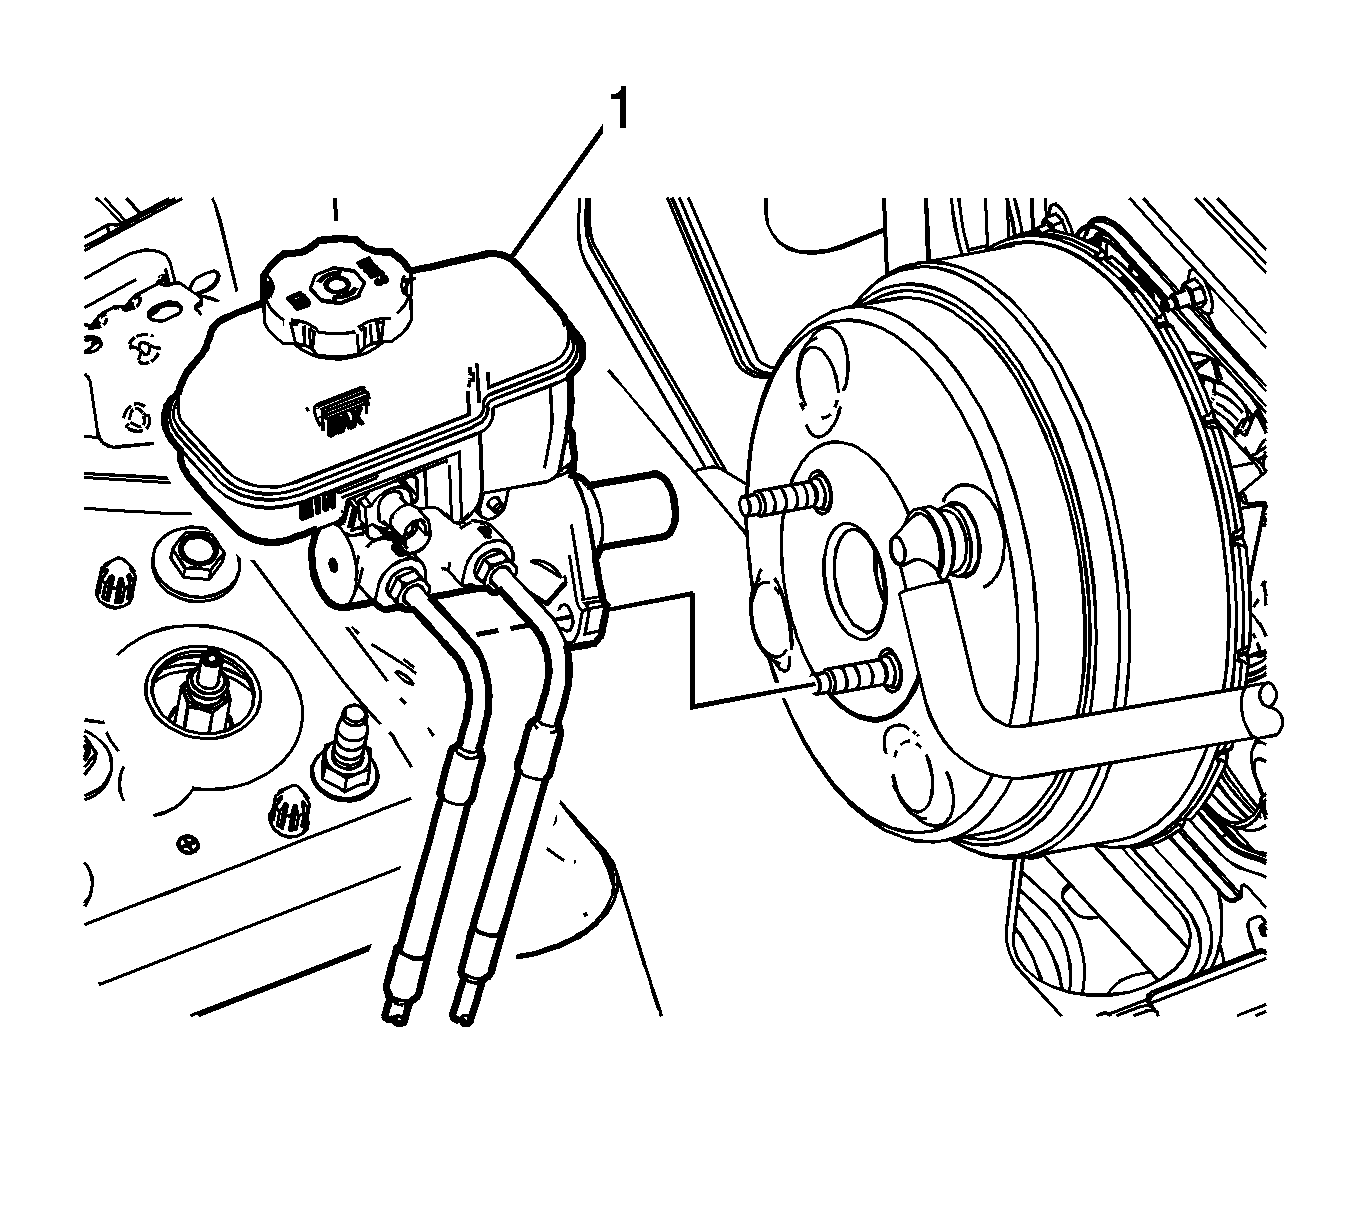
- Without disconnecting the brake pipe fittings, position aside the master cylinder (1) and support with heavy mechanics wire or equivalent.
- Remove the air inlet grille panel. Refer to Air Inlet Grille Panel Replacement.
- Without disconnecting the hoses, remove and position aside the surge tank. Refer to Radiator Surge Tank Replacement.
- Modify the J-22805-B Brake Booster Holder to accommodate the narrower span between the master cylinder mounting studs on the power vacuum brake booster:
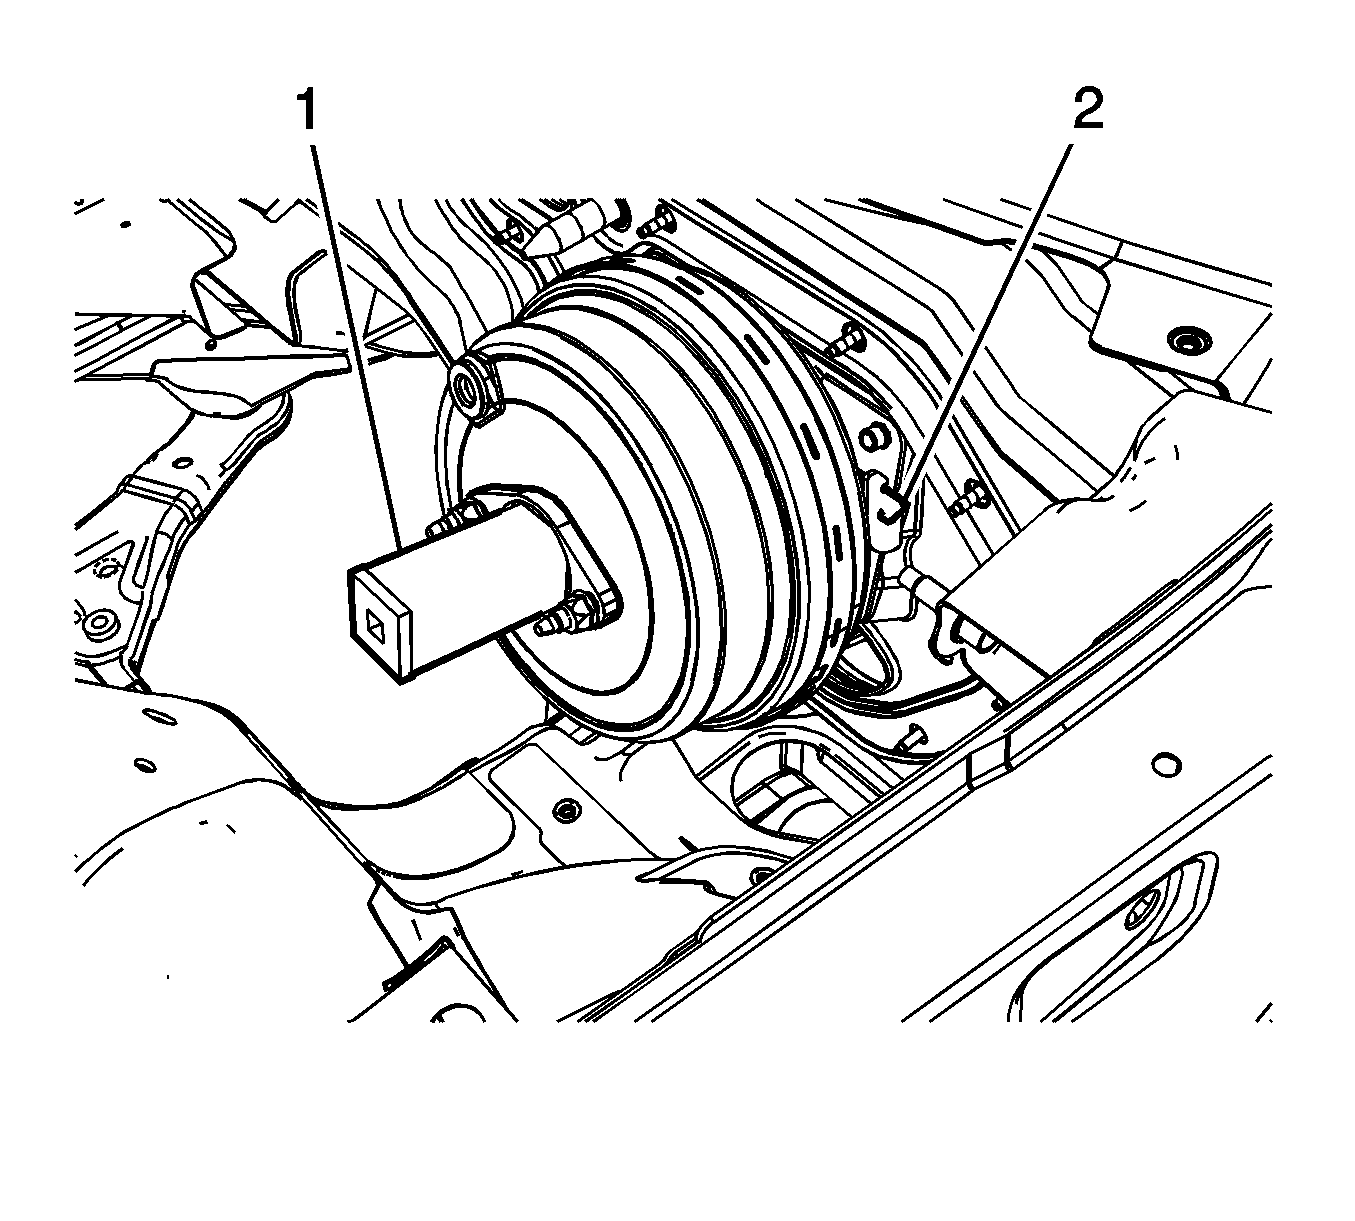
- Install the J-22805-B Brake Booster Holder (1) and secure with the master cylinder nuts.
- Using a flat-bladed tool, depress the locking tab (2) toward the cowl.
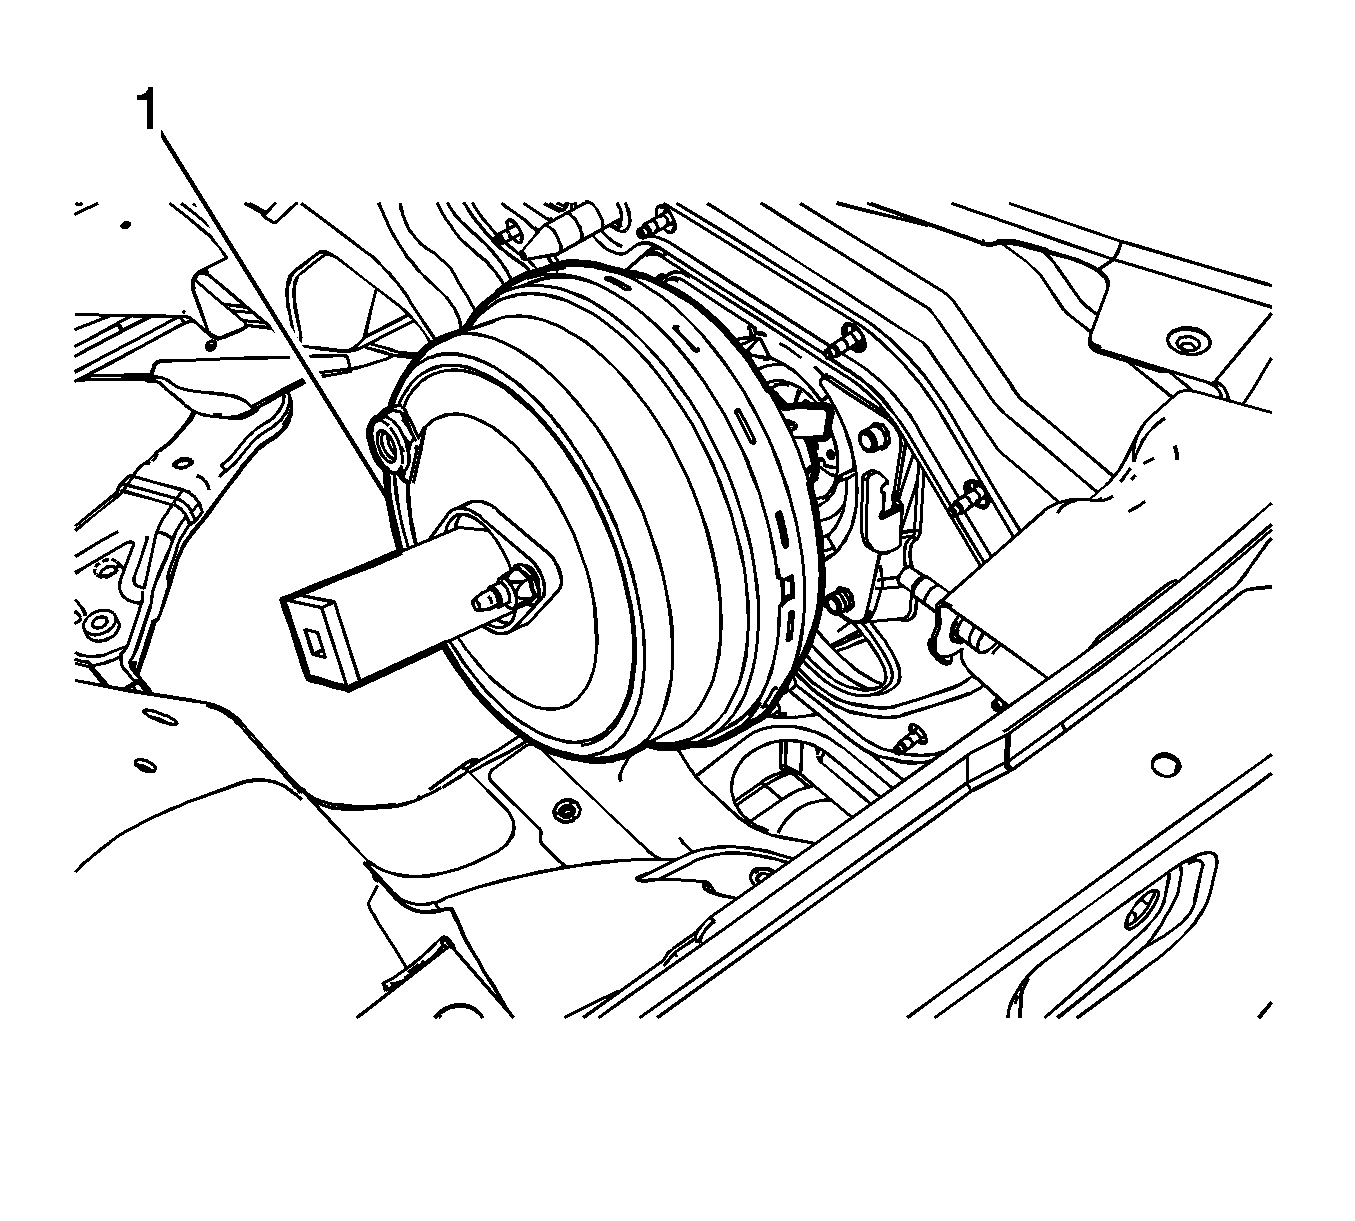
- Rotate the J-22805-B Brake Booster Holder and power vacuum brake booster (1) counter clockwise and release the power vacuum brake booster from the bracket.
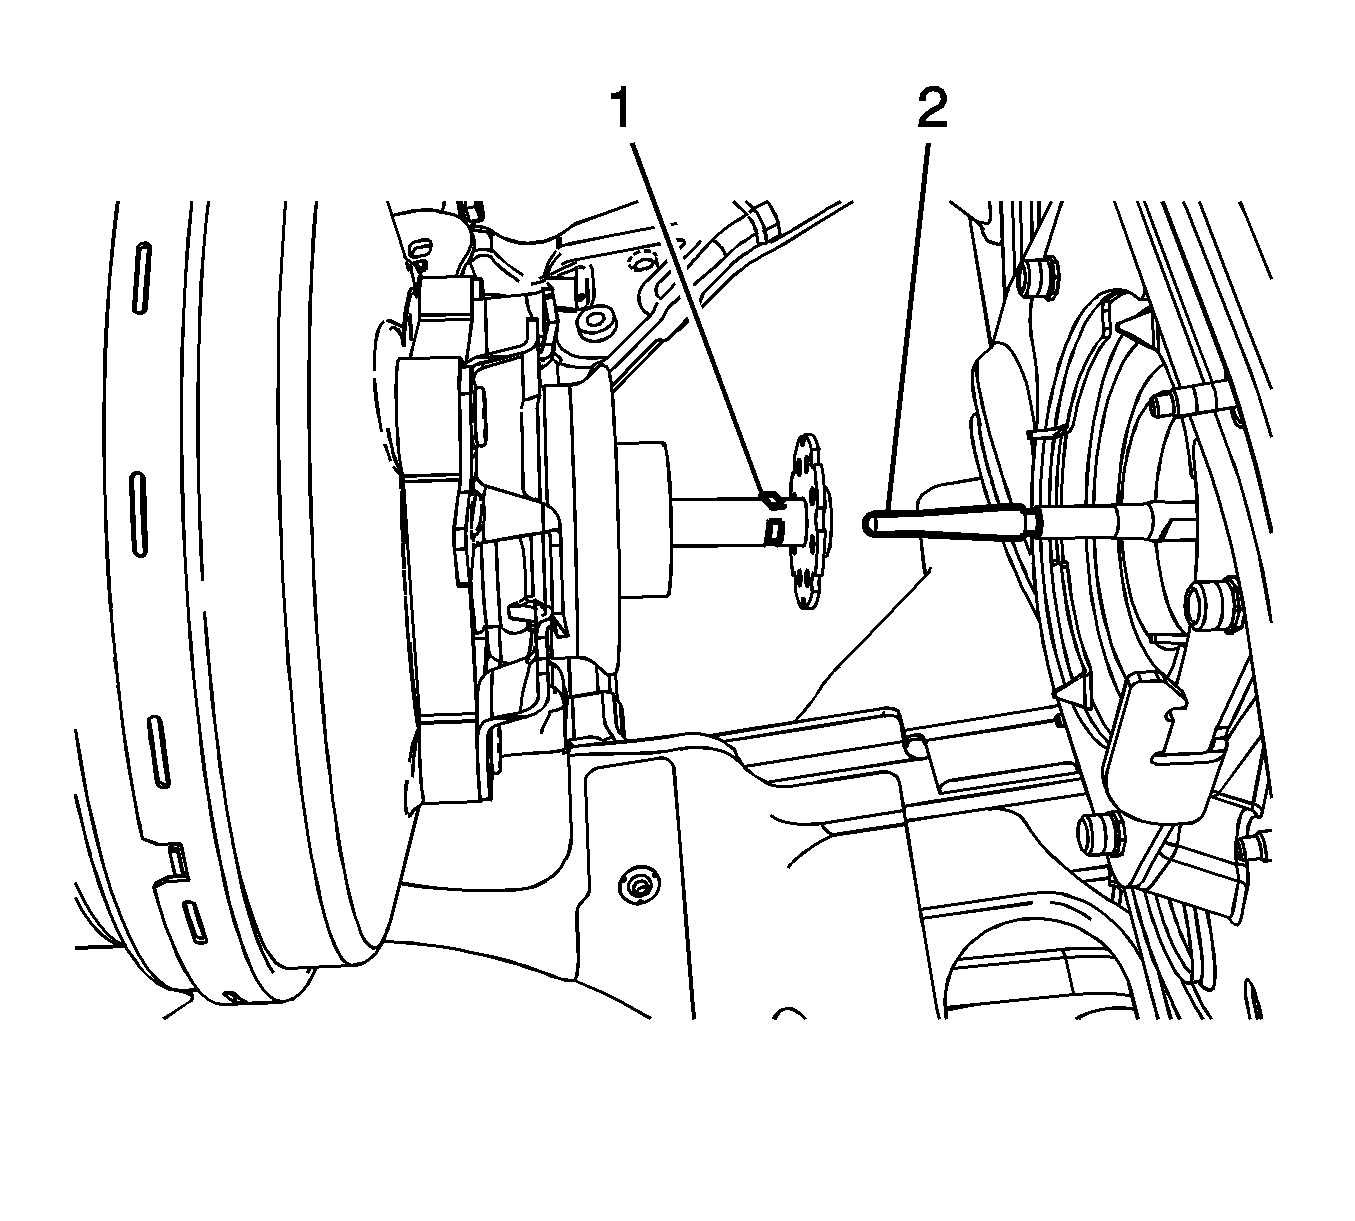
- Carefully pull the power vacuum brake booster forward slightly and support the power vacuum booster to access the booster pushrod retaining clip.
- Compress the power vacuum brake booster foam filter to access the power vacuum brake booster pushrod retaining clip.
- Disconnect the power vacuum brake booster pushrod (1) from the booster by releasing the retaining clip (2).
- Remove the power vacuum brake booster from the vehicle.
- Remove the power vacuum brake booster pushrod through the dust boot from inside of the vehicle, if necessary.
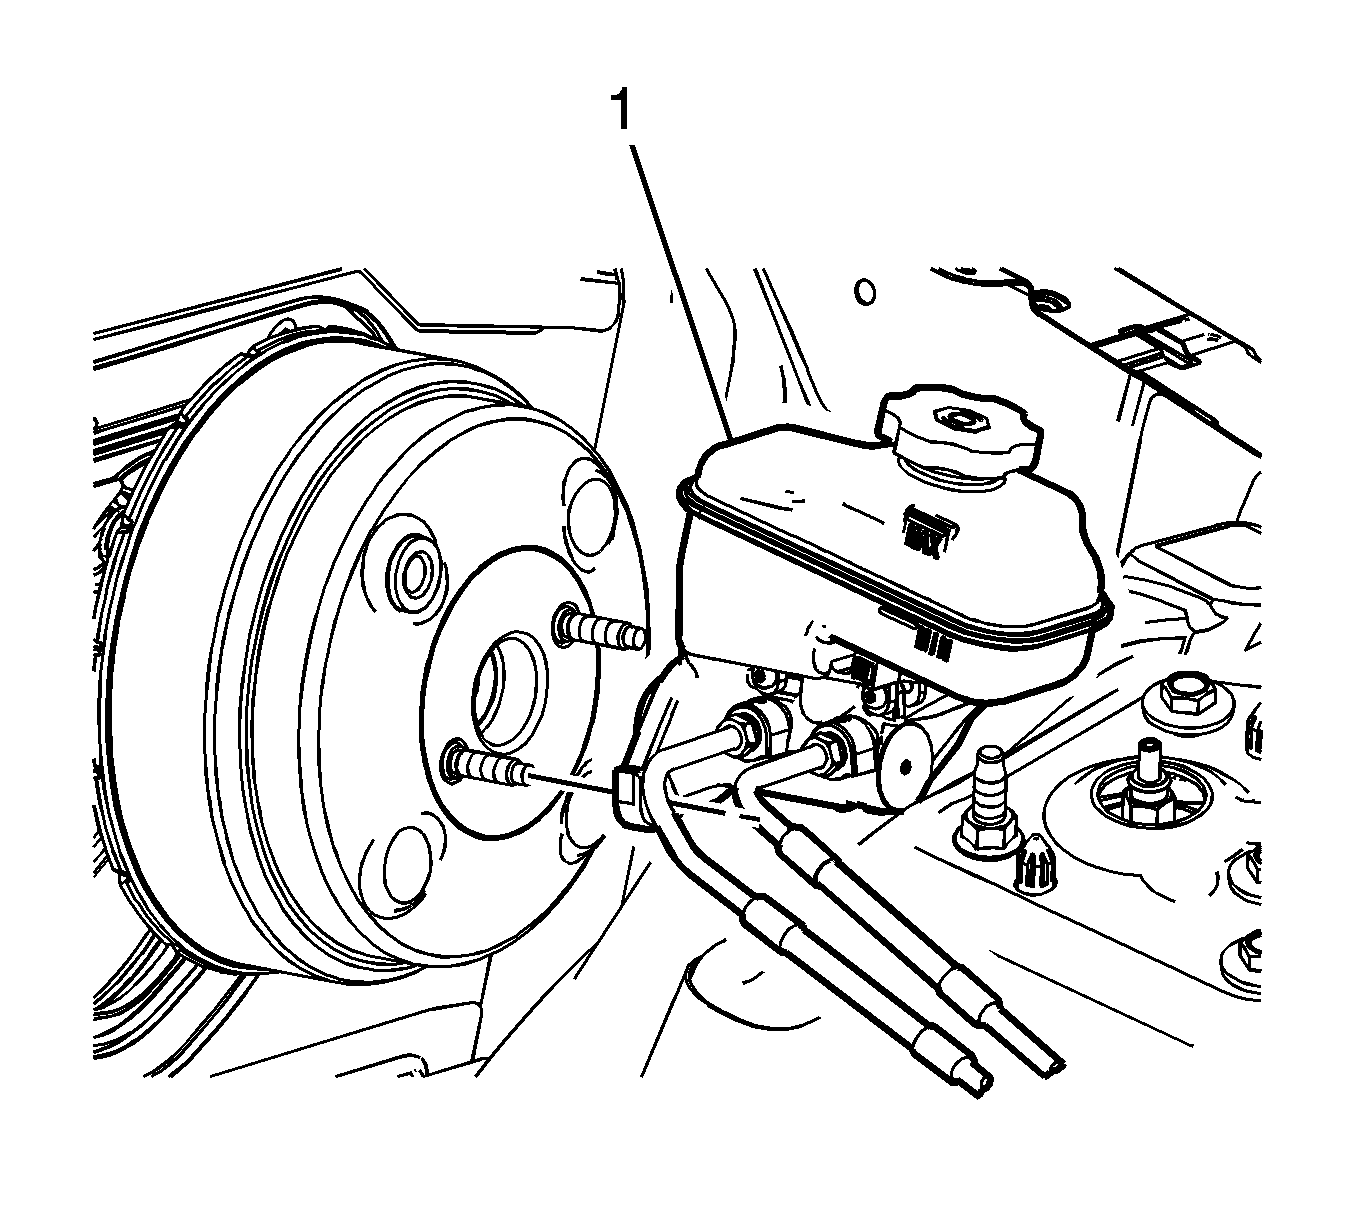
Note: Do not attempt to lever against the master cylinder mounting studs to remove the power vacuum brake booster.
| • | Using a suitable grinding tool or metal file, elongate the mounting holes of the J-22805-B Brake Booster Holder |
| • | Remove approximately 6.36 mm (0.25 in) of material from the inner edges of both mounting holes |
| • | Remove material from the inner edges of the mounting until the span, from center to center, is approximately 80.00 mm (3.15 in) |
Note: Do not attempt to remove the power vacuum brake booster completely. The power vacuum brake booster pushrod retaining clip must be released prior to booster removal.
Installation Procedure
Caution: Inspect the locking flanges on booster and mounting plate. Replace the booster and mounting plate if the locking flanges are bent or damaged.
Caution: Internal components of this booster are not serviceable. The housing must not be unstaked and separated. Separating the housing will cause permanent deformation, preventing the booster from holding proper volume.
- Install the power vacuum brake booster pushrod through the dust boot from inside of the vehicle, if removed.
- Install the vacuum brake booster to the vehicle.
- Compress the power vacuum brake booster foam filter to access the vacuum brake booster pushrod retaining clip.
- Connect the power vacuum brake booster pushrod (1) to the booster and engage the retaining clip (2).
- Position the power vacuum brake booster to the booster bracket.
- Using the J-22805-B Brake Booster Holder (1), rotate the power vacuum brake booster clockwise until the locking tab (2) engages the booster bracket flange.
- Remove the J-22805-B Brake Booster Holder from the power vacuum brake booster and discard the master cylinder nuts.
- Install the master cylinder (1) to the power vacuum brake booster.
- Install new master cylinder nuts (1) and tighten to 25 N·m (18 lb ft).
- Connect the power vacuum brake booster check valve and hose assembly (1).
- Connect the brake fluid level indicator switch electrical connector.
- Install the air inlet grille panel. Refer to Air Inlet Grille Panel Replacement.
- Install the surge tank. Refer to Radiator Surge Tank Replacement.
- Install the cross vehicle brace, if removed. Refer to Cross Vehicle Brace Replacement.
- Connect the power vacuum brake booster pushrod to the brake pedal pivot.
- Install the power vacuum brake booster pushrod nut (1) and tighten to 9 N·m (80 lb in).
- Connect the brake pedal position sensor electrical connector (1).
- Install the steering column. Refer to Steering Column Replacement.
- Calibrate the brake pedal position sensor. Refer to Brake Pedal Position Sensor Calibration.
- Install the left side instrument panel insulator panel. Refer to Instrument Panel Insulator Replacement - Left Side.


Ensure the booster locking tab fully engages in the bracket.

Caution: Refer to Fastener Caution in the Preface section.


If necessary, a small amount of denatured alcohol may be used as a lubricant for assembly. Do not use soap.


Power Vacuum Brake Booster Replacement RHD
Special Tools
J-22805-B Brake Booster Holder
Removal Procedure
- Remove the right side instrument panel insulator panel. Refer to Instrument Panel Insulator Replacement - Right Side.
- Without disconnecting the steering column from the intermediate shaft, lower and support the steering column. Refer to Steering Column Replacement.
- Disconnect the brake pedal position sensor electrical connector (1).
- Remove the power vacuum brake booster pushrod nut (1).
- Disconnect the power vacuum brake booster pushrod from the brake pedal pivot.
- Remove the cross vehicle brace, if equipped. Refer to Cross Vehicle Brace Replacement.
- Disconnect the brake fluid level indicator switch electrical connector.
- Remove the master cylinder nuts (1).
- Without disconnecting the brake pipe fittings, position aside the master cylinder (1) and support with heavy mechanics wire or equivalent.
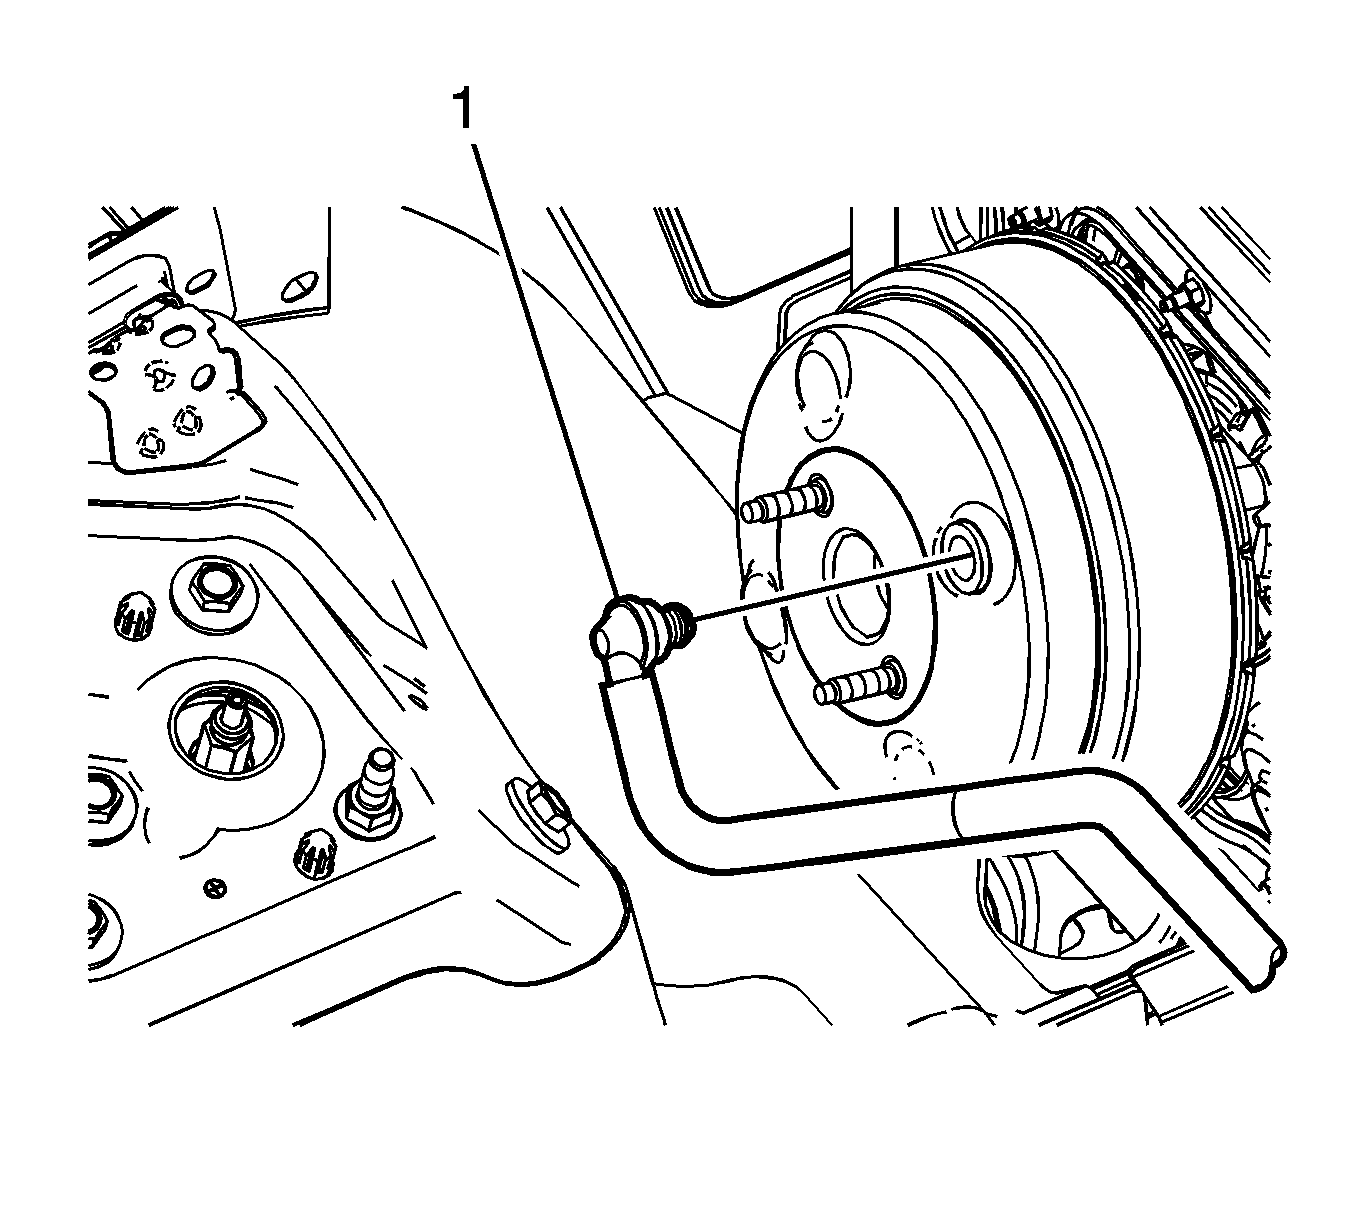
- Disconnect the power vacuum brake booster check valve and hose assembly (1).
- Modify the J-22805-B Brake Booster Holder to accommodate the narrower span between the master cylinder mounting studs on the power vacuum brake booster:
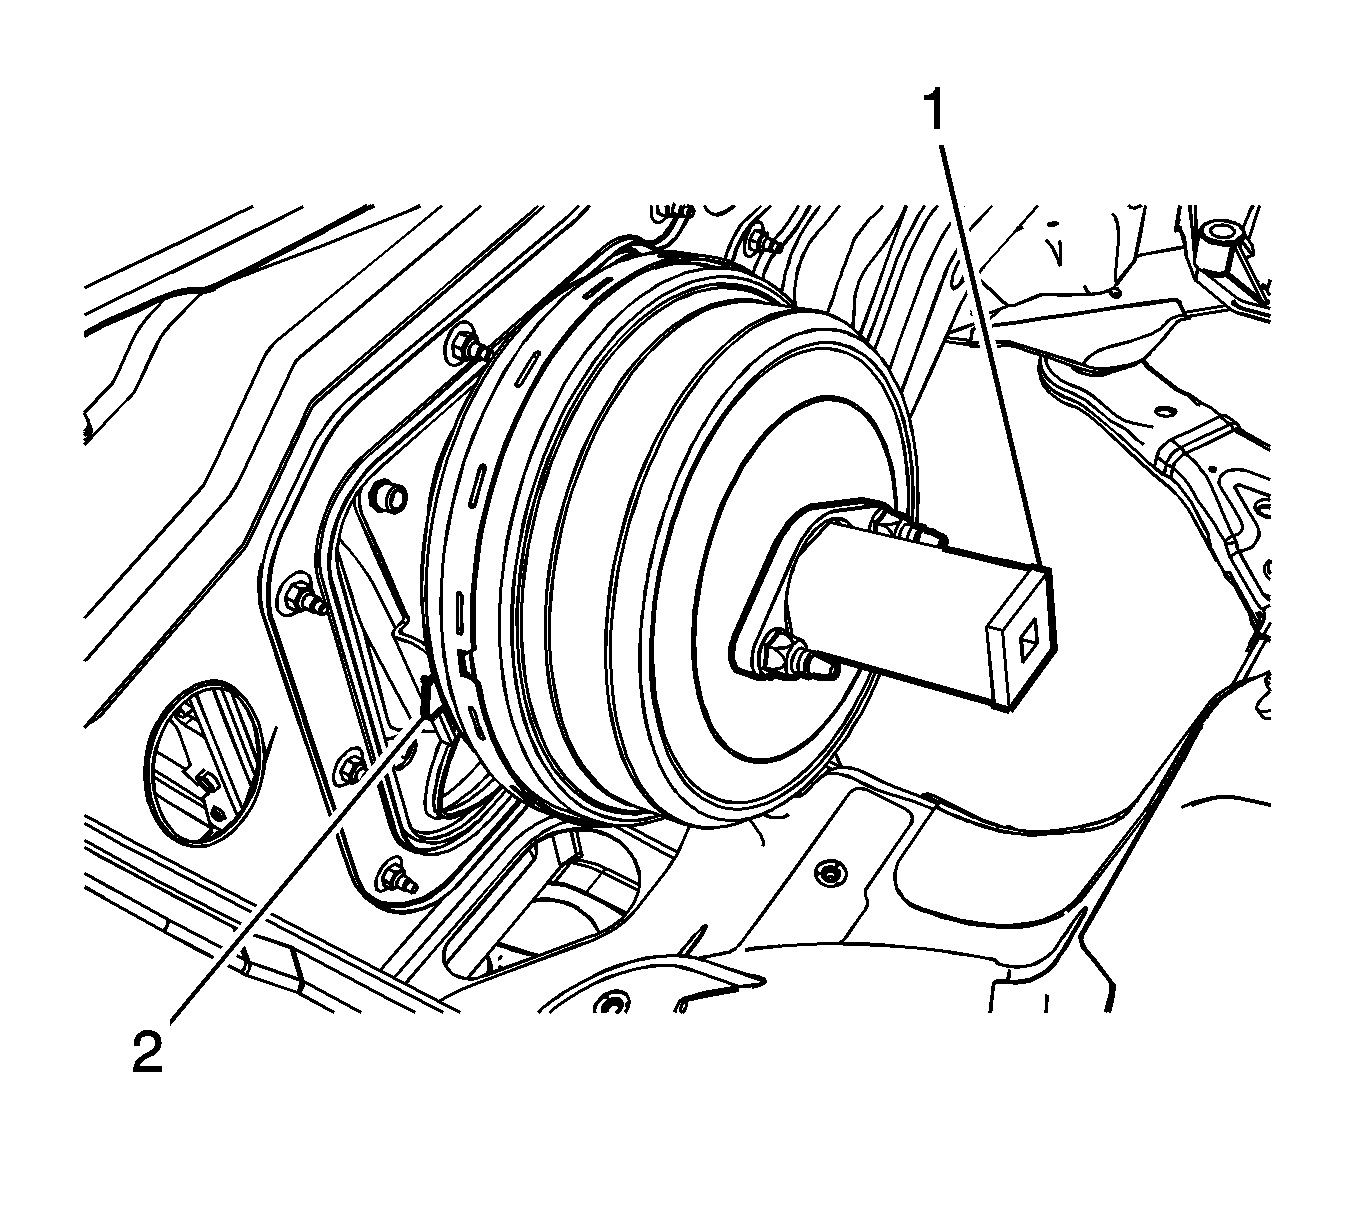
- Install the J-22805-B Brake Booster Holder (1) and secure with the master cylinder nuts.
- Using a flat-bladed tool, depress the locking tab (2) toward the cowl.
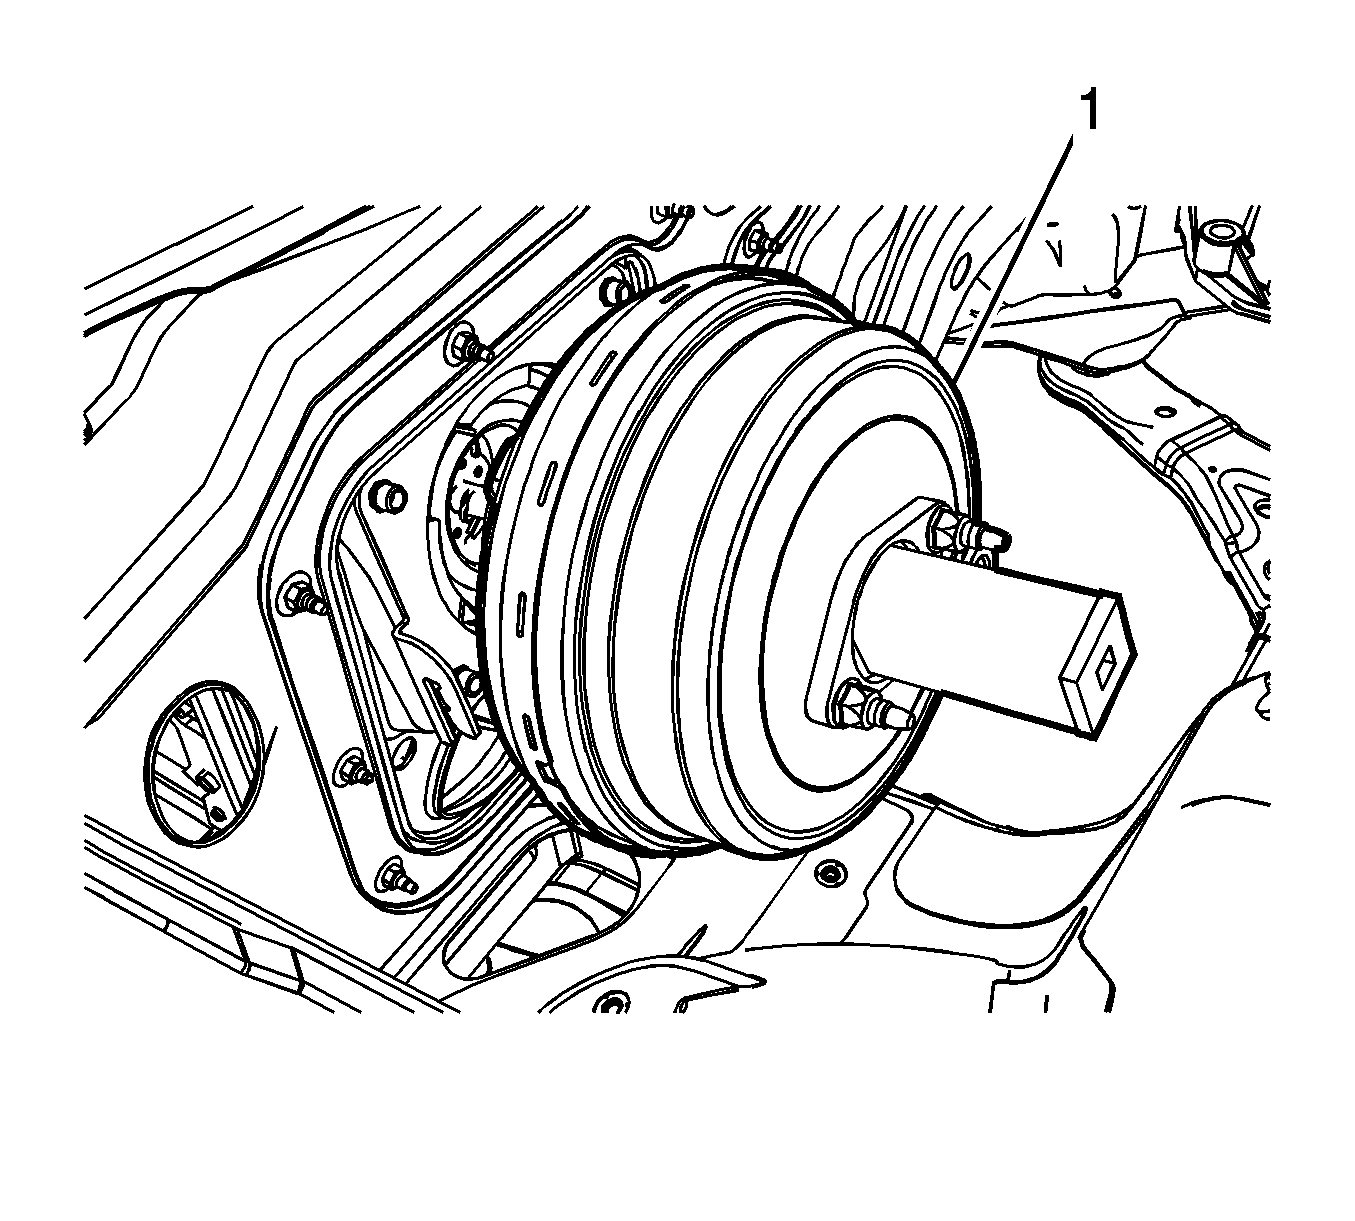
- Rotate the J-22805-B Brake Booster Holder and power vacuum brake booster (1) counter clockwise and release the power vacuum brake booster from the bracket.
- Carefully pull the power vacuum brake booster forward slightly and support the power vacuum booster to access the booster pushrod retaining clip.
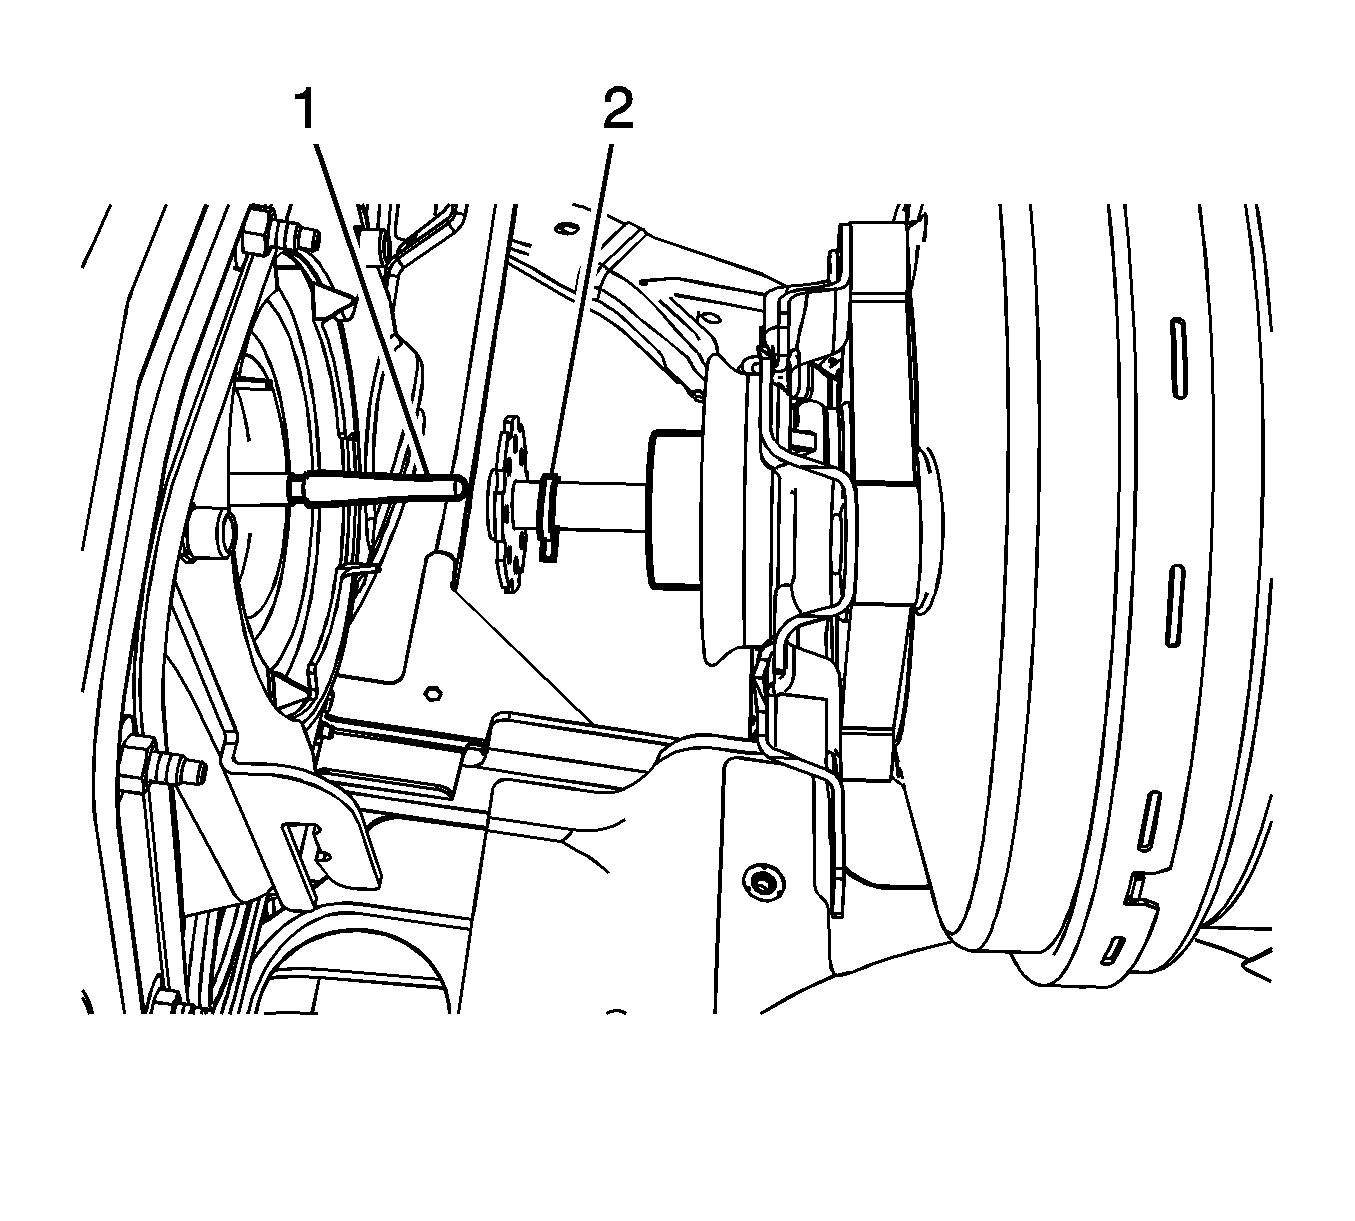
- Compress the power vacuum brake booster foam filter to access the power vacuum brake booster pushrod retaining clip.
- Disconnect the power vacuum brake booster pushrod (1) from the booster by releasing the retaining clip (2).
- Remove the power vacuum brake booster from the vehicle.
- Remove the power vacuum brake booster pushrod through the dust boot from inside of the vehicle, if necessary.
Note: Do not attempt to lever against the master cylinder mounting studs to remove the power vacuum brake booster.
| • | Using a suitable grinding tool or metal file, elongate the mounting holes of the J-22805-B Brake Booster Holder |
| • | Remove approximately 6.36 mm (0.25 in) of material from the inner edges of both mounting holes |
| • | Remove material from the inner edges of the mounting until the span, from center to center, is approximately 80.00 mm (3.15 in) |
Note: Do not attempt to remove the power vacuum brake booster completely. The power vacuum brake booster pushrod retaining clip must be released prior to booster removal.
Installation Procedure
Caution: Inspect the locking flanges on booster and mounting plate. Replace the booster and mounting plate if the locking flanges are bent or damaged.
Caution: Internal components of this booster are not serviceable. The housing must not be unstaked and separated. Separating the housing will cause permanent deformation, preventing the booster from holding proper volume.
- Install the power vacuum brake booster pushrod through the dust boot from inside of the vehicle, if removed.
- Install the vacuum brake booster to the vehicle.
- Compress the power vacuum brake booster foam filter to access the vacuum brake booster pushrod retaining clip.
- Connect the power vacuum brake booster pushrod (1) to the booster and engage the retaining clip (2).
- Position the vacuum power brake booster (1) to the booster bracket.
- Using the J-22805-B Brake Booster Holder (1), rotate the power vacuum brake booster clockwise until the locking tab (2) engages the booster bracket flange.
- Remove the J-22805-B Brake Booster Holder from the power vacuum brake booster and discard the master cylinder nuts.
- Connect the power vacuum brake booster check valve and hose assembly (1).
- Install the master cylinder (1) to the power vacuum brake booster.
- Install new master cylinder nuts (1) and tighten to 25 N·m (18 lb ft).
- Connect the brake fluid level indicator switch electrical connector.
- Install the cross vehicle brace, if removed. Refer to Cross Vehicle Brace Replacement.
- Connect the power vacuum brake booster pushrod to the brake pedal pivot.
- Install the power vacuum brake booster pushrod nut (1) and tighten to 9 N·m (80 lb in).
- Connect the brake pedal position sensor electrical connector (1).
- Install the steering column. Refer to Steering Column Replacement.
- Calibrate the brake pedal position sensor. Refer to Brake Pedal Position Sensor Calibration.
- Install the right side instrument panel insulator panel. Refer to Instrument Panel Insulator Replacement - Right Side.


Ensure the booster locking tab fully engages in the bracket.

If necessary, a small amount of denatured alcohol may be used as a lubricant for assembly. Do not use soap.

Caution: Refer to Fastener Caution in the Preface section.


