Air Conditioning Compressor Replacement RHD
Tools Required
J 39400-A Halogen Leak Detector
Removal Procedure
- Recover the refrigerant. Refer to Refrigerant Recovery and Recharging .
- Remove the drive belt. Refer to Drive Belt Replacement in Engine Mechanical - 2.6L and Engine Mechanical - 3.2L.
- Remove the air cleaner assembly. Refer to Air Cleaner Assembly Replacement in Engine Controls - 2.6L and Engine Controls - 3.2L.
- Partially remove the intake air resonator and reposition for compressor clearance. Refer to Intake Air Resonator Replacement in Engine Controls - 2.6L and Engine Controls - 3.2L.
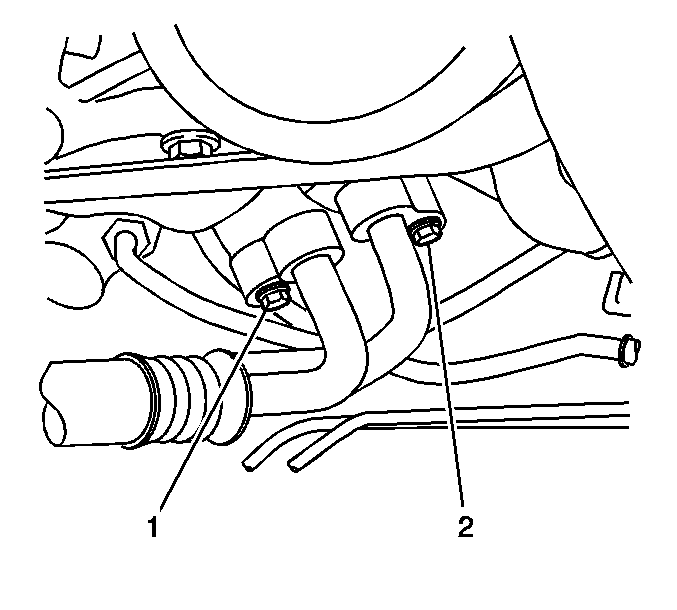
- Remove the suction line bolt (1) at the compressor.
- Remove the discharge line bolt (2) at the compressor.
- Disconnect the A/C lines from the compressor.
- Remove and discard the O-ring seals.
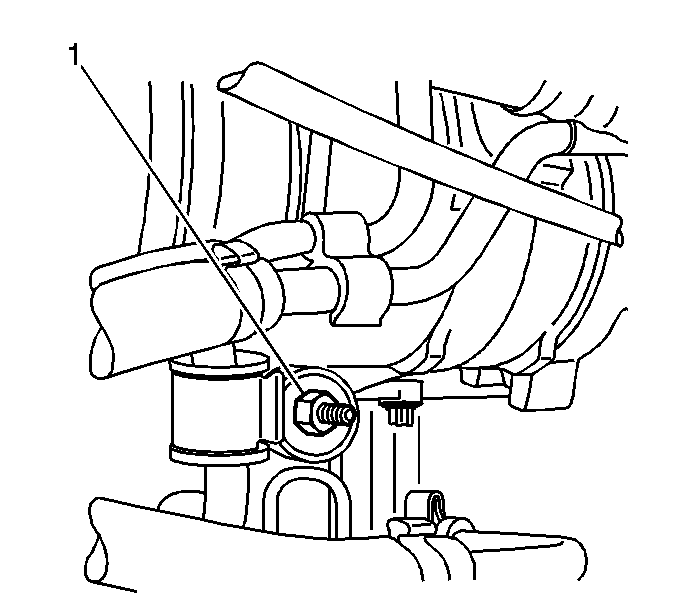
- Remove the nut (1) retaining the power steering line to the compressor stud.
- Remove the clip and line from the compressor stud.
- Remove the nut (1) retaining the power steering cooler line to the compressor stud.
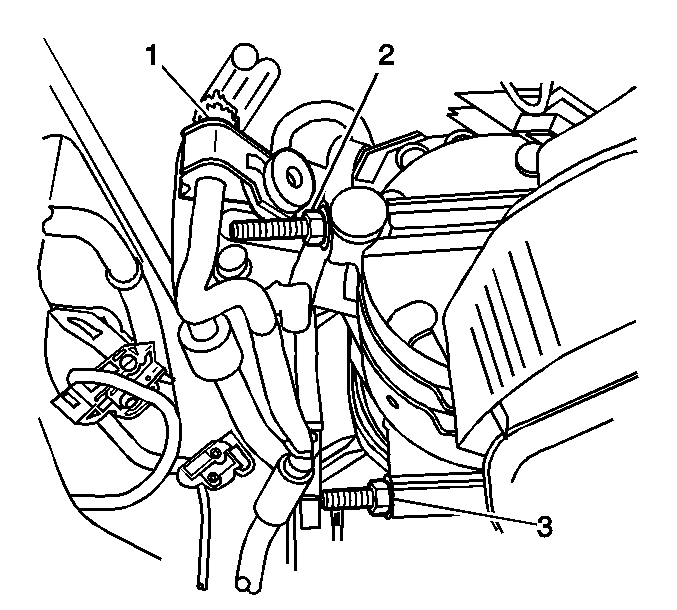
- Remove the clip (1) and line from the compressor stud (2).
- Remove the front lower compressor stud (3).
- Remove the front upper compressor stud.
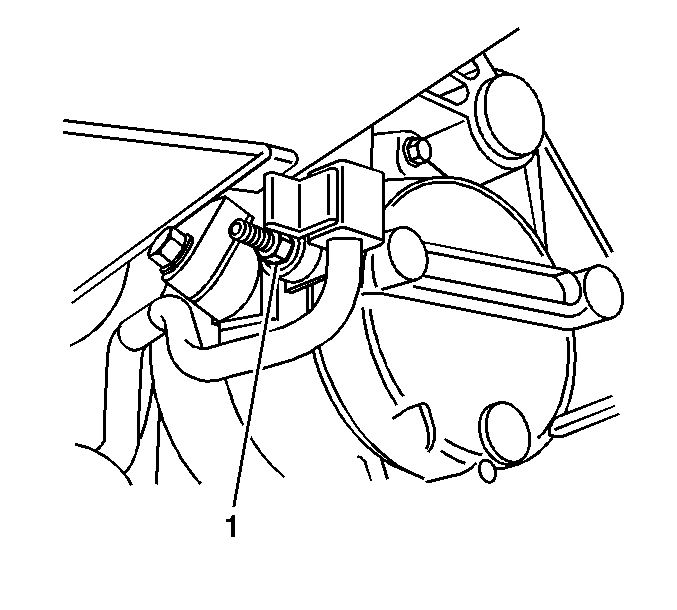
- Remove the rear compressor stud (1).
- Disconnect the electrical connector from the compressor.
- Rotate the compressor and remove from the vehicle.
- Replace the desiccant bag if the following conditions exist. Refer to Air Conditioning Refrigerant Desiccant Replacement .
- If you are replacing the compressor, balance the compressor oil. Refer to Compressor Oil Balancing .
| • | Color of PAG oil is brown or black |
| • | Presence of foreign substances |
Installation Procedure
- Install the compressor.
- Connect the electrical connector.
- Install all compressor mounting studs finger tight.
- Tighten the compressor lower rear stud (1).
- Tighten the front lower compressor stud (1).
- Tighten the front upper compressor stud (1).
- Install the power steering line and bracket to lower compressor stud.
- Install the power steering line nut (1).
- Install the power steering line and clamp to rear compressor stud.
- Install the power steering line retainer nut (1).
- Install new O-ring seals to the line fittings. Refer to O-Ring Replacement .
- Connect the suction line to the compressor.
- Connect the discharge line to the compressor.
- Install the compressor AC line bolts (1,2).
- Reposition intake air resonator and install. Refer to Intake Air Resonator Replacement in Engine Controls - 2.6L and Engine Controls - 3.2L.
- Install the air cleaner assembly. Refer to Air Cleaner Assembly Replacement in Engine Controls - 2.6L and Engine Controls - 3.2L.
- Install the engine drive belt. Refer to Drive Belt Replacement in Engine Mechanical - 2.6L and Engine Mechanical - 3.2L.
- Evacuate and recharge the refrigerant system. Refer to Refrigerant Recovery and Recharging .
- Leak test the fitting of the repaired or reinstalled component using theJ 39400-A .
Important: Install the compressor with the top bolt in the compressor.
Notice: Refer to Fastener Notice in the Preface section.

Tighten
Tighten the stud to 25 N·m (18 lb ft).

Tighten
Tighten the stud to 25 N·m (18 lb ft).
Tighten
Tighten the stud to 25 N·m (18 lb ft).

Tighten
Tighten the nut to 8 N·m (71 lb in).

Tighten
Tighten the nut to 8 N·m (71 lb in).

Tighten
Tighten the bolts to 9.8 N·m (87 lb
in).
Air Conditioning Compressor Replacement LHD
Tools Required
J 39400-A Halogen Leak Detector
Removal Procedure
- Recover the refrigerant. Refer to Refrigerant Recovery and Recharging .
- Remove the drive belt. Refer to Drive Belt Replacement in Engine Mechanical - 2.6L and Engine Mechanical - 3.2L.
- Remove the air cleaner assembly. Refer to Air Cleaner Assembly Replacement in Engine Controls - 2.6L and Engine Controls - 3.2L.
- Partially remove the intake air resonator and reposition for compressor clearance. Refer to Intake Air Resonator Replacement in Engine Controls - 2.6L and Engine Controls - .2L.
- Remove the suction line bolt (1) at the compressor.
- Remove the discharge line bolt (2) at the compressor.
- Disconnect the A/C lines from the compressor.
- Remove and discard the O-ring seals.
- Remove the nut (1) retaining the power steering line to the compressor stud.
- Remove the clip and line from the compressor stud.
- Remove the nut (1) retaining the power steering cooler line to the compressor stud.
- Remove the clip (1) and line from the compressor stud (2).
- Remove the front lower compressor stud (3).
- Remove the front upper compressor stud.
- Remove the rear compressor stud (1).
- Disconnect the electrical connector from the compressor.
- Rotate the compressor and remove from the vehicle.
- Replace the desiccant bag if the following conditions exist. Refer to Air Conditioning Refrigerant Desiccant Replacement .
- If you are replacing the compressor, balance the compressor oil. Refer to Compressor Oil Balancing .


| • | Color of PAG oil is brown or black |
| • | Presence of foreign substances |
Installation Procedure
- Install the compressor.
- Connect the electrical connector.
- Install all compressor mounting studs finger tight.
- Tighten the compressor lower rear stud (1).
- Tighten the front lower compressor stud (1).
- Tighten the front upper compressor stud (1).
- Install the power steering line and bracket to lower compressor stud.
- Install the power steering line nut (1).
- Install the power steering line and clamp to rear compressor stud.
- Install the power steering line retainer nut (1).
- Install new O-ring seals to the line fittings. Refer to O-Ring Replacement .
- Connect the suction line to the compressor.
- Connect the discharge line to the compressor
- Install the compressor AC line bolts (1,2).
- Reposition intake air resonator and install. Refer to Intake Air Resonator Replacement in Engine Controls - 2.6L and Engine Controls - 3.2L.
- Install the air cleaner assembly. Refer to Air Cleaner Assembly Replacement in Engine Controls - 2.6L and Engine Controls - 3.2L.
- Install the engine drive belt. Refer to Drive Belt Replacement in Engine Mechanical - 2.6L and Engine Mechanical - 3.2L.
- Evacuate and recharge the refrigerant system. Refer to Refrigerant Recovery and Recharging .
- Leak test the fitting of the repaired or reinstalled component using theJ 39400-A .
Important: Install the compressor with the top bolt in the compressor.
Notice: Refer to Fastener Notice in the Preface section.

Tighten
Tighten the stud to 25 N·m (18 lb ft).

Tighten
Tighten the stud to 25 N·m (18 lb ft).
Tighten
Tighten the stud to 25 N·m (18 lb ft).

Tighten
Tighten the nut to 8 N·m (71 lb in).

Tighten
Tighten the nut to 8 N·m (71 lb in).

Tighten
Tighten the bolts to 9.8 N·m (87 lb
in).
