Tools Required
| • | J 42069 Timing Belt Alignment Kit |
| • | J 42098 Crank Hub TORX® Socket |
Removal Procedure
- Visually inspect the timing belt for cracks and wear. If cracks or wear are present, do not reuse the belt.
- Remove the timing belt cover. Refer to Timing Belt Cover Replacement .
- Remove the crankshaft balancer. Refer to Crankshaft Balancer Replacement .
- Rotate the crankshaft in the engine rotational direction, clockwise using the J 42098 until the #1 cylinder is at Top Dead Center (TDC) on the compression stroke.
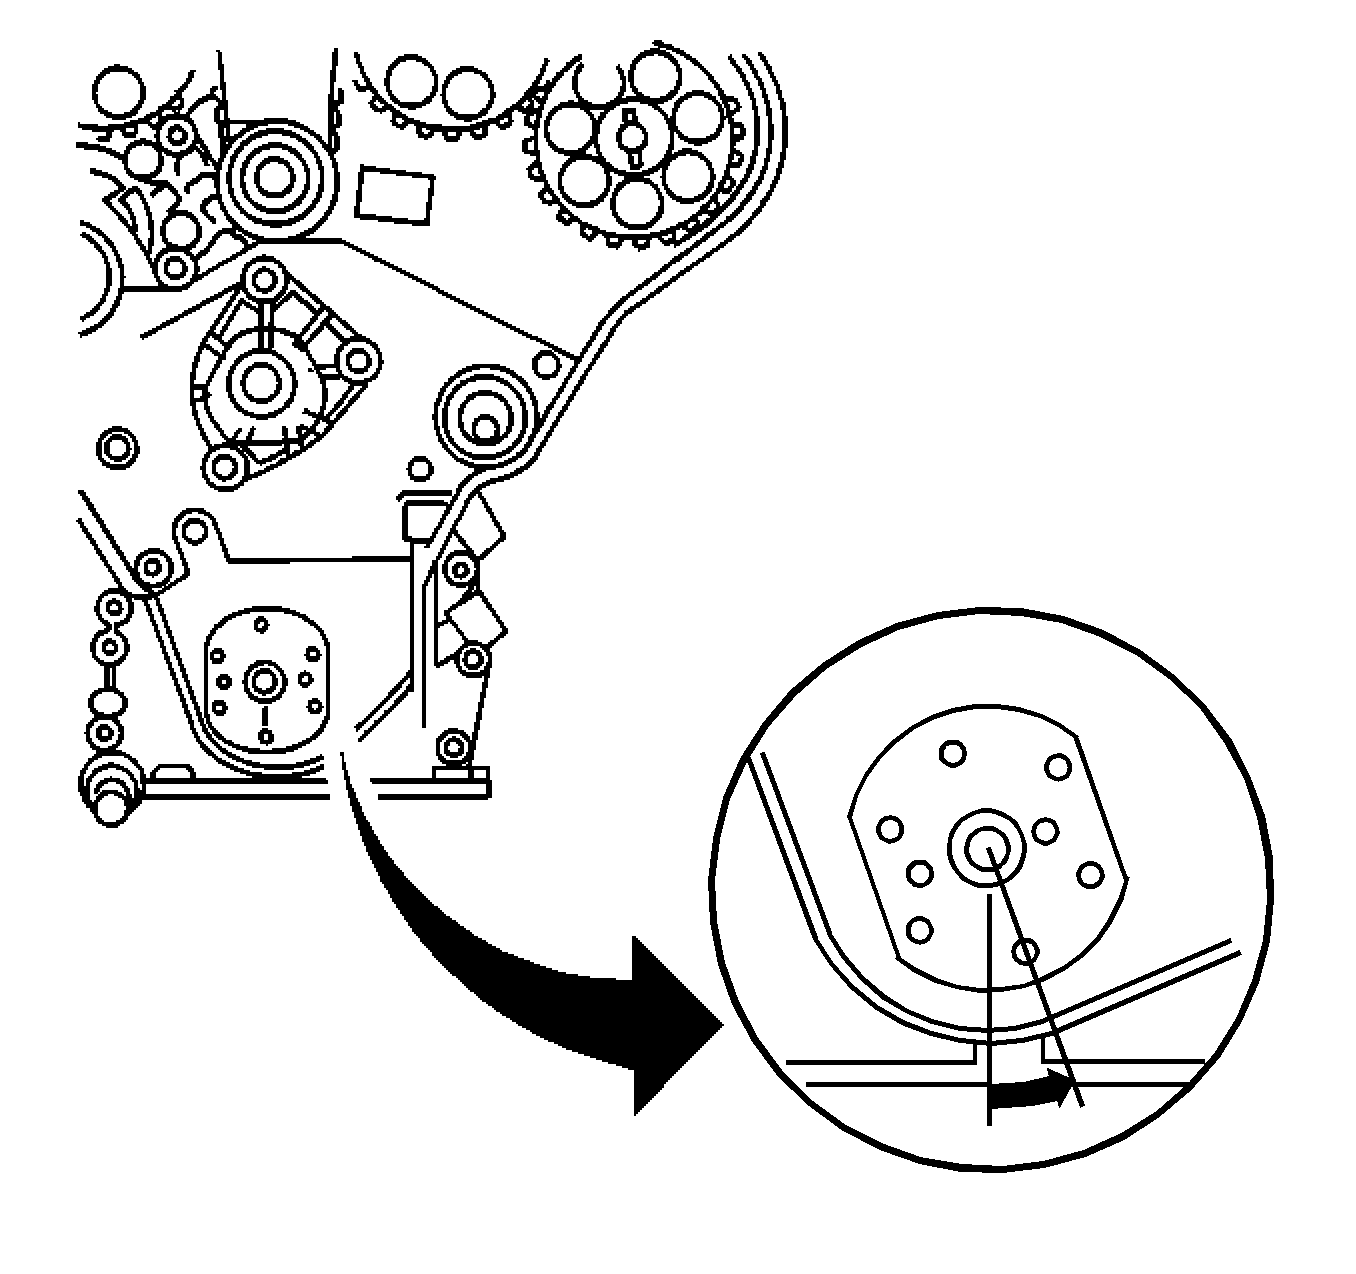
- Rotate the crankshaft counter clockwise using the J 42098 until 60 degrees Before Top Dead Center (BTDC).
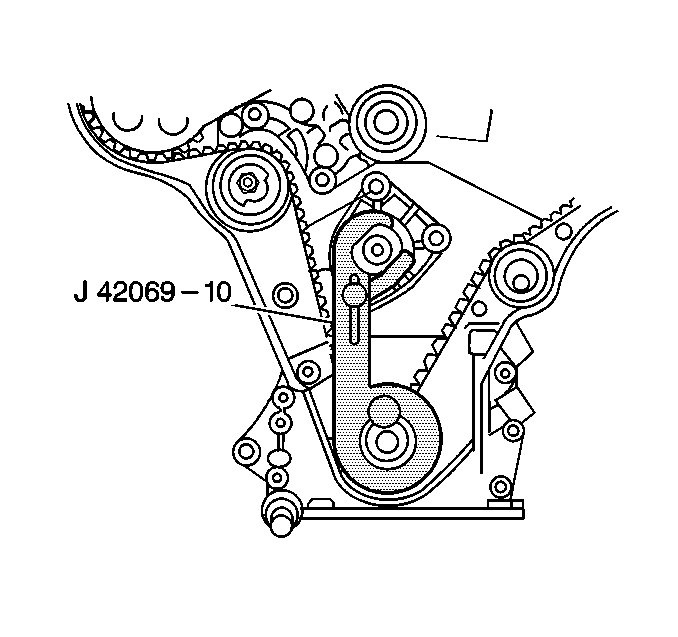
- Install the J 42069-10 to the crankshaft sprocket with the knurled bolt.
- Rotate the crankshaft in the engine rotational direction, clockwise using the J 42098 until the lever of the J 42069-10 firmly contacts the water pump pulley flange.
- Secure the moveable lever of the tool to the water pump pulley flange.
- Install the J 42069-1 and the J 42069-2 to the camshaft gears.
- Loosen the timing belt tensioner nut.
- Loosen the upper idler pulley bolt.
- Remove the lower idler pulley bolt.
- Remove the lower idler pulley and spacer.
- Remove the J 42069-10 from the crankshaft sprocket.
- Remove the timing belt.
Notice: Failure to follow the described timing belt inspection and maintenance may result in a broken timing belt and cause severe engine damage.
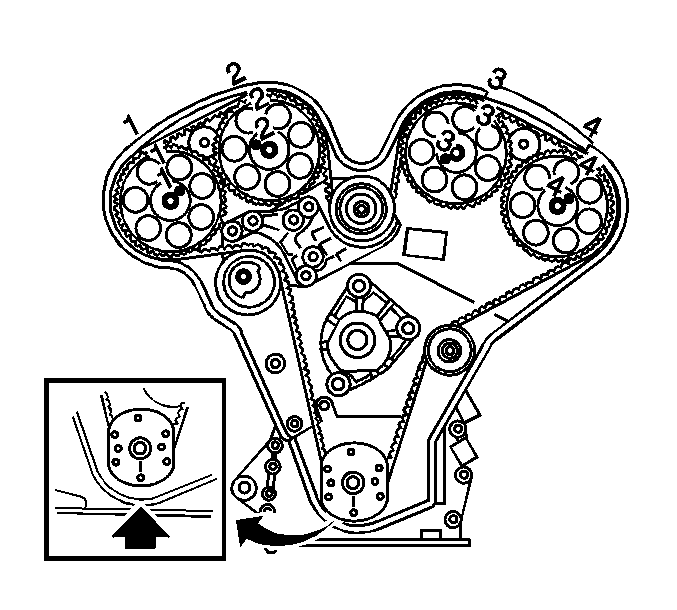
The reference marks on the camshaft gears should be aligned with the corresponding notches on the rear timing belt cover, as well as the mark on the crankshaft sprocket and oil pump housing.
The 60 degrees BTDC point can be identified by the index mark on the oil pump cover.
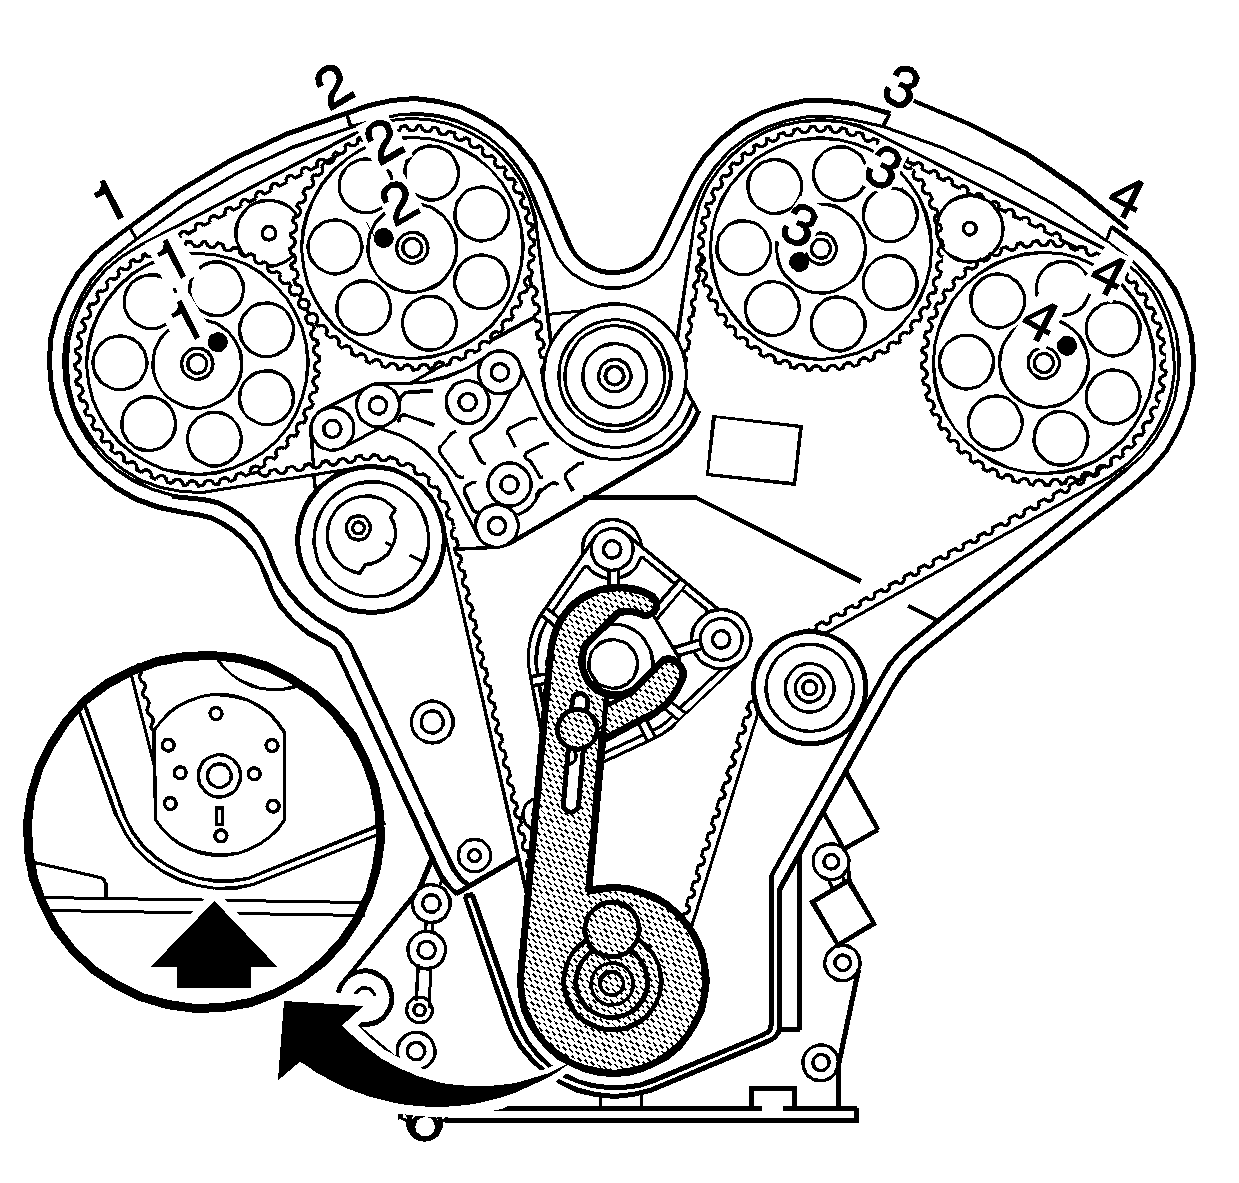
Important: Ensure the moveable lever is positioned toward the crankshaft.
The #1 cylinder is at TDC at this point.
Important: Ensure that the crankshaft is not 180 degrees off TDC.
The reference marks on the camshaft gears should be aligned with the corresponding notches on the rear timing belt cover at this point. If they are not aligned, the engine is 180 degrees off.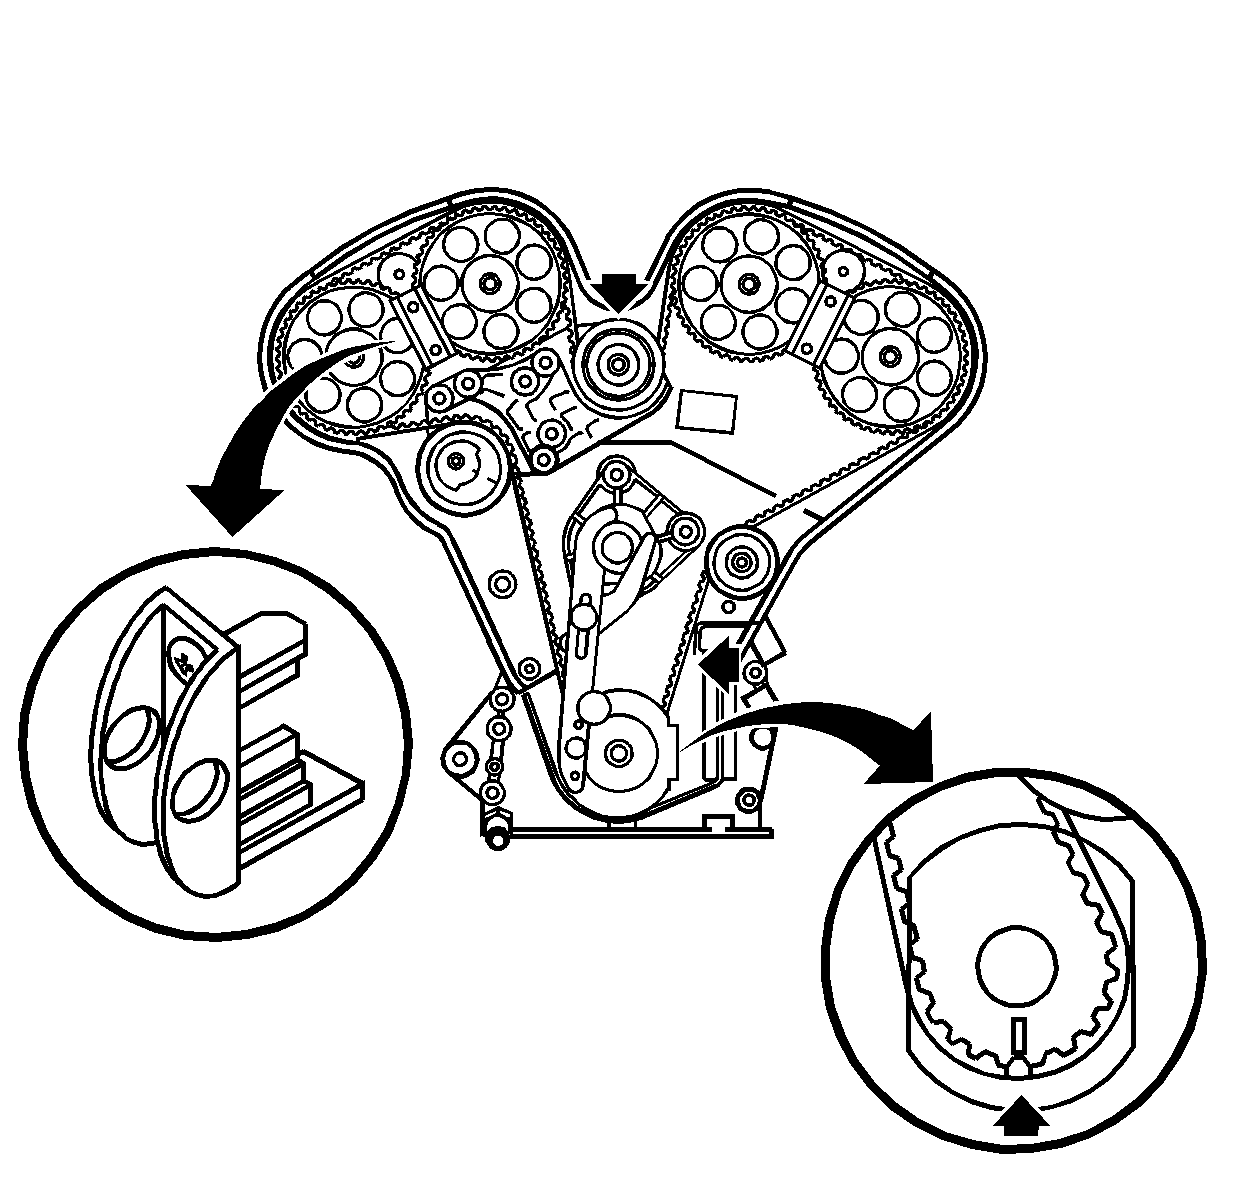
If the J 42069-1 or the J 42069-2 do not fit into the teeth of the camshaft gears, it may be necessary to loosen the upper idler pulley and turn the eccentric or camshaft gears until the tool can be inserted.
Notice: After timing belt is removed, never turn camshaft and crankshaft independently. If turned, interference may occur among pistons and valves, and parts related to pistons and valves may be damaged.
Important: Do not remove J 42069-1 and the J 42069-2 while the belt is removed.
Installation and Initial Adjustment Procedure
Notice: When installing a new or used timing belt, the directional arrows on the timing belt must be matched with the rotation of the crankshaft. If this precaution is not observed, excessive wear and timing belt failure may occur.
- Inspect the timing belt. Refer to Timing Belt Inspection .
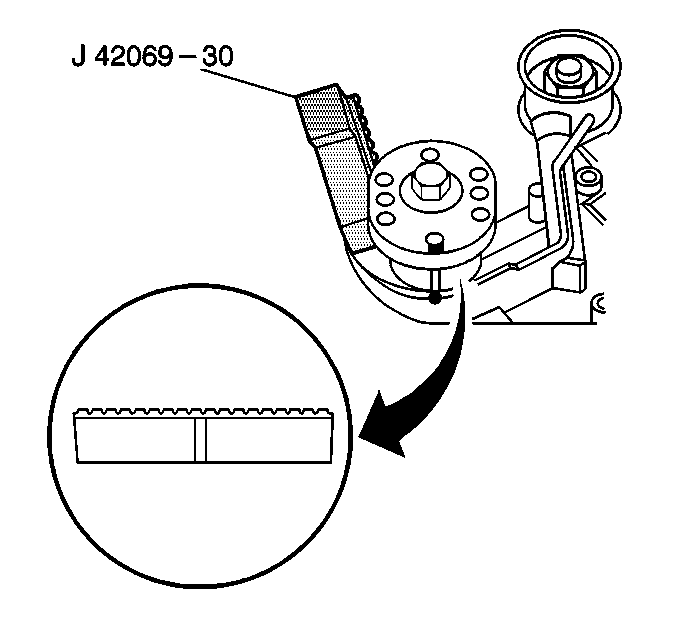
- Start at the crankshaft sprocket by aligning the double dash TDC mark on the timing belt with the marks on the oil pump housing and on the crankshaft sprocket.
- Wedge the J 42069-30 between the oil pump housing and timing belt in order to prevent the belt teeth from jumping the crankshaft sprocket teeth.
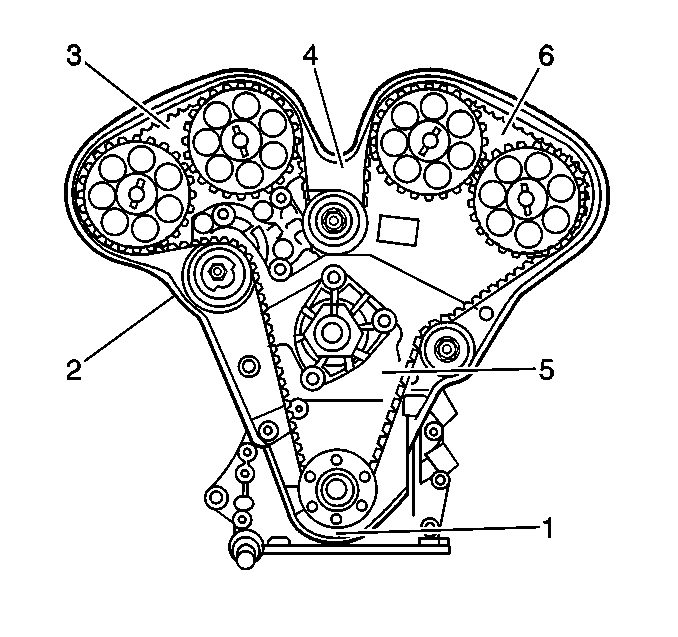
- Route the timing belt through the timing belt tensioner (2).
- Slip the timing belt through camshaft gears 1 and 2 simultaneously (3), ensuring the dash marks on the timing belt align with the marks on the camshaft gears and the notches on the rear timing belt cover.
- Route the timing belt through the upper idler pulley (4).
- Slip the timing belt through camshaft gears 3 and 4 simultaneously (6), ensuring the dash marks on the timing belt align with the marks on the camshaft gears and the notches on the rear timing belt cover.
- Using the J 42098 rotate the crankshaft counter clockwise to 3 degrees BTDC, allowing the timing belt to slide on the J 42069-30.
- Install the lower idler pulley and spacer with the timing belt.
- Install the lower idler pulley bolt.
- Turn the crankshaft back to TDC, using the J 42098 .
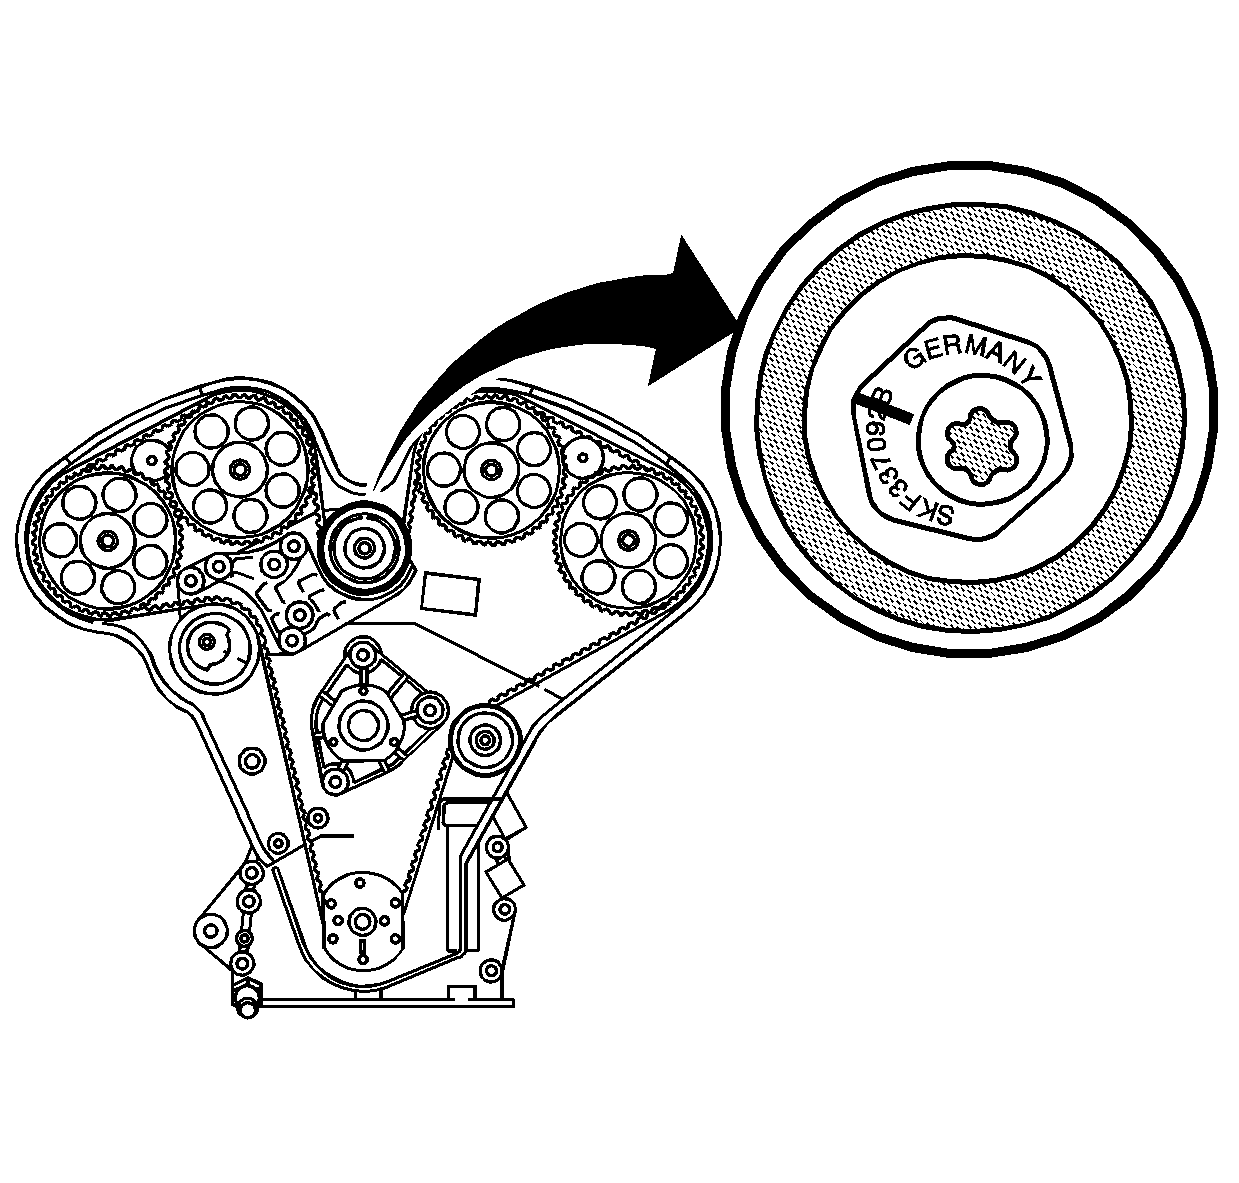
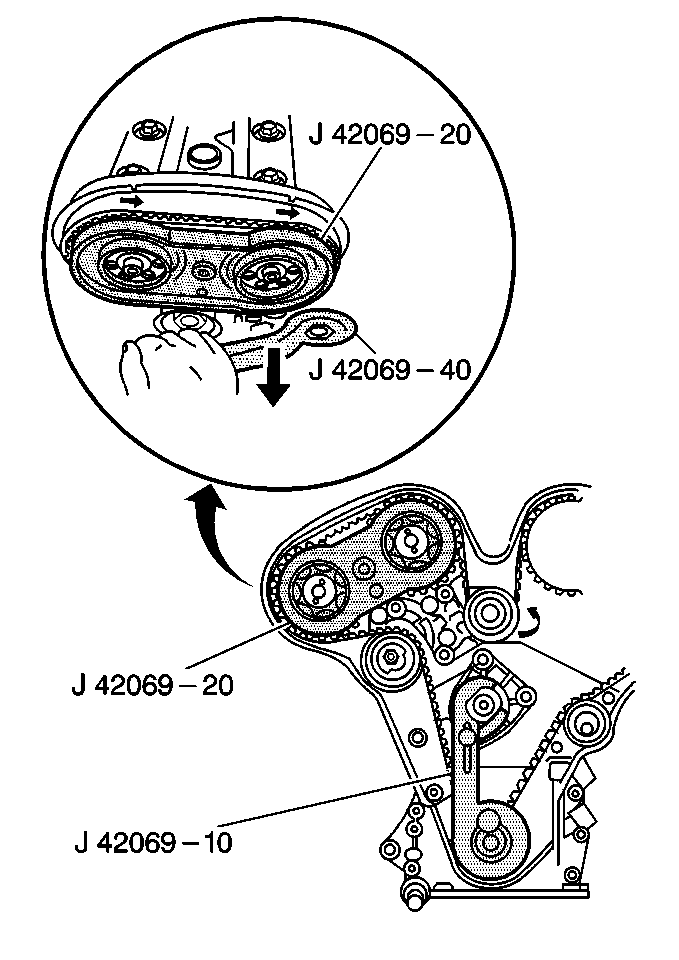
- Apply tension to the timing belt, at the upper idler pulley by turning the high point of the eccentric to approximately the 9 o'clock position. Tighten the idler pulley locking bolt, while holding the eccentric with the J 42069-40, until snug.
- Set the initial timing belt tension:
- Inspect the alignment marks on the timing belt to ensure that they are aligned with the appropriate reference points on the camshaft gears, the rear timing belt cover and on the oil pump housing.
- Remove the J 42069-30, the J 42069-1 and the J 42069-2 locking tools from the engine.
- Rotate the crankshaft clockwise 2 revolutions using the J 42098 until the #1 cylinder is 60 degrees BTDC.
- Install the J 42069-10 to the crankshaft sprocket with the knurled bolt.
- Rotate the crankshaft in the engine rotational direction, clockwise using the J 42098 until the lever of the J 42069-10 firmly contacts the water pump pulley flange.
- Secure the moveable lever of the tool to the water pump pulley flange.
- Inspect the alignment of the reference marks on the camshaft gears with the notches on the rear timing belt cover, as well as the mark on the crankshaft sprocket and oil pump housing.
- Use the J 42069-20 to inspect the alignment of the camshaft gears 3 and 4.
- Use the J 42069-20 to inspect the alignment of the camshaft gears 1 and 2.
- If timing belt adjustment IS REQUIRED, refer to Timing Belt Timing Adjustment .
- If timing belt adjustment IS NOT REQUIRED, set the final timing belt tension:
- Hold the upper idler pulley eccentric in place with the J 42069-40.
- Remove the J 42069-20 from the camshaft gears.
- Remove the J 42069-10 from the engine.
- For final inspection rotate the crankshaft in the engine rotational direction, clockwise 2 revolutions using the J 42098 until reaching 60 degrees BTDC.
- Install the J 42069-10 to the crankshaft sprocket.
- Rotate the crankshaft in the engine rotational direction, clockwise using the J 42098 until the lever of the J 42069-10 firmly contacts the water pump pulley flange.
- Secure the moveable lever of the tool to the water pump pulley flange.
- Inspect the alignment of the reference marks on the camshaft gears with the notches on the rear timing belt cover, as well as the mark on the crankshaft sprocket and oil pump housing.
- Use the J 42069-20 to inspect the alignment of the camshaft gears 3 and 4.
- Use the J 42069-20 to inspect the alignment of the camshaft gears 1 and 2.
- If the reference marks on the camshaft gears do not match exactly, timing belt adjustment IS REQUIRED.
- If the reference marks match exactly, further timing belt adjustment IS NOT necessary.
- Remove the J 42069-10 and the J 42069-20.
- Install the crankshaft balancer. Refer to Crankshaft Balancer Replacement .
- Install the timing belt cover. Refer to Timing Belt Cover Replacement .
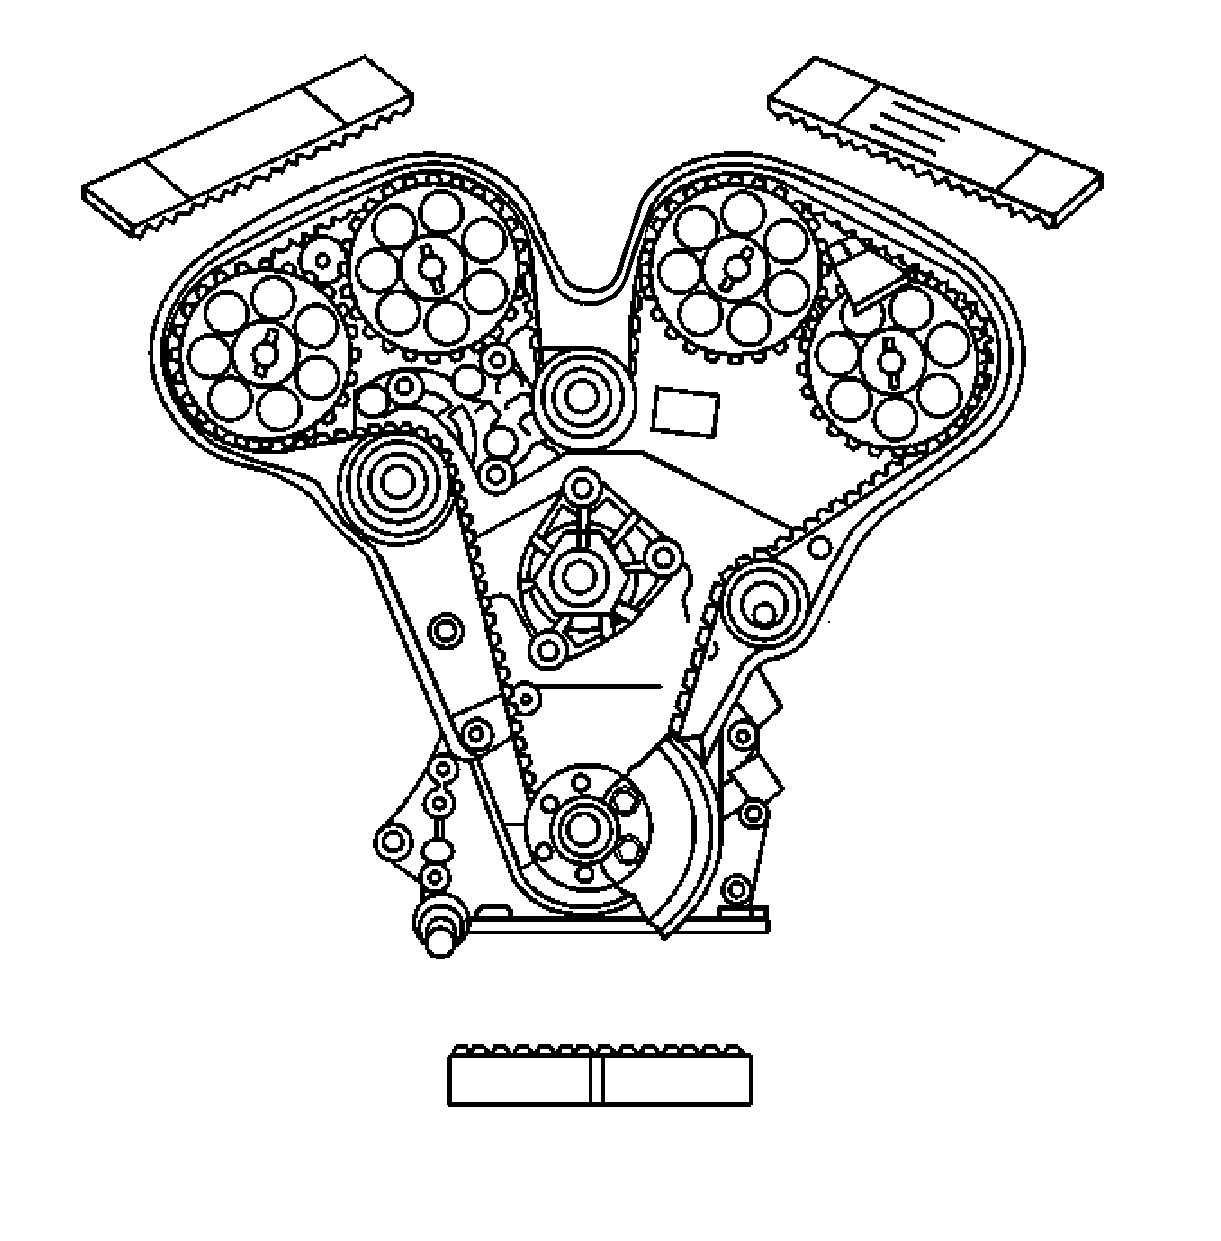
Important:
• Guide marks are printed on the timing belt to aid in installation. If
these marks are not identifiable, install a new belt. • Arrows are printed on the timing belt indicating the required direction
of travel. When installing the timing belt, ensure the arrows are traveling in engine
rotational direction, clockwise. • Install the timing belt with the engine at room temperature. • Do not crimp or bind the timing belt when handling or installing.
Notice: Refer to Fastener Notice in the Preface section.
Tighten
Tighten the lower idler pulley bolt to 40 N·m (30 lb ft).
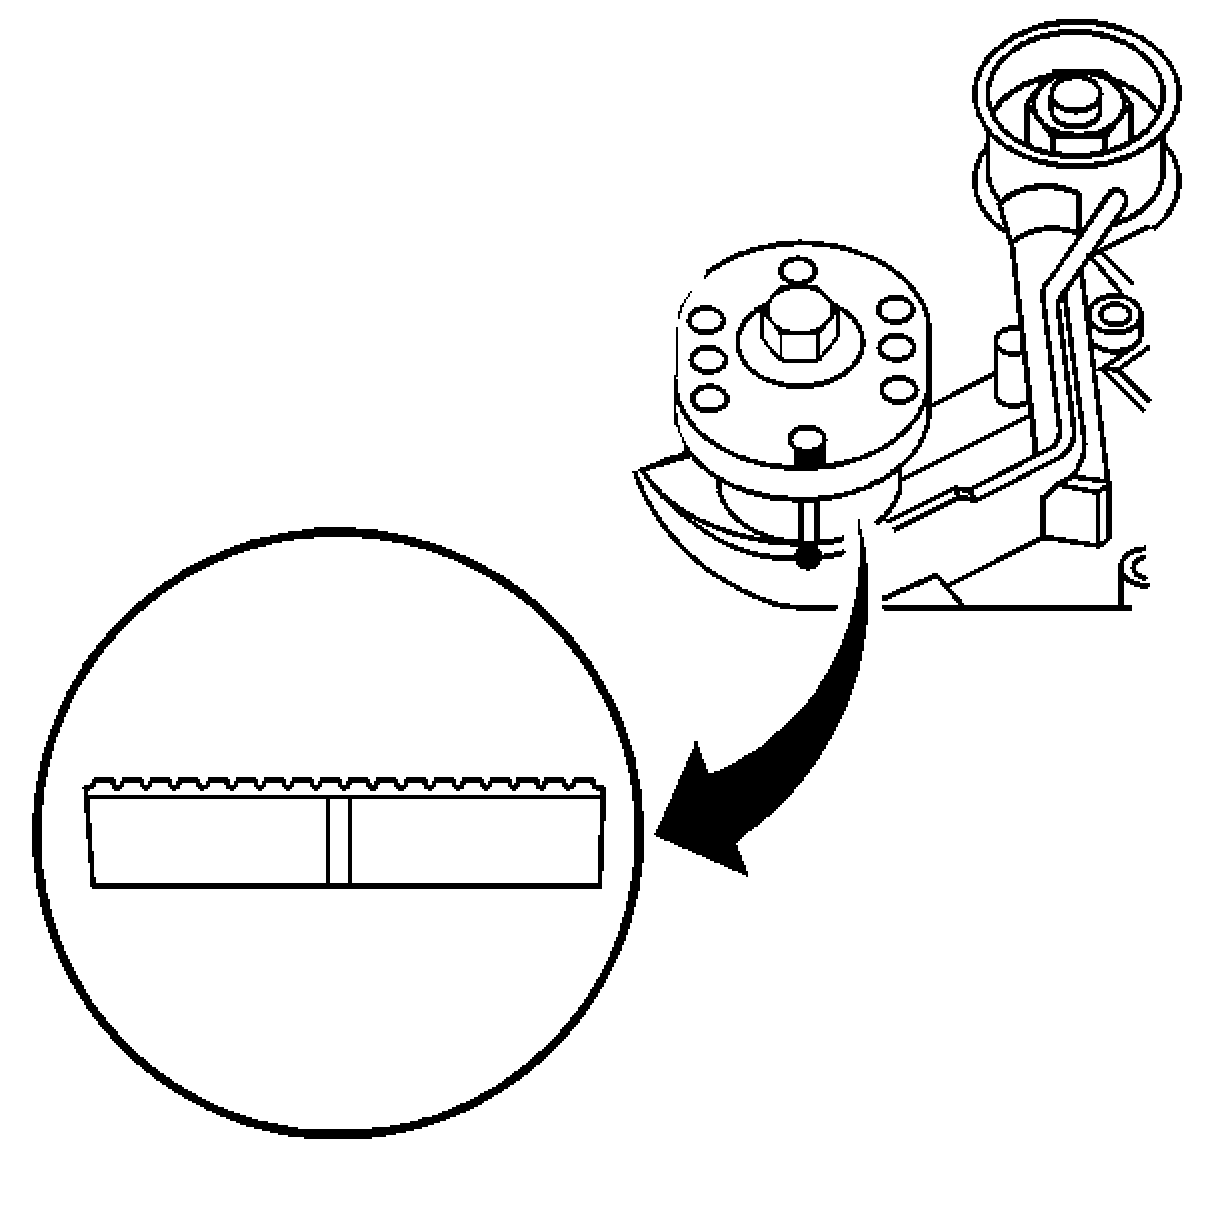
The idler pulley bolt will be tightened to specifications after all final adjustments are made.
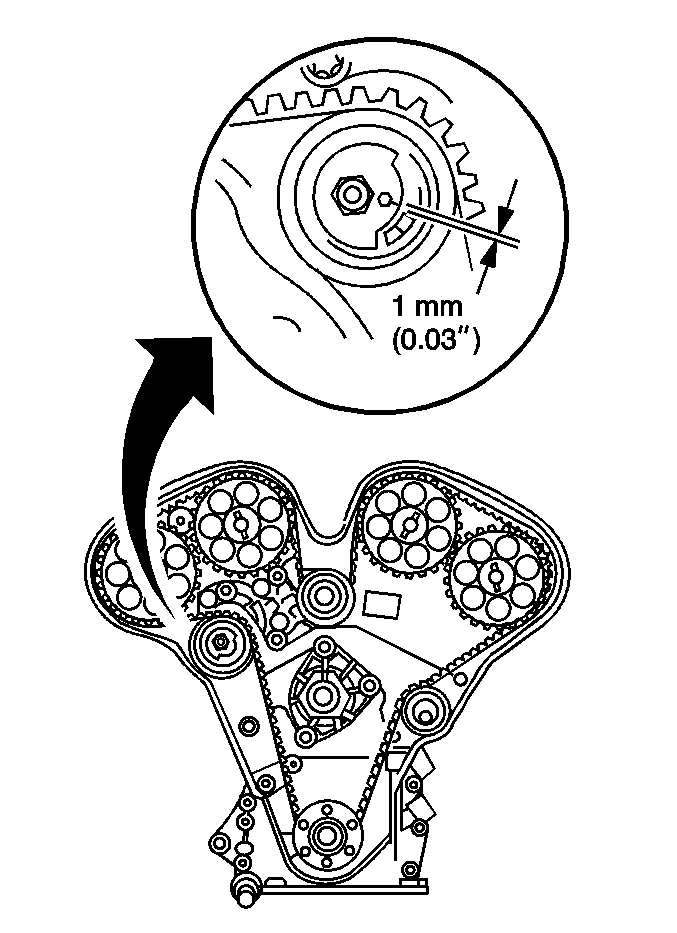
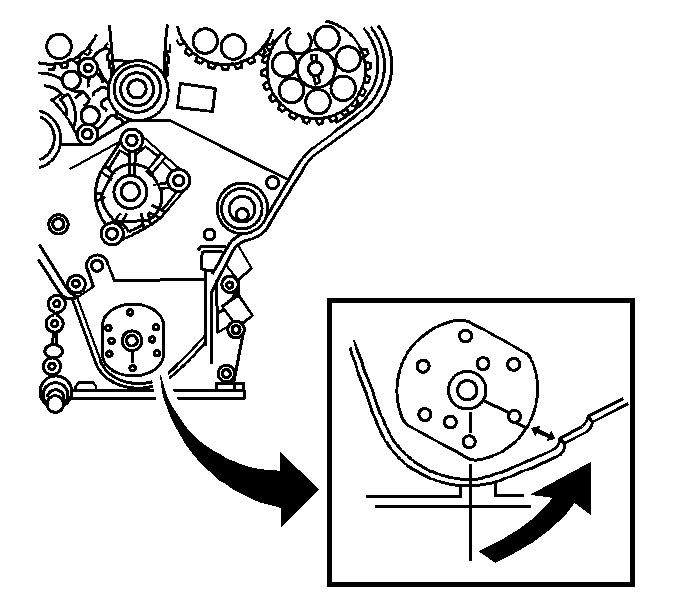
| 13.1. | Rotate the tensioner eccentric counter clockwise to full stop, turn the eccentric back until the reference mark is 1 mm (0.03 in) over the flange. |
| 13.2. | Tighten the timing belt tensioner locking nut until snug. |
The locking nut will be tightened to specifications after all final adjustments are made.

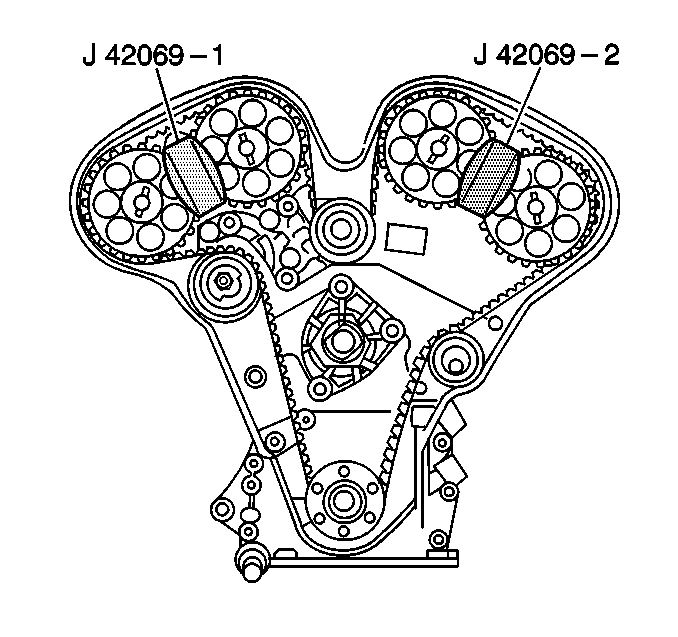

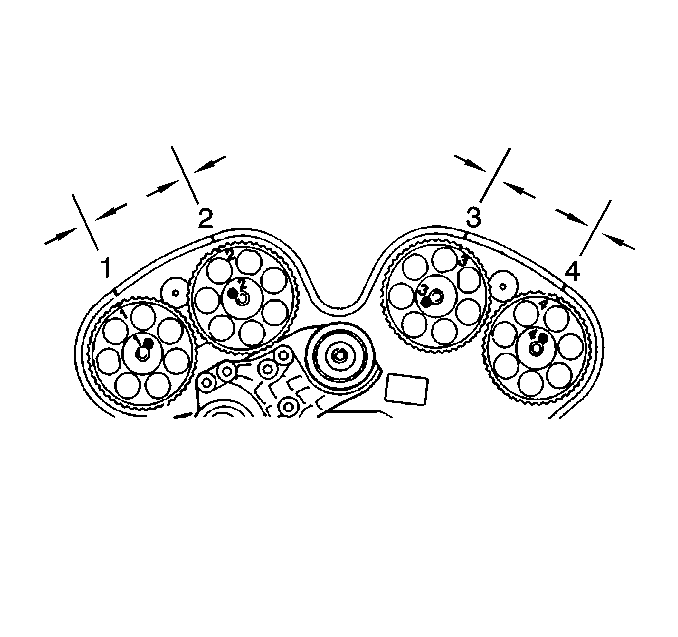
Important: The alignment marks on the timing belt will no longer align with the marks on the camshaft gears after one or more engine revolutions.
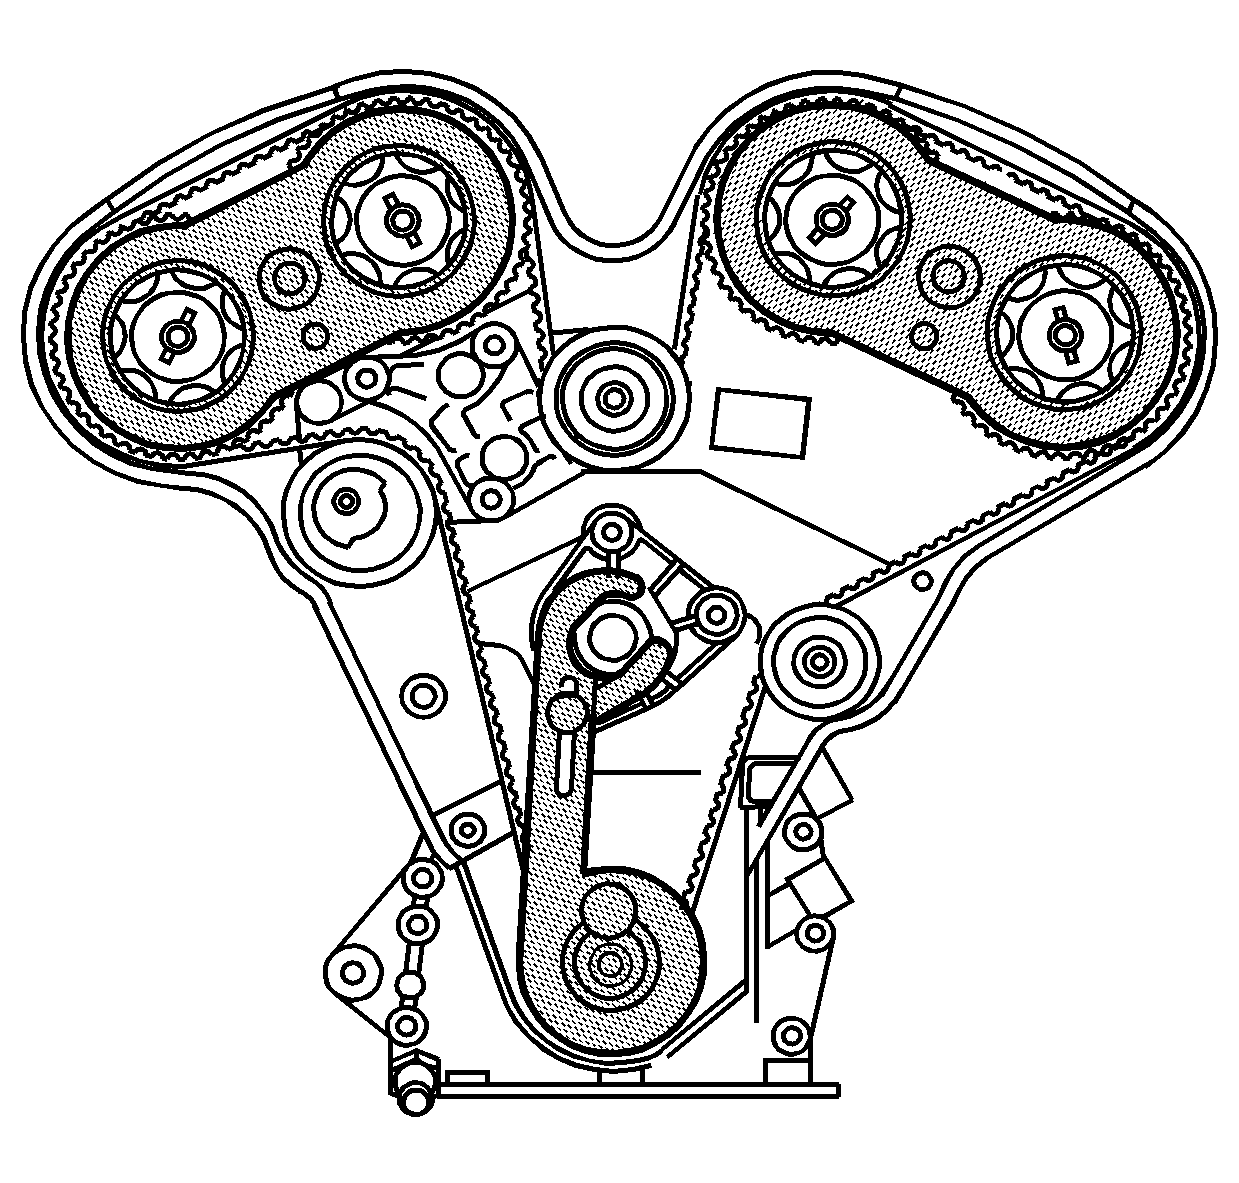
Important: The reference marks on both sets of the camshaft gears must match exactly with the marks on the J 42069-20 checking gage.
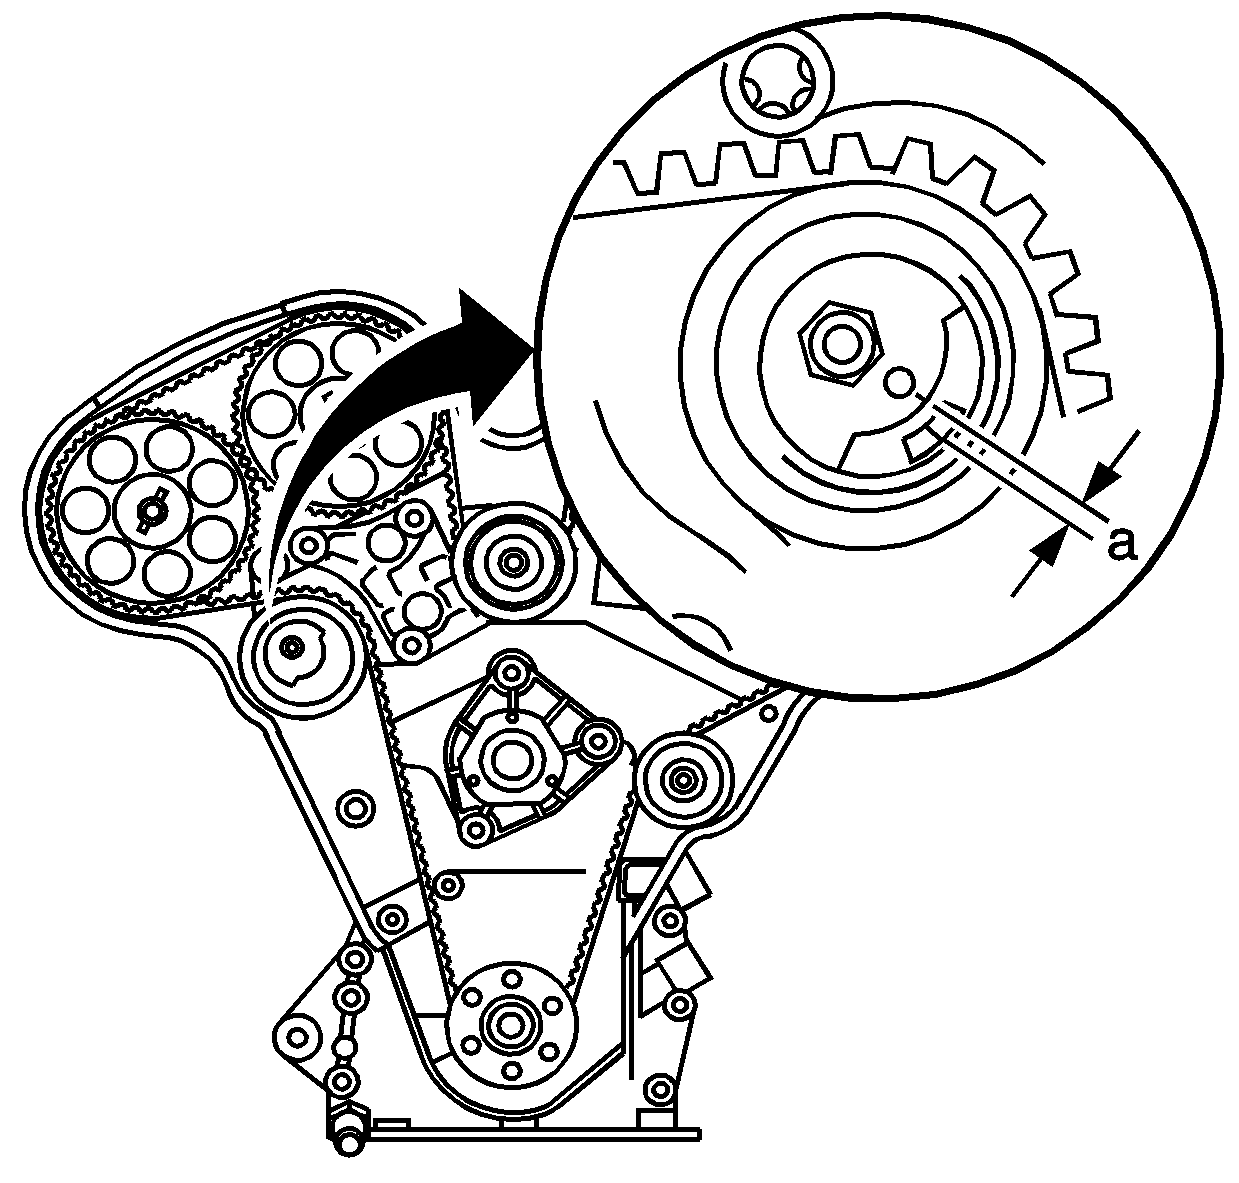
| 24.1. | Loosen the timing belt eccentric locking nut. |
| 24.2. | Turn the eccentric counter clockwise to full stop, then back to the following specification: |
| • | NEW BELT |
| • | until the reference mark is 3-4 mm (0.118-0.157 in) (a) above the datum line. |
| • | USED BELT |
| • | until the reference mark is aligned with the datum line. |
Tighten
Tighten the timing belt tensioner eccentric locking nut to 20 N·m
(15 lb ft).
Tighten
Tighten the upper idler pulley bolt to 40 N·m (30 lb ft).


Important: The alignment marks on the timing belt will no longer align with the marks on the camshaft gears after one or more engine revolutions.

Refer to. Timing Belt Timing Adjustment .
Continue with reassembly of the engine.
