Driver or Passenger Seat Back Cushion Finish Panel Replacement First design seat back
Removal Procedure
- Remove the front seat. Refer to Seat Replacement or Seat Replacement
- Remove the lumbar support actuator knobs.
- Remove the front seat cushion outer finish panel. Refer to Seat Cushion Outer Trim Panel Replacement
- Remove the front seat cushion inner finish panel by unsnapping.
- Remove the seatback map storage panel screws.
- Remove the front seatback map storage pocket and panel by disengaging tabs to release.
- Remove the seatback map storage pocket screws.
Use a small screwdriver to pry the knobs off.
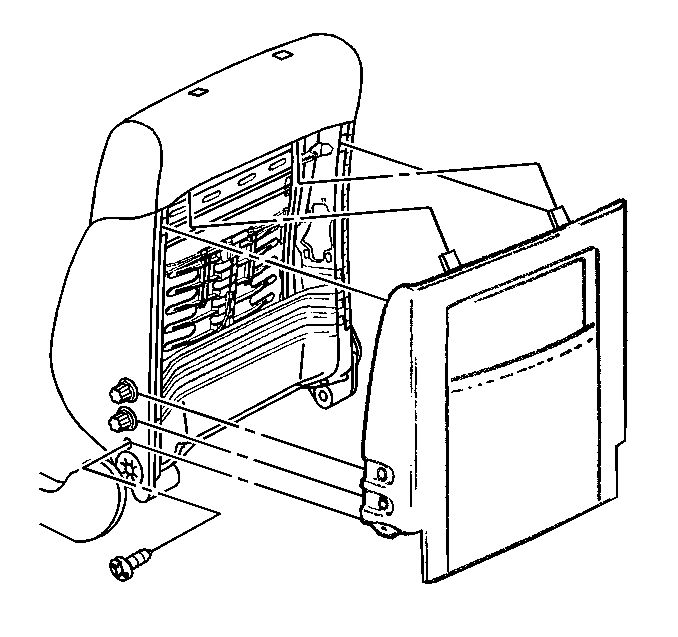
Remove the front seatback map storage pocket and panel by disengaging tabs to release.
Installation Procedure
- Install the front seatback map storage pocket.
- Install the front seatback map storage pocket screws.
- Install the front seatback map storage pocket and panel.
- Install the front seatback map storage pocket panel screws.
- Install the front seat cushion inner finish panel by snapping on.
- Install the Lumbar support actuator knobs.
- Install the front seat. Refer to Seat Replacement or Seat Replacement
Tighten
Tighten the front seatback map storage pocket screws until fully seated
and not stripped. Refer to
Notice: Use the correct fastener in the correct location. Replacement fasteners must be the correct part number for that application. Fasteners requiring replacement or fasteners requiring the use of thread locking compound or sealant are identified in the service procedure. Do not use paints, lubricants, or corrosion inhibitors on fasteners or fastener joint surfaces unless specified. These coatings affect fastener torque and joint clamping force and may damage the fastener. Use the correct tightening sequence and specifications when installing fasteners in order to avoid damage to parts and systems.
Install the front seatback map storage pocket and panel by engaging tabs to secure in place.
Notice: Use the correct fastener in the correct location. Replacement fasteners must be the correct part number for that application. Fasteners requiring replacement or fasteners requiring the use of thread locking compound or sealant are identified in the service procedure. Do not use paints, lubricants, or corrosion inhibitors on fasteners or fastener joint surfaces unless specified. These coatings affect fastener torque and joint clamping force and may damage the fastener. Use the correct tightening sequence and specifications when installing fasteners in order to avoid damage to parts and systems.
Tighten
Tighten the front seatback map storage pocket panel screws until fully
seated and not stripped.
Install the front seat cushion outer finish panel. Refer to Seat Cushion Outer Trim Panel Replacement
Grasp knob and push inward to secure.
Driver or Passenger Seat Back Cushion Finish Panel Replacement Second design seat back
Removal Procedure
- Move the front seat to the full forward position.
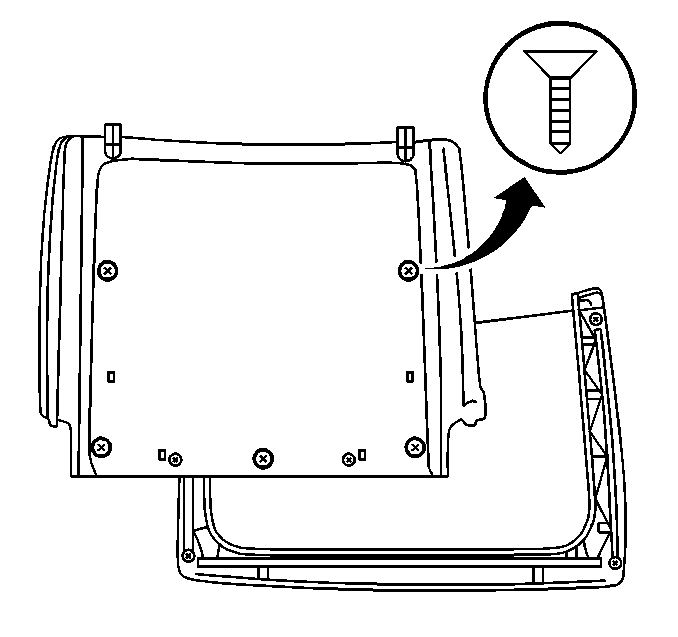
- Remove the seatback panel screws.
- Remove the seatback panel from the seatback.

Installation Procedure
- Install the seatback panel to the seatback.
- Install the seatback panel screws.
- Install the front seat to original position.
Notice: Use the correct fastener in the correct location. Replacement fasteners must be the correct part number for that application. Fasteners requiring replacement or fasteners requiring the use of thread locking compound or sealant are identified in the service procedure. Do not use paints, lubricants, or corrosion inhibitors on fasteners or fastener joint surfaces unless specified. These coatings affect fastener torque and joint clamping force and may damage the fastener. Use the correct tightening sequence and specifications when installing fasteners in order to avoid damage to parts and systems.
Tighten
Tighten the front seatback panel screws until fully seated and not stripped.
