OIL FROM VENT / THM125 AUX. VALVE BOLTS MAY BOTTOM

TRANSMISSION OIL EXHAUSTING FROM VENT - THM 125C
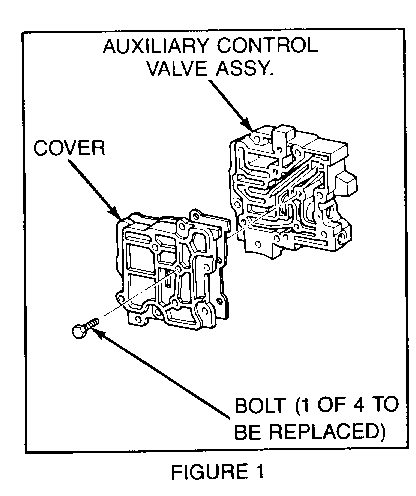
Some 1982-1983 Cimarrons equipped with THM 125C transaxles may exhibit a condition of transmission oil exhausting from the vent. The condition can be caused by a loose auxiliary control valve assembly cover plate (refer to Figure 1).
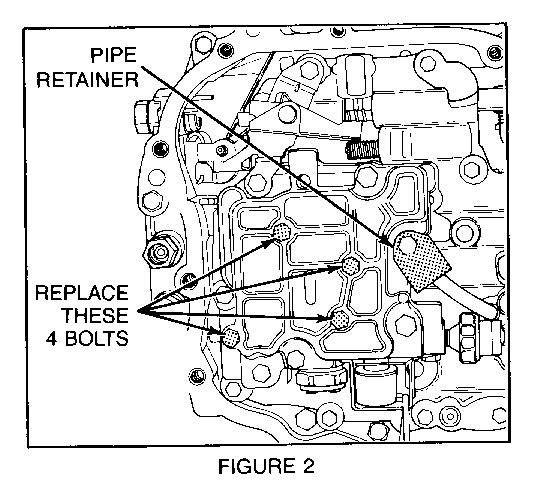
The cover plate can be loose because the four bolts that secure it to the auxiliary control valve assembly are bottoming out in the bolt hole threads in the auxiliary control valve assembly (refer to Figure 2). The bolts will tighten to the correct torque specification but will not clamp the cover plate tightly to the assembly.
To correct the condition, it will be necessary to install the correct size bolts (P/N 8643250) which are M6 x 1.0 x 20mm and available through GMWDD.
To replace the bolts with the transaxle in the vehicle, proceed as follows:
1. To gain access to the auxiliary control valve assembly, remove all but two of the control valve cover (oil pan) to case retaining bolts.
2. Leave the two remaining bolts 180 DEG apart and only finger tight.
3. Using a rubber mallet, strike an outer edge of the cover to shear the RTV seal. (DO NOT pry the cover loose from the case as damage to the cover or case flange will occur.)
4. Remove the two remaining bolts and allow the fluid to drain.
5. Remove the original four bolts attaching the cover plate to the auxiliary control valve assembly as shown in Figure 2.
6. Install the four correct size bolts and torque each of them to 11 N.m (8 ft. lbs.).
7. Use a sharp edge plastic scraper to remove any excess or loose RTV sealant from the control valve cover or case flange. The flanges do not have to be completely clean; only loose or excessive RTV must be removed. (Make certain to remove any loose RTV that may have fallen into the cover or case.)
8. Use a dry, clean shop towel with solvent to remove all traces of transmission oil from the cover and case flanges. (If the flanges are not dry and free of any oil film, leakage may result.)
9. Put a 1/16" bead of RTV sealant (P/N 1052734) on the cover's flange (make certain the bead is applied around the inside of all bolt holes) and position it onto the case while the sealant is still wet.
10. Install the control valve cover to case attaching bolts and torque to 16 N.m (12 ft. lbs.).
11. Follow label directions in regard to RTV sealant curing time.
12. Add sufficient transmission fluid to bring the transaxle level to specification.
13. Check for any transmission oil leaks in the control valve cover area. If necessary, repeat Steps 1 through 4 and 7 through 13 to eliminate a transmission oil leak in the cover area.
For warranty purposes, use labor Operation No. K6545 at .9 hour.


General Motors bulletins are intended for use by professional technicians, not a "do-it-yourselfer". They are written to inform those technicians of conditions that may occur on some vehicles, or to provide information that could assist in the proper service of a vehicle. Properly trained technicians have the equipment, tools, safety instructions and know-how to do a job properly and safely. If a condition is described, do not assume that the bulletin applies to your vehicle, or that your vehicle will have that condition. See a General Motors dealer servicing your brand of General Motors vehicle for information on whether your vehicle may benefit from the information.
