MPFI FUEL SYSTEM PULSATOR P/N-REPAIR FUEL SYSTEM NOISE

SUBJECT: FUEL PUMP NOISE
MODELS AFFECTED: 1986-1987 ELDORADO, SEVILLE, CIMARRON 1987 DE VILLE, FLEETWOOD, ALLANTE
Some 1986-1987 Cadillac models may experience a fuel pump noise condition such as a whine, rattle, or gurgle.
This condition may be caused by inadequate fuel tank to body isolation, an ineffective fuel pump pulsator, or a combination of both.
To repair this condition, the following service procedure should be performed. Use the service procedure listed below for the appropriate model:
1987 ALLANTE:
1. Drain and remove the fuel tank following the procedures described in the 1987 Cadillac Allante Service Information Manual, Page 6C-3. NOTE: Using a felt tip marker or other marking tool, mark the position of the tank support straps on the tank to ensure that the straps are reinstalled in the original location.
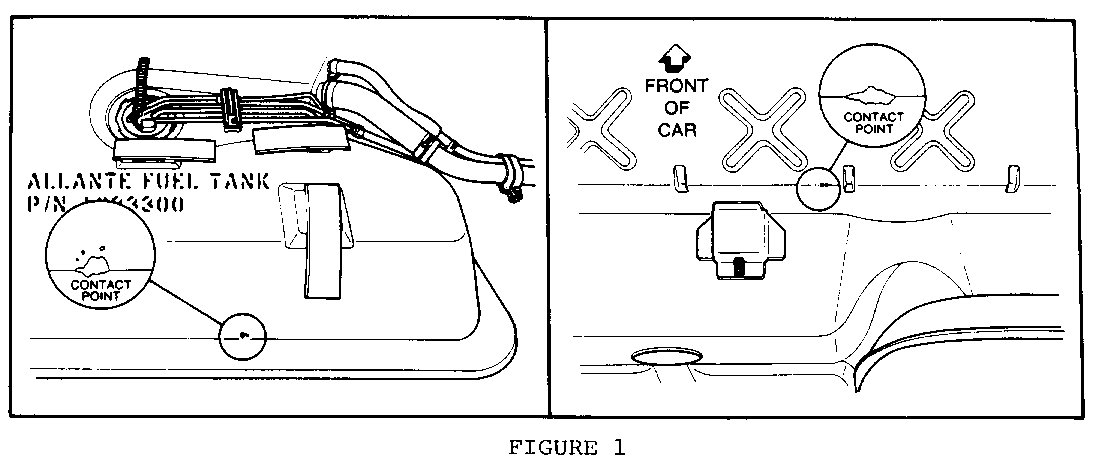
2. Inspect the fuel tank and underbody surface for any evidence of rubbing or tank-to-body contact (refer to Figure 1).
3. Clean the top of the fuel tank and remove the fuel tank sending unit following procedures on Page 6C-3 of the Allante Service Manual.
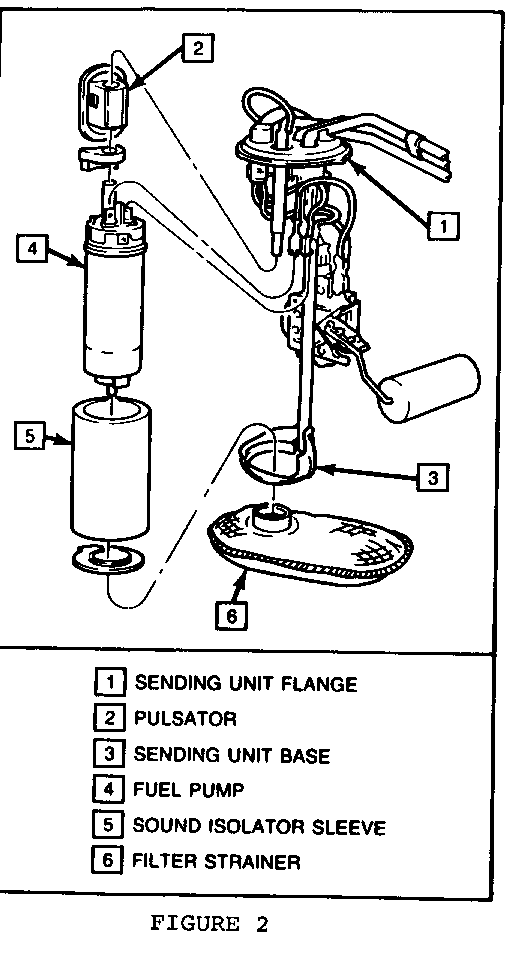
4. Verify that adequate clearance exists between the base of the sending unit and the bottom of the fuel tank. To do this, remove the 0-ring from the sending unit. Temporarily reinstall the sending unit into the tank. The flange of the sending unit (Figure 2) should rest on the lip of the tank opening. If the sending unit flange does not rest on the fuel tank lip, a new sending unit will be required. Repeat step four on the new sending unit to verify proper clearance.
5. Remove the sending unit from the fuel tank. Note the orientation of the fuel pump filter strainer for later reinstallation. Remove the fuel pump and fuel pump pulsator from the sending unit.
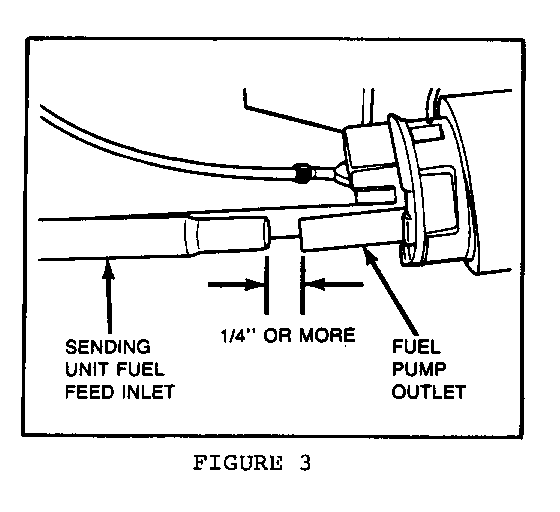
6. Temporarily position the fuel pump, without a pulsator, into the sending unit. With the fuel pump fully seated into the base of the sending unit, measure the clearance between the fuel pump outlet and the fuel feed inlet of the sending unit. This clearance must be 1/4" or more (refer to Figure 3). If inadequate clearance is obtained, a new sending unit will be required. Repeat step six to verify proper clearance.
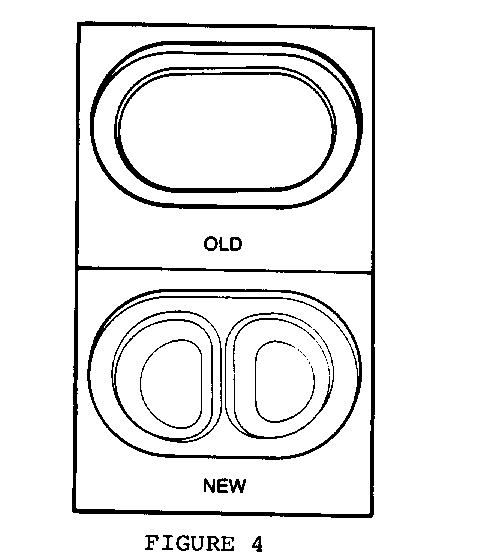
7. Remove the fuel pump. Install a new design pulsator, P/N 25094266, with the original fuel pump into the sending unit. The new design pulsator can be identified by a double-chambered appearance (refer to Figure 4). Assure that the fuel pump is fully seated into the base of the sending unit to maintain the minimum 1/4" clearance. Reinstall the fuel pump filter strainer in the original orientation.
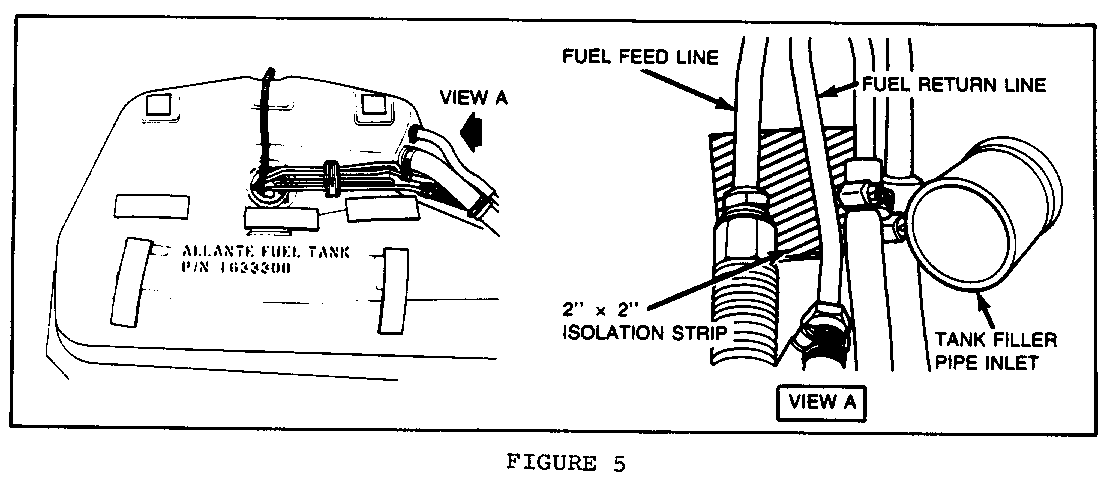
8. Place the 2" x 2" isolation strip from the Sound Isolation Kit, P/N 22530899, on the fuel tank (in the position shown in Figure 5) to isolate the fuel return and feed pipes from the tank surface. NOTE: The two molded rubber fuel line isolators included in the Sound Isolation Kit will not be used in this procedure.
9. Using a new sending unit 0-ring, P/N 22515965, reinstall the sending unit into the fuel tank.
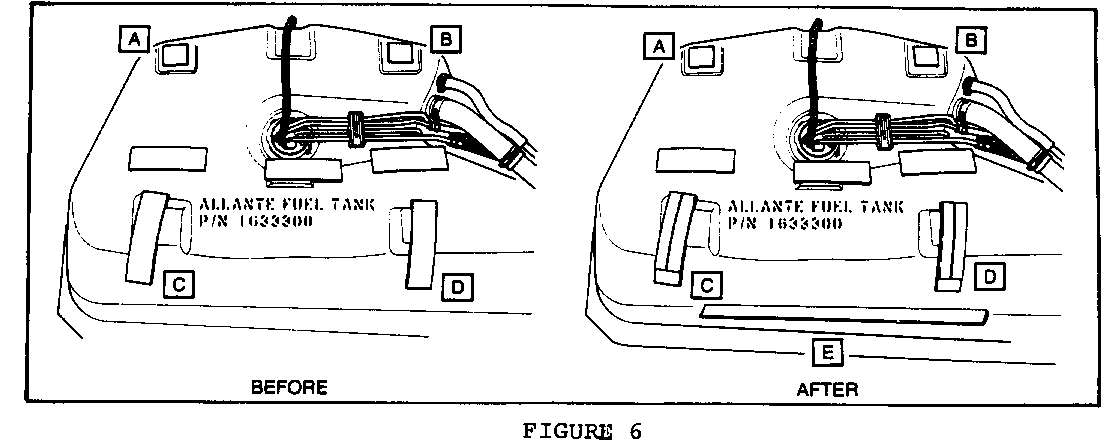
10. Referring to Figure 6, note the location of the original isolation strips on the upper surface of the fuel tank.
a. Cut the remaining 2" x 6" isolation strip from the kit into two equal 2" x 3" pieces. Install these pieces on top of the existing isolation pads at locations A and B (Figure 6).
b. Cut one of the long isolation strips from the Isolation Kit into four 6" pieces. Place two strips, side by side, on top of each existing tank isolation pad at tank locations C and D (refer to Figure 6, "After").
c. Place the remaining long isolation strip from the Isolation Kit into the curve of the tank (labeled E on Figure 6, "After").
11. Raise and position the fuel tank to the vehicle underbody. Install two 7/16" flat washers, P/N 3899696 or equivalent, at each bolt/nut location between the strap and the vehicle underbody. This will prevent excessive crush of the double-thickness isolation strips.
12. Assure that the tank straps are in the original location marked on the tank in step 1. Torque the fasteners to 35 N-m (25 ft. lbs.). NOTE: Assure that the fuel tank weld flange at the front of the fuel tank is not contacting the tank support strap anchors.
13. Reconnect the battery cable and check for fuel leaks.
1987 DE VILLE, FLEETWOOD:
Perform the above steps 1-7. Refer to the 1987 DeVille/Fleetwood Service Information Manual, Section 6C for fuel tank removal.
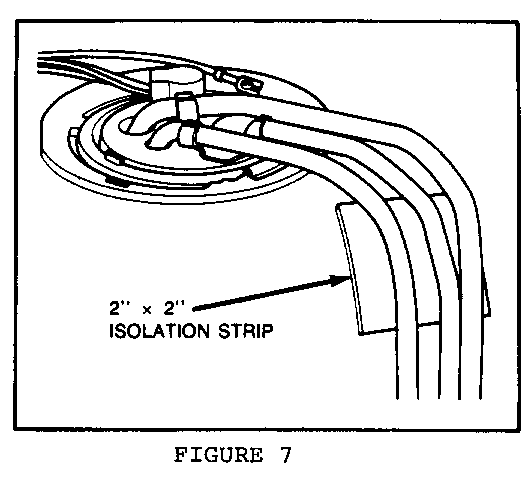
8. Place the 2" x 2" isolation strip from the Sound Isolation Kit, P/N 22530899, on the fuel tank (in the position shown in Figure 7) to isolate the fuel return and feed pipes from the tank surface. NOTE: The two molded rubber fuel line isolators included in the Sound Isolation Kit will not be used in this procedure.
9. Using a new sending unit 0-ring, P/N 22515965, reinstall the sending unit into the fuel tank.
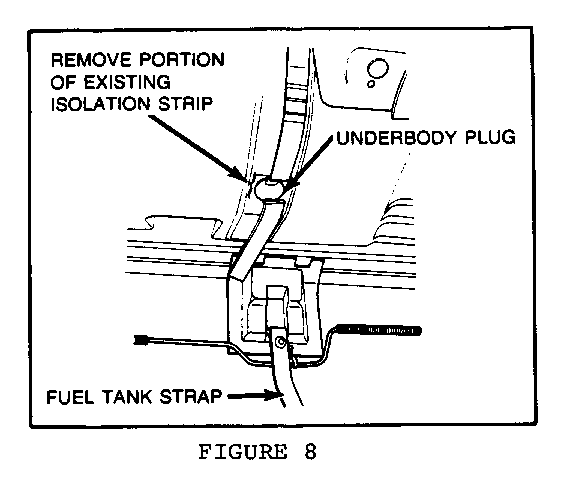
10. Referring to Figure 8, cut and remove the 1-1.5" portion of the existing long isolation strips covering the underbody plugs.
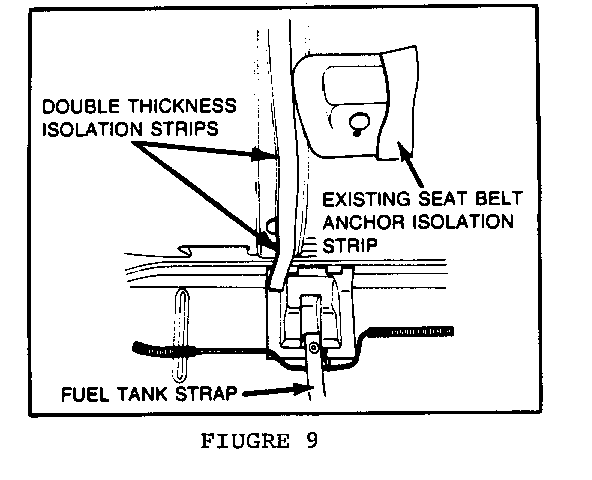
11. Install the long isolation strips from the Isolation Kit over the existing long underbody strips. The new strips will cover the underbody plugs (refer to Figure 9).
12. Raise and position the fuel tank to the vehicle underbody. Make sure that existing seat belt anchor isolation strips are in position (refer to Figure 9). Install two 7/16" flat washers, P/N 3899696 or equivalent, at each bolt location between the strap and the vehicle underbody. This will prevent excessive crush of the double-thickness isolation strips.
13. Assure that the tank straps are in the original location marked on the tank in step 1. Torque the fasteners to 35 N-m (25 ft. lbs.).
14. Reconnect the battery cable and check for fuel leaks.
1986-1987 ELDORADO, SEVILLE, CIMARRON:
Similar procedures for installation of the new design pulsator are required for these models. In addition, for the 1986 models it will be necessary to check the fuel pump part number stamped into the pump body underneath the foam isolation sleeve. If part number is either 6442409 or 6442439, replace the pump. See the GMSPO parts catalog for the correct application. Using the appropriate model Service Information Manual, follow the procedure described above for Allante repair, steps 1-7, step 9, and step 13.
Parts Required Part Number -------------- ----------- Pulsator 35094266 Sound Isolation Kit 22530899 O-Ring, Fuel Sending Unit 22515965 Flat Washer Package 3899696
For warranty purposes, use Labor Operation T6251 at 1.7 hours for Allante, 1.5 hours for DeVille and Fleetwood, 1.5 hours for Cimarron, and 1.4 hours for Eldorado and Seville.
General Motors bulletins are intended for use by professional technicians, not a "do-it-yourselfer". They are written to inform those technicians of conditions that may occur on some vehicles, or to provide information that could assist in the proper service of a vehicle. Properly trained technicians have the equipment, tools, safety instructions and know-how to do a job properly and safely. If a condition is described, do not assume that the bulletin applies to your vehicle, or that your vehicle will have that condition. See a General Motors dealer servicing your brand of General Motors vehicle for information on whether your vehicle may benefit from the information.
