ENGINE OVERHEATS IN HIGH AMBIENT CONDITIONS

ENGINE OVERHEATS IN HIGH AMBIENT CONDITIONS - INSTALL FAN SHROUD KIT AND AIR DEFLECTOR
VEHICLES AFFECTED: 1985-1987 'J' CARS -----------------
Some 1985-1987 'J' cars equipped with the 2.8L V-6 engine may overheat in high ambient conditions without heavy engine loads (i.e., during low speed, light load driving). Symptoms are steam and coolant boil over. This condition should not be confused with an inaccurate temperature gauge reading, or with coolant afterboil on 1985-1986 models, which can be repaired by installing a larger overflow bottle (P/N 14093493).
This condition may be caused by a cooling fan shroud that allows too much underhood air recirculation. To repair this condition, install a new fan shroud. Also, to aid in reducing the underhood temperature, install a new front air deflector.
The parts required to repair this condition are listed below:
Fan Shroud Kit: P/N 22088901 Air Deflector : P/N 22532605
To repair this condition, the following steps should be performed:
1. Raise hood, install fender covers.
2. Disconnect the negative battery cable.
3. Remove the air cleaner cover and element.
4. Disconnect the MAF/MAT sensor connector.
5. Remove the air cleaner body assembly.
6. Remove hood latch plate (mark position for reinstallation) and disconnect release cable and position out of the way.
7. Raise car.
8. Remove the air deflector (3 bolts).
9. Disconnect the coolant fan wire connector.
10. Remove the lower fan shroud mounting bolt.
11. Lower car.
12. Remove the two upper fan shroud mounting bolts and remove the fan and shroud assembly.
13. Remove fan and motor from shroud and install in new fan shroud P/N 22088901.
14. Install fan and shroud assembly. Secure with the two upper mounting bolts.
15. Install release cable and hood latch plate.
16. Install air cleaner body, cover and element.
17. Connect MAF/MAT sensor connector.
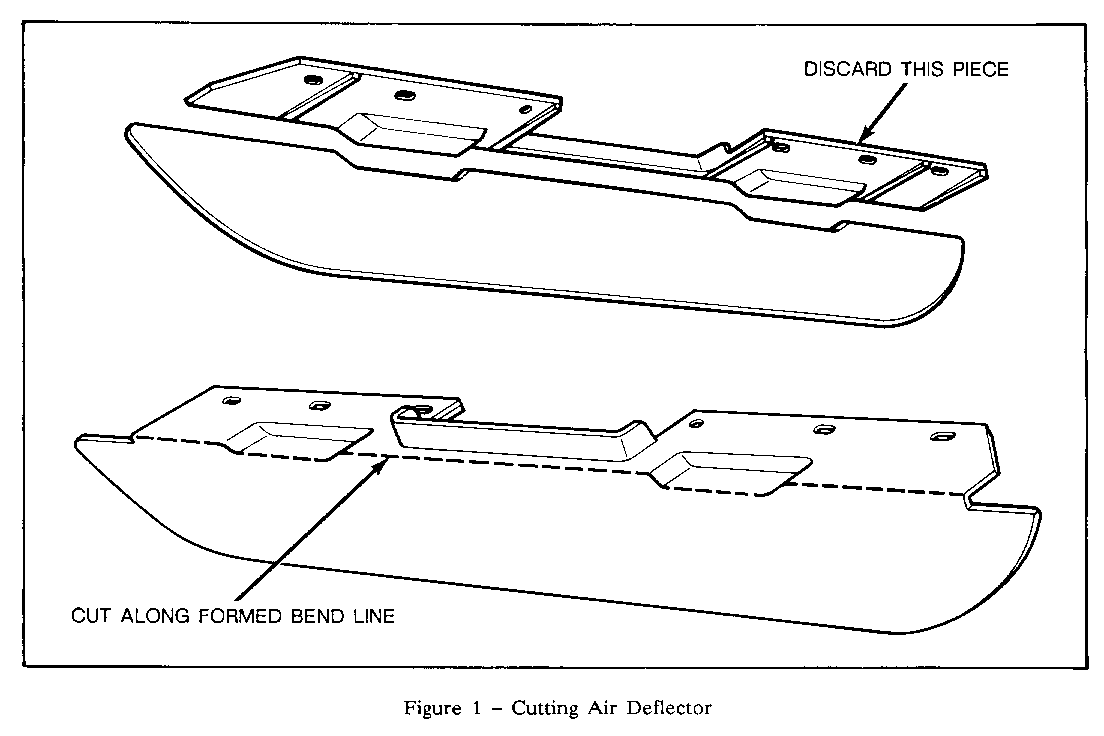
18. Cut the air deflector, P/N 22532605, along the formed bend line using a utility knife with a heavy duty blade, refer to Figure 1.
19. Trim any excess material that may be on the lower portion of the deflector that would prevent it from laying flat on the lower portion of original deflector.
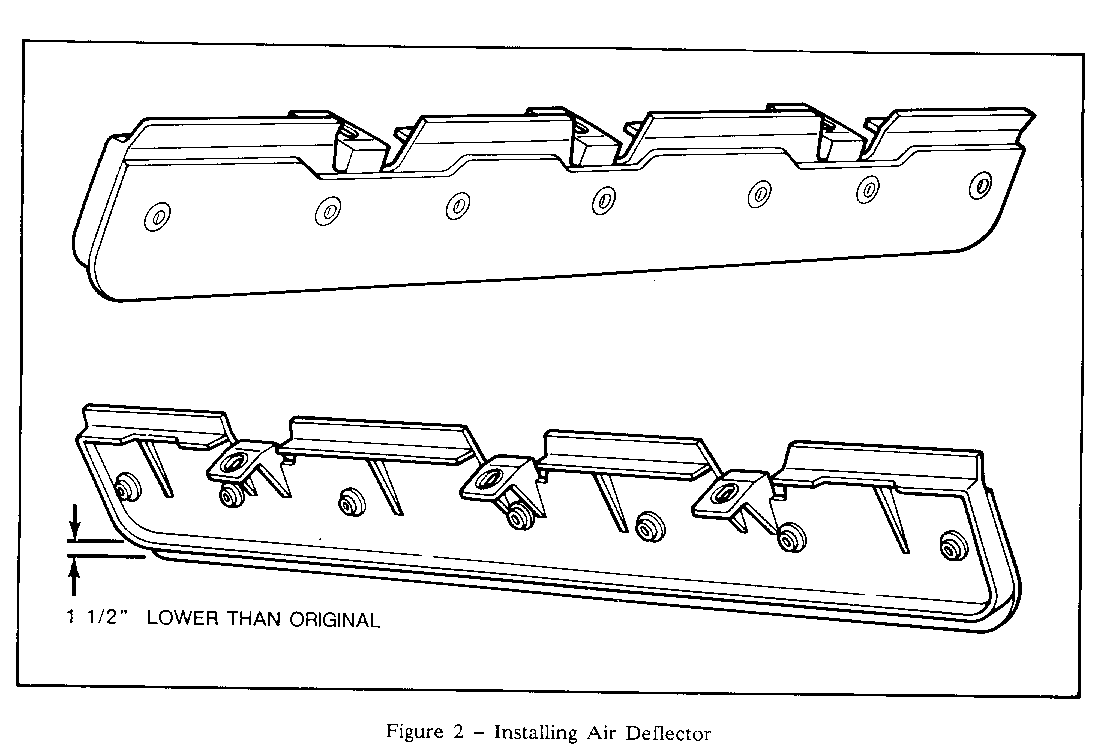
20. Position the lower portion of the deflector over the original deflector so an equal amount of material extends from both sides. The lower edge should extend 38.1 mm (1.5") lower than the original deflector's bottom edge, refer to Figure 2.
21. Clamp at both ends using small vise grip pliers and drill 7-3.175 mm (1/8") holes as indicated in Figure 2.
22. Secure extension in place with 1/8" x 1/2" aluminum rivets using reinforcing washers on both sides.
23. Trim air deflector extension ends even with original air deflector ends.
24. Raise car.
25. Install lower Shroud bolt and fan connector.
26. Install extended air deflector (three bolts).
27. Lower car.
28. Connect negative battery cable.


General Motors bulletins are intended for use by professional technicians, not a "do-it-yourselfer". They are written to inform those technicians of conditions that may occur on some vehicles, or to provide information that could assist in the proper service of a vehicle. Properly trained technicians have the equipment, tools, safety instructions and know-how to do a job properly and safely. If a condition is described, do not assume that the bulletin applies to your vehicle, or that your vehicle will have that condition. See a General Motors dealer servicing your brand of General Motors vehicle for information on whether your vehicle may benefit from the information.
