- It is only necessary to lower the headliner. Only do those steps in the headliner replacement procedure that will lower the headliner enough to gain access to the part.
- Remove the mounting bolts to the motor.
- Disengage the motor from the drive cables and module, keep the electrical connectors connected.
- Push and hold the sunroof switch to the close position, until the sunroof motor gear stops rotating.
- Remove the sunroof window. Refer to Sunroof Window Replacement.
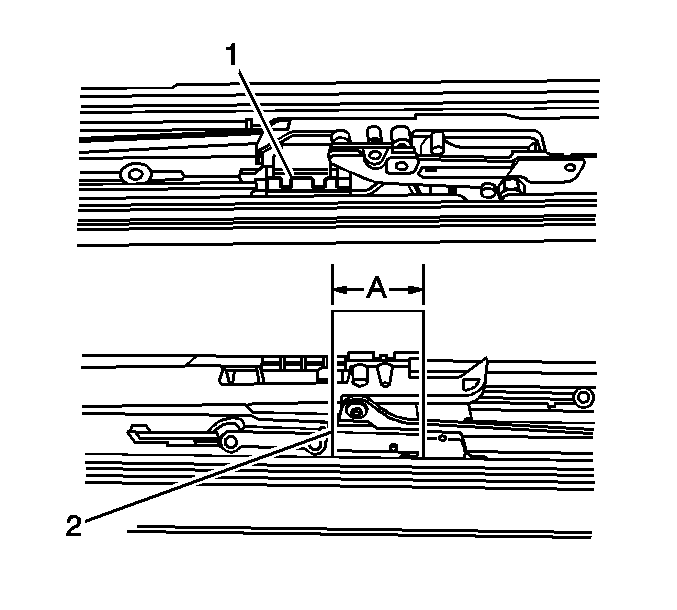
- Fabricate a gage (2) 46.8 +/- 0.5 mm (1.84 in) wide (A).
- Set the gage into the track near the rear of the opening between the move drive slide (1) and the bracket.
- Move the drive slide fore or aft in order to get the proper setting.
- Repeat steps 3 and 4 for the other side.
- Install the sunroof window. Refer to Sunroof Window Replacement.
- Install the sunroof actuator. Refer to Sunroof Motor/Actuator Replacement.
- Operate the sunroof through all functions to ensure proper operation.
- Install the headliner and molding.
Important: If the sunroof actuator is the only part being serviced, follow the power sunroof actuator replacement procedure for the sunroof actuator to sunroof window timing. Refer to Sunroof Motor/Actuator Replacement.
A new replacement power sunroof actuator is set to the fully closed and flush position at the factory.Important: If the sunroof is damaged to the point that the window and or cables cannot be moved to the closed position, then the following procedure should be followed to time the electronics to the close position independently of the module sunroof.
Important: Do Not disconnect the electrical connectors to the motor or control module ( if equipped).
Important: The motor will have to be run to the stopped position to ensure the motor and module are timed.

Important: After the motor has been remove it will be necessary to align the module tracks with motor.
A piece of thick paper will work.
