Special Tools
| • | J 39694 Clutch Compressor |
| • | J 34741-1 Input Shaft Seal Protector |
| • | J 34741-2 Input Shaft Seal Pusher |
| • | J 34741-3 Input Shaft Seal Sizer |
| • | J 36850 Assembly Lubricant
(or equivalent) |
For equivalent regional tools, refer to
Special Tools.
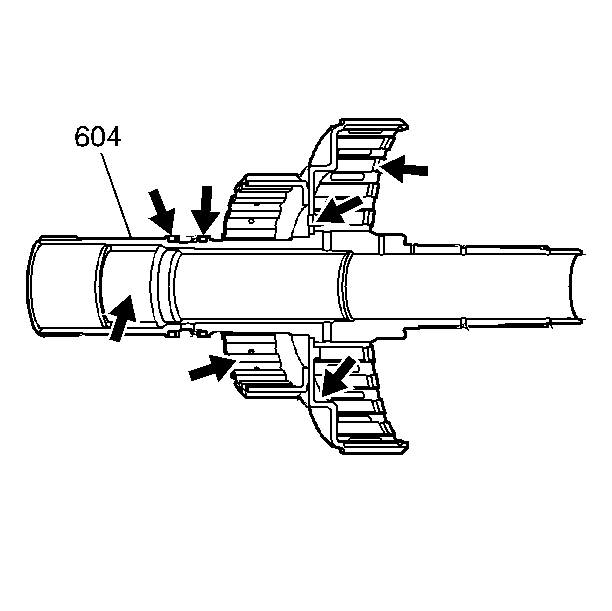
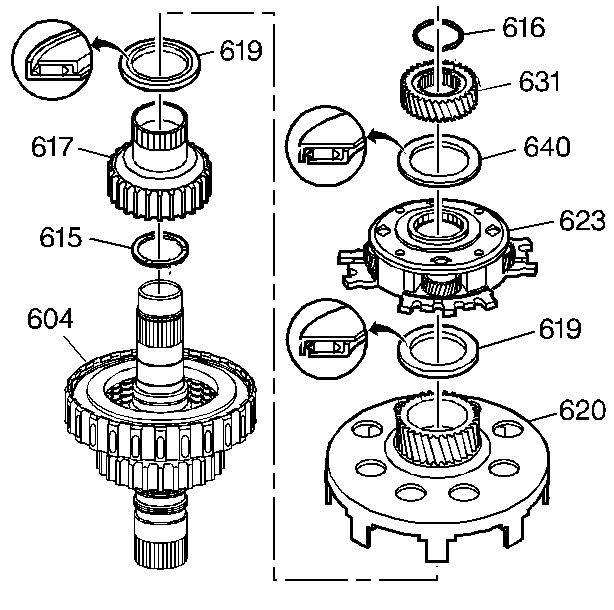
- Inspect the 3rd clutch housing (604) for the following:
| • | Seal ring grooves for nicks or burrs |
| • | Input shaft for cracked or blocked fluid passages |
| • | Input shaft bushing for excessive wear |
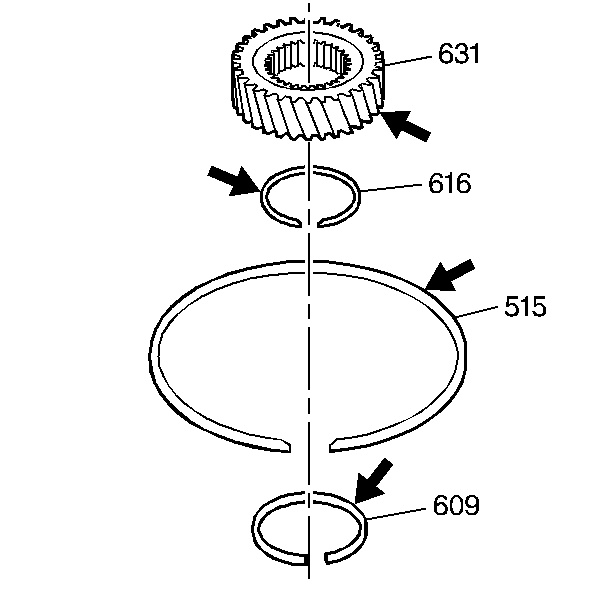
- Inspect the input sun gear (631) for damage or wear.
- Inspect the snap rings (616, 515, 609) for overexpansion.
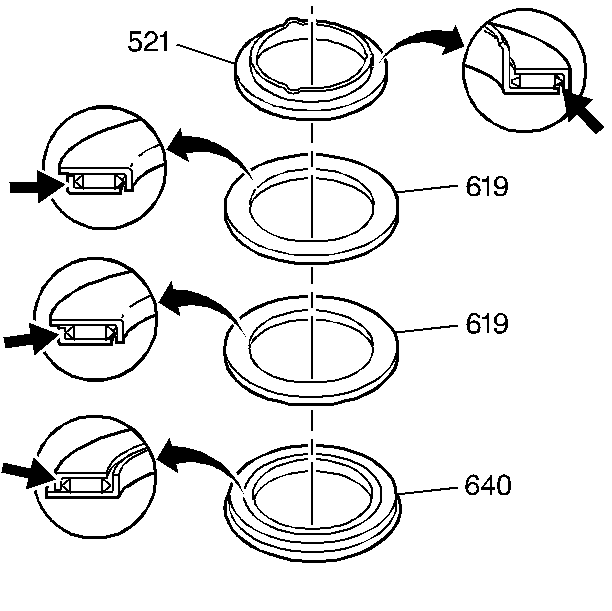
- Inspect the thrust bearings (521, 619, 640) for damage or wear.
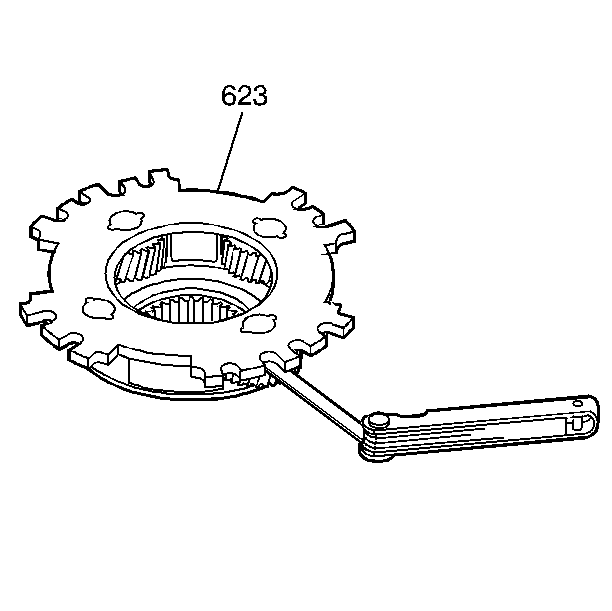
- Inspect the reaction carrier planet pinions (623) for wear. Inspect the planet pinion end play with a feeler gage. Pinion gear end play is
0.09-0.90 mm (0.0035-0.035 in).
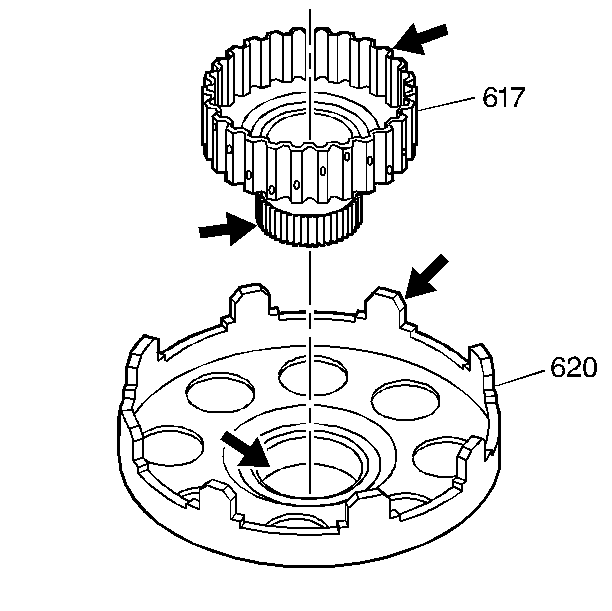
- Inspect the reaction sun gear and shell assembly (620) for damage.
- Inspect the bushing on the reaction sun gear and shell assembly (620) for wear.
- Inspect the splines on the third clutch hub (617) for damage.
- Check for plugged oil feed holes.
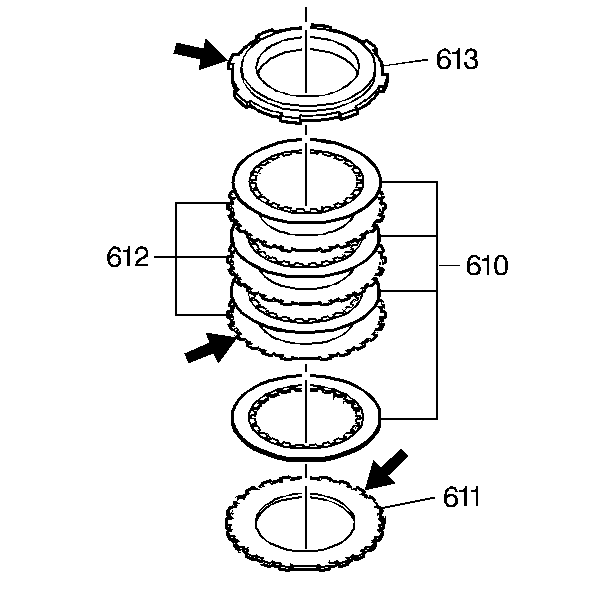
- Inspect the third clutch backing plate (613) for damage.
- Inspect all third clutch steel plates (612) for scoring.
- Inspect the third clutch apply plate (611) for scoring.
- Replace all fiber plates (610).
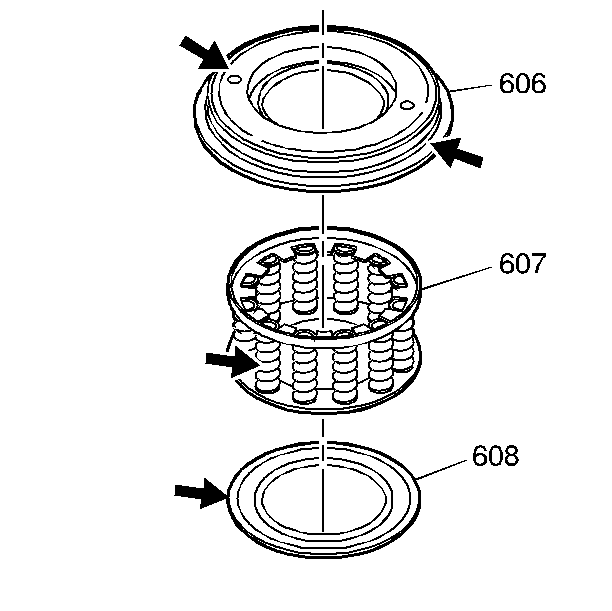
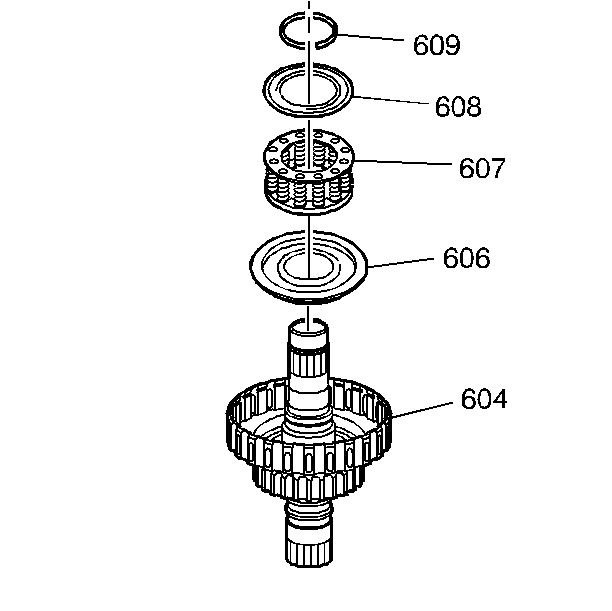
- Inspect the seals of the third clutch piston assembly (606). Inspect the checkball orifices. The checkball should move freely in the capsule. If the seals or checkballs are damaged, replace the third clutch piston assembly (606).
- Inspect the return spring and retainer assembly (607) for missing or broken springs.
- Inspect the snap ring retainer (608) for damage.
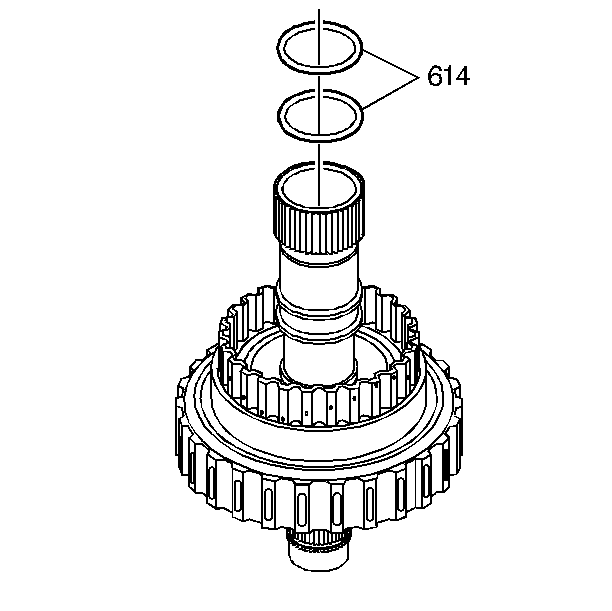
- Cut the oil seal rings (614) and remove the rings from the input shaft.
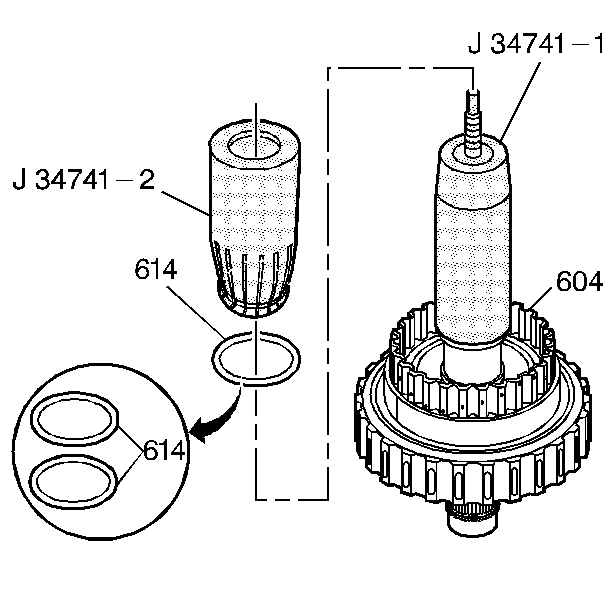
- Install the
J 34741-1 seal protector
over the input shaft. Adjust the tool so that the bottom of the
J 34741-1 seal protector
matches the correct oil seal ring groove.
- Lubricate the oil seal ring (614) with transmission fluid, and position the ring on the
J 34741-1 seal protector
.
- Using the
J 34741-2 seal pusher
, quickly slide the oil seal ring (614) into the oil seal ring groove.
- Readjust the
J 34741-1 seal protector
to the second oil seal ring groove.
- Lubricate the second oil seal ring (614) with transmission fluid, and position the ring on the
J 34741-1 seal protector
.
- Using the
J 34741-2 seal pusher
, quickly slide the oil seal ring (614) into the oil seal ring groove.
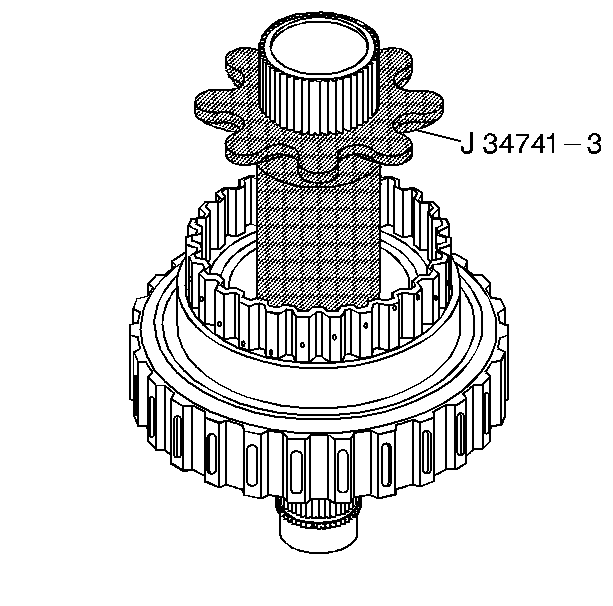
- Size the oil seal rings with the
J 34741-3 seal sizer
.
- Leave the
J 34741-3 seal sizer
in place for at least five minutes.
- Remove the
J 34741-3 seal sizer
.
- Lubricate the 3rd clutch piston seals with a light coating of
J 36850 assembly lubricant
or equivalent.
- Install the 3rd clutch piston assembly (606) into the bottom side of the 3rd clutch housing (604). Use a twisting motion when pushing the piston into the housing.
- Install the spring and retainer assembly (607), and install the snap ring retainer (608).

- Install the
J 39694 clutch compressor
-1 and the
J 39694 clutch compressor
-3 and
compress the spring and retainer assembly.
- Install the snap ring (609).
- Remove the
J 39694 clutch compressor
-1 and the
J 39694 clutch compressor
-3.
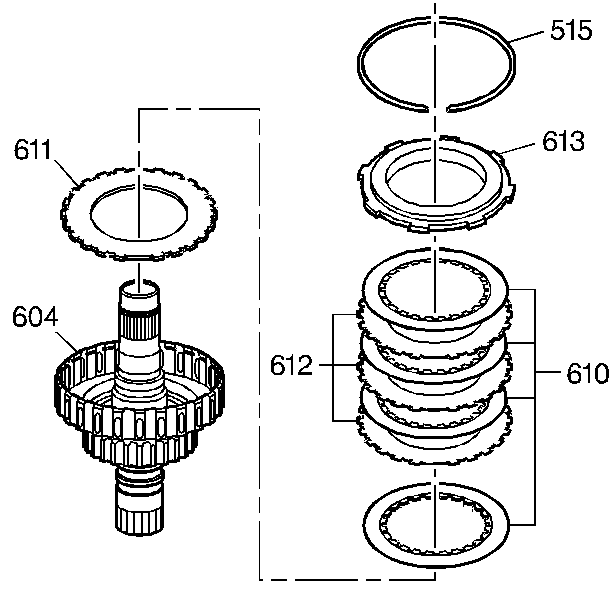
- Install the following parts:
| • | The four fiber clutch plates (610) |
| • | The three steel clutch plates (612) |
Note: The backing plate (613) must be installed with the stepped side up.
- Install the backing plate (613).
- Install the snap ring (515).
- Install the following parts:
| • | The thrust washer (615) |
| • | The third clutch hub and bushing assembly (617) |
| | Note: Make sure that the rolled inner lip of the thrust bearing (619) is facing toward the clutch pack.
|
| • | The thrust bearing (619). |
- Install the reaction sun gear and shell assembly (620). If the thrust bearing (619) was removed, install this bearing inside the reaction carrier assembly (623).
- Install the reaction carrier assembly (623).
Note: Make sure that the thrust bearing (640) is installed with the black surface toward the clutch pack.
- Install the thrust bearing (640).
- Install the input sun gear (631). The sun gear can be assembled in either direction.
- Install the snap ring (616).
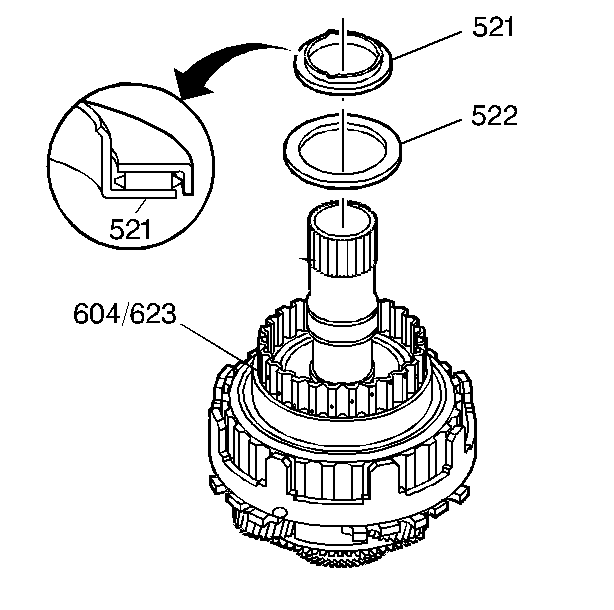
- Install the selective washer (522) and the thrust bearing (521). Secure the washer and the bearing to the top of the clutch housing with
J 36850 assembly lubricant
or equivalent.
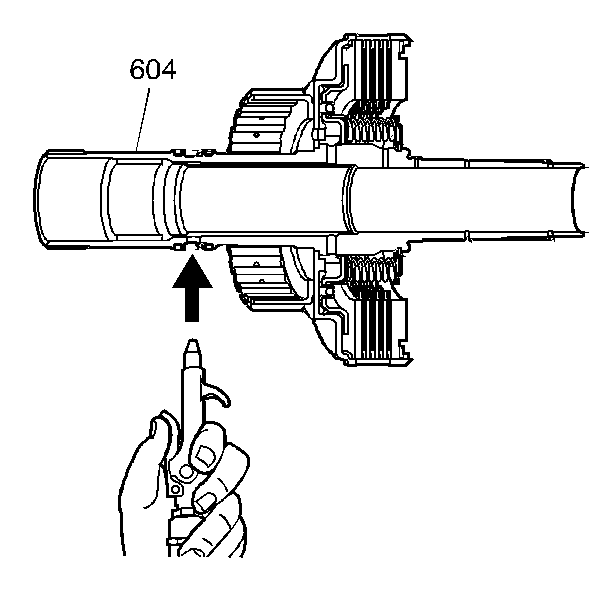
- Air check the 3rd clutch assembly by applying 50-60 psi of air to the proper orifice in the input shaft while blocking the orifice on the other side of the input shaft and 3rd clutch housing assembly (604).
