WINDSHIELD REMOVAL AND INSTALLATION (INSTRUCTIONS)

MODELS AFFECTED: 1985-1989 DE VILLES AND FLEETWOODS 1986-1989 ELDORADOS AND SEVILLES
The following procedure should be followed when replacing the windshields on 1985-1989 DeVilles and Fleetwoods and 1986-1989 Eldorados and Sevilles. This procedure supersedes the procedures given in the past Body Service Manual.
1. Place protective coverings on vehicle to prevent damage to paint or interior.
2. Remove wiper arms, windshield reveal moldings, and glass supports.
3. Using a razor or utility knife, make a preliminary cut around the entire perimeter of glass staying as close to the edge of the glass as possible.
4. Using cold knife, J-24402-A or equivalent, cut out windshield keeping blade as close to the edge of glass as possible. Remove windshield.
5. Using a sharp scraper or chisel, remove the old urethane from the window opening. It is not necessary to remove all traces of the urethane, but there should not be any excessive amounts or loose pieces left.
6. Check opening for uneven sheet metal and/or spot weld burrs. Rework as required to eliminate disruptive surfaces.
NOTICE: If refinishing or painting operations are required or painted surface is exposed during removal of material, black body primer should be applied to exposed area.
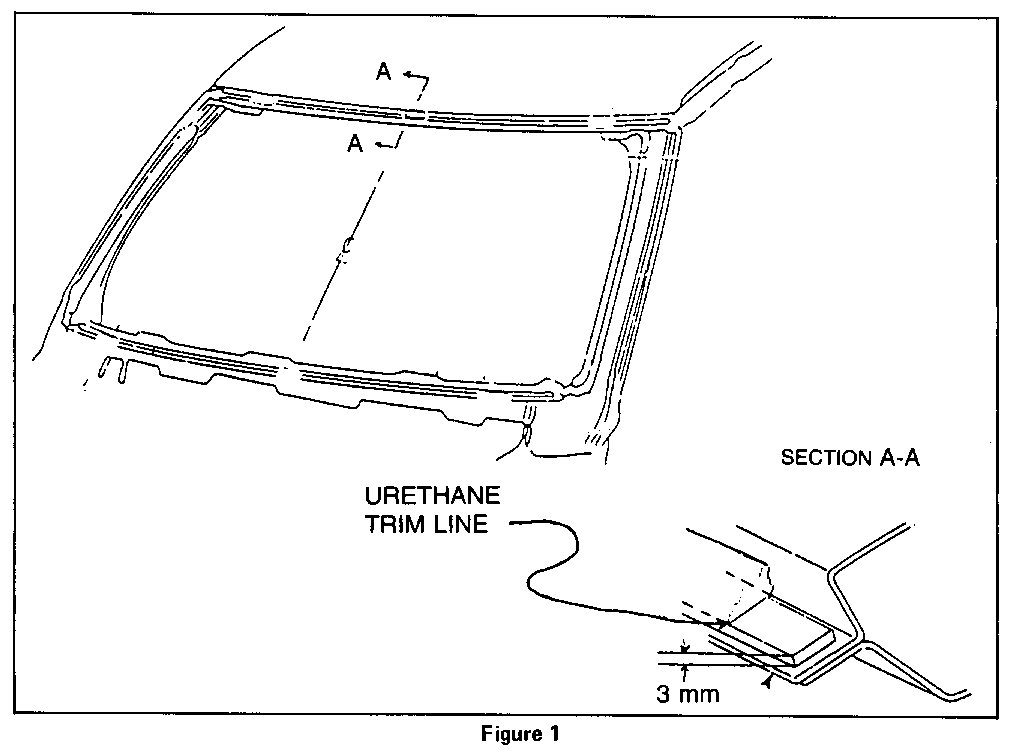
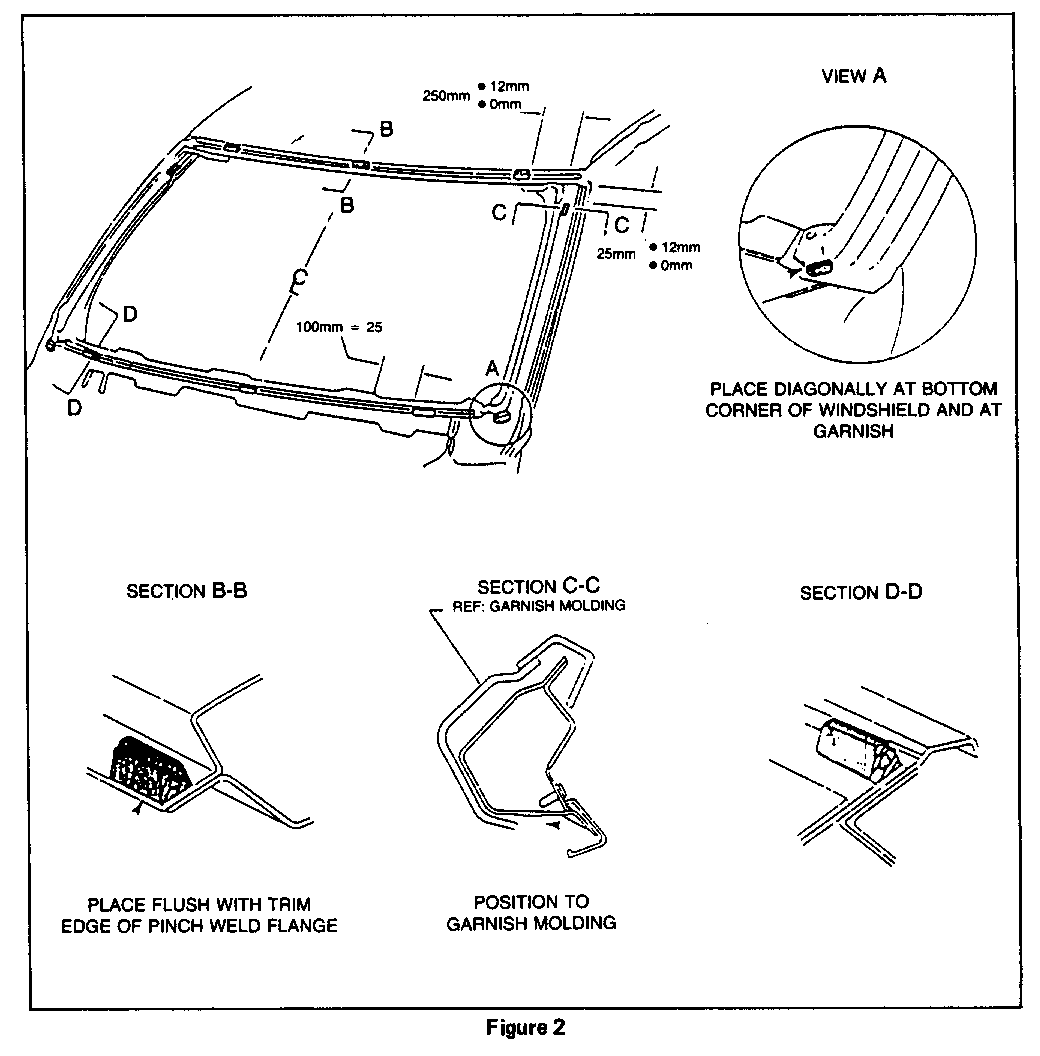
7. Locate and attach spacers, P/N 20603560, around window opening. For Eldorados and Sevilles, refer to Figure 1. For 1985-1988 DeVilles and Fleetwoods, refer to Figure 2. 1989 DeVilles and Fleetwoods do not use spacers, they must use the original J-type upper reveal molding.
8. Position windshield glass into opening. Align for uniform fit to roof and windshield pillars.
With glass in proper position in opening, apply a piece of masking tape over edge of glass and adjacent body pillar. Slit tape vertically at edge of glass. During installation, tape on glass can be aligned with tape on body to guide glass onto desired position.
9. Remove windshield from body and prep as follows utilizing primers contained in the urethane repair kit number 9636067:
A. Clean windshield with general glass cleaner.
B. Apply clear primer ass prep No. 1 to entire perimeter of glass edge inboard (approximately 12mm). Wipe primer off with a clean, dry cloth.
C. Apply black glass prep No. 2 primer directly over clear primer area.
NOTE: Two kits will be required per vehicle.
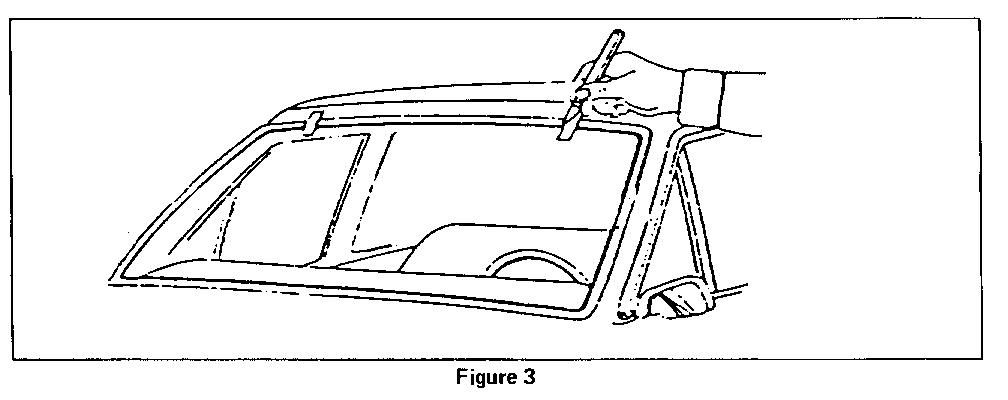
10. On DeVilles and Fleetwoods apply insulation strip, P/N 25540623, along lower inboard edge of glass so as to allow 12-15mm of glass clearance from edge of glass to bottom edge of insulation strip. Refer to Figure 3.
On Eldorados and Sevilles apply insulation strip, P/N 20375201, along lower inboard edge of glass so as to allow 32-34mm of glass clearance from edge of glass to bottom edge of insulation strip. Refer to Figure 3.
Parts are expected to be available on November 7, 1988. Until then, normal part orders will not be accepted by GMSPO. Only verifiable emergency VIP orders will be accepted. SPO will make every effort to obtain parts. All parts will be placed on 400 control to waive VIP surcharges. However, the part will be shipped premium transportation at dealer's expense. All other order types will be cancelled as incorrectly ordered while the 400 control is in place.
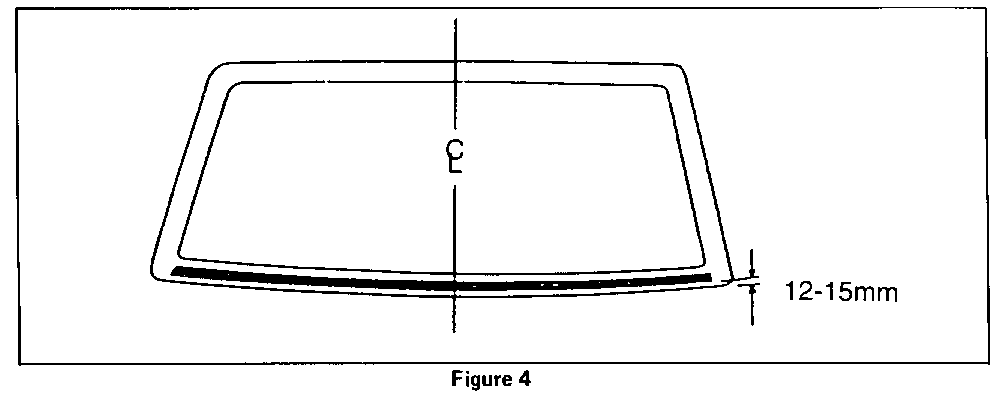
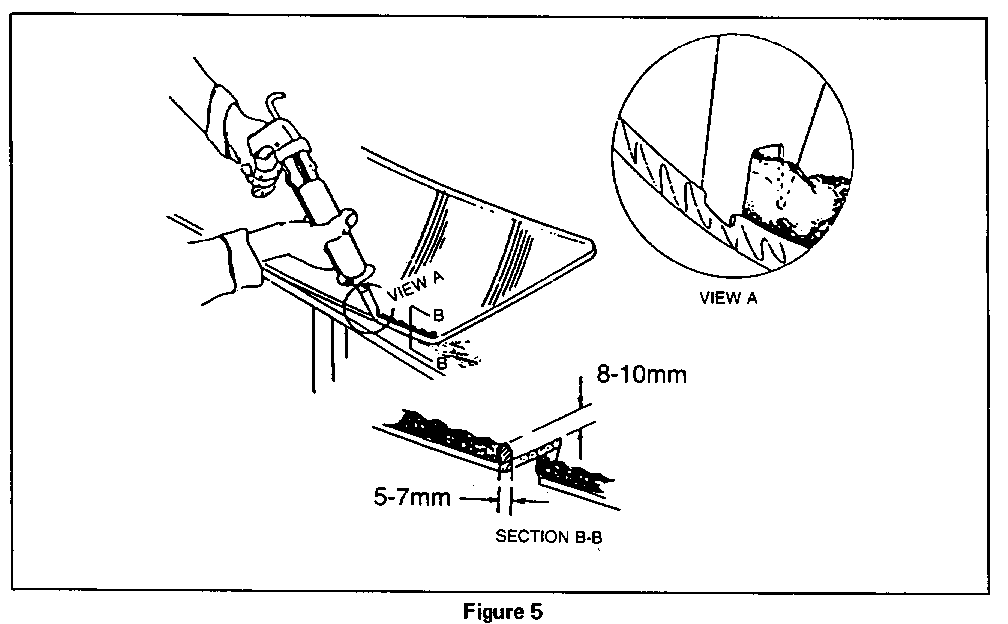
11. Trim urethane dispense tip as shown in Figure 4, View A.
12. Apply urethane bead to glass ensuring a bead size of 7mm wide by 8-10mm high.
13. Position glass in opening onto spacers. With glass centered in opening, place glass on lower supports and use tape applied in step 8 to carefully place glass in proper position.
14. Press glass firmly to wet-out and set adhesive. Use care to avoid excessive squeeze out which may cause an appearance problem.
15. Except where push-in molding will be inserted, paddle excess urethane around glass to ensure water-tight seal. If necessary, paddle additional material to fill voids in seal, refer to Figure 5.
16. Remove protective coverings from body.
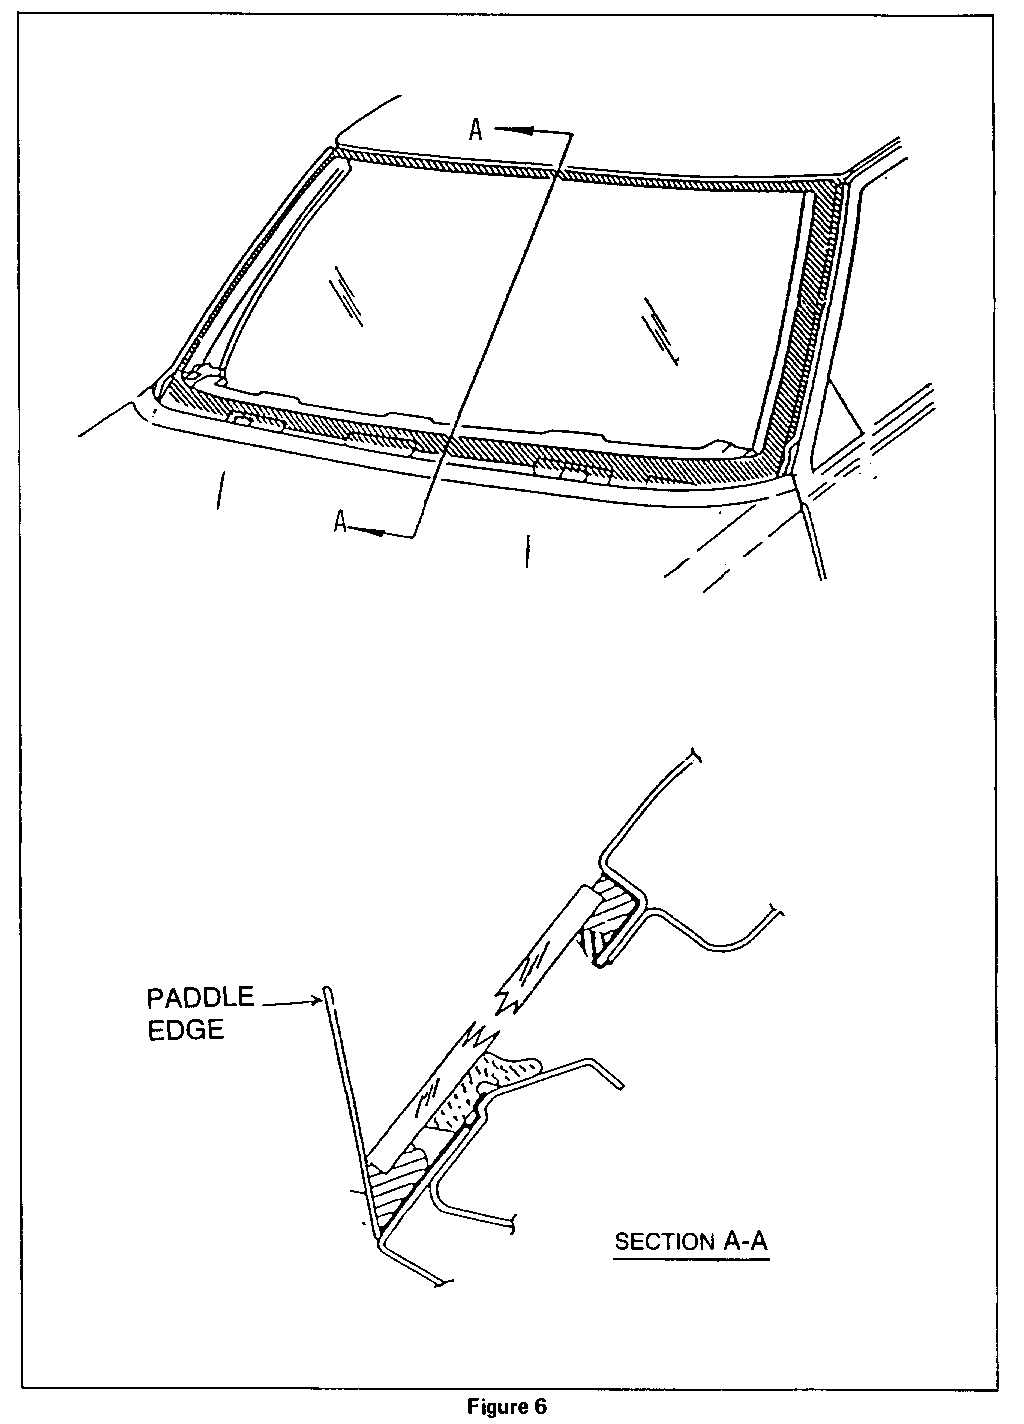
17. Install "push-in" type reveal moldings.
18. If reveal moldings won't stay in proper position, use cloth waterproof tape to hold them in position until adhesive is cured.
19. Water test car using a soft spray. Use warm or hot water if available. Do not direct hard stream of water at fresh adhesive material. If any leaks are found, paddle in extra adhesive at leak point using a small disposable brush or flat-bladed tool. Water applied on top of urethane adhesive will speed up the cure of the urethane.
20. Install remaining reveal moldings and wiper arms.
21. Vehicle must be kept at a minimum of 65 degrees F for six hours to allow material to cure.
22. Remove tape.
For warranty purposes use Labor Operation C0034 at 1.7 hours.
General Motors bulletins are intended for use by professional technicians, not a "do-it-yourselfer". They are written to inform those technicians of conditions that may occur on some vehicles, or to provide information that could assist in the proper service of a vehicle. Properly trained technicians have the equipment, tools, safety instructions and know-how to do a job properly and safely. If a condition is described, do not assume that the bulletin applies to your vehicle, or that your vehicle will have that condition. See a General Motors dealer servicing your brand of General Motors vehicle for information on whether your vehicle may benefit from the information.
