REAR ENGINE OIL LEAKS LOCATION & DIAGNOSIS

VEHICLES AFFECTED: 82-85 C, 82-90 C, E, K, 87-90 V
This bulletin supersedes bulletins 87-641-112 and 88-641-110 which should be discarded. This bulletin is being revised to include a new part number and add 1989-90 model years.
Rear of engine oil leaks are often difficult to pinpoint since there are several potential leak areas. The potential leak areas are as follows:
Rear main seal Oil pan/main cap joint Main cap side seals Cam plug Oil galley plug Oil feed pipe Casting cracks or porosity
To diagnose and repair a leak condition use the following procedure:
Longitudinal Engine:
1. Remove transmission inspection cover.
2. Visually inspect for oil leak source (i.e., rear main seal, galley plug, etc.).
3. If oil leak cannot be determined by visual inspection, perform black light diagnosis to pinpoint leak source.
4. Repair leak source (transmission removal may be required).
5. If situations where cracks or porosity are found in high pressure passages, engine replacement is required as there are no effective repair techniques.
Transverse Engine:
1. Remove oil feed pipe from engine using procedure from Section 6A of the appropriate Cadillac Service Information Manual.
2. Install new style oil feed pipe, P/N 1649685, which utilizes two O-rings, P/N 1623825, for improved sealing.
3. If leak is still present, R&R transmission.
4. Visually inspect for oil leak source (i.e., Galley plug).
5. If oil leak cannot be determined by visual inspection, perform black light diagnosis to pinpoint leak source.
6. Reoair leak source.
7. In situations where cracks or porosity are found in high pressure passages or the new style oil feed pipe cannot seal the feed pipe to the block, engine replacement is required as there are no effective repair techniques.
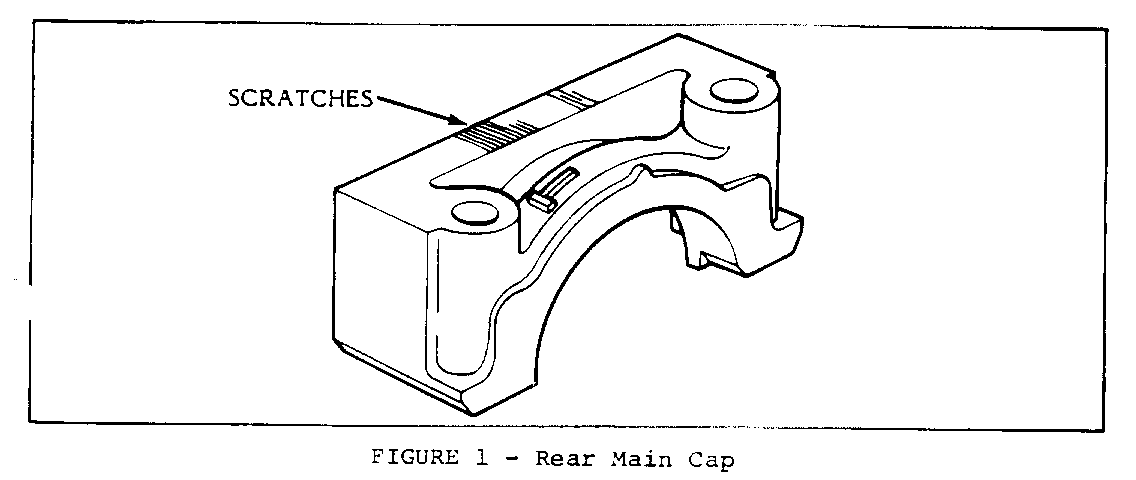
IMPORTANT: If the oil pan gasket has been determined to be the source of the leak on either the transverse or longitudinal engine, be sure to check the sealing, surface of the rear main cap for casting of machining imperfections. Deep scratches, such as shown in Figure 1, may prevent the pan gasket from sealing. To repair these deep scratches: first, clean the area thoroughly with solvent such as lacquer thinner or GM fabric cleaner. Next, apply RTV sealant int the blemished area. Clean off excessive RTV and allow RTV to cure for 10-15 minutes before assembling the gasket and oil pan.

General Motors bulletins are intended for use by professional technicians, not a "do-it-yourselfer". They are written to inform those technicians of conditions that may occur on some vehicles, or to provide information that could assist in the proper service of a vehicle. Properly trained technicians have the equipment, tools, safety instructions and know-how to do a job properly and safely. If a condition is described, do not assume that the bulletin applies to your vehicle, or that your vehicle will have that condition. See a General Motors dealer servicing your brand of General Motors vehicle for information on whether your vehicle may benefit from the information.
