SHOULDER BELT COMFORT, INSTALL RETRACTOR RETAINING BOLT

SUBJECT: SHOULDER BELT COMFORT (INSTALL NEW RETRACTOR WITH COMFORT FEATURE)
VEHICLES AFFECTED: 1990-91 'C'
Drivers and front seat passengers of 1990 Sedan DeVilles and Fleetwood Sedans, and 1991 Sedan DeVilles and Fleetwood Sedans built before VIN breakpoint 287715 may comment that the shoulder belts are not comfortable. These comments may be that the shoulder belt creates too much pressure on the person's chest or some other comfort complaint. If you get these complaints, you can use this procedure to install new safety belt retractor assemblies. These new assemblies have an adjustment feature that may alleviate these complaints. Important owner notification materials are in the service kit and must be given to the owner, as covered in this procedure.
Parts Required:
The following procedure requires that both the driver's position safety belt retractor assembly and the right front passenger safety belt retractor assembly be replaced. The new safety belt retractor assemblies include a shoulder belt tightness adjustment feature which the driver and right front passenger can use to set up to one inch of slack in the shoulder belt. Select the correct retractor assembly part numbers from the following chart according to colour.
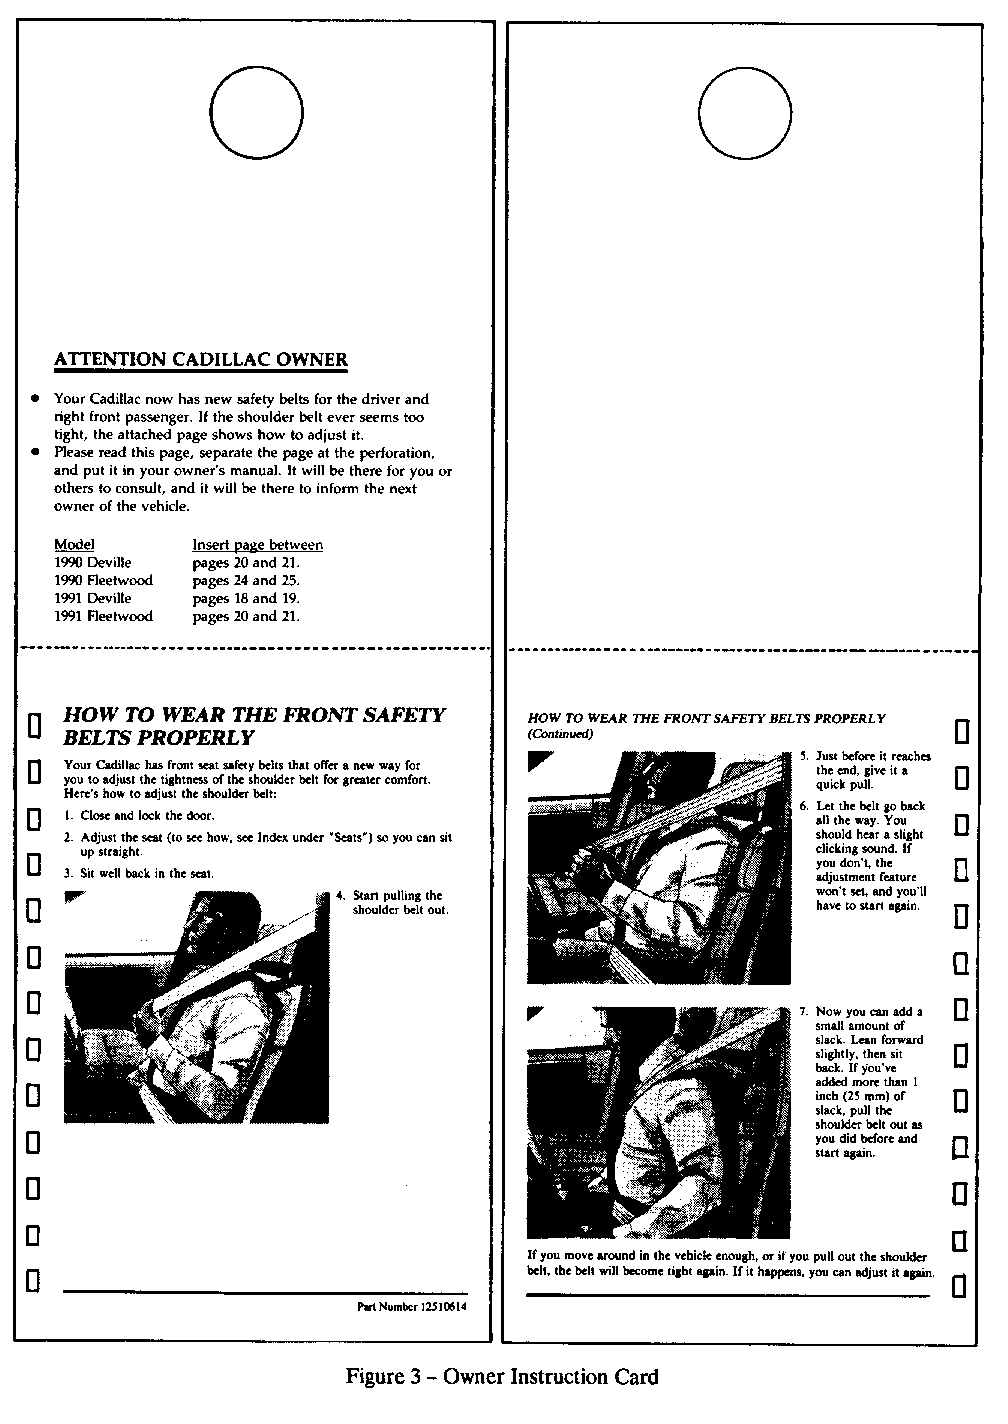
In addition, special owner notification materials are included with each driver position retractor assembly including an instruction card which is to be placed on the rearview mirror of the vehicle as a part of the installation procedure. This instruction card includes a special page which is to be placed in the Owner's Manual after review by the owner.
SAFETY BELT RETRACTOR ASSEMBLY PART NUMBERS
COLOUR DRIVER SIDE PASSENGER SIDE ------- ----------- -------------- WHITE 12509232 12509244 GRAY 12509233 12509245 BLACK 12509234 12509246 VERY DARK SAPPHIRE 12509235 12509247 YELLOW 12509236 12509248 ANTELOPE 12509237 12509249 BEECHWOOD 12509238 12509250 AUBURN 12509239 12509251 GARNET RED 12509240 12509252
Figure 1 - Retractor Part Numbers
Installation Procedure:
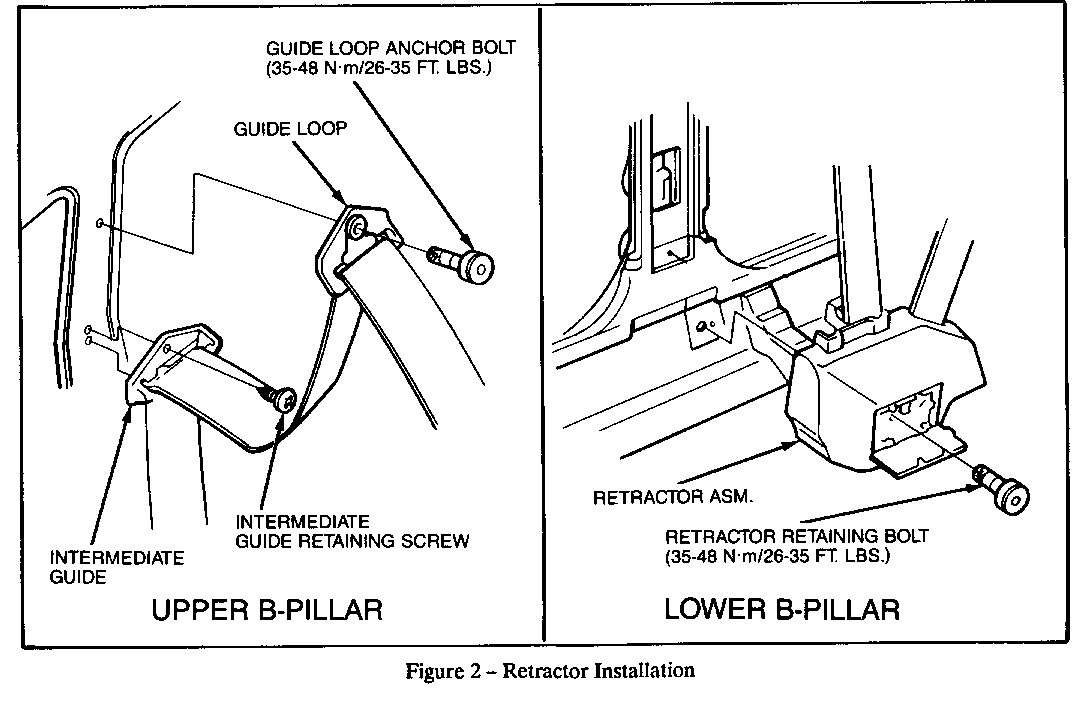
Refer to Figure 2. 1. Remove driver's side B-pillar interior trim (two pieces). 2. Remove shoulder belt guide loop anchor bolt. 3. Remove shoulder belt intermediate guide retaining screw. 4. Open retractor cover and remove driver's side retractor retaining bolt, and remove retractor from car. 5. Align anti-rotation tab on back of new retractor with hole in rocker panel, and position retractor on pillar. 6. Install retractor retaining bolt into B-pillar at rocker, and tighten to 35-48 N.m (26-35 ft.lbs.). 7. Install shoulder belt guide loop anchor bolt into upper B- pillar. Be sure that shoulder belt is not twisted, and tighten bolt to 35-48 N.m (26-35 ft.lbs.). 8. Install shoulder belt intermediate guide retaining screw. 9. Install B-pillar interior trim. 10. Repeat procedure to install passenger's side retractor assembly. 11. HANG OWNER INSTRUCTION CARD ON REARVIEW MIRROR. Figure 2 - Retractor Installation Figure 3 - Owner Instruction Card
Shoulder Belt Tightness Adjustment Procedure:
Up to one inch of slack can be set in the shoulder belt by using the procedure shown in Figure 3. This figure is a reproduction of the owner instruction card which is included with each driver's position retractor assembly service kit. Dealer personnel should study and understand this procedure.


General Motors bulletins are intended for use by professional technicians, not a "do-it-yourselfer". They are written to inform those technicians of conditions that may occur on some vehicles, or to provide information that could assist in the proper service of a vehicle. Properly trained technicians have the equipment, tools, safety instructions and know-how to do a job properly and safely. If a condition is described, do not assume that the bulletin applies to your vehicle, or that your vehicle will have that condition. See a General Motors dealer servicing your brand of General Motors vehicle for information on whether your vehicle may benefit from the information.
