F/CMVSS Noncompliance - Front Seat Belt Compliance

| Subject: | 00095 -- Front Seat Belt Compliance |
| Models: | 2000-01 Cadillac DeVille |
Condition
General Motors has decided that certain 2000-01 Cadillac DeVille model vehicles fail to conform to Federal/Canada Motor Vehicle Safety Standard (FMVSS) 209, "Seat Belt Assemblies." The push button release effort for the front outboard seat belts exceeds the maximum of 14 kilograms (30 pounds). After a crash, higher release efforts could make it more difficult for an occupant to release the belt and exit the vehicle.
Correction
Dealers will add "snap on" latch clips to eliminate the potential of inverted latch plate insertion. Dealers will inspect the seat belts, and, if necessary, modify the latch plates with a special tool or replace the retractor.
Vehicles Involved
Involved are certain 2000-2001 Cadillac DeVille model vehicles built within these VIN breakpoints:
Year | Division | Model | Plant | From | Through |
|---|---|---|---|---|---|
2000 | Cadillac | DeVille | Hamtramck | YU117934 | YU357898 |
2001 | Cadillac | DeVille | Hamtramck | 1U100001 | 1U139779 |
2000 | Cadillac | Limo | Hamtramck | YU550001 | YU551043 |
2001 | Cadillac | Limo | Hamtramck | 1U550001 | 1U550135 |
2000 | Cadillac | Hearse | Hamtramck | YU500001 | YU501100 |
2001 | Cadillac | Hearse | Hamtramck | 1U500001 | 1U500137 |
Important: Dealers should confirm vehicle eligibility through GMVIS (GM Vehicle Inquiry System) or GM Access Screen (Canada only) or DCS Screen 445 (IPC only) before beginning campaign repairs. [Not all vehicles within the above breakpoints may be involved.]
Involved vehicles have been identified by Vehicle Identification Number. Computer listings containing the complete Vehicle Identification Number, customer name and address data have been prepared, and are being furnished to involved dealers with the campaign bulletin. The customer name and address data furnished will enable dealers to follow up with customers involved in this campaign. Any dealer not receiving a computer listing with the campaign bulletin has no involved vehicles currently assigned.
These dealer listings may contain customer names and addresses obtained from Motor Vehicle Registration Records. The use of such motor vehicle registration data for any other purpose is a violation of law in several states/provinces/countries. Accordingly, you are urged to limit the use of this listing to the follow-up necessary to complete this campaign.
Parts Information
Parts required to complete this campaign are to be obtained from General Motors Service Parts Operations (GMSPO). Please refer to your "involved vehicles listing" before ordering parts. Normal orders should be placed on a DRO = Daily Replenishment Order. In an emergency situation, parts should be ordered on a CSO = Customer Special Order.
Part Number | Description | Qty/ Vehicle |
|---|---|---|
25735007 | Clip, Seat Belt Ret (Bkl Si), Dark Gray 14I | 2 |
25735008 | Clip, Seat Belt Ret (Bkl Si), Shale 15I | 2 |
25735009 | Clip, Seat Belt Ret (Bkl Si), Black 19I | 2 |
25735010 | Clip, Seat Belt Ret (Bkl Si), Tuxedo Blue 29I | 2 |
25735011 | Clip, Seat Belt Ret (Bkl Si), Lt. Wheat 50I | 2 |
25735012 | Clip, Seat Belt Ret (Bkl Si), Md Dk Pewter 92I | 2 |
Special Tool
Beginning the week of May 23, 2001, each dealer will be shipped a Latch Plate Forming Tool, J 45215, for use in this campaign. This tool is being furnished at no charge. Additional tools, if required, may be purchased by contacting Kent Moore at 1-800-345-2233/
Service Procedure
2000-2001 Cadillac DeVille Front Seat Belt Latch Plate Campaign
To perform the following procedure, campaign tool J 45215 (Latch Plate Forming Tool) is required. Obtain tool prior to beginning this procedure.
Inspection
Important: All illustrations shown in these service procedures are of the right front passenger seat belt. With the exception of the child seat caution label and information on the part number tag, the driver's seat belt is a direct opposite of the right front passenger belt.
- Open both front doors.
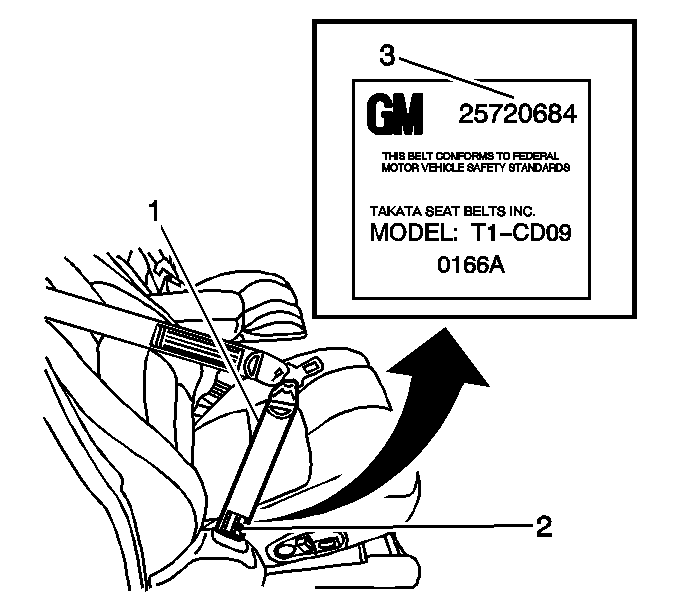
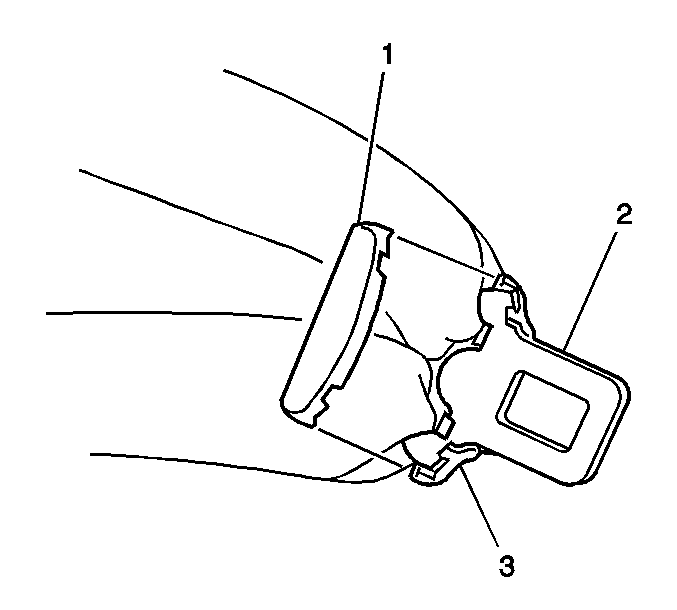
- Inspect the 8-digit "casting number" (3) on BOTH the driver's and right front passenger belt by extending (pulling) the belt webbing material (1) out of the lower retractor until the casting number tag (2) on the belt is visible. Refer to Figure 1A.
- Compare the 8-digit casting number (3) on the tags with the casting numbers listed below.
Figure 1A
| • | If BOTH casting numbers (driver's and right front passenger) are on the list below, proceed to the service procedure titled "Install Covers on BOTH Latch Plates Only" (no reforming of latch plates necessary). |
| • | If ONE casting number IS on the list below and the other is NOT, then proceed to the service procedure titled "Reform ONE Latch Plate (that is not on the list) and Install Covers on BOTH Latch Plates." |
| • | If BOTH casting numbers are NOT on the list below, then proceed to the service procedure titled "Reform BOTH Latch Plates and Install Covers on BOTH Latch Plates." |
Casting Number | Location | Color/RPO |
|---|---|---|
25730455 | Driver Side | Dark Gray (14I) |
25730456 | Driver Side | Shale (15I) |
25730457 | Driver Side | Black (19I) |
25730458 | Driver Side | Blue (29I) |
25730459 | Driver Side | Lt. Wheat (50I) |
25730688 | Pass Side | Dark Gray (14I) |
25730689 | Pass Side | Shale (15I) |
25730690 | Pass Side | Black (19I) |
25730691 | Pass Side | Blue (29I) |
25730692 | Pass Side | Lt. Wheat (50I) |
25732190 | Driver Side | Dark Gray (14I) |
25732190A | Driver Side | Dark Gray (14I) |
25732191 | Driver Side | Shale (15I) |
25732191A | Driver Side | Shale (15I) |
25732192 | Driver Side | Black (19I) |
25732192A | Driver Side | Black (19I) |
25732193 | Driver Side | Blue (29I) |
25732193A | Driver Side | Blue (29I) |
25732194 | Driver Side | Lt. Wheat (50I) |
25732194A | Driver Side | Lt. Wheat (50I) |
25732196 | Pass Side | Dark Gray (14I) |
25732196A | Pass Side | Dark Gray (14I) |
25732197 | Pass Side | Shale (15I) |
25732197A | Pass Side | Shale (15I) |
25732198 | Pass Side | Black (19I) |
25732198A | Pass Side | Black (19I) |
25732199 | Pass Side | Blue (29I) |
25732199A | Pass Side | Blue (29I) |
25732200 | Pass Side | Lt. Wheat (50I) |
25732200A | Pass Side | Lt. Wheat (50I) |
Install Covers on BOTH Latch Plates Only (no reforming of latch plate necessary)
Important: Only use this procedure if BOTH of the seat belt casting numbers are on the above list.
Important: The campaign kits listed by color each contain four plastic latch plate half covers (two inboard and two outboard). One inboard cover and one outboard cover together make on complete latch plate cover.
- Fully extend the seat belt out from both retractors and remove any twists from the webbing material. When all the twists are removed, the webbing material (1) and latch plate should appear as shown in Figure 1B.
- From the appropriate color campaign kit, install (snap) one plastic latch plate OUTBOARD cover (1) on the latch plate (2) as shown in Figure 2. The OUTBOARD cover can be identified by the two raised ribs (3) or horns on the outboard surface. Verify that all four locking tabs are attached to the latch plate.
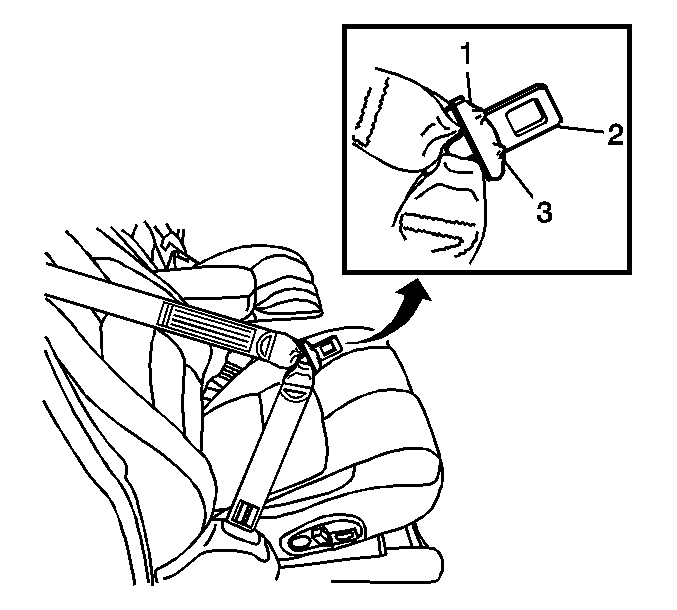
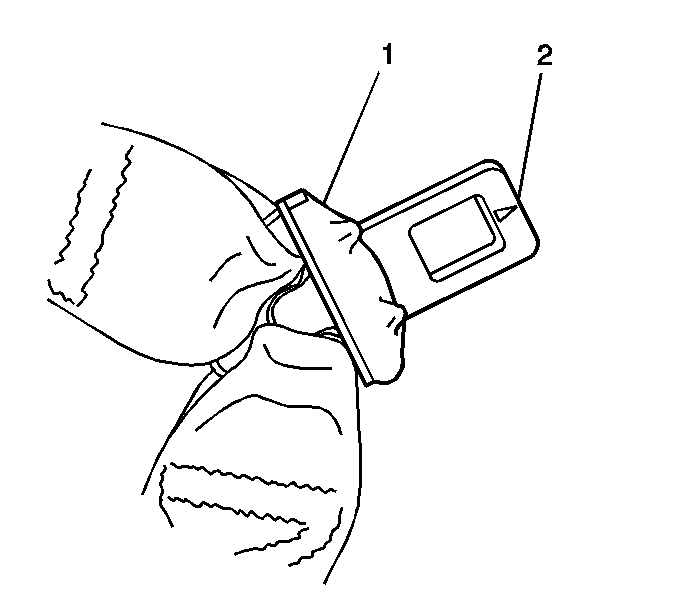
- Verify that the OUTBOARD latch plate cover (3) has been installed correctly by inserting the latch plate in the seat belt buckle (1) as shown in Figure 3. When properly installed the raised ribs (2) or horns on the OUTBOARD latch plate cover will be facing the seat belt buckle release button (4). If the outboard cover is NOT installed correctly, do NOT proceed to the next step. The incorrectly installed cover must be removed and replaced with a NEW outboard cover. Do NOT attempt to reuse the incorrectly installed outboard cover.
- If the latch plate latches to the buckle correctly, install the INBOARD plastic cover (1) on the latch plate (2) and snap firmly to the OUTBOARD cover (3) as shown in Figure 9.
- Verify once again that the latch plate works correctly with the buckle by performing only Step 3 again.
- Repeat this procedure on the opposite (driver or passenger) seat belt again.
- Install the GM Campaign Identification Label.
Figure 1B
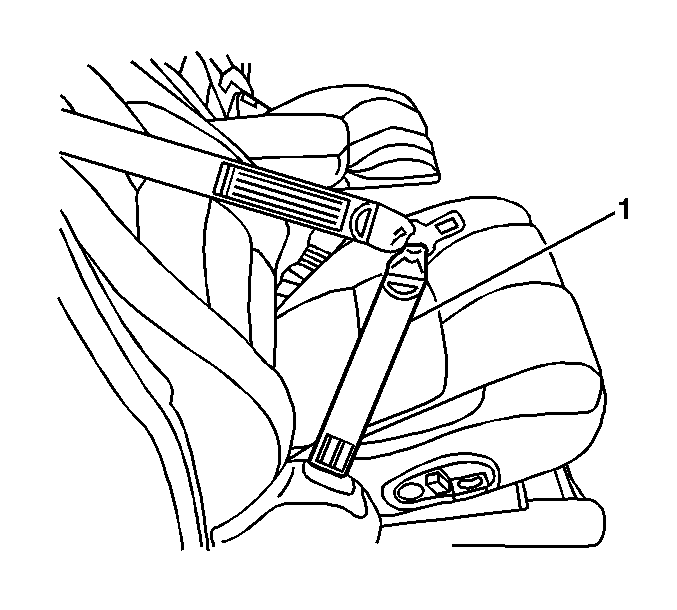
Figure 2
Important: Only install the outboard latch plate cover in the next step. Do NOT install the inboard cover until instructed to do so later in this procedure.
Figure 3
Important: If it is determined in the NEXT step that the outboard cover was NOT installed correctly, it must be removed and a NEW outboard cover installed. Do NOT attempt to remove and reinstall the outboard cover.
Figure 9
Reform ONE Latch Plate and Install Covers on BOTH Latch Plates
Important: Only use this procedure if ONE of the seat belt casting numbers IS on the above list and the other seat belt casting number is NOT.
The seat belt with the casting number that is NOT on the above list will have to have its' latch plate reformed and a two-piece cover installed.
The seat belt with the casting number that IS on the list above ONLY needs to have a two-piece cover installed. Do NOT reform the latch plate if the casting number IS on the list above.
Important: The campaign kit listed by color contain four plastic latch plates half covers (two inboard and two outboard). One inboard cover and one outboard cover together make one complete latch plate cover.
- Fully extend the seat belt that needs to be REFORMED out from its' retractor and remove any twists from the webbing material. When all twists are removed, the webbing material (1) and latch plate should appear as shown in Figure 1B.
- From the appropriate colored campaign kit, install (snap) one plastic latch plate OUTBOARD cover (1) on the latch plate (2) as shown in Figure 2. The OUTBOARD cover can be identified by the two raised ribs (3) or horns on the outboard surface. Verify that all four locking tabs are attached to the latch plate.
- Verify that the OUTBOARD latch plate cover (3) has been installed correctly by inserting the latch plate in the seat belt buckle (1) as shown in Figure 3. When properly installed, the raised ribs (2) or horns on the OUTBOARD latch plate cover will be facing the seat belt buckle release button (4). If the outboard cover is NOT installed correctly, do NOT proceed to the next step. The incorrectly installed cover must be removed and replaced with a NEW outboard cover. Do NOT attempt to reuse the incorrectly installed outboard cover.
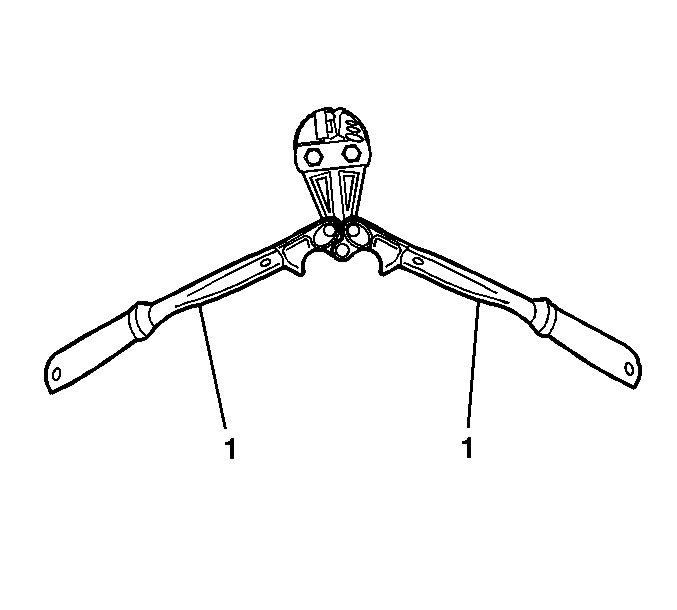
- Fully open the handles (1) of campaign tool J 45215 as shown in Figure 4.
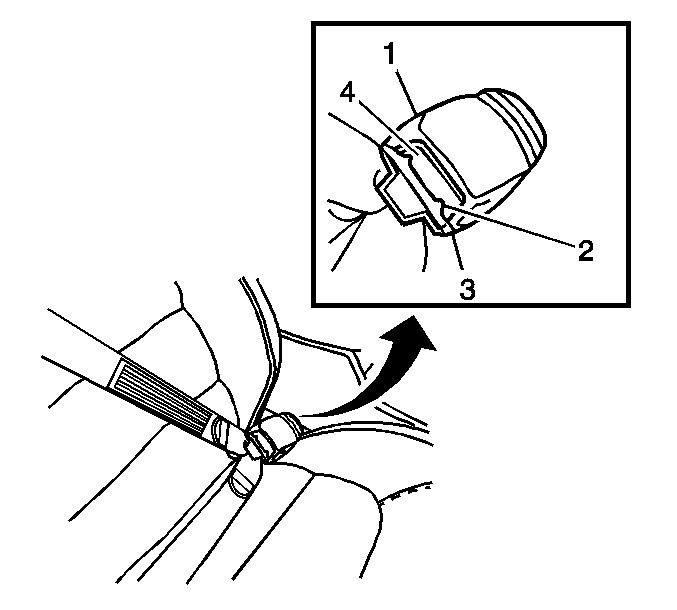
- Place the seat belt latch plate (1) in the holding fixture (2) on the J 45215 as shown in Figure 5. When properly positioned, the raised ribs (3) or horns on the outboard cover (4) will be facing upwards. Refer to Figure 6 also.
- With the latch plate properly installed in the holding fixture, close the arms on the tool until the jaws make light contact with the latch plate. Once again confirm that the latch plate is properly installed in the tool holding fixture.
- If the latch plate is properly installed in the holding fixture, continue closing the tool arms until they contact each other. When the stops on the arms contact each other, the reforming (crowning) operation is complete.
- Open the jaws of the tool completely and remove the reformed latch plate.
- Take the reformed latch plate with the OUTBOARD cover attached and connect it to the seat belt buckle as shown earlier in this procedure. Verify that is latches completely.
- Hold the seat belt buckle so that it is pointing toward the door opening as shown in Figure 8. Without pulling on the latch plate or belt material, push the release button on the buckle and see if the latch plate ejects or "pops out" of the buckle COMPLETELY.
- Attempt to connect it to the buckle with the latch plate turned or flipped over (with the raised ribs or horns on the outboard cover facing away from the buckle release button). In this position it should NOT latch in the seat belt buckle.
- If the reformed latch plate only latches in the buckle with the raised ribs or horns facing the release button, the procedure was done correctly. If it does NOT latch this way or if it latches both ways, inspect the outboard cover and verify that it is properly installed and not loose. A loose or damaged cover must be replaced with a new one. Do NOT attempt to reform the latch plate a second time.
- If the reformed latch plate latches to the buckle correctly, install the INBOARD plastic cover (1) on the latch plate (2) and snap firmly to the OUTBOARD cover (3) as shown in Figure 9.
- Verify once again that the latch plate works correctly with the buckle.
- Fully extend the OTHER seat belt that does NOT need to be REFORMED out from its retractor and remove any twists from the webbing material. When all twists are removed, the webbing material and latch plate should appear as shown earlier in this procedure.
- From the campaign kit, install (snap) the remaining plastic OUTBOARD cover on the latch plate as shown earlier in this procedure. The OUTBOARD cover can be identified by the two raised ribs or horns on the outboard surface. Verify that all four locking tabs are attached to the latch plate.
- Verify that the OUTBOARD latch plate cover has been installed correctly by inserting the latch plate in the seat belt buckle. When properly installed, the raised ribs or horns on the OUTBOARD latch plate cover will be facing the seat belt buckle release button. If the outboard cover is NOT installed correctly, do NOT proceed to the next step. The incorrectly installed cover must be removed and replaced with a NEW outboard cover. Do NOT attempt to reuse the incorrectly installed outboard cover.
- If the latch plate latches to the buckle correctly, install the INBOARD plastic cover on the latch plate and snap firmly to the OUTBOARD cover.
- Verify once again that the latch plate works correctly with the buckle by performing only Step 17 again.
- Install the GM Campaign Identification Label.
Figure 1B
Figure 2
Important: Only install the outboard latch plate cover in the next step. Do NOT install the inboard cover until instructed to do so later in this procedure.
Figure 3
Important: If it is determined in the NEXT step that the outboard cover was NOT installed correctly, it must be removed and a NEW outboard cover installed. Do NOT attempt to remove and reinstall the outboard cover.
Figure 4
Important: Campaign tool J 45215 (Latch Plate Forming Tool) is required to reform or apply a crown to the seat belt latch beginning with the next step. Do NOT attempt to perform the operation by any other means (vise, hammer, etc.).
Figure 5
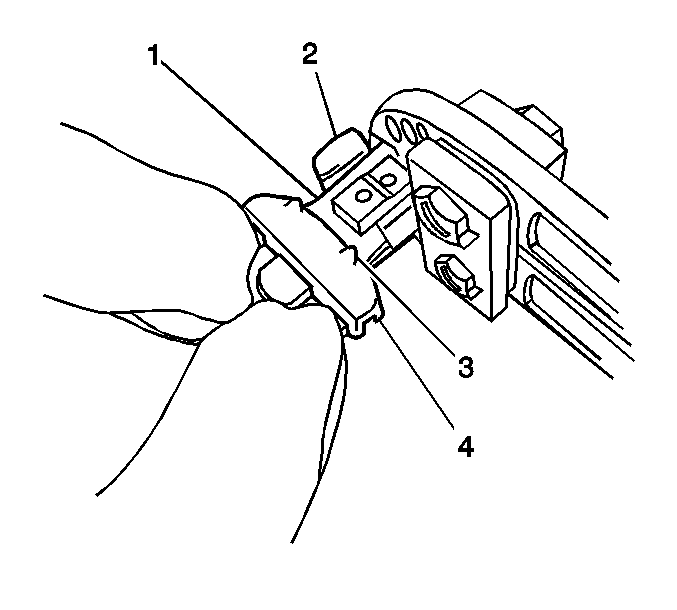
Figure 6

Figure 7
Important: Because the reforming (bending) of the latch plate is very minimal, you may find it difficult to see or feel. However, upon close inspection you should be able to see a very small mark (2) that the reforming tool (J 45215) leaves behind on the side of the latch plate that has the outboard cover (1) attached. Refer to Figure 7. If this mark is present, the reforming operation was done correctly.
Figure 8

| • | If it DOES eject or "pop out" COMPLETELY, continue to Step 11. |
| • | If it does NOT eject or "pop out" COMPLETELY, replace the seat belt retractor assembly. Be sure to install new plastic latch plate covers on the replacement retractor latch plate. Do not attempt to remove and reuse the plastic latch plate covers from the old retractor. Follow the instructions in this procedure for correct installation of the plastic latch plate covers. For seat belt retractor replacement procedures, refer to the Seat Belts subsection of the Restraints section of the Service Manual. |
Figure 9
Important: Only install the outboard latch plate cover in the next step. Do NOT install the inboard cover until instructed to do so.
Important: If it is determined in the NEXT step that the outboard cover was NOT installed correctly, it must be removed and a NEW outboard cover installed. Do NOT attempt to remove and reinstall the outboard cover.
Reform BOTH Latch Plates and Install Covers on BOTH Latch Plates
Important: Only use this procedure if BOTH of the seat belt casting numbers are NOT on the above list.
Important: The campaign kits listed by color contain four plastic latch plate half covers (two inboard and two outboard). One inboard cover and one outboard cover together make one complete latch plate cover.
- Fully extend the front passenger seat belt out from its retractor and remove any twists from the webbing material. When all twists are removed, the webbing material (1) and latch plate should appear as shown in Figure 1B.
- From the appropriate color campaign kit, install (snap) one plastic latch plate OUTBOARD cover (1) on the latch plate (2) as shown in Figure 2. The OUTBOARD cover can be identified by the two raised ribs (3) or horns on the outboard surface. Verify that all four locking tabs are attached to the latch plate.
- Verify that the OUTBOARD latch plate cover (3) has been installed correctly by inserting the latch plate in the seat belt buckle (1) as shown in Figure 3. When properly installed, the raised ribs (2) or horns on the OUTBOARD latch plate cover will be facing the seat belt buckle release button (4). It the outboard cover is NOT installed correctly, do NOT proceed to the next step. The incorrectly installed cover must be removed and replaced with a NEW outboard cover. Do NOT attempt to reuse the incorrectly installed outboard cover.
- Fully open the handles (1) of tool J 45215 as shown in Figure 4.
- Place the seat belt latch plate (1) in the holding fixture (2) on the J 45215 as shown in Figure 5. When properly positioned, the raised ribs (3) or horns on the outboard cover (4) will be facing upwards. Refer to Figure 6 also.
- With the latch plate properly installed in the holding fixture, close the arms on the tool until the jaws make light contact with the latch plate. Once again, confirm that the latch plate is properly installed in the tool holding fixture.
- If the latch plate is properly installed in the holding fixture, continue closing the tool arms until they contact each other. When the stops on the arms contact each other, the reforming (crowning) operation on the latch plate is complete.
- Open the jaws of the tool completely and remove the reformed latch plate.
- Take the reformed latch plate with the OUTBOARD cover attached and connect it to the seat belt buckle as shown earlier in this procedure. Verify that it latches completely.
- Hold the seat belt buckle so that it is pointing toward the door opening as shown in Figure 8. Without pulling on the latch plate or belt material, push the release button on the buckle and see if the latch plate ejects or "pops out" of the buckle COMPLETELY.
- Attempt to connect it to the buckle with the latch plate turned or flipped over (with the raised ribs or horns on the outboard cover facing away from the buckle release button). In this position it should NOT latch in the seat belt buckle.
- If the reformed latch plate only latches in the buckle with the raised ribs or horns facing the release button, the procedure was done correctly. If it does NOT latch this way or if it latches both ways inspect the outboard cover and verify that it is properly installed and not loose. A loose or damaged cover must be replaced with a new one. Do NOT attempt to reform the latch plate a second time.
- If the reformed latch plate latches to the buckle correctly, install the INBOARD plastic cover (1) on the latch plate (2) and snap firmly to the OUTBOARD cover (3) as shown in Figure 9.
- Verify once again that the latch plate works correctly with the buckle.
- Repeat this procedure on the driver's seat belt latch plate.
- Install the GM Campaign Identification Label.
Figure 1B
Figure 2
Important: Only install the outboard latch plate cover in the next step. Do NOT install the inboard cover until instructed to do so later in this procedure.
Figure 3
Important: If it is determined in the NEXT step that the outboard cover was NOT installed correctly, it must be removed and a NEW outboard cover installed. Do NOT attempt to remove and reinstall the outboard cover.
Figure 4
Important: Campaign tool J 45215 (Latch Plate Forming Tool) is required to reform or apply a crown to the seat belt latch plate beginning with the next step. Do NOT attempt to perform the operation by any other means (vise, hammer, etc.).
Figure 5
Figure 6
Figure 7
Important: Because reforming (bending) of the latch plate is very minimal, you may find it difficult to see or feel. However, upon close inspection you should be able to see a very small mark (2) that the reforming tool (J 45215) leaves behind on the side of the latch plate that has the outboard cover (1) attached. Refer to Figure 7. If this mark is present, the reforming operation was done correctly.
Figure 8
| • | If it DOES eject or "pop out" COMPLETELY, continue to Step 11. |
| • | If it does NOT eject or "pop out" COMPLETELY, replace the seat belt retractor assembly. Be sure to install new plastic latch plate covers on the replacement retractor latch plate. Do not attempt to remove and reuse the plastic latch plate covers from the old retractor. Follow the instructions in this procedure for correct installation of the plastic latch plate covers. For seat belt retractor replacement procedures, refer to the Seat Belt subsection of the Restraints section of the Service Manual. |
Figure 9
Campaign Identification Label
FOR US AND IPC
Place a Campaign Identification Label on each vehicle in accordance with the instructions outlined in this Product Campaign Bulletin. Each label provides a space to include the campaign number and the five (5) digit dealer code of the dealer performing the campaign service. This information may be inserted with a typewriter or a ball point pen.
Put the Campaign Identification Label on a clean and dry surface of the radiator core support in an area that will be visible to people servicing the vehicle. When installing the Campaign Identification Label, be sure to pull the tab to allow the adhesion of the clear protective covering. Additional Campaign Identification Labels for US dealers can be obtained from Dealer Support Materials by calling 1-888-549-6152 (Monday-Friday, 8:00 am to 5:00 pm EST). Ask for Item Number S-1015 when ordering.
Additional Campaign Identification Labels for IPC dealers can be obtained from your Regional Marketing Office.
Campaign Identification Label
FOR CANADA
Place a Campaign Identification Label on each vehicle in accordance with the instructions outlined in this Product Campaign Bulletin. Each label provides a space to include the campaign number and the five (5) digit dealer code of the dealer performing the campaign service. This information may be inserted with a typewriter or a ball point pen.
Put the Campaign Identification Label on a clean and dry surface of the radiator core support in an area that will be visible to people servicing the vehicle. Additional Campaign Identification Labels for Canadian dealers can be obtained from DGN by calling 1-800-668-5539 (Monday-Friday, 8:00 am to 5:00 pm EST). Ask for Item Number GMP 91 when ordering.
Claim Information
Submit a Product Campaign Claim with the information indicated below:
Repair Performed | Part Count | Part No. | Parts Allow | CC-FC | Labor Op | Labor Hours* |
|---|---|---|---|---|---|---|
Inspect & Install Latch Plate Covers Only | 2 | ##### | ** | MA-96 | V0614 | 0.2 |
Add: Reform 1 or Both Latch Plates |
|
|
|
|
| 0.1 |
Add: Replace 1 Retractor & Install Latch Plate Cover | 1 |
|
|
|
| 0.8 |
Add: Replace 2 Retractors & Install Latch Plate Covers | 2 |
|
|
|
| 1.5 |
* -- For Campaign Administrative Allowance, add 0.1 hours to the "Labor Hours". ** -- The "Parts Allowance" should be the sum total of the current GMSPO Dealer Net price plus applicable Mark-Up or Landed Cost Mark-Up (for IPC) for parts needed to complete the repair. | ||||||
Refer to the General Motors WINS Claim Processing Manual for details on Product Campaign Claim Submission.
Customer Notification
FOR US AND CANADA
Customers will be notified of this campaign on their vehicles by General Motors (see copy of customer letter included with this bulletin).
Customer Notification
FOR IPC
Letters will be sent to known owners of record located within areas covered by the US National Traffic and Motor Vehicle Safety Act. For owners outside these areas, dealers should notify customers using the attached suggested dealer letter.
Dealer Campaign Responsibility
FOR US AND IPC (US States, Territories, and Possessions)
The US National Traffic and Motor Vehicle Safety Act provides that each vehicle that is subject to a recall campaign of this type must be adequately repaired within a reasonable time after the customer has tendered it for repair. A failure to repair within sixty days after tender of a vehicle is prima facie evidence of failure to repair within a reasonable time. If the condition is not adequately repaired within a reasonable time, the customer may be entitled to an identical or reasonably equivalent vehicle at no charge or to a refund of the purchase price less a reasonable allowance for depreciation. To avoid having these burdensome remedies, every effort must be made to promptly schedule an appointment with each customer and to repair their vehicle as soon as possible. In the recall campaign notification letters, customers are told how to contact the US National Highway Traffic Safety Administration if the campaign is not completed within a reasonable time.
This bulletin is notice to you that the new motor vehicles included in this campaign may not comply with the standard identified above. Under Title 49, Section 30112 of the United States Code, it is illegal for a dealer to sell a new motor vehicle which the dealer knows does not comply with an applicable Federal Motor Vehicle Safety Standard. As a consequence, if you sell any of these motor vehicles without first performing the campaign correction, your dealership may be subject to a civil penalty for each such sale.
Dealer Campaign Responsibility
ALL
All unsold new vehicles in dealers' possession and subject to this campaign MUST be held and inspected/repaired per the service procedure of this campaign bulletin BEFORE customers take possession of these vehicles.
Dealers are to service all vehicles subject to this campaign at no charge to customers, regardless of mileage, age of vehicle, or ownership, from this time forward.
Customers who have recently purchased vehicles sold from your vehicle inventory, and for which there is no customer information indicated on the dealer listing, are to be contacted by the dealer. Arrangements are to be made to make the required correction according to the instructions contained in this bulletin. This could be done by mailing to such customers a copy of the customer letter accompanying this bulletin. Campaign follow-up cards should not be used for this purpose, since the customer may not as yet have received the notification letter.
In summary, whenever a vehicle subject to this campaign enters your vehicle inventory, or is in your dealership for service in the future, please take the steps necessary to be sure the campaign correction has been made before selling or releasing the vehicle.
May, 2001Dear General Motors Customer:
This notice is sent to you in accordance with the requirements of the National Traffic and Motor Vehicle Safety Act.
Reason For This Recall
General Motors has decided that certain 2000-01 Cadillac DeVille model vehicles fail to conform to Federal/Canada Motor Vehicle Safety Standard 209, "Seat Belt Assemblies." The push button release effort for the front outboard seat belts exceeds the maximum 30 pounds. After a crash, higher release efforts could make it more difficult for an occupant to release the belt and exit the vehicle.
What Will Be Done
Dealers will add "snap on" latch clips to eliminate the potential of inverted latch plate insertion. Dealers will inspect the seat belts and, if necessary, modify the latch plates or replace the retractor. This service will be performed for you at no charge .
How Long Will The Repair Take?
The length of time required to perform this service correction is approximately 1 hour and 50 minutes. Additional time may be required to schedule and process your vehicle. If you dealer has a large number of vehicles awaiting service, this additional time may be significant. Please ask your dealer if you wish to know how much additional time will be needed schedule, process, and repair your vehicle.
Contacting Your Dealer
Please contact your dealer as soon as possible to arrange a service date. Parts are available and instructions for making this correction have been sent to your dealer.
Your dealer is best equipped to obtain parts and provide services to correct your vehicle as promptly as possible. Should your dealer be unable to schedule a service date within a reasonable time, you should contact the appropriate Customer Assistance Center at the number listed below:
Division | Number | Deaf, Hearing Impaired, or Speech Impaired* |
|---|---|---|
Cadillac | 1-800-458-8006 | 1-800-833-2622 |
GMODC | (905)644-4112 |
|
Puerto Rico - English | 1-800-496-9992 |
|
Puerto Rico - Español | 1-800-496-9993 |
|
Virgin Islands | 1-800-496-9994 |
|
* Utilizes Telecommunication Devices for the Deaf/Text Telephones (TDD/TTY) | ||
If, after contacting the appropriate customer assistance center, you are still not satisfied that we have done our best to remedy this condition without charge and within a reasonable time, you may wish to write the Administrator, National Highway Traffic Safety Administration, 400 Seventh Street SW, Washington, DC 20590 or call 1-888-327-4236.
Customer Reply Card
The attached customer reply card identifies your vehicle. Presentation of this card to your dealer will assist in making the necessary correction in the shortest possible time. If you no longer own this vehicle, please let us know by completing the attached and mailing it in the postage paid envelope.
We are sorry to cause you this inconvenience; however, we have taken this action in the interest of your safety and continued satisfaction with our products.
General Motors Corporation
Enclosure
