Strut Assembly Replacement FE1, FE3
Removal Procedure
- Remove the upper strut mounting bolts.
- Raise and support the vehicle. Refer to Lifting and Jacking the Vehicle in General Information.
- Remove the tire and wheel. Refer to Tire and Wheel Removal and Installation in Tires and Wheels.
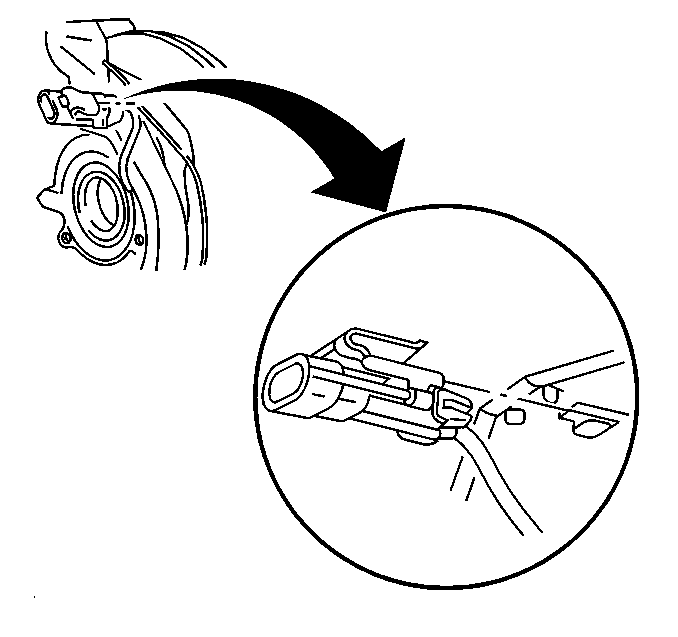
- Disconnect the wheel speed sensor wiring harness.
- Remove the wheel speed sensor bracket from the strut.
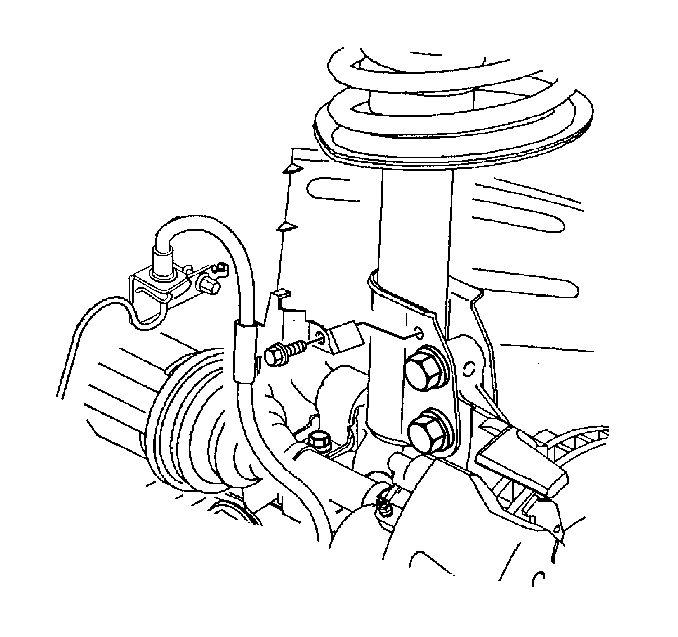
- Remove the brake line bracket mounting bolt and bracket from the strut.
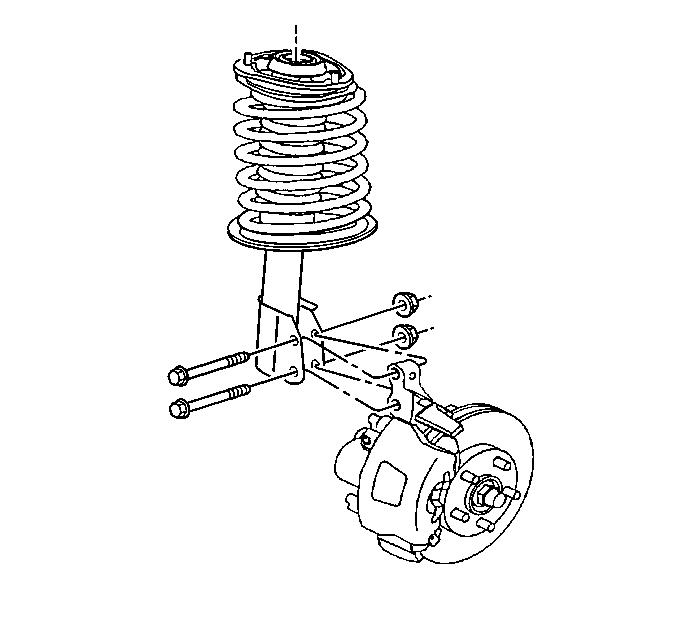
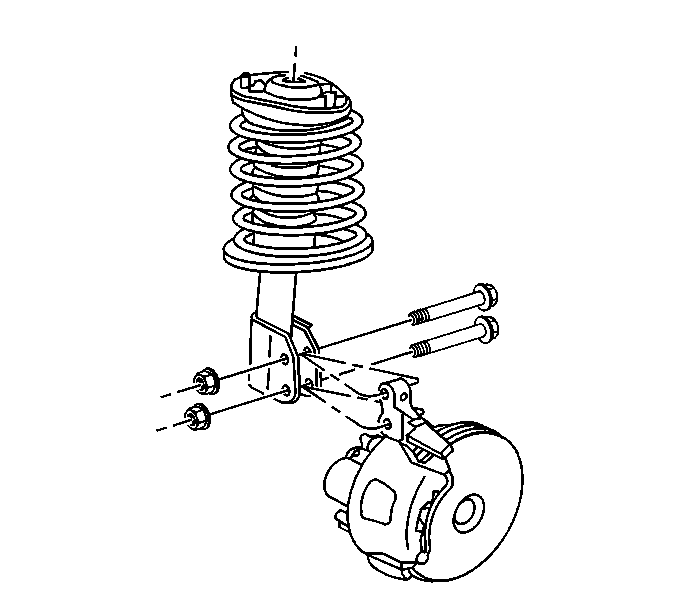
- Remove the strut to steering knuckle bolts and nuts.
- Remove the strut from the vehicle.
Notice: Use care when handling the coil springs in order to avoid chipping or scratching the coating. Damage to the coating will result in premature failure of the coil springs.

Installation Procedure
- Lower the vehicle.
- Install the strut to the vehicle.
- Install the upper strut mounting bolts.
- Raise the vehicle.
- Install new strut to steering knuckle bolts and nuts.
- Install the brake line bracket and mounting bolt to the strut.
- Install the wheel speed sensor bracket and mounting bolt to strut.
- Install the wheel speed sensor bracket to strut.
- Install the wheel speed sensor wiring harness to the bracket.
- Install the wheel and tire. Refer to Tire and Wheel Removal and Installation in Tires and Wheels.
- Lower the vehicle.
Notice: Use the correct fastener in the correct location. Replacement fasteners must be the correct part number for that application. Fasteners requiring replacement or fasteners requiring the use of thread locking compound or sealant are identified in the service procedure. Do not use paints, lubricants, or corrosion inhibitors on fasteners or fastener joint surfaces unless specified. These coatings affect fastener torque and joint clamping force and may damage the fastener. Use the correct tightening sequence and specifications when installing fasteners in order to avoid damage to parts and systems.
Tighten
Tighten the upper strut mounting bolts to 40 N·m (30 lb ft).
Tighten
Tighten the strut to steering knuckle bolts and nuts to 147 N·m
(108 lb ft).
Tighten
Tighten the bolts and nuts to 17 N·m (13 lb ft).
Tighten
Tighten the bolt to 17 N·m (13 lb ft).
Strut Assembly Replacement FE7
Removal Procedure
- Remove the 3 strut tower bolts.
- Raise the vehicle and suitably support by the frame allowing the control arms to hang free. Refer to Lifting and Jacking the Vehicle .
- Remove the wheel and tire. Refer to Tire and Wheel Removal and Installation .
- Disconnect the wheel speed sensor connector.
- Remove the wheel speed sensor bracket from the dust shield.
- Remove the brake line bracket from the strut.
- Remove the strut to knuckle bolts.
- Remove the strut from the vehicle.
Notice: Care should be taken to avoid chipping or scratching the coating when handling the suspension coil spring. Damage to the coating can cause premature failure.
Installation Procedure
- Install the strut.
- Install the 3 strut tower bolts and washers.
- Install the strut to knuckle bolts and nuts.
- Install the brake line bracket to strut.
- Install the wheel speed sensor bracket to dust shield.
- Connect the wheel speed sensor connector.
- Install the wheel and tire. Refer to Tire and Wheel Removal and Installation .
- Lower the vehicle.
Notice: Use the correct fastener in the correct location. Replacement fasteners must be the correct part number for that application. Fasteners requiring replacement or fasteners requiring the use of thread locking compound or sealant are identified in the service procedure. Do not use paints, lubricants, or corrosion inhibitors on fasteners or fastener joint surfaces unless specified. These coatings affect fastener torque and joint clamping force and may damage the fastener. Use the correct tightening sequence and specifications when installing fasteners in order to avoid damage to parts and systems.
Tighten
Tighten 3 strut tower bolts to 66 N·m (49 lb ft).
Tighten
Tighten the strut to knuckle bolts and nuts to 177 N·m (131 lb ft).
Tighten
Tighten the brake line bracket to 23 N·m (17 lb ft).
Tighten
Tighten the wheel and tire to 125 N·m (80 lb ft).
