Key Identification and Usage
The lock cylinder keyway is designed so that other model keys will not enter a current model lock cylinder. A single key is used for all locks on the vehicle.
The key identification is obtained from the four-character key code stamped on the knockout portion of the key head. Knock the plugs out of the key head after code numbers have been recorded. The code list, available to owners of key cutting equipment from equipment suppliers, determines the lock combinations from the code numbers.
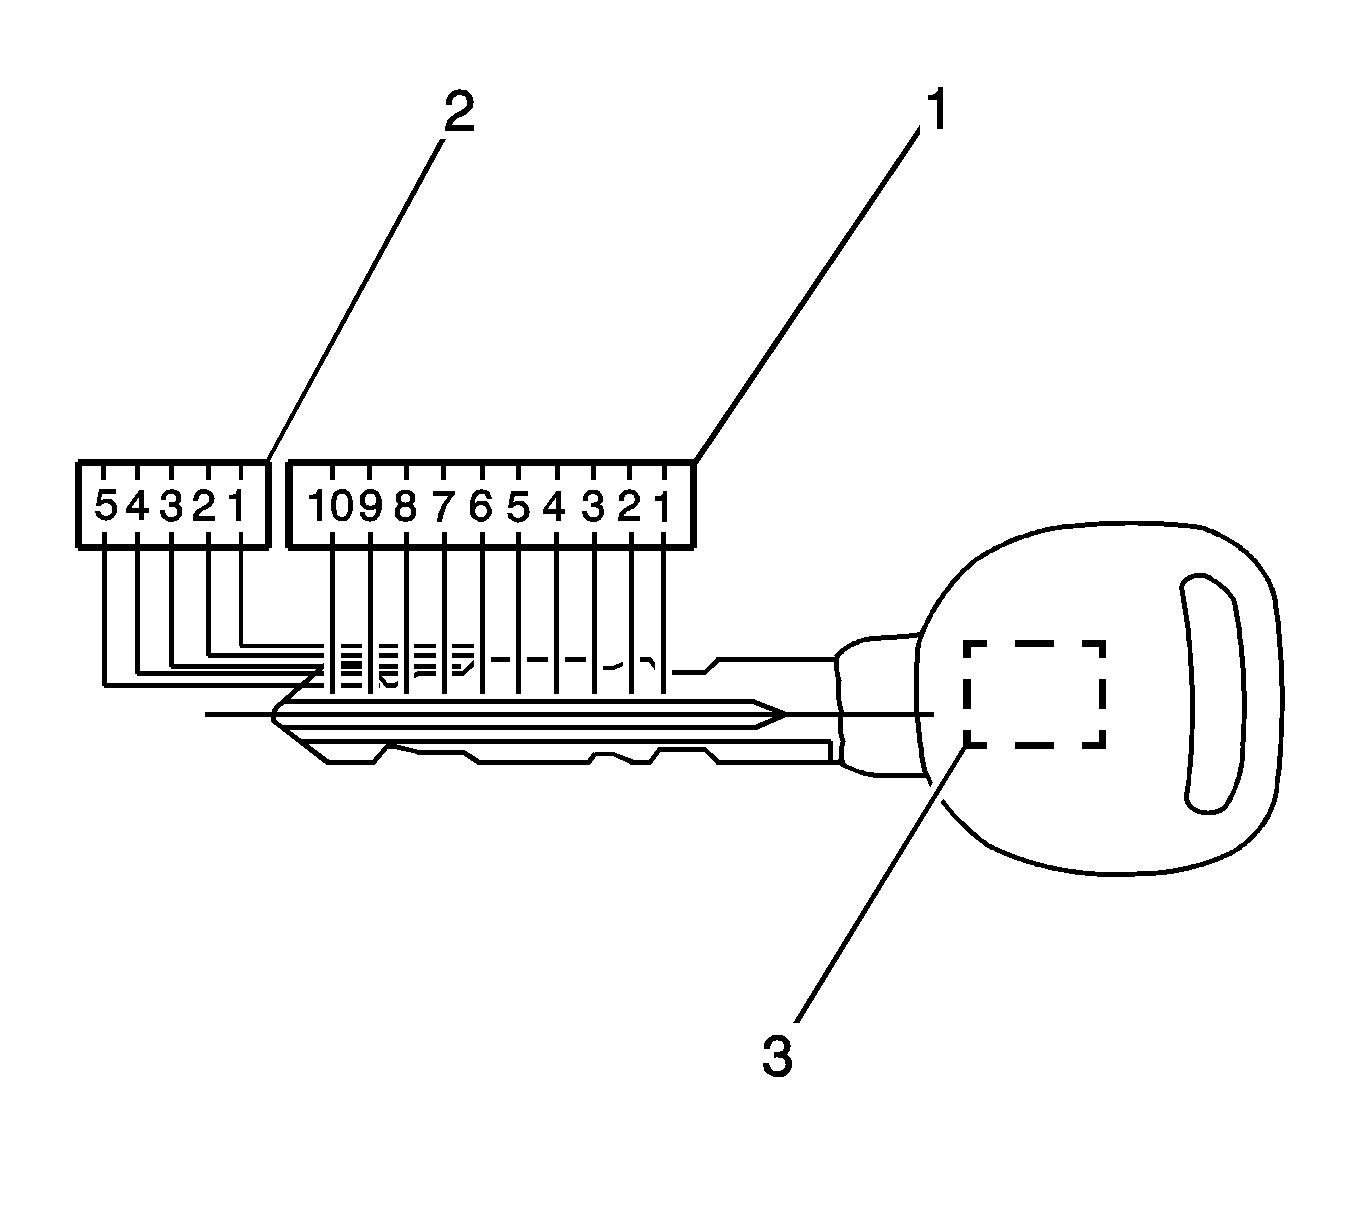
The keys are double sided and reversible. The master keys and valet keys contain PK3 transponders (3) that are read by the theft deterrent system when the keys are used in the ignition. The keys have 10 cut positions (1) with five different depths (2).
The keys that are furnished with the vehicle are:
| • | The master key, which contains a transponder (3). This key will operate all of the locks on the vehicle. |
| • | The valet key, which contains a transponder (3). This key will operate the front door locks and the ignition lock only. |
| • | The emergency key, which does not contain a transponder. This key will operate the door locks, rear compartment lock and the I/P storage compartment lock only. This key is intended for emergency use only. |
Cutting Keys
The key code can be obtained from the 5 digit number on the key tag that accompanies the original master and valet keys. The 5 digit key code cross references to the cut and tumbler sequence. The keys have 10 key cut positions (1) and 5 key cut depths (2). Key cut positions are numbered 1-10, counting from the head of the key to the tip. The key cut depths are 1-5, cut depth number 1 is the deepest cut. The key transponder (3) in the master and valet key must be programmed to the vehicle. Refer to Programming Theft Deterrent System Components .
- Cut a blank key to the proper depth and sequence of each of the tumbler positions.
- Inspect the mechanical operation of the key in the lock cylinders in the doors, the ignition switch, the rear compartment lid and any storage compartments:
- If replacing a master or valet key, program the key transponder to the vehicle. Refer to Programming Theft Deterrent System Components .
With each side of the key pointing up inside the lock, inspect the operation of the lock in both directions.
| • | Turn the key both directions in each lock cylinder. |
| • | Turn the key with each side of the key pointing upward in each lock cylinder. |
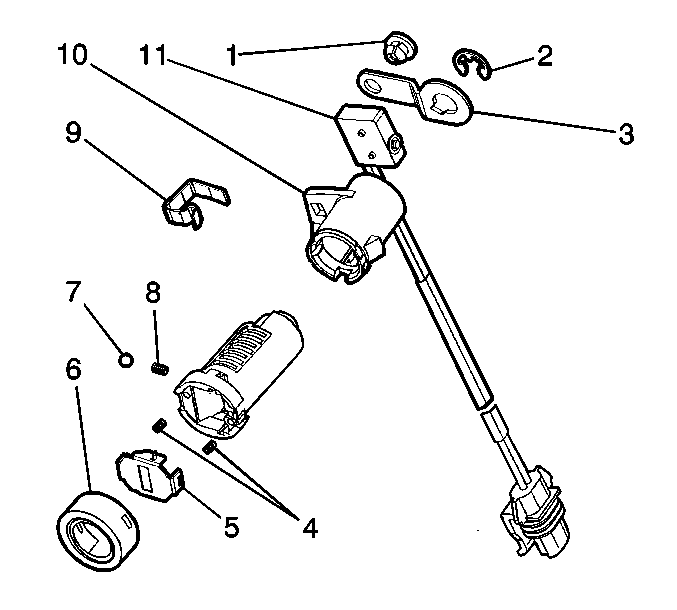
Lock Cylinder Tumbler Operation
All lock tumblers are shaped alike with the exception of the notched position on one side. As the key is inserted into the lock cylinder, the tumblers are lowered to the correct height so that notches on each tumbler are at the same level. When the notches on all six tumblers line up, two small springs push the side bar into the notches, allowing the cylinder to turn in the cylinder bore. Five types of tumblers are used in making the lock combinations, and each is coded and stamped with a number between 1 and 5.
Each of the 4 cut depths on the key has corresponding tumblers, sometimes referred to as plates or wafers. The tumbler depth number is stamped on the tumblers for identification. Door, rear compartment, ignition tumblers and glove box tumblers represent 3 different series. There are also 3 different compression springs - with door and rear compartment sharing the same part numbers and ignition and glove box with separate part numbers. The I/P storage compartment lock cylinder also requires a retainer tumbler in the position closest to the front key insertion surface of the cylinder. The retainer tumbler is not moved by the key, its function is to retain the I/P storage compartment lock cylinder in the lock assembly. It is essential that the correct components be used in tumbling of locks. The compression springs are inserted into the spring wells, then the correct tumblers are inserted into the tumbler wards.
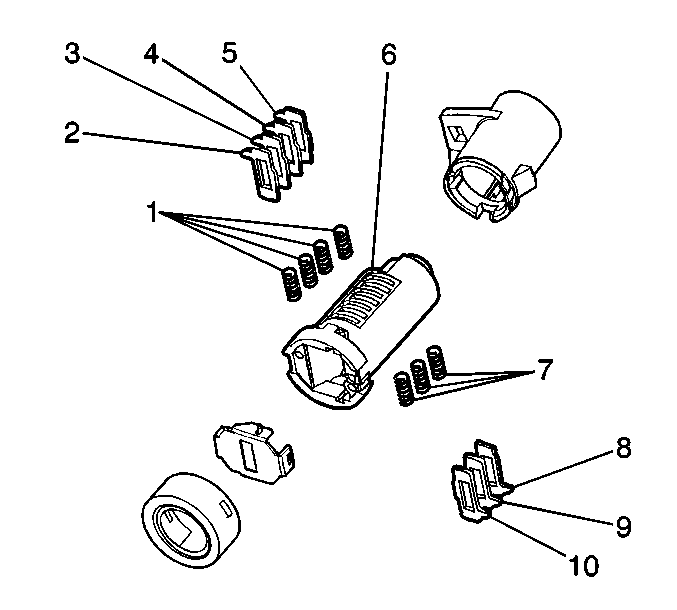
Assembling and Coding Ignition Lock Cylinder
The ignition lock assemblies are serviced using one assembly which includes the following.
| • | Cylinder |
| • | Retainer Bar |
| • | Retainer Spring |
| • | Sidebar Spring |
| • | Security Bar |
| • | Retaining Ring |
| • | Knob |
| • | Sidebar |
- Beginning at the front of the ignition cylinder (5) and working toward the tail end of the cylinder, insert the appropriate tumbler (3), according to the key code, into the corresponding tumbler ward (4). For example, using the code #0008 (2, 4, 4, 2, 3, 2, 4, 4, 4, 3) and key cut positions 1-9, tumblers 2, 4, 4, 2, 3, 2, 4, 4, 4 would be inserted into tumbler slots 1-9, respectively.
- Seat the tumblers by pushing it past the sidebar with a small flat screwdriver.
- Place several drops of Mobile SHC 524 synthetic oil, or equivalent, on top of the tumblers for lubrication.
- Install the tumbler springs (2) into the spring wells in the cylinder where they will sit on top of the tumblers.
- Install the retainer locator legs into the receptacle slots in the cylinder.
- While holding the seal plate in position with the thumb, insert the key into the cylinder and watch for the side bar to drop.
- Stake the 2 metal areas of the cylinder directly over the seal plate legs with a hammer and a punch. Repeat this stake on the areas of the cylinder directly opposite the first 2 stakes.
- Carefully place the detent ball (9) on the detent spring (10).
- Depress the detent ball and spring and insert the cylinder (5) into the cylinder housing (4).
- Install the lock pawl (3).
- Install the lock pawl E-clip (2) to retain the lock pawl.
- Remove the key from the lock cylinder (5).
- Install the lock cylinder cap (7) by aligning the notch in the cap with the large drain slot in the lock housing (4).
Important: If the side bar does not drop when the key is inserted into the cylinder, then the cylinder is tumbled wrong and you need to start over. The side bar must be completely flush to the cylinder diameter.
Caution: Wear safety glasses in order to avoid eye damage.
Press the cap into place with light hand pressure.
Assembling and Coding Door Lock Cylinder
The door lock cylinder assembly has 7 positions, which accept springs and tumblers. It uses key cut positions 3 through 9. A cylinder is tumbled in the following manner.
- Hold the cylinder so that the side with 4 tumbler spring wells (6) faces up.
- Install the 4 tumbler springs (1) into the 4 tumbler slots (6).
- Using key cut position 3, install the first tumbler (2) into the cylinder.
- Using key cut position 5, install the second tumbler (3) into the cylinder.
- Using key cut position 7, install the third tumbler (4) into the cylinder.
- Using key cut position 9, install the fourth tumbler (5) into the cylinder.
- Turn the cylinder so that the side with three 3 spring wells is up.
- Using key cut position 4, install the fifth tumbler (10) into the cylinder.
- Using key cut position 6, install the sixth tumbler (9) into the cylinder.
- Using key cut position 8, install the seventh tumbler (8) into the cylinder.
- Inserting the key can at this point check the correct loading of tumblers. All tumblers should come to flush with the outside diameter of the cylinder. This will allow the cylinder to turn within its housing.
- Place the detent spring (2) into the spring well located on the side of the cylinder near the tail.
- Place the detent ball (7) on the spring and carefully insert the cylinder into the housing so that the ball fits in the "V" and the cylinder bottoms out.
- When the cylinder bottoms out in the housing, remove the key while ensuring that the cylinder is not pulled out of the housing.
- Insert the 2 plate springs (4) into the 2 spring wells in the head of the door cylinder.
- Snap the shutter sub-assembly (5) to the cylinder by firmly pressing down on the face of the shutter making sure the shutter pin lines up with the corresponding pin pockets on the cylinder.
- Insert the key.
- Install the cap (6) by aligning the notch in the cap with the large drain slot in the housing and pressing the cap until it bottoms out and snaps onto the housing.
- Position the microswitch (11) to the platform of the housing.
- Locate the plunger toward the cylinder and snap the clamp (2) over the switch onto the housing.
- Place the pawl (3) on the tail of the cylinder and secure it with the retaining ring (2) included in the master service kit.
- Press the spindle clip (1) into the hole provided on the pawl (3).
- After installation, review Power Door Locks Description and Operation in Doors, for proper operation.
Important: The tumblers are self-retaining and are snapped in with light pressure.
Caution: Wear safety glasses in order to avoid eye damage.
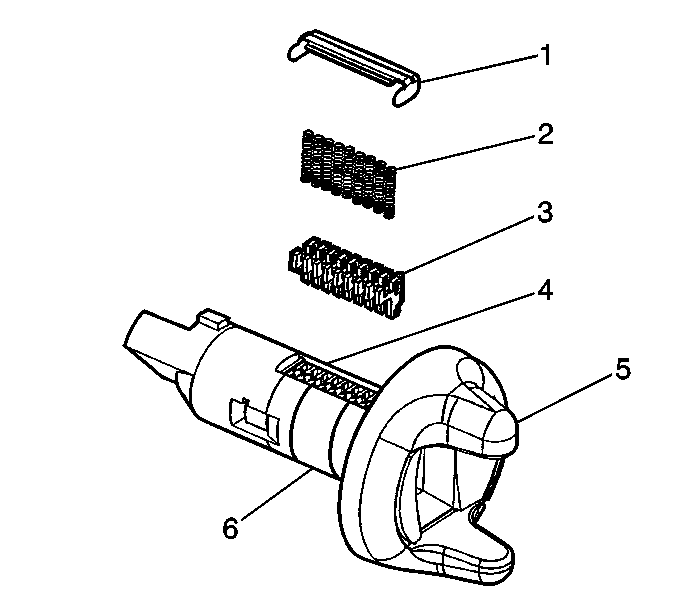
Assembling and Coding the Rear Compartment Lock Cylinder
The rear compartment lid lock service kit is provided with the housing, adaptor, dust cover, shutter sub-assembly, plate springs, torsion spring, and the cylinder. Lock cylinder tumbling is the same as in Assembling and Coding the Door Lock Cylinder, steps 1-11.
The balance of the assembly is as follows:
- Add grease to the outside diameter of the cylinder (4) and the inside diameter of the housing (5).
- Insert the cylinder (4) into the housing (5).
- Rotate the cylinder (4) until it seats into the housing (5).
- Remove the key.
- Insert the plate springs (3) into the spring wells in the head of the rear compartment lock cylinder (4).
- Snap the shutter sub-assembly on the cylinder (4) and housing (5) and crimp it with a flat head screwdriver.
- Pre-assemble the microswitch (7) to the adapter (8) by completing the following steps:
- Slide the straight leg of the torsion spring (6) up the ramp of the adaptor (8) and into the hole.
- Confirm that the torsion spring (6) is fully seated by pulling on the adaptor (8) and the cylinder (4). The spring retains the adaptor.
- Assemble the torsion spring (6) with the curved leg engaging the hook provided on the housing (5).
- Install the cylinder assembly to the rear compartment lid. Refer to Rear Compartment Lid Lock Cylinder Replacement in Body Rear End.
- Check system for proper operation.
Important: The cylinder is completely seated when it is flush with the housing.
| • | Slide the microswitch (7) onto the adapter shaft (8). |
| • | Ensure that the "C" molded into the visible face of the switch rotor faces 180 degrees away from the projection on the switch body. |
| • | Slide the adaptor (8) on the cylinder (4). |
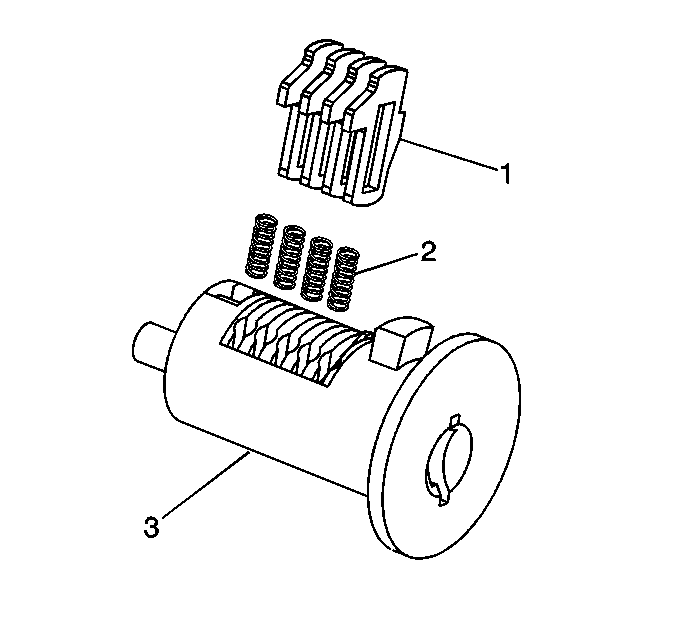
Assembling and Coding I/P Storage Compartment Lock Cylinder
The I/P storage compartment lock only uses 4 of the 10 cut positions 7-10 . A retainer tumbler is used in the I/P storage compartment lock to retain the lock cylinder in the latch assembly. This retainer tumbler is not moved by the key. The retainer tumbler occupies the slot closest to the head of the I/P storage compartment lock cylinder and should come already installed in the cylinder.
- Hold the cylinder (3) so that the side with 4 tumbler spring wells is facing up.
- Insert tumbler springs (2) into the 4 spring wells.
- Install the tumbler (1) for key cut position 7 into the slot nearest to the front of the lock cylinder.
- Install the 3 remaining tumblers, key cut positions 8, 9 and 10, into the cylinder.
- Snap the tumblers into place with light hand pressure.
- Inspect for the correct loading of the tumblers (1) by inserting the key into cylinder (3). All of the tumblers should be flush with the lock cylinder.