SIMULATED CONVERTIBLE TOP GENERAL REPAIR MAINTENANCE

MODELS AFFECTED: 1982 AND 1983 ELDORADOS AND SEVILLES
This bulletin contains information on the care and servicing of the optional full Cabriolet roof (CF8) available on 1982 and 1983 Eldorados and Sevilles.
Care and Cleaning of Vinyl Cover Material
The vinyl cover material used on the Eldorado and Seville full Cabriolet roof is an extremely durable material that will, with proper care, retain its appearance characteristics for a long period of time. Commercial car wash equipment procedures and cleaning solutions may be used without adversely affecting the appearance of the material.
Hand washing should be done with neutral soap suds and cold or lukewarm water and a soft-bristled brush. Rinse the top with sufficient quantities of clear water to remove all traces of soap. If the cover is severely soiled and cannot be properly cleaned with soap and water, a mild cleaning agent may be used such as GM Multi-Purpose Powdered Cleaner (GM #1050429) or equivalent. Rinse the entire top with water and apply the mild cleaner on a small area (approximately two square feet). Scrub the area with a soft-bristled hand brush, adding water as necessary. Remove excess cleaner with a sponge and rinse the balance of the cleaner off with water. Use a liberal amount of water to prevent the cleaner from running down onto the body finish and drying. This could cause streaks in the paint finish.
If the cover material has been contaminated with grease, oil, or tar, use GM Spot Lifter No. 1051398 or equivalent and follow label directions. No waxes, polishes, sealers or "dressing" type materials should be applied to the top material.
General Service Information
The top consists of a vinyl covered, fiberglass cap (bonnet assembly) which is riveted and cemented to the roof. The cover material and cap are serviced as a complete assembly. If replacement of the top is required, it will be necessary to transfer only the feature strip end caps. The backlight extension on Sevilles and the rear valance on Eldorados can be serviced as a separate operation.
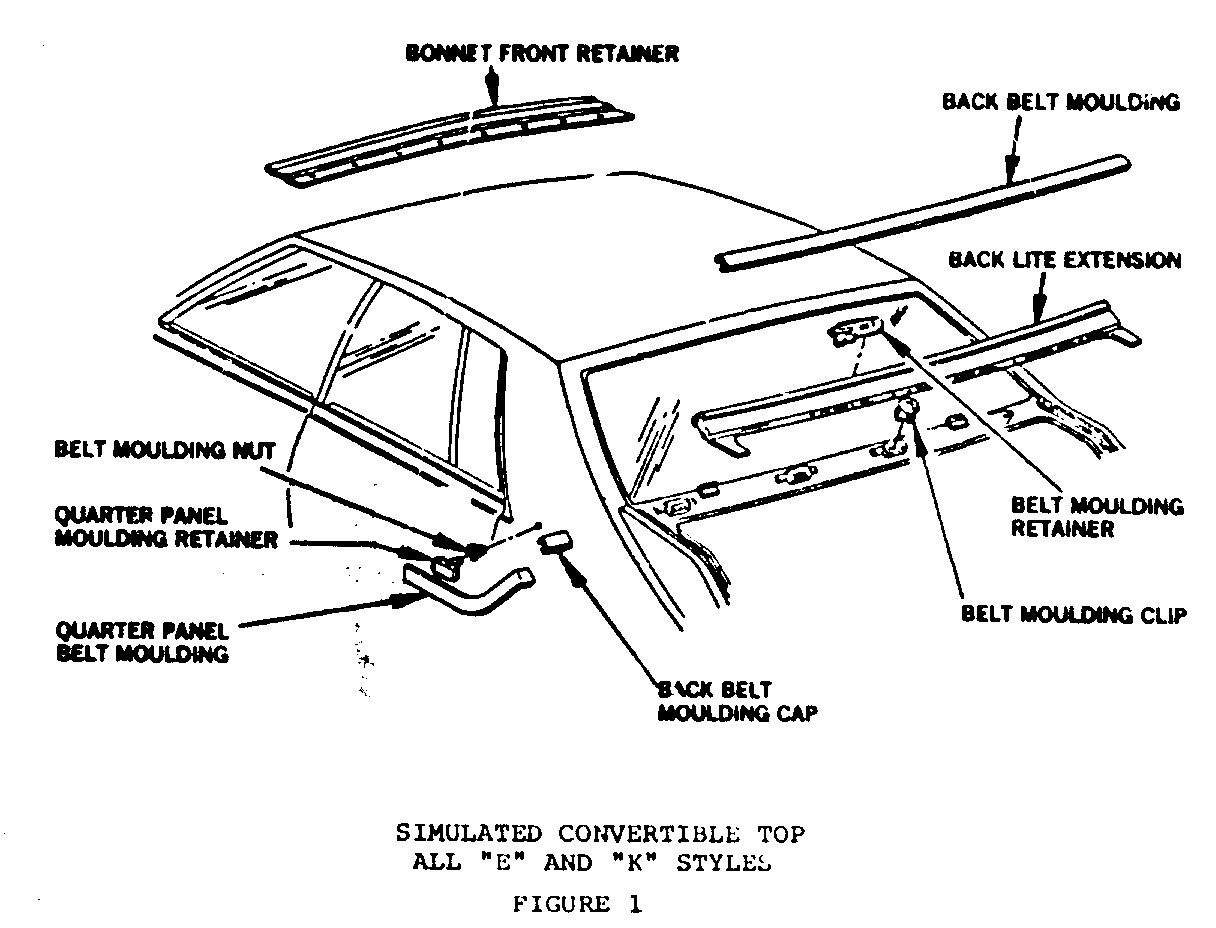
Figure 1 shows a view of the component parts of the top assembly for illustrative purposes. Service adhesives required to perform service operations are:
3M 8064 or equivalent for cementing top material.
Silicone sealants such as 3M T3 Silicone #08660, Dow-Corning Automotive type or General Electric's RVP sealant or equivalent for sealing between quarter glass and cover, and back glass and cover. (Silicone sealant must be noncorrosive type.)
3M Body Caulk or equivalent to seal all rivet holes.
3M Butyl tape or double sided tape or equivalent to secure cap to roof panel and prevent panel flutter.
Feature Strip Bow, Retainer and Cap
Removal:
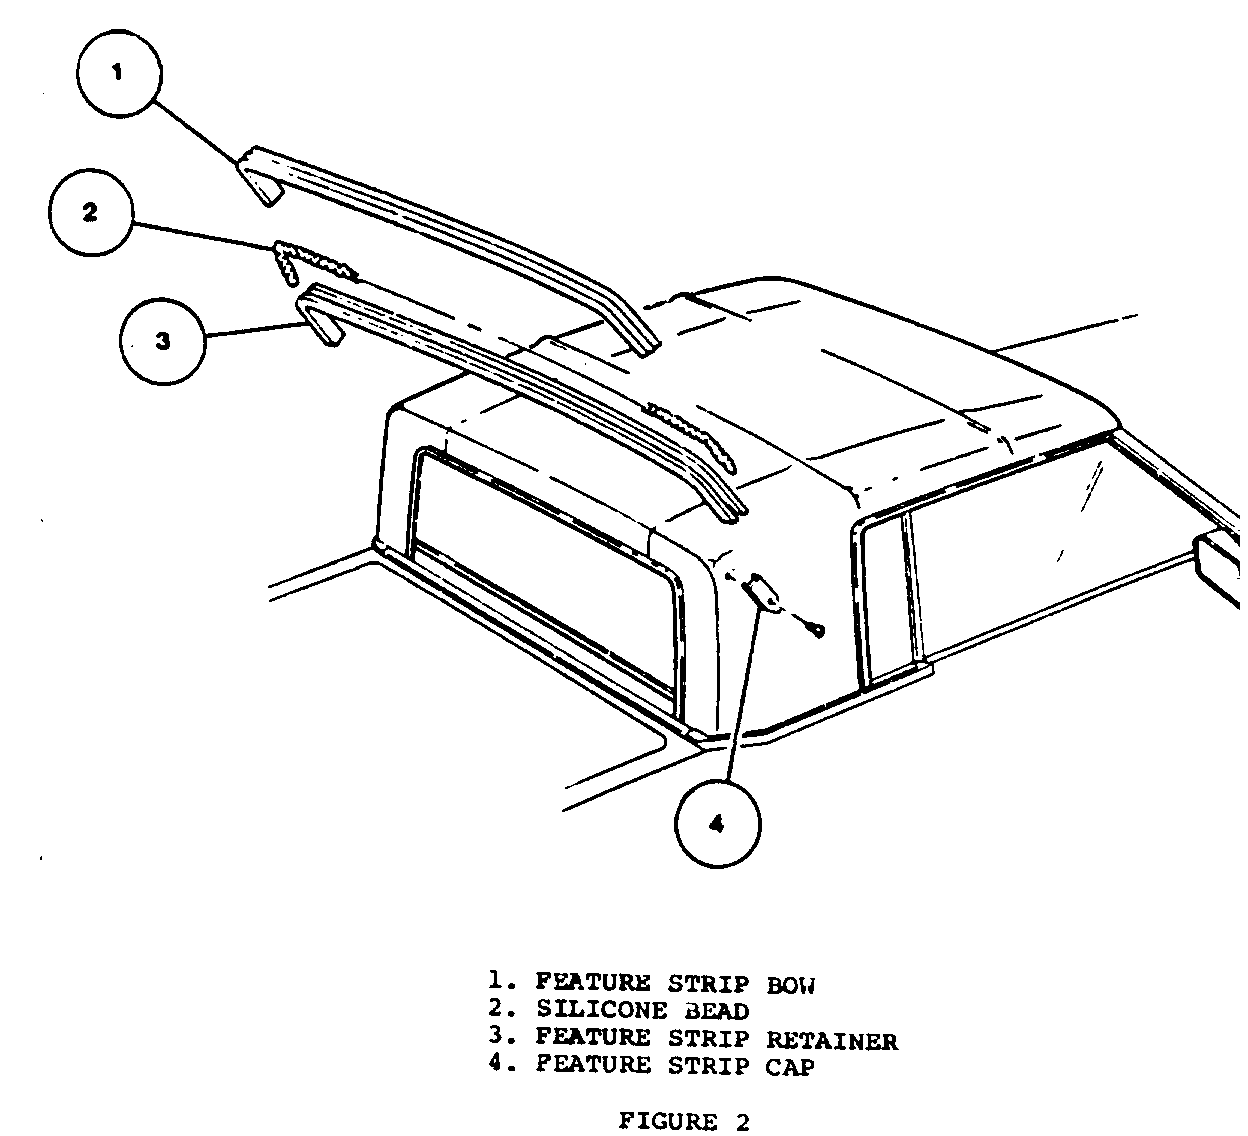
------- 1. Remove retaining screw from each feature strip end cap and remove caps from top (15 and 16, Figure 1).
2. Starting at either end, grasp feature strip and pull it from the retainer.
3. Remove silicone from retainer.
4. Using a No. 29 drill bit with an adjustable stop set at a maximum drilling depth of 3/8" (9mm), drill exposed rivets from feature strip retainer and remove retainer from car.
Installation:
------------- 1. Seal open rivet holes with clear silicone sealant.
2. Position new feature strip retainer onto vinyl top and attach retainer to top and fiberglass bonnet with rivets.
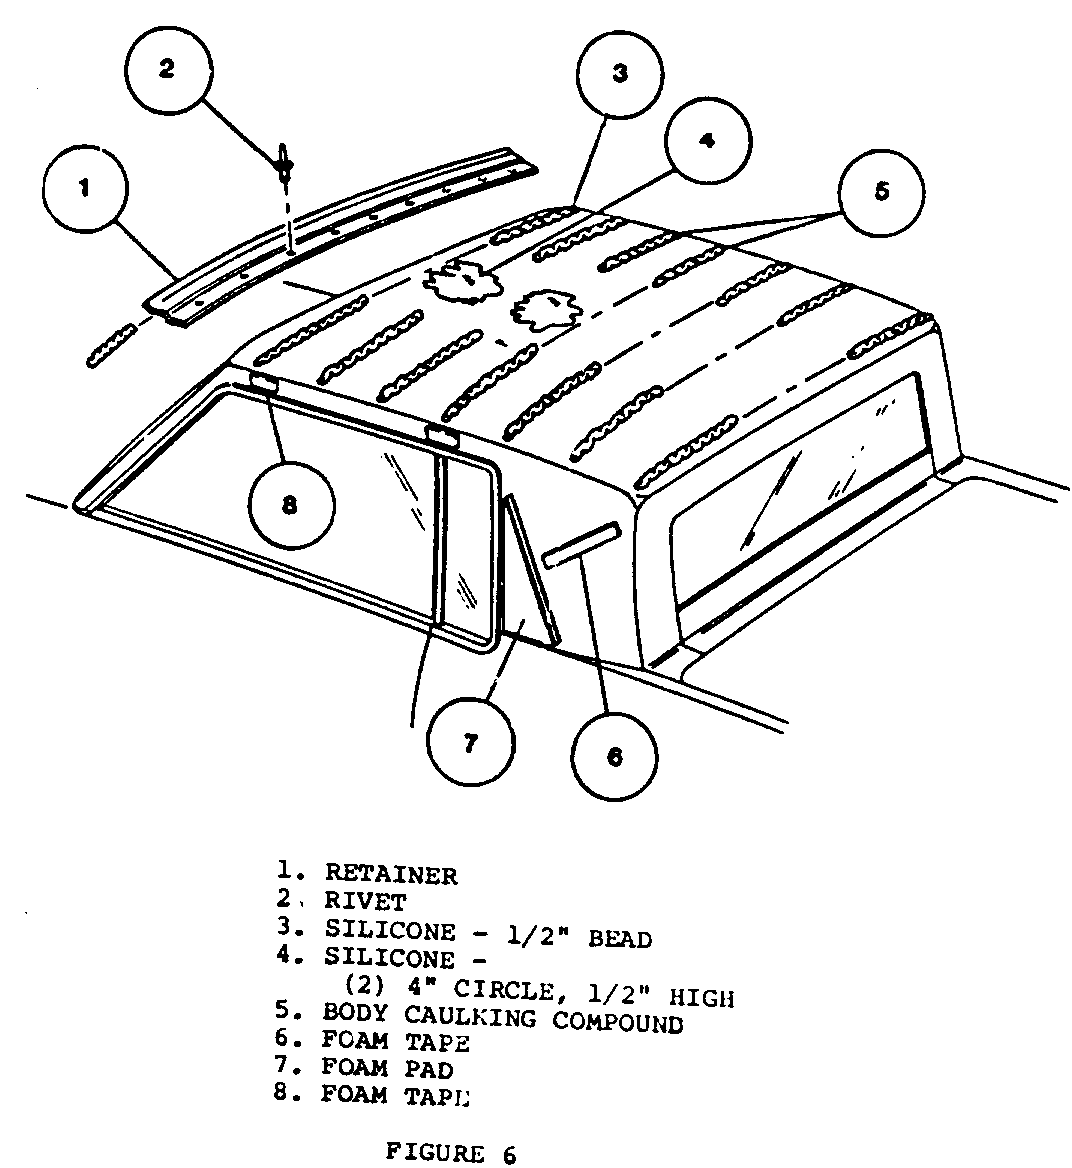
3. Apply bead of silicone (4, Figure 1) across entire width of retainer (5).
4. Starting at center of roof, install feature strip to retainer.
5. Trim ends of feature strip. Install feature strip end cap to each end of strip.
Bonnet (Cover and Cap) Assemb!y ------------------------------- Removal: ------- 1. Cover front and rear of vehicle to protect paint.
2. Mask off windshield and back window to avoid scratching glass.
3. Mask off side roof rail rear vertical scalp moldings to avoid scratching.
4. Remove feature strip, retainer and end caps as previously described.
5. Using a putty knife or other flat-bladed tool, carefully pry quarter belt moldings from retainers (9 and 10, Figure 2).
6. Using a putty knife, carefully loosen adhesive bond securing fabric cover (3, Figure 2) to fiberglass cap (4) along edge of right and left quarter panel to expose rivets that secure fiberglass cap to body.
7. Starting at rear end of side roof rail, use a hook tool (approximately 90 degree bend), and insert tool between fabric cover material and roof panel. Carefully pull material flap out from under the fiberglass cap along entire length of side roof rail.
8. Repeat step 6 and 7 on opposite side of car.
9. Using a putty knife, carefully loosen adhesive bond securing fabric cover to fiberglass cap along side roof rail to expose rivets that secure bonnet assembly to body (1, Figure 2).
10. Using a 1/8" (3.2mm) drill bit equipped with an adjustable stop set at a maximum drilling depth of 1/2" (12mm), drill and remove all exposed rivets around perimeter of bonnet assembly.
11. Using a flat-bladed tool, carefully break any remaining sealer bond between fiberglass cap and body.
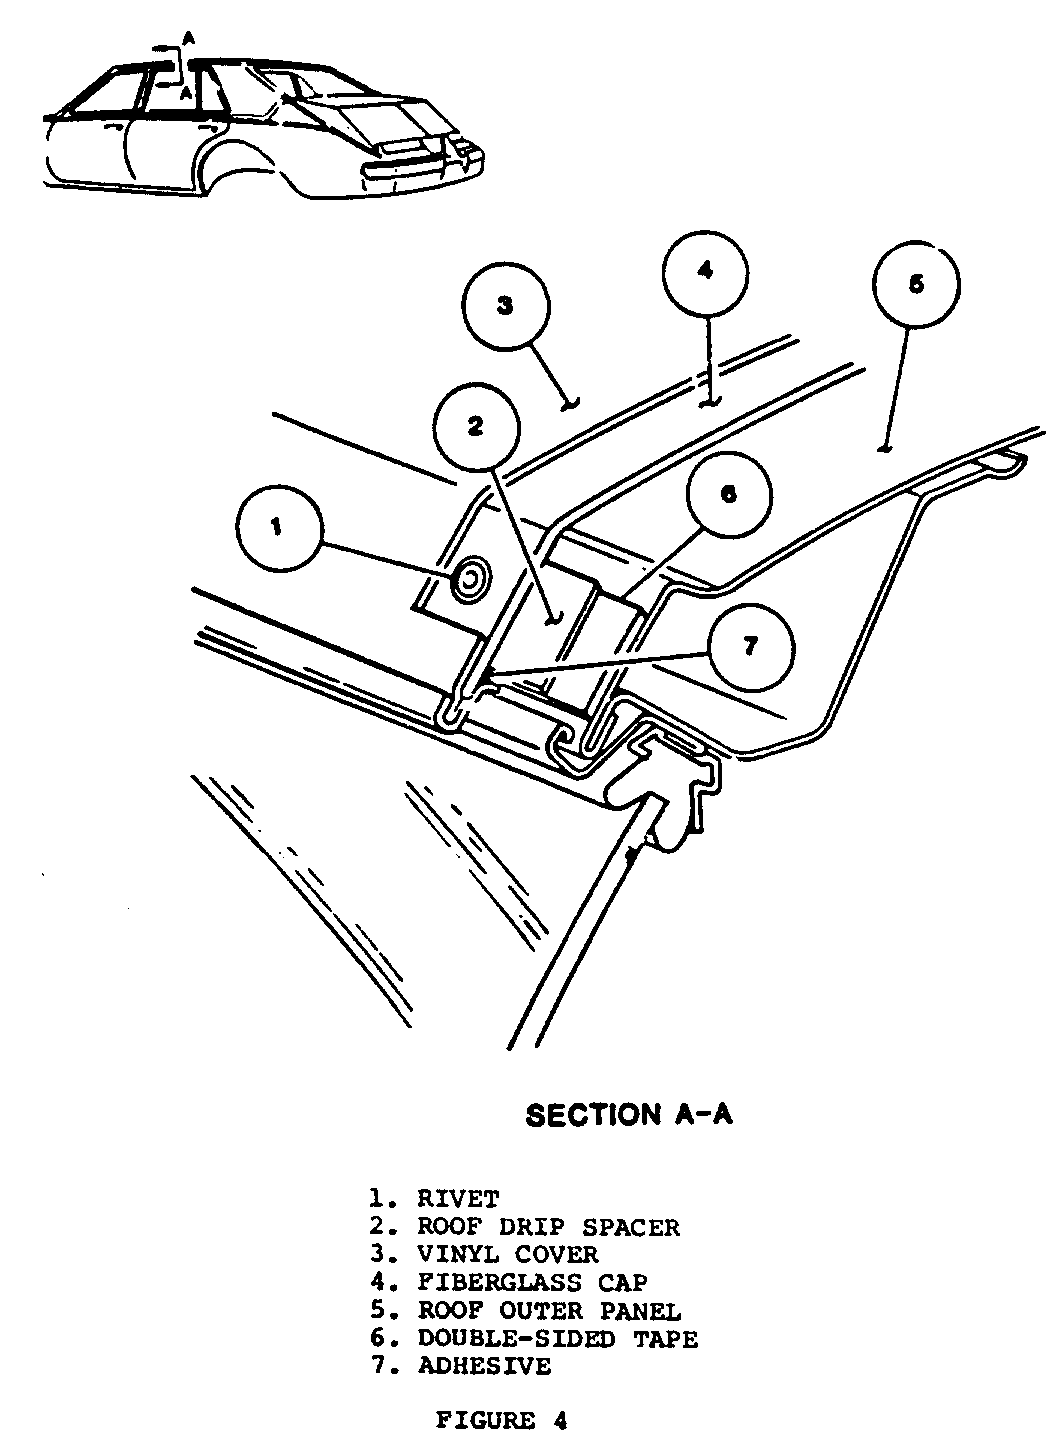
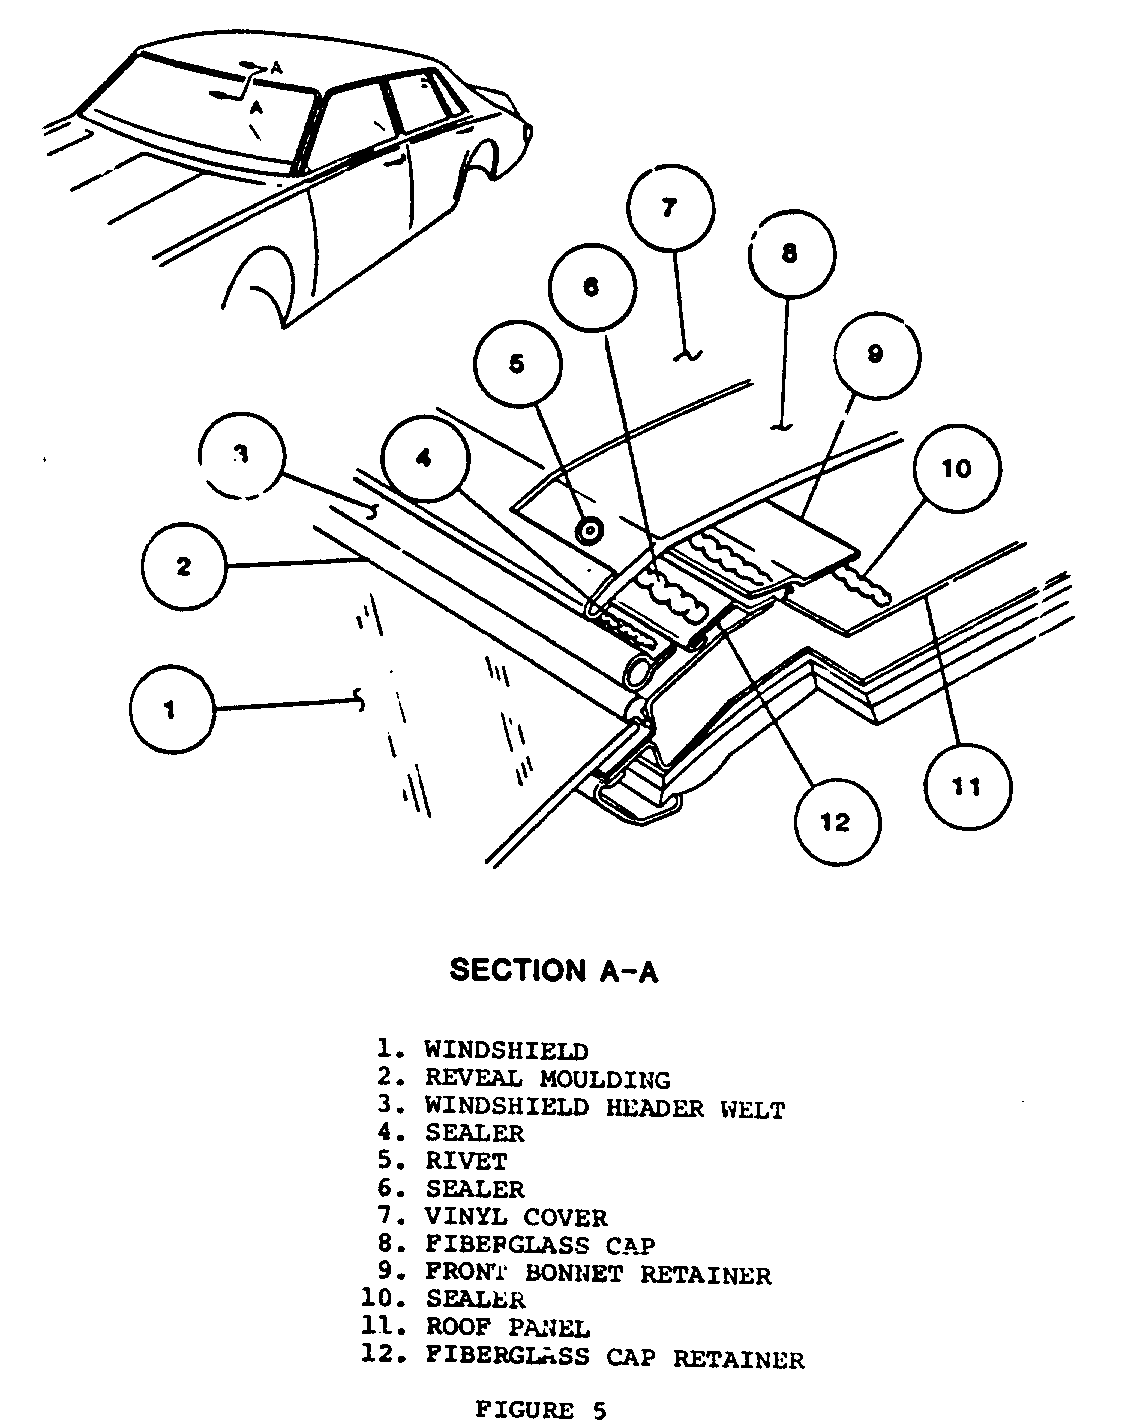
12. Using a flat-bladed tool, carefully break sealer bond between windshield header welt and roof panel assembly (3 and 10, Figure 4).
13. With the aid of a helper, carefully slide bonnet assembly forward to disengage fiberglass cap retainer from front bonnet retainer. Lift bonnet assembly from body.
Installation:
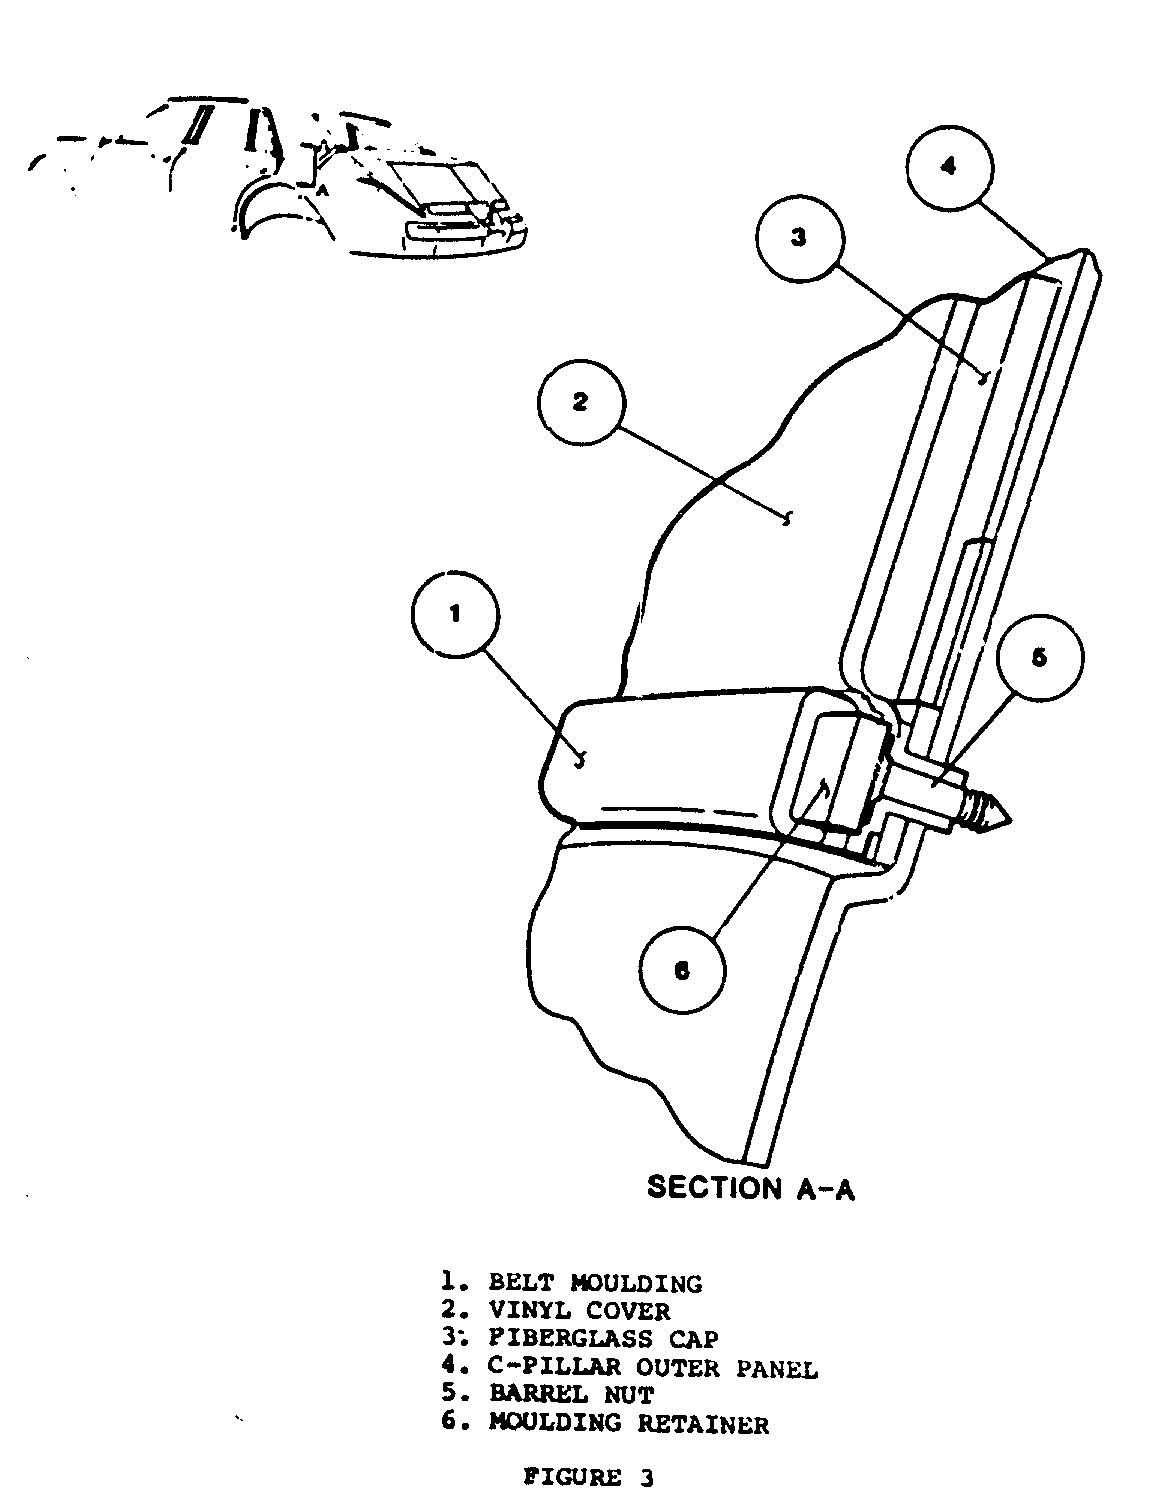
------------- 1. Prior to installing new bonnet assembly, be sure strips of medium-bodied sealer (1, 2 and 3, Figure 3) are complete. Where necessary, add additional sealer to roof panel to act as an anti-flutter (2, Figure 3). Use same pattern as shown in illustration. Apply 3/8" (10mm) diameter bead of silicone across entire length of front bonnet retainer (8 and 9, Figure 4).
2. Where required, install new double sided tape in rear quarter rail and side roof rail areas (4, Figure 3).
3. With the aid of a helper, carefully position bonnet assembly on roof panel approximately 2" (50mm) ahead of front bonnet retainer.
4. Pull bonnet assembly rearward until fiberglass cap retainer (11, Figure 4) on underside of bonnet assembly fully engages front bonnet retainer on roof panel.
5. When cap is in its installed position, use hand pressure as necessary to firmly seat fiberglass cap to roof panel.
NOTICE: Excessive pressure may cause cap to set too low and develop a flat spot in surface of cover. Once adhered in the wrong position, cap must be removed and rebonded to roof to establish proper adhesion and contour of the assembly.
6. The new bonnet should attach to the same rivet holes originally used. In the event new rivet attaching holes are needed, seal all old attaching holes with medium-bodied sealer to prevent water entry into body. Drill new holes as required using a 1/8" (3.2mm) drill bit with an adjustable stop set at a maximum drilling depth of 1/2" (12mm).
NOTICE: All rivets must be of an aluminum, closed-end type to prevent water entry into body.
7. Starting at front of car and working rearward, rivet cap to roof panel assembly. Repeat procedure on opposite side of car.
NOTICE: All rivet heads must be flush with fiberglass cap and free of burrs to prevent highlighting of rivet heads through the vinyl cover material. Carefully file or grind rivet heads as required.
8. Apply adhesive around perimeter of cover and fiberglass cap.
9. Firmly "slick" top material to fiberglass cap. Material must be free of all wrinkles and draws.
10. Using a headlining inserting tool, tuck top material flap under fiberglass cap along right and left side roof rail.
11. Trim excess top material at right and left quarter belt beneath belt reveal moldings (9, Figure 2).
CAUTION:
Care must be exercised when trimming top material to prevent damage to painted surfaces.
12. Check quarter panel belt molding nuts and retainers. Replace nuts or retainers as required.
13. Install body caulking compound over all molding attaching nuts to prevent water entry into body.
14. Install all previously removed moldings.
15. Clean top assembly as required.
16. Remove all previously installed protective covers and tape from vehicle.
Back Window Replacement (Seville)
Removal:
------- 1. Cover rear of vehicle to protect paint.
2. Install protective cover over rear seat back to back window trim panel.
3. If back window is intact, tape glass to avoid scratching.
4. Remove rear quarter belt moldings by prying the push-in retainers from the barrel nuts (10 and 11, Figure 2).
5. If back window is heated, disconnect feed and ground wires.
6. Using a flat-bladed tool, carefully loosen adhesive bond securing fabric cover to fiberglass cap along edge of right and left quarter panel to expose rivets that secure fiberglass cap to body.
7. Starting at rear end of side roof rail, use a hook tool; inserted between fabric cover material and roof panel, to carefully pull material flap from under fiberglass cap along entire length of side roof rail.
8. Repeat step 7 on opposite side of car.
9. Using a 1/8" (3.2mm) drill bit with an adjustable stop set at maximum drilling depth of 1/2" (12mm), drill and remove all exposed rivets around perimeter of bonnet assembly.
10. Using a flat-bladed tool, carefully loosen any remaining cement bond that exists between fiberglass cap and body.
11. Prop up rear portion of cap assembly to gain access to back window assembly.
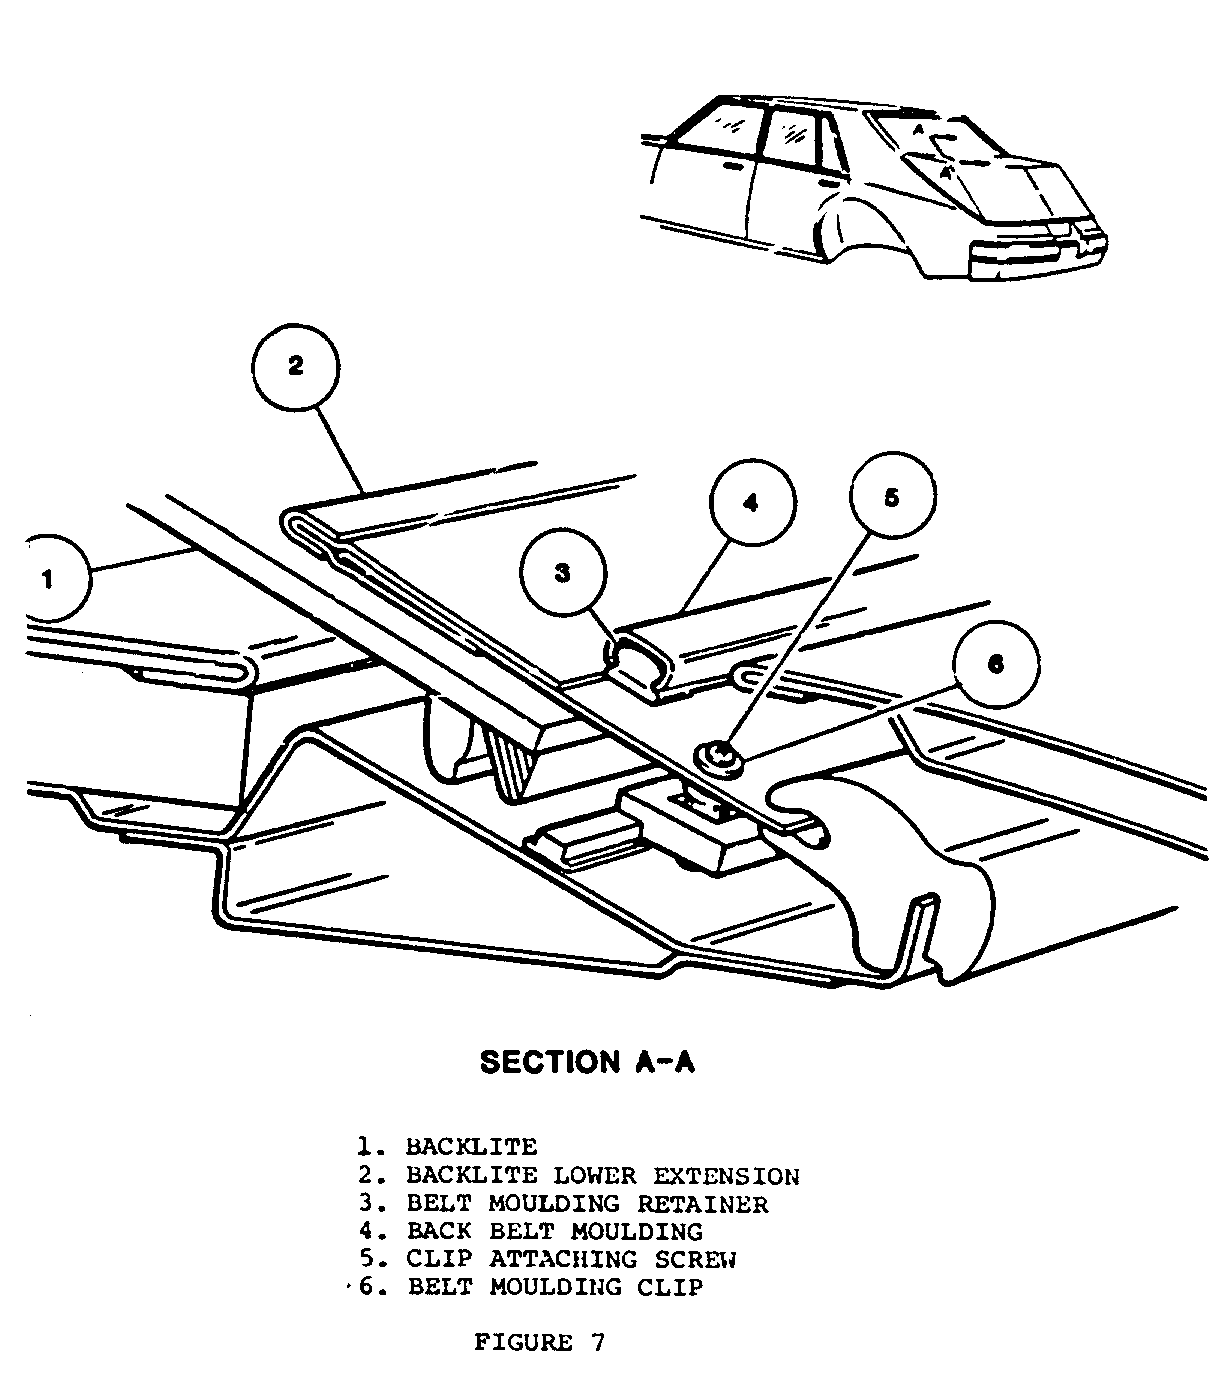
12. Remove screws securing backlight lower extension to body and remove extension (13, Figure 2).
13. Remove and replace back window using conventional method as outlined in the Fisher Body Service Manual.
Installation:
------------- 1. Install backlight lower extension to body.
2. Remove prop from under bonnet assembly and place bonnet in its installed position.
3. Use hand pressure to seat cap assembly to roof panel.
4. Starting at front of car and working rearward, rivet cap to roof panel assembly. Repeat procedure on opposite side.
NOTICE: All rivet heads must be flush with the fiberglass cap and free of burrs to prevent highlighting of rivet head through the vinyl cover material. Carefully file or grind rivet heads as required.
5. Apply adhesive around perimeter of vinyl cover and fiberglass cap.
6. Firmly "slick" top material to fiberglass cap. Material must be free of all wrinkles and draws.
7. Using a headlining inserting tool, tuck top material flap under fiberglass cap along right and left side roof rail.
8. Check quarter panel belt molding nuts and retainers. Replace any damaged nuts or retainers as required.
9. Install body caulking compound over all molding attaching nuts to prevent water entry into body.
10. Install all previously removed moldings.
11. Clean top assembly as required.
12. Remove all previously installed protective covers and tape from vehicle.
Backlight Extension or Rear Valance
Removal:
------- 1. Cover rear of vehicle to protect paint.
2. Open rear compartment lid.
3. Remove screws securing backlight extension or valance to body and remove extension or valance (13, Figure 2).
Installation:
------------- 1. Install body caulking compound over attaching screw holes to prevent water entry into body.
2. Position backlight lower extension to body and install attaching screws.
3. Close rear compartment lid.
4. Remove all previously installed protective covers and tape from vehicle.
For warranty purposes, use the following labor operations:
"E" "K" --- --- B2072 Windshield Header Lace - R& R or Replace .2 .2
B2076 Lower Rear Valance - Cover ("E") or .3 Extension ("K")
B3510 Feature Strip Bow - R&R or Replace .3 .3 ADD: To Replace Retainer .2 .2
B2079 Cover and Cap Complete (Bonnet) - Replace 2.3 2.3
PARTS LIST 1982-1983 CADILLAC "K" BODY SIMULATED CONVERTIBLE TOP -------------------------------------------------------
Item Quantity Per 1982 GM 1983 GM No. Description Vehicle Part No. Part No. --- ------------ ------- --------- ---------- 1 BONNET ASM-RF WHITE 1 20496635 20496635
2 BONNET ASM-RF BLACK 1 20496636 20496636 3 BONNET ASM-RF D BLU 1 20496637
4 BONNET ASM-RF DK ROYAL BLUE 1 20497301
5 BONNET ASM-RF DK BRIAR BROWN 1 20497302 6 BOW-F/STRIP WHITE 1 20496613 20496613 7 BOW-F/STRIP BLACK 1 20496614 20496614 8 BOW-F/STRIP DK BLUE 1 20496615 9 BOW-F/STRIP DK ROYAL BLUE 1 20496941 10 BOW-F/STRIP DK BRIAR BROWN 1 - 20496942 11 RETAINER F/STRIP 1 20496617 20496617 12 EXT ASM-B/L LWR WHITE 1 20496643 20496643 13 EXT ASM-B/L LWR BLACK 1 20496644 20496644 14 EXT ASM-B/L LWR DK BLUE 1 20496645 15 EXT ASM-B/L LWR DK ROYAL BLUE 1 20497303 16 EXT ASM-B/L LWR DK BRIAR BROWN 1 20497304 17 WELT ASM-W/S HDR WHITE 1 20496609 20496609 18 WELT ASM-W/S HDR BLACK 1 20496610 20496610 19 WELT ASM-W/S HDR DK BLUE 1 20496611 20 WELT ASM-W/S HDR DK ROYAL BLUE 1 20496939 21 WELT ASM-W/S HDR DK BRIAR BROWN 1 20496940 22 C AP F/ST RIP 2 20497278 20497278 23 MLDG-BACK BELT 1 20497297 20497297 24 RETAINER-MLDG BACK BELT 7 9838109 9838109 25 CAP-B/BELT MLDG 2 20496620 20496620 26 NUT-BELT MLDGS 8 1099943 1099943 27 MLDG-Q/PNL BELT RH 1 20497295 20497295 28 MLDG-Q/PNL BELT LH 1 20497296 20497296 29 RET-MLDG Q/PNL 8 1099948 1099948 30 RET-BONNET FRT 1 20496625 20496625
General Motors bulletins are intended for use by professional technicians, not a "do-it-yourselfer". They are written to inform those technicians of conditions that may occur on some vehicles, or to provide information that could assist in the proper service of a vehicle. Properly trained technicians have the equipment, tools, safety instructions and know-how to do a job properly and safely. If a condition is described, do not assume that the bulletin applies to your vehicle, or that your vehicle will have that condition. See a General Motors dealer servicing your brand of General Motors vehicle for information on whether your vehicle may benefit from the information.
