WATER LEAKS/WIND NOISE AT UPPER REAR DOOR GLASS AREA

SUBJECT: WATER LEAKS/WIND NOISE AT UPPER REAR DOOR GLASS AREA (REPLACE WEATHERSTRIP RETAINER)
VEHICLES AFFECTED: 1992-93 "E" MODELS
Some owners of 1992-1993 Eldorados (before VIN breakpoint PU614412) may comment on water leaks and/or wind noise at the upper rear door glass area. This condition occurs when the door glass catches outside of the blow-out clip causing a gap between the door glass and the roof rail weatherstrip.
To repair this condition use the following procedure:
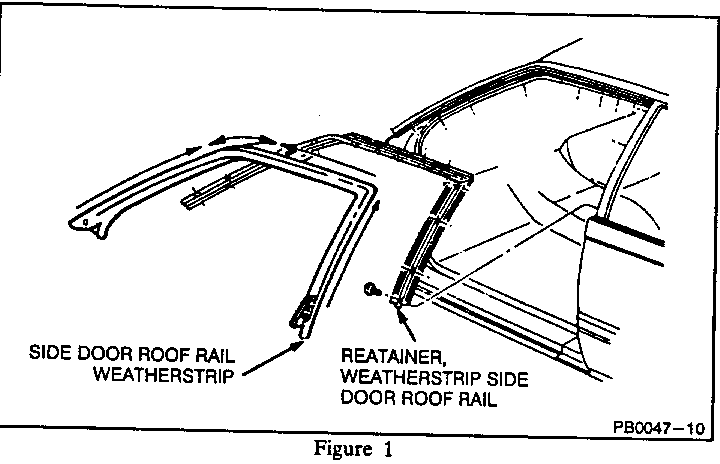
1. Remove side door roof rail weatherstrip by removing all the weatherstrip fastener's. Pull the weatherstrip away from the weatherstrip retainer. Refer to Figure 1.
NOTE: Use, as necessary, 3M weatherstrip release agent (P/N 08971 or equivalent) to assist in removing the weatherstrip.
2. To remove the weatherstrip retainer remove the retaining screws, and pull the retainer assembly away from the door opening. Refer to Figure 1.
NOTE: Some 1992 Eldorado retainer systems may have two separate pieces consisting of scalp molding and weatherstrip retainer assembly, including blow-out clip. Both pieces should be removed.
3. Fill all previous screw holes with 3M strip-caulk sealer, P/N 08578, or equivalent.
4. Using a new side door roof rail retainer assembly, P/N's 3544798 RH and 3544799 LH, fit the retainer to upper door opening ensuring that the upper rear corner of the retainer assembly is fully seated upward, rearward, and inboard at the B-pillar.
5. Starting at the upper rear corner drill 1/8" holes through the body sheet metal at the locations corresponding to the molding. Secure the retainer with screws, P/N 11509153, working from the upper rear corner and down to hinge pillar belt line.
6. To ensure that the retainer vertical leg is located correctly at the upper corner, firmly grasp the retainer and push upward seating the retainer into the upper corner of the B-pillar.
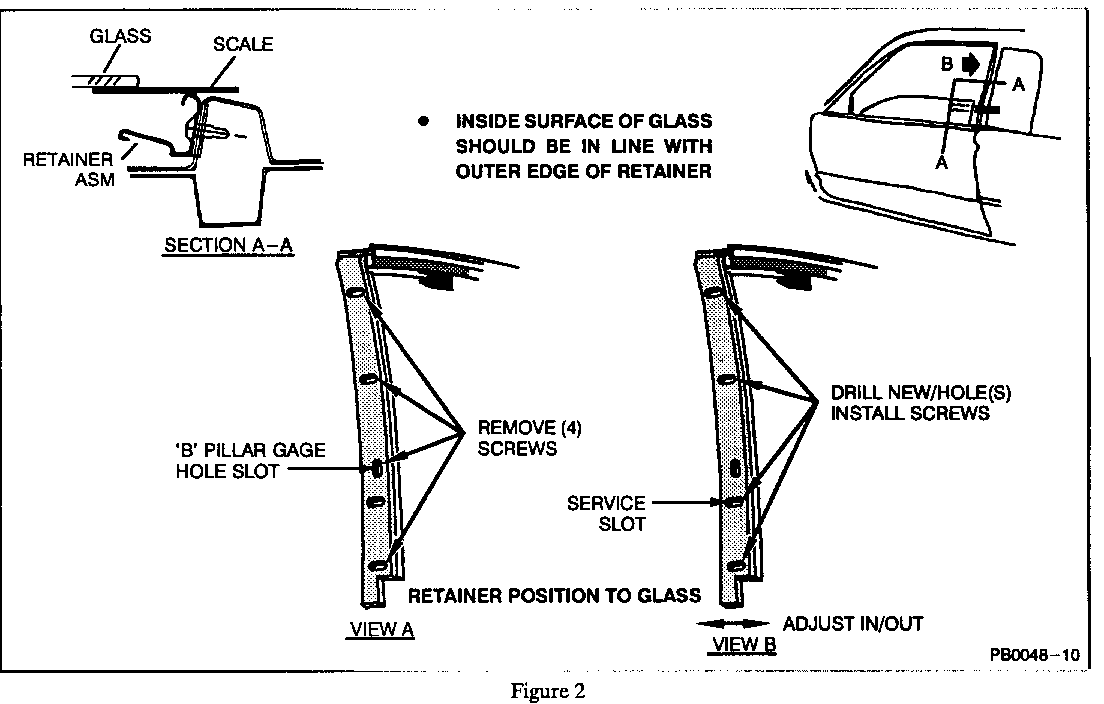
7. Secure retainer assembly to B-pillar gage hole with one screw through vertical slot. Refer to Figure 2, View A.
8. Check for correct position of retainer to door glass with glass raised approximately 2" above the belt line. Using a scale or straight edge, the inside glass surface should be in line with outside of retainer surface. Refer to Figure 2, Section A-A.
0 If a retainer adjustment is needed, remove the screw from vertical slot (fill hole with 3M strip caulk), adjust retainer, repeating step seven.
0 Use 1/8" bit to drill new hole at service slot (second slot from belt line). Secure the retainer to the new location on the B-pillar. Refer to Figure 1, View B.
0 Check the other three horizontal holes for hole alignment and complete retainer attachment.
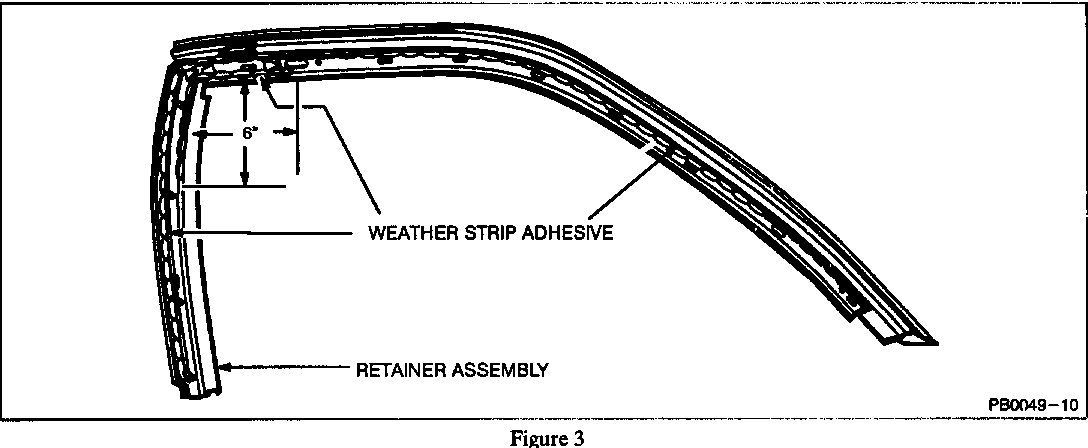
9. Apply a 1/4" bead of 3M weatherstrip adhesive, P/N 08008 or equivalent, to base of weatherstrip retainer assembly outboard of retainer attaching screws around the entire periphery of the retainer assembly. Refer to Figure 3.
10. Apply a second 1/4" bead of 3M weatherstrip adhesive, P/N 08008, to the inboard side of the weatherstrip retainer assembly attaching screws. Apply the bead six inches forward and six inches down from the upper rear corner of the retainer. Refer to Figure 3.
11. Slide weatherstrip inside B-pillar retainer up to roof rail. Retain weatherstrip to lock pillar with push pin fasteners. Refer to Figure 1 for steps 11, 12, 14, and 1 5.
12. Continue the weatherstrip installation from B-pillar to six inches forward of blow-out clip using a flat-bladed tool.
13. Slide the weatherstrip front molded tube over the plug on the lower door opening weatherstrip and secure with a push pin fastener.
14. Install weatherstrip from front belt line to top of windshield post.
NOTE: Weatherstrip and scalp molding cap must be flush at belt line.
15. Complete weatherstrip installation from blow-out clip forward.
NOTE: Ensure weatherstrip is seated in retainer behind blow-out clip and nested in upper rear corner of B- pillar.
16. Check door glass for proper alignment. Refer to Service bulletin T-92-81 (Corporate bulletin 211513) if a door glass adjustment is required.
17. Test - Blow-Out Clip Entrapment:
Start engine.
0 A/C to 60 degree setting
0 Blower to Hi setting
0 Vents wide open
0 Door glass closed
0 Wait one minute
0 Open door from outside vehicle and slam door several times. Door glass must remain inboard of the blow- out clip.
0 From inside vehicle, cycle glass down then up.
0 Slam door shut several times. Door glass must remain inboard of blow-out clip.
18. Test for water leaks.
For vehicles repaired under warranty use:
Labour Time: .6 hour (each side)


General Motors bulletins are intended for use by professional technicians, not a "do-it-yourselfer". They are written to inform those technicians of conditions that may occur on some vehicles, or to provide information that could assist in the proper service of a vehicle. Properly trained technicians have the equipment, tools, safety instructions and know-how to do a job properly and safely. If a condition is described, do not assume that the bulletin applies to your vehicle, or that your vehicle will have that condition. See a General Motors dealer servicing your brand of General Motors vehicle for information on whether your vehicle may benefit from the information.
