
| Subject: | Door Trim Panel Removal Procedures and Hook Repair Information |
| Models: | 1992-1997 Cadillac Seville |
| 1992-2002 Cadillac Eldorado |
| 1994-1999 Cadillac DeVille |
This bulletin is being issued to address the following:
- To provide proper door trim panel removal
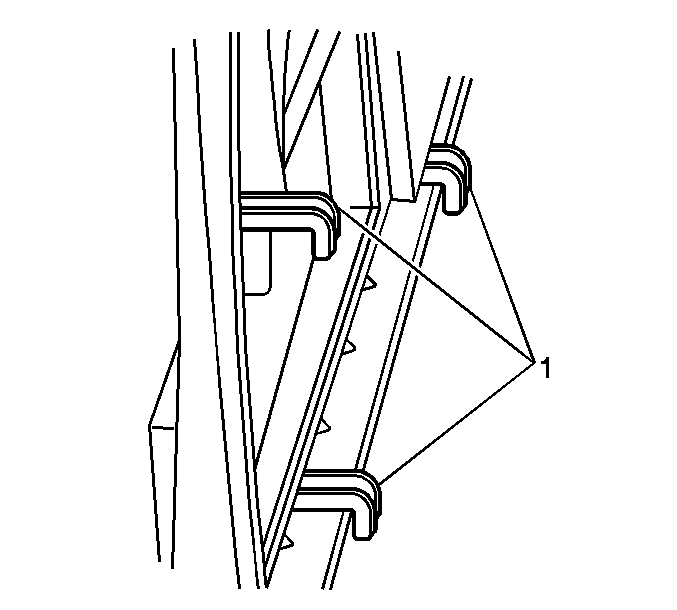
procedures in order to avoid door trim panel retainer hook breakage. Hook-style
retainers (1) are used to retain the door trim panels on the vehicles listed
above. To avoid retainer hook breakage, it is important to observe the proper
removal procedure. Refer to the appropriate removal procedure in this bulletin.
- To provide door trim panel retaining
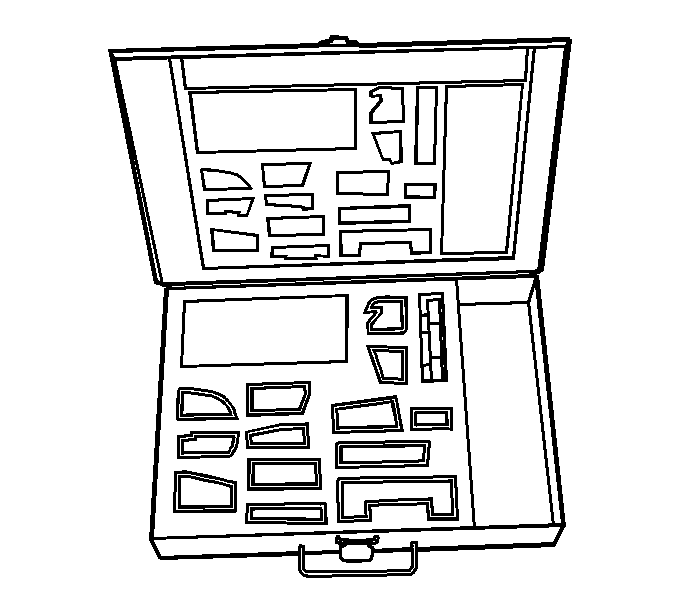
hook repair information. If retainer hook breakage does occur, the hook(s)
can be repaired with the Kent-Moore Kit J 42983. The kit contains hooks,
adhesive, templates, carbide bits and instructions.
1994-1999 DeVille Trim Panel Replacement-RH Front Door (LH Similar)
Tools Required
J 38778 Door Trim Pad Clip Remover For Upper Trim Panel Retainer
ONLY
Removal Procedure
- Disable the SIR system. Refer to Disabling the SIR System in the
SIR sub-section of the Service Manual.
Caution: Striking the vehicle near the side air bag impact sensor can cause an
air bag deployment if the ignition switch is not OFF. To help avoid personal
injury and damage to the vehicle from a deployment, always turn the ignition
switch to OFF during body repairs.
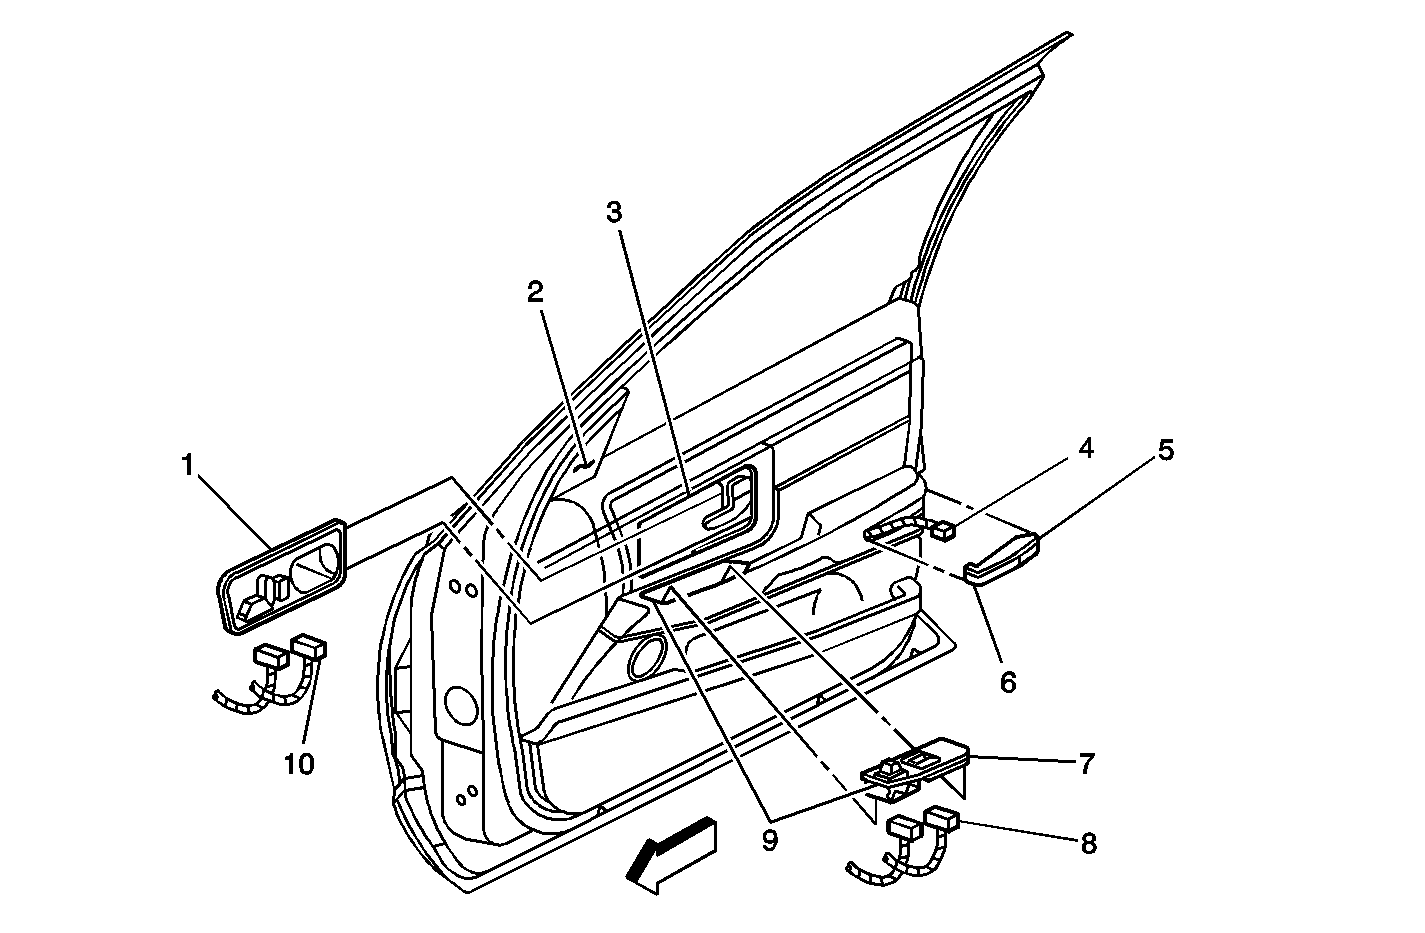
- Remove the power window switch assembly (7).
| 2.1. | Place protective tape between the forward edge of the power window
switch assembly and the door trim panel (9). |
| | Important: In order to avoid damage, the retention spring clip must be fully disengaged
prior to removal of the power window switch assembly.
|
| 2.2. | Between the forward edge of the power window switch assembly and the
door trim panel (9), carefully insert a plastic trim tool far enough to depress
and disengage the switch plate retention spring clip. |
| 2.3. | Use the plastic trim tool in one hand to gently pry the forward
edge of the power window switch assembly upward. Use the other hand to grasp
and pull the switch assembly from the door trim panel. |
| 2.4. | Disconnect the electrical connectors (8). |
- Remove the inside door handle trim plate/bezel (1).
| 3.1. | Between the top edge of the inside door handle trim plate/bezel
and the door trim panel (3), carefully insert the plastic trim tool and gently
pry the inside door handle trim plate/bezel outward far enough to disengage
the retaining clips. |
| 3.2. | Pull the door handle trim plate/bezel outward and slide over the
handle. |
| 3.3. | Disconnect the two electrical connectors (10). |
- Remove the outside rearview mirror upper door trim panel (shark
fin) (2). Use the door trim pad clip remover, J 38778, to disengage
the upper door trim panel (shark fin) retaining clip.
- Remove the door lamp lens cover assembly (5).
| 5.1. | Between the forward angled edge of the door lamp lens cover and
the door trim panel (6), carefully insert the plastic trim tool and gently
pry the lens cover assembly outward far enough to disengage the retaining
clip. |
| 5.2. | Disconnect the electrical connector (4). |

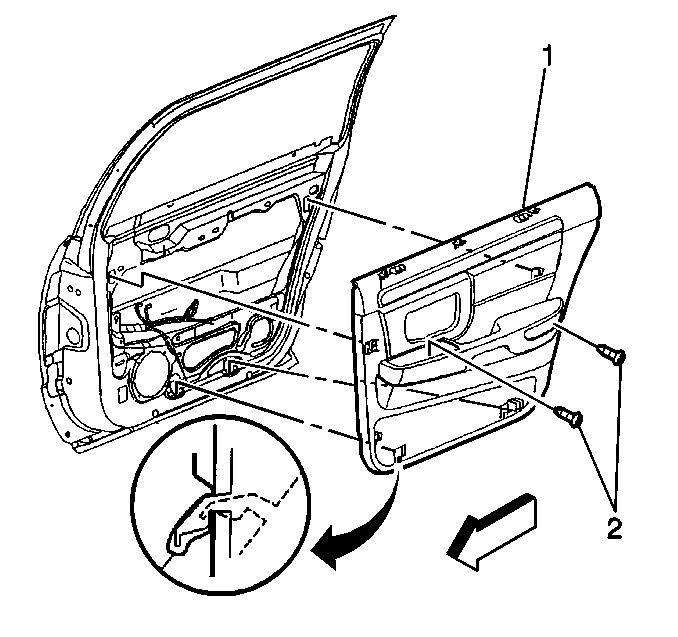
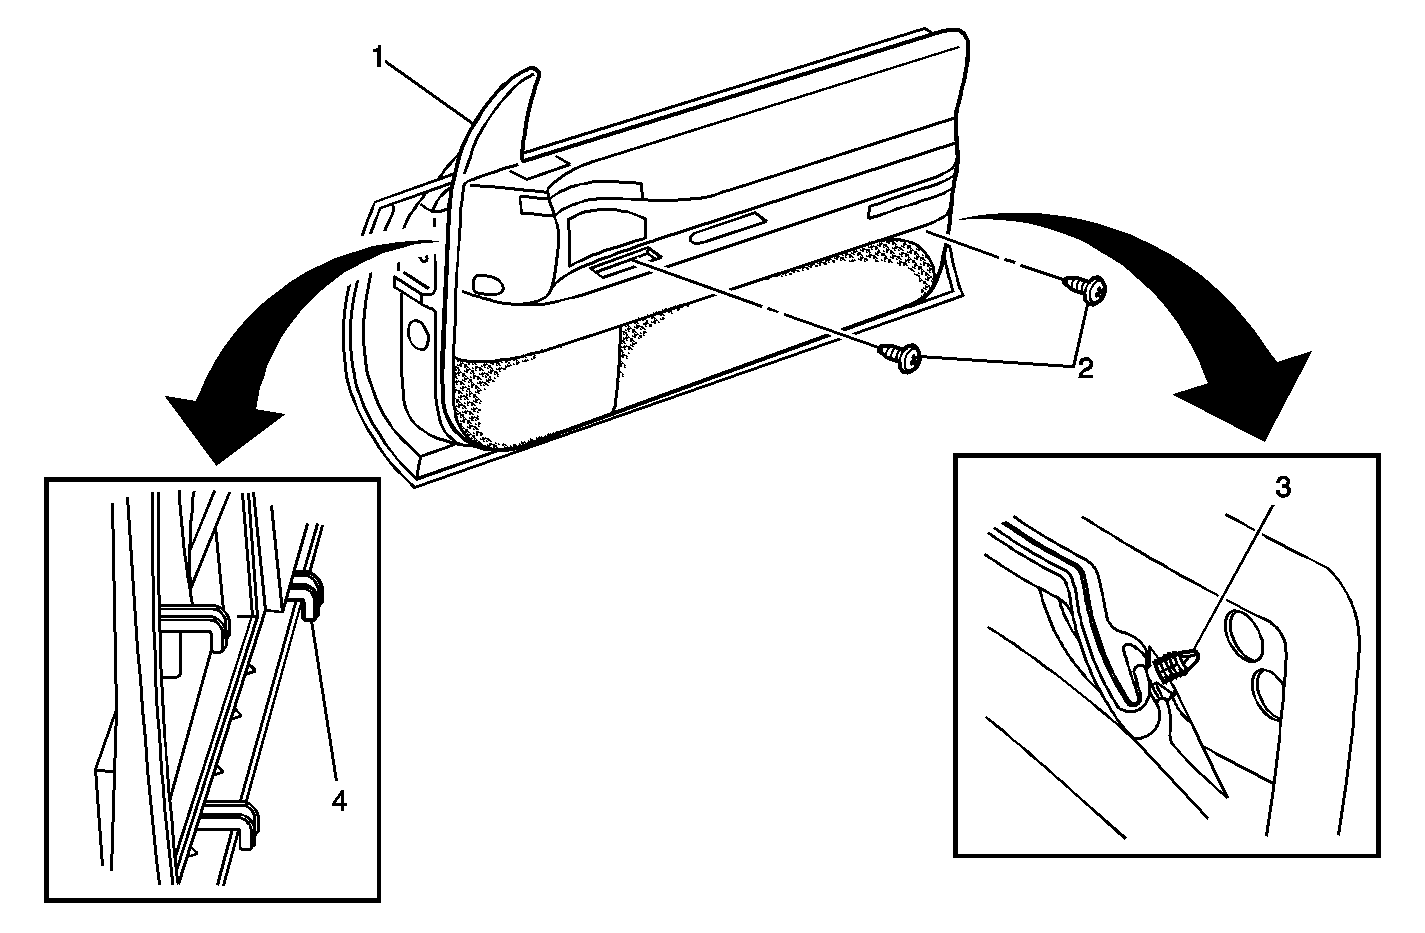
- Remove the two door trim panel retaining
fasteners (2).
| • | Behind the door lamp lens cover assembly. |
| • | Behind the door handle trim plate/bezel. |
Important: If the door trim panel hooks are damaged during removal, a hook repair
kit with instructions, J 42983, is available.
- Remove the door trim panel (1) by LIFTING upward and outward in order
to disengage the panel hooks from the door.
- Disconnect the door trim panel speaker electrical connector.
1994-1999 DeVille Trim Panel Replacement-RH Side Rear Door (LH
Similar)
Removal Procedure
- Remove the power window switch assembly.
| 1.1. | Place protective tape between the forward edge of the power window
switch assembly and the door trim panel. |
| | Important: In order to avoid damage, the retention spring clip must be fully disengaged
prior to removal of the power window switch assembly.
|
| 1.2. | Between the forward edge of the power window switch assembly and the
door trim panel, carefully insert a plastic trim tool far enough to depress
and disengage the switch plate retention spring clip. |
| 1.3. | Use the plastic trim tool in one hand to gently pry the forward
edge of the power window switch assembly upward. Use the other hand to grasp
and pull the switch assembly from the door trim panel. |
| 1.4. | Disconnect the electrical connectors. |
- Remove the inside door handle trim plate/bezel.
| 2.1. | Between the top edge of the inside door handle trim plate/bezel
and the door trim panel, carefully insert the plastic trim tool and gently
pry the inside door handle trim plate/bezel outward far enough to disengage
the retaining clips. |
| 2.2. | Pull the door handle trim plate/bezel outward and slide over the
handle. |
| 2.3. | Disconnect the two electrical connectors. |
- Remove the door lamp lens cover assembly.
| 3.1. | Between the forward angled edge of the door lamp lens cover and
the door trim panel, carefully insert the plastic trim tool and gently pry
the lens cover assembly outward far enough to disengage the retaining clip. |
| 3.2. | Disconnect the electrical connector. |
- Remove the two door trim panel retaining
fasteners (2).
| • | Behind the door lamp lens cover assembly. |
| • | Behind the door handle trim plate/bezel. |
Important: If the door trim panel hooks are damaged during removal, a hook repair
kit with instructions, J 42983, is available.
- Remove the door trim panel (1) by LIFTING upward and outward in order
to disengage the panel hooks from the door.
1992-2002 Eldorado Trim Panel Replacement-RH Front Door (LH Similar)
Tools Required
J 38778 Door Trim Pad Clip Remover For Map Pocket Retainer ONLY
Removal Procedure
- Remove the power window switch assembly
(3).
| 1.1. | Place protective tape between the forward edge of the power window
switch assembly and the door trim panel (5). |
| | Important: In order to avoid damage, the retention spring clip must be fully disengaged
prior to removal of the power window switch assembly.
|
| 1.2. | Between the forward edge of the power window switch assembly and the
door trim panel (5), carefully insert a plastic trim tool far enough to depress
and disengage the switch plate retention spring clip. |
| 1.3. | Use the plastic trim tool in one hand to gently pry the forward
edge of the power window switch assembly upward. Use the other hand to grasp
and pull the switch assembly from the door trim panel. |
| 1.4. | Disconnect the electrical connectors (4). |
- Remove the inside door handle trim plate/bezel (2).
| 2.1. | Between the top edge of the inside door handle trim plate/bezel
and the door trim panel, carefully insert the plastic trim tool and gently
pry the inside door handle trim plate/bezel outward far enough to disengage
the retaining clips. |
| 2.2. | Pull the door handle trim plate/bezel outward and slide over the
handle. |
| 2.3. | Disconnect the electrical connector (1). |
- Use the door trim pad clip remover, J 38778,
to disengage the upper rear corner map pocket retaining clip (3).
- Remove the two door trim panel retaining fasteners (2).
| • | Behind the upper rear corner of the map pocket. |
| • | Behind the door handle trim plate/bezel. |
Important: If the door trim panel hooks are damaged during removal, a hook repair
kit with instructions, J 42983, is available.
- Remove the upper trim panel (shark fin) and the door trim panel (1)
together by LIFTING upward and outward in order to disengage the panel hooks
from the door.
- Disconnect the door trim panel speaker electrical connector.
1992-1997 Seville Trim Panel Replacement-Front Door (Rear Door
Similar)
Tools Required
J 38778 Door Trim Pad Clip Remover For Map Pocket Retainer ONLY
Removal Procedure
- Remove the power window switch assembly.
| 1.1. | Place protective tape between the forward edge of the power window
switch assembly and the door trim panel. |
| | Important: In order to avoid damage, the retention spring clip must be fully disengaged
prior to removal of the power window switch assembly.
|
| 1.2. | Between the forward edge of the power window switch assembly and the
door trim panel, carefully insert a plastic trim tool far enough to depress
and disengage the switch plate retention spring clip. |
| 1.3. | Use the plastic trim tool in one hand to gently pry the forward
edge of the power window switch assembly upward. Use the other hand to grasp
and pull the switch assembly from the door trim panel. |
| 1.4. | Disconnect the electrical connectors. |
- Remove the inside door handle trim plate/bezel.
| 2.1. | Between the top edge of the inside door handle trim plate/bezel
and the door trim panel, carefully insert the plastic trim tool and gently
pry the inside door handle trim plate/bezel outward far enough to disengage
the retaining clips. |
| 2.2. | Pull the door handle trim plate/bezel outward and slide over the
handle. |
| 2.3. | Disconnect the two electrical connectors. |
- Use the door trim pad clip remover, J 38778, to disengage
the upper rear corner map pocket retaining clip.
- Remove the two door trim panel retaining fasteners.
| • | Behind the upper rear corner of the map pocket. |
| • | Behind the door handle trim plate/bezel. |
Important: If the door trim panel hooks are damaged during removal, a hook repair
kit with instructions, J 42983, is available.
- Remove the door trim panel by LIFTING upward and outward in order to
disengage the panel hooks from the door.
- Disconnect the door trim panel speaker electrical connector.
Warranty Information
For vehicles repaired under warranty, use:
Labor Operation
| Description
| Labor Time
|
Add
| To Repair Door Trim Assembly Hook/One or All
| 0.1-0.3 hr*
|
*Add repair time to any repair operation that requires removal of the door trim panel.
|
