Front Heated Seat Inoperative/Cold (Replace/Install Seat Heat Element)

| Subject: | Front Heated Seat Inoperative/Cold (Replace/Install Seat Heat Element) |
| Models: | 1997-1999 Cadillac DeVille |
| 1994-1997 Cadillac Seville |
| 1994-2002 Cadillac Eldorado |
| with RPO KA1 |
Condition
Some customers may comment that the front seat assembly heat function is not operating properly. The front seat back and seat cushion remain cold when either the LO or HI setting on the SEAT HEAT control has been activated.
Cause
This condition may be due to a non-functioning heat element in the front seat back or seat cushion trim cover.
1997-1999 DeVille (KD) LH F/Seat Heat Element Locations (RH Similar)
The heated seat system in the base model DeVille (KD) consists of two front heated seats. Each heated seat has two heat elements, one in the seat back and one in the seat cushion.
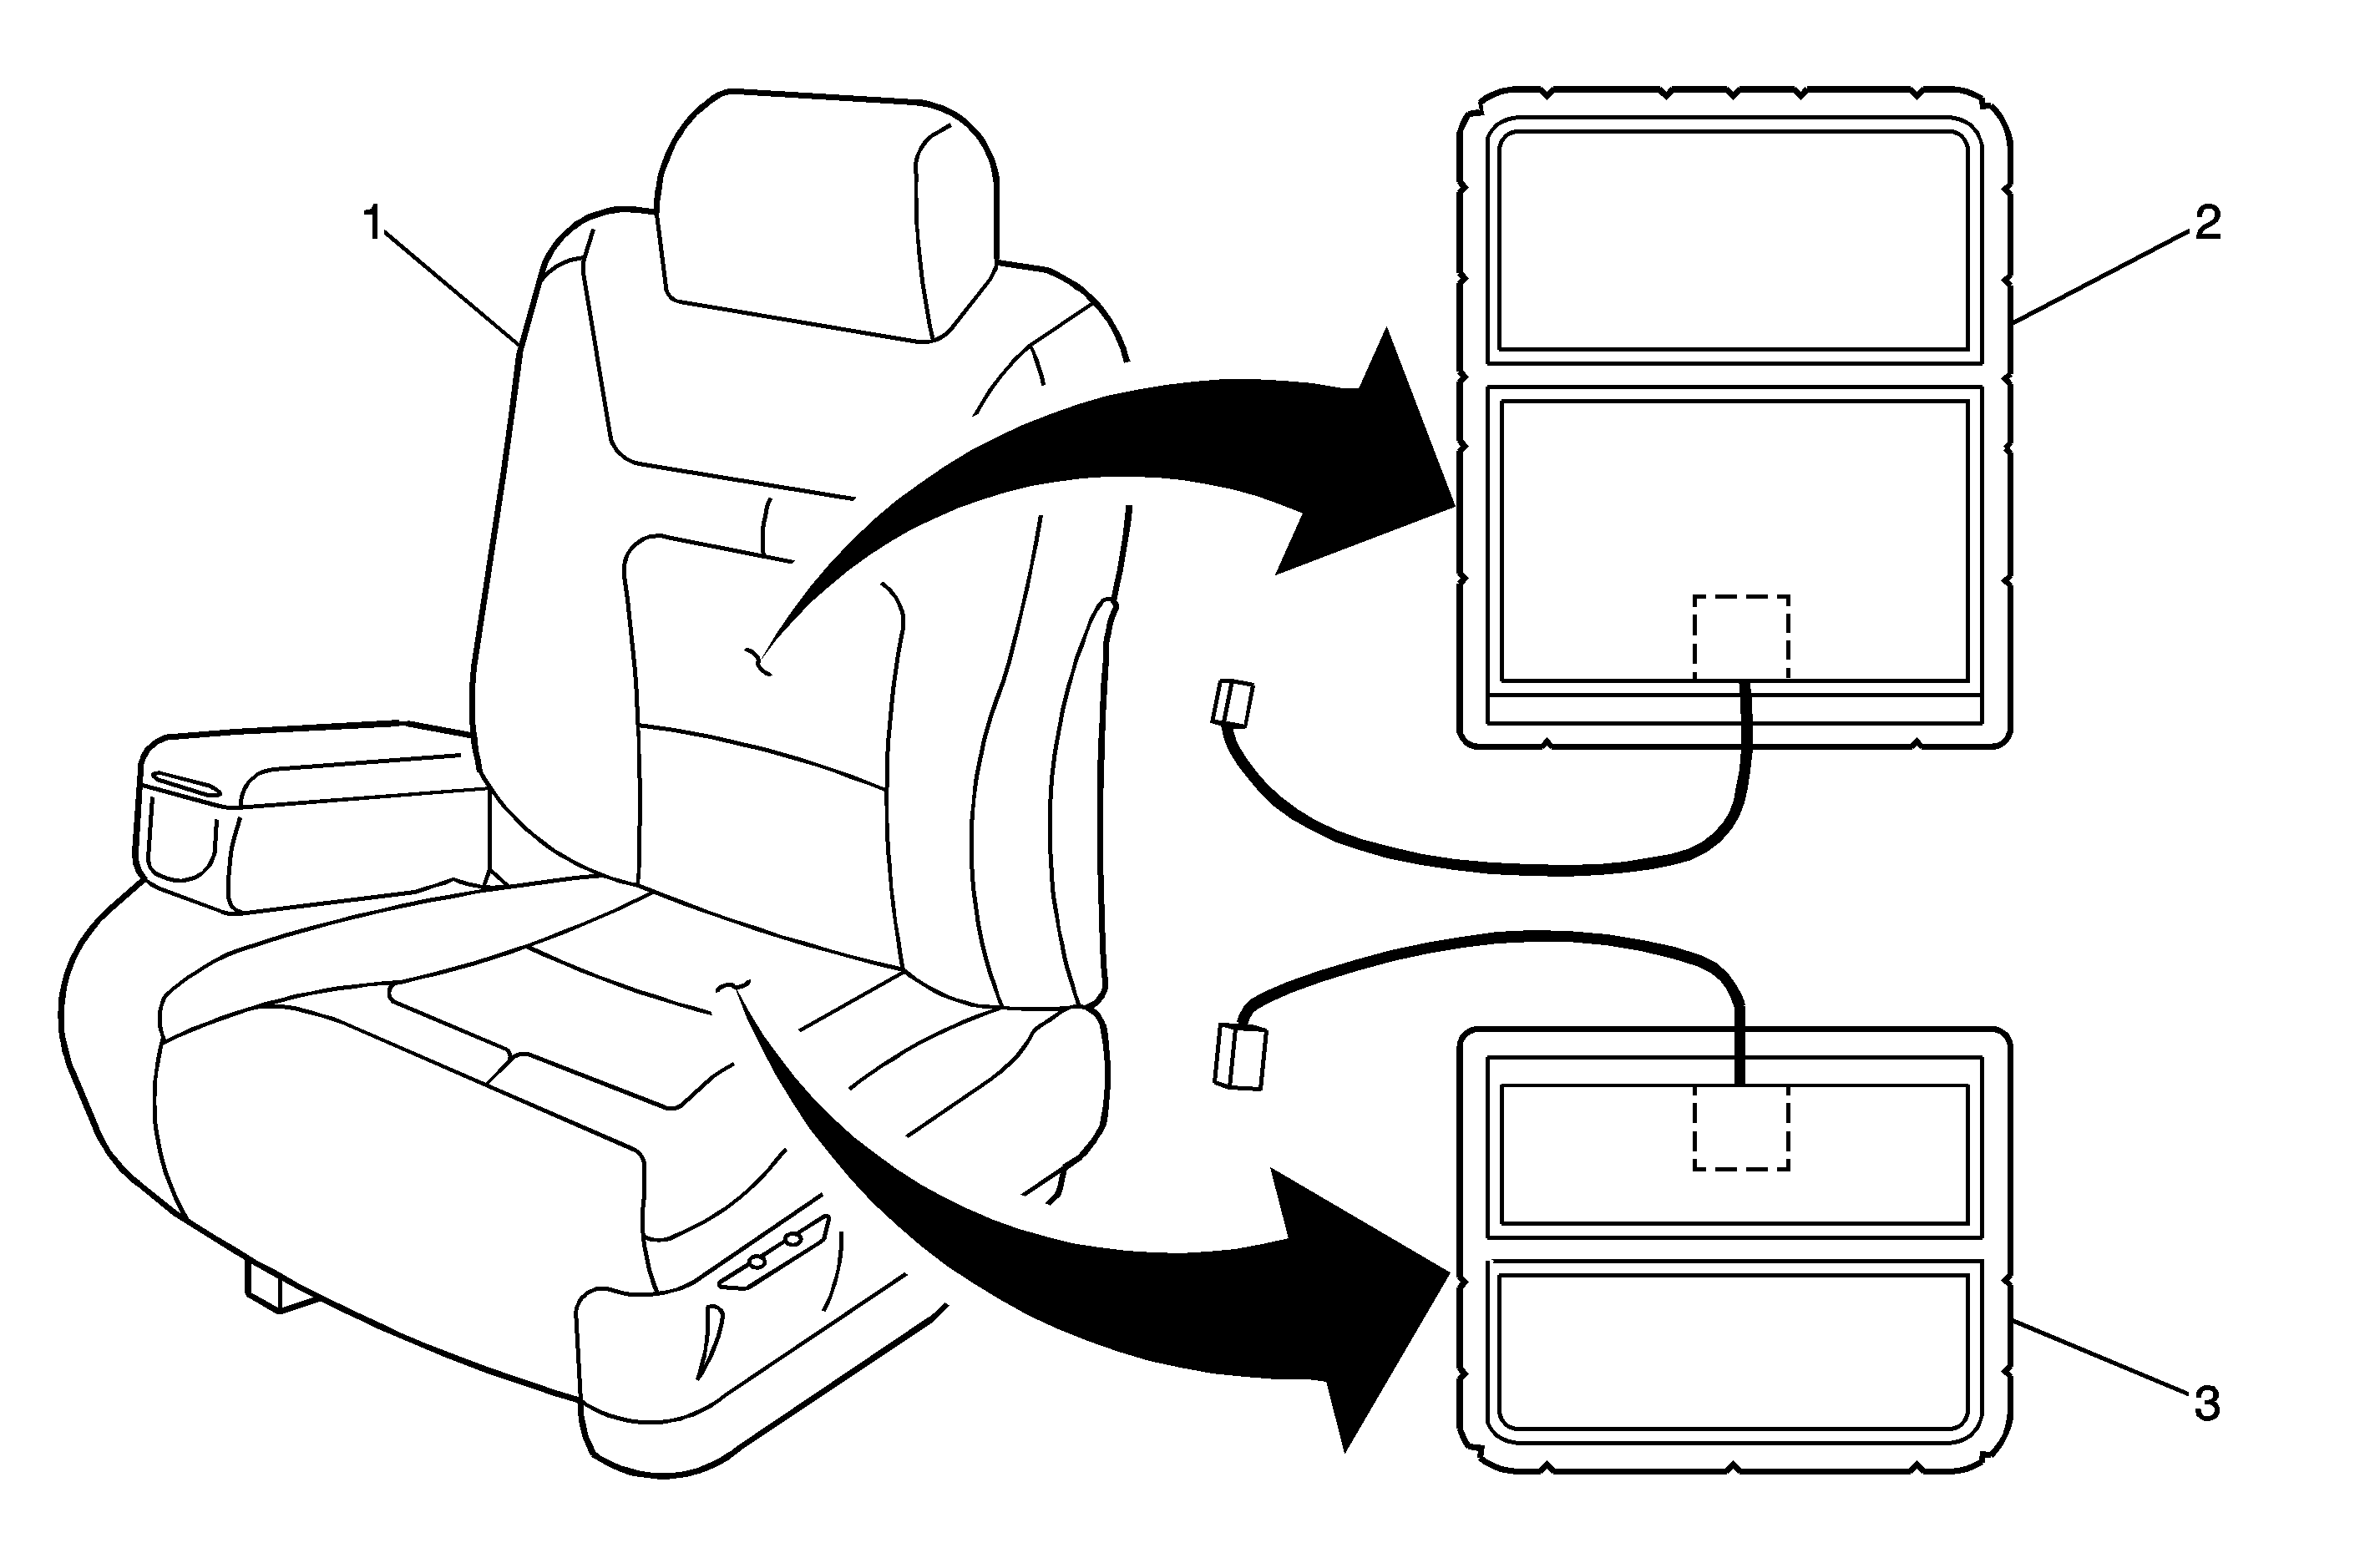
Location | Part Number | Description |
|---|---|---|
1 | Horizontal Seam | KD LH F/Seat Assembly |
2 | 16793880 | F/Seat Back Cushion Heat Element |
3 | 25743718 | F/Seat Cushion Heat Element |
1997-1999 DeVille (KE/KF) LH F/Seat Heat Element Locations (RH Similar)
The heated seat system in the DeVille D'Elegance (KE, RPO-YP7) and Concours (KF, RPO-YP8) models consist of two front heated seats. Each heated seat has two heat elements, one in the seat back and one in the seat cushion.
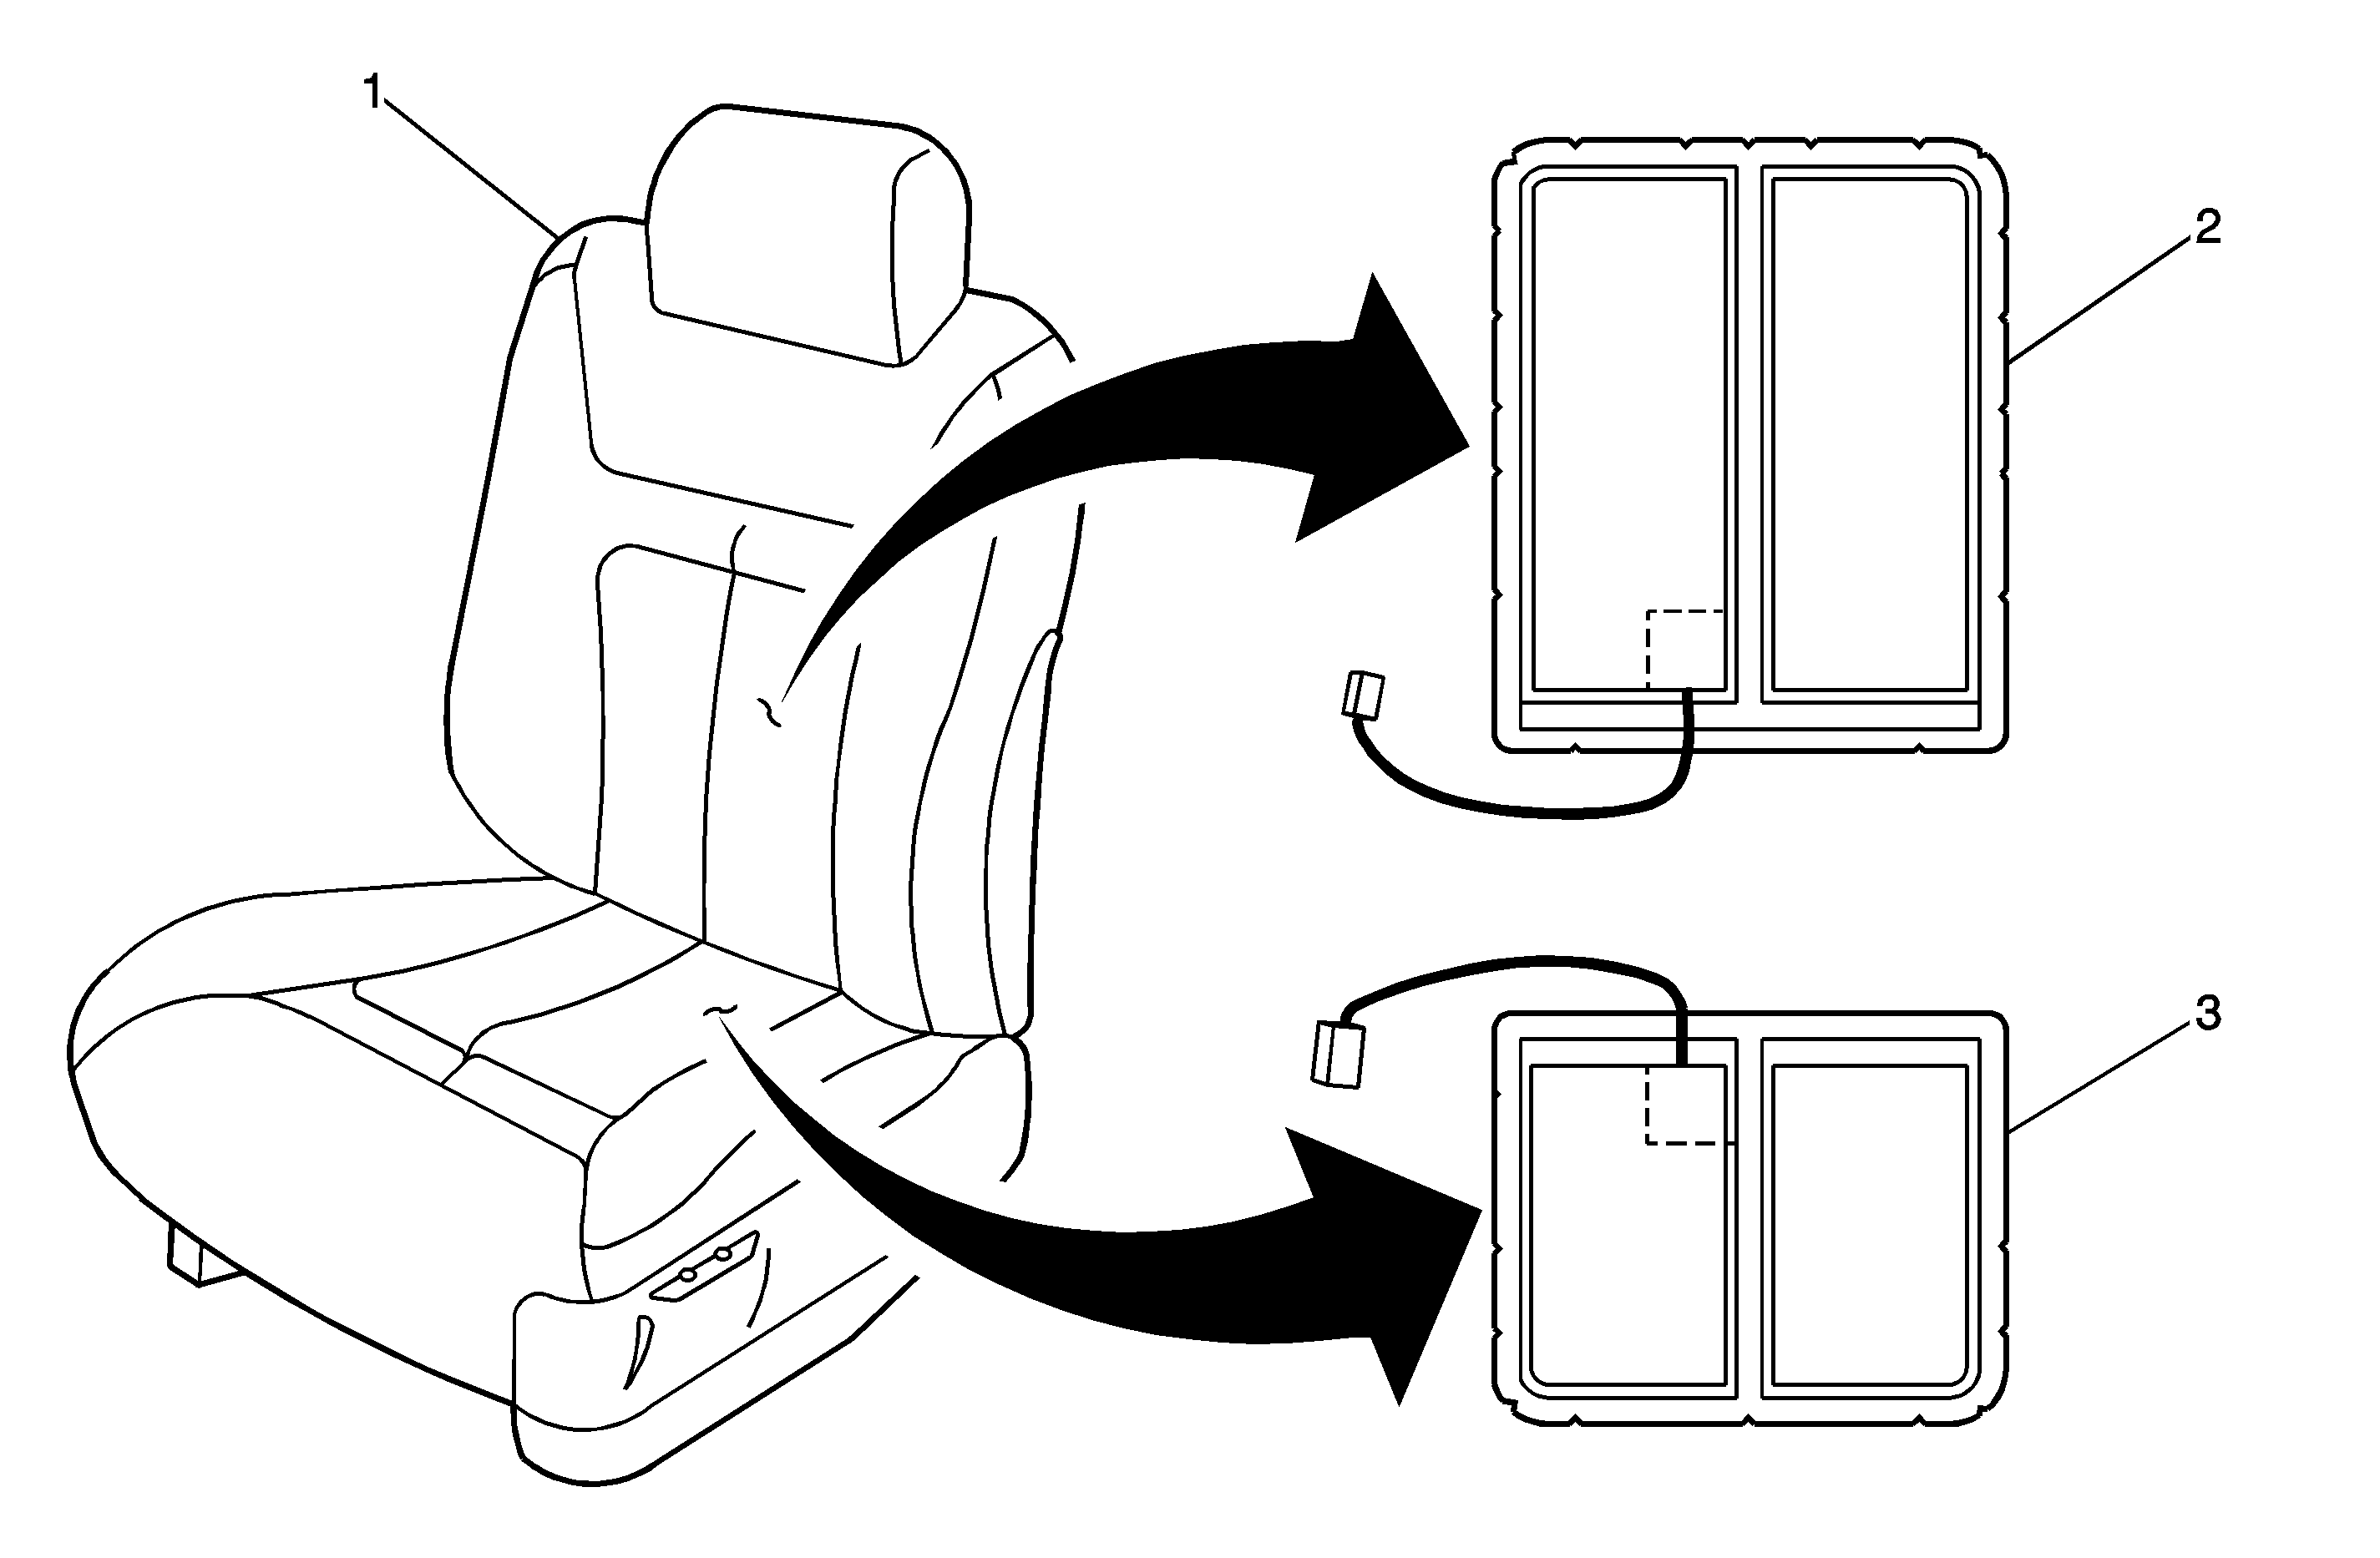
Location | Part Number | Description |
|---|---|---|
1 | Vertical Seam | KE-YP7/KF-YP8 LH F/Seat Assembly |
2 | 16793882 | F/Seat Back Cushion Heat Element |
3 | 25743719 | F/Seat Cushion Heat Element |
1994-1997 Seville LH F/Seat Heat Element Locations (RH Similar)
The heated seat system consists of two front heated seats. Each heated seat has four heat elements, two in the seat back and two in the seat cushion.
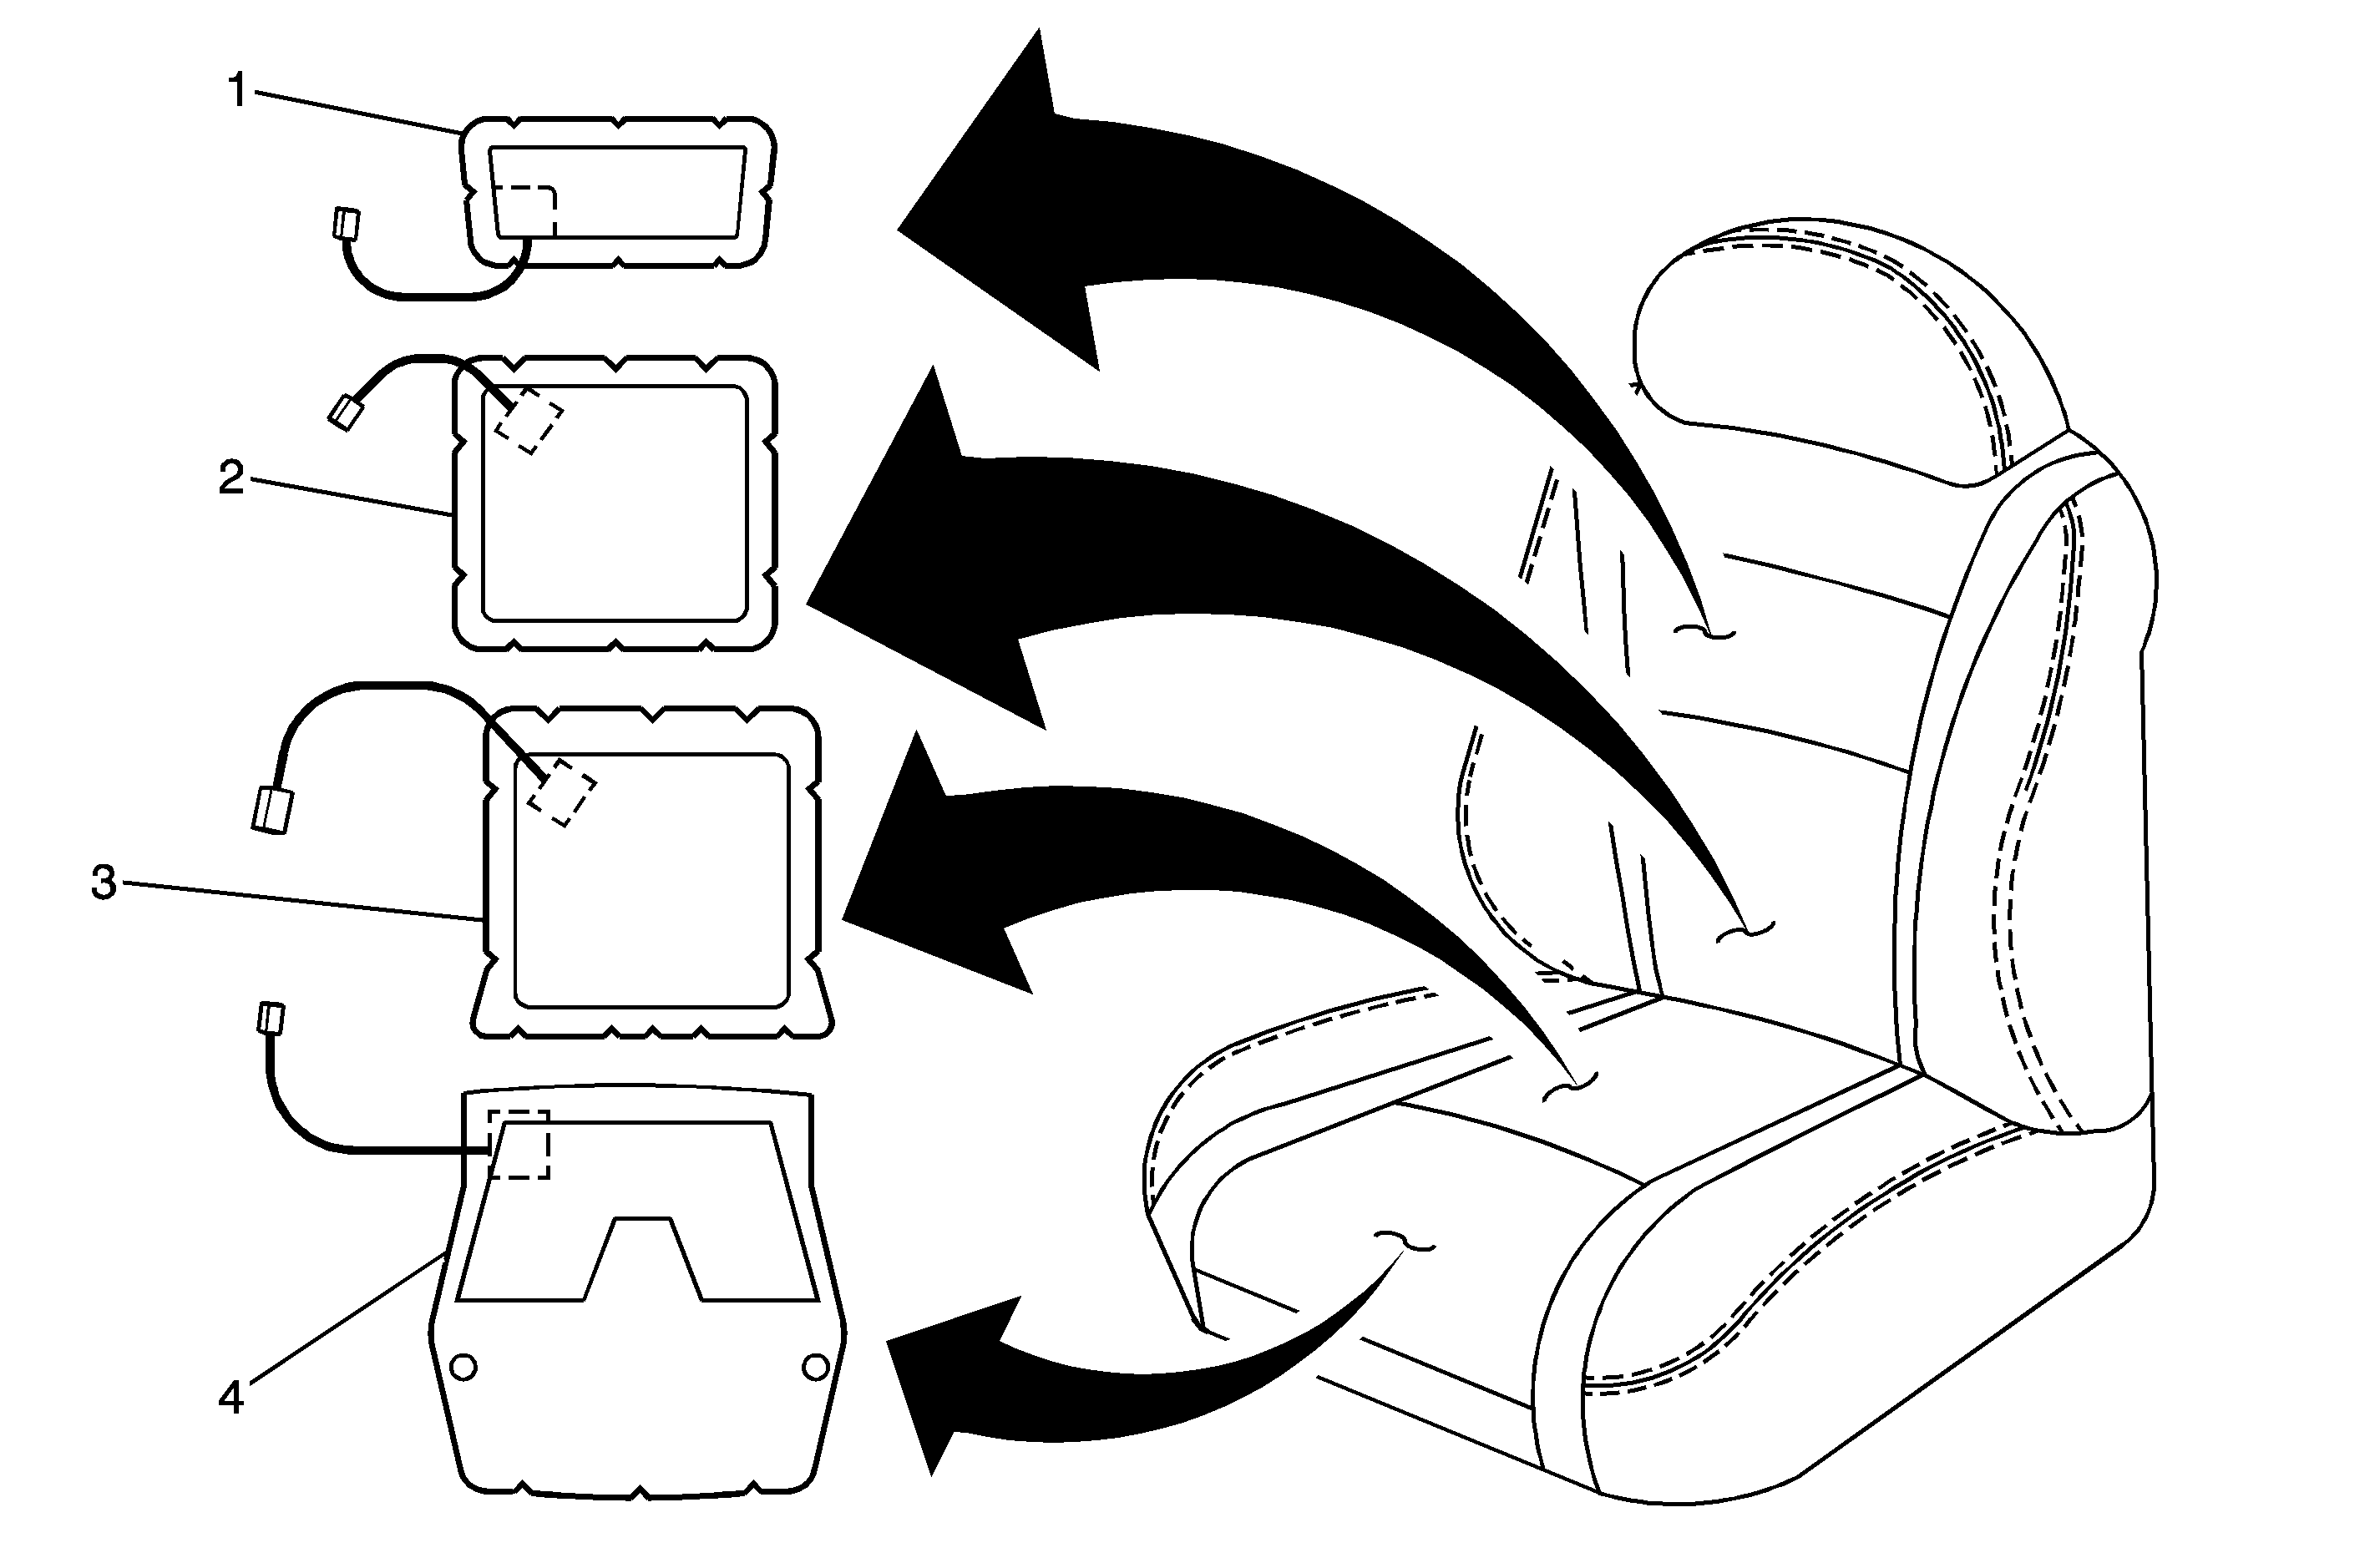
Location | Part Number | Description |
|---|---|---|
1 | 25743721 | F/Seat Back Cushion Upr Heat Element |
2 | 25743722 | F/Seat Back Cushion Ctr Heat Element |
3 | 25743720 | F/Seat Cushion Ctr Heat Element |
4 | 25743723 | F/Seat Cushion Thigh Heat Element |
1994-2002 Eldorado LH F/Seat Heat Element Locations (RH Similar)
The heated seat system consists of two front heated seats. Each heated seat has four heat elements, two in the seat back and two in the seat cushion.
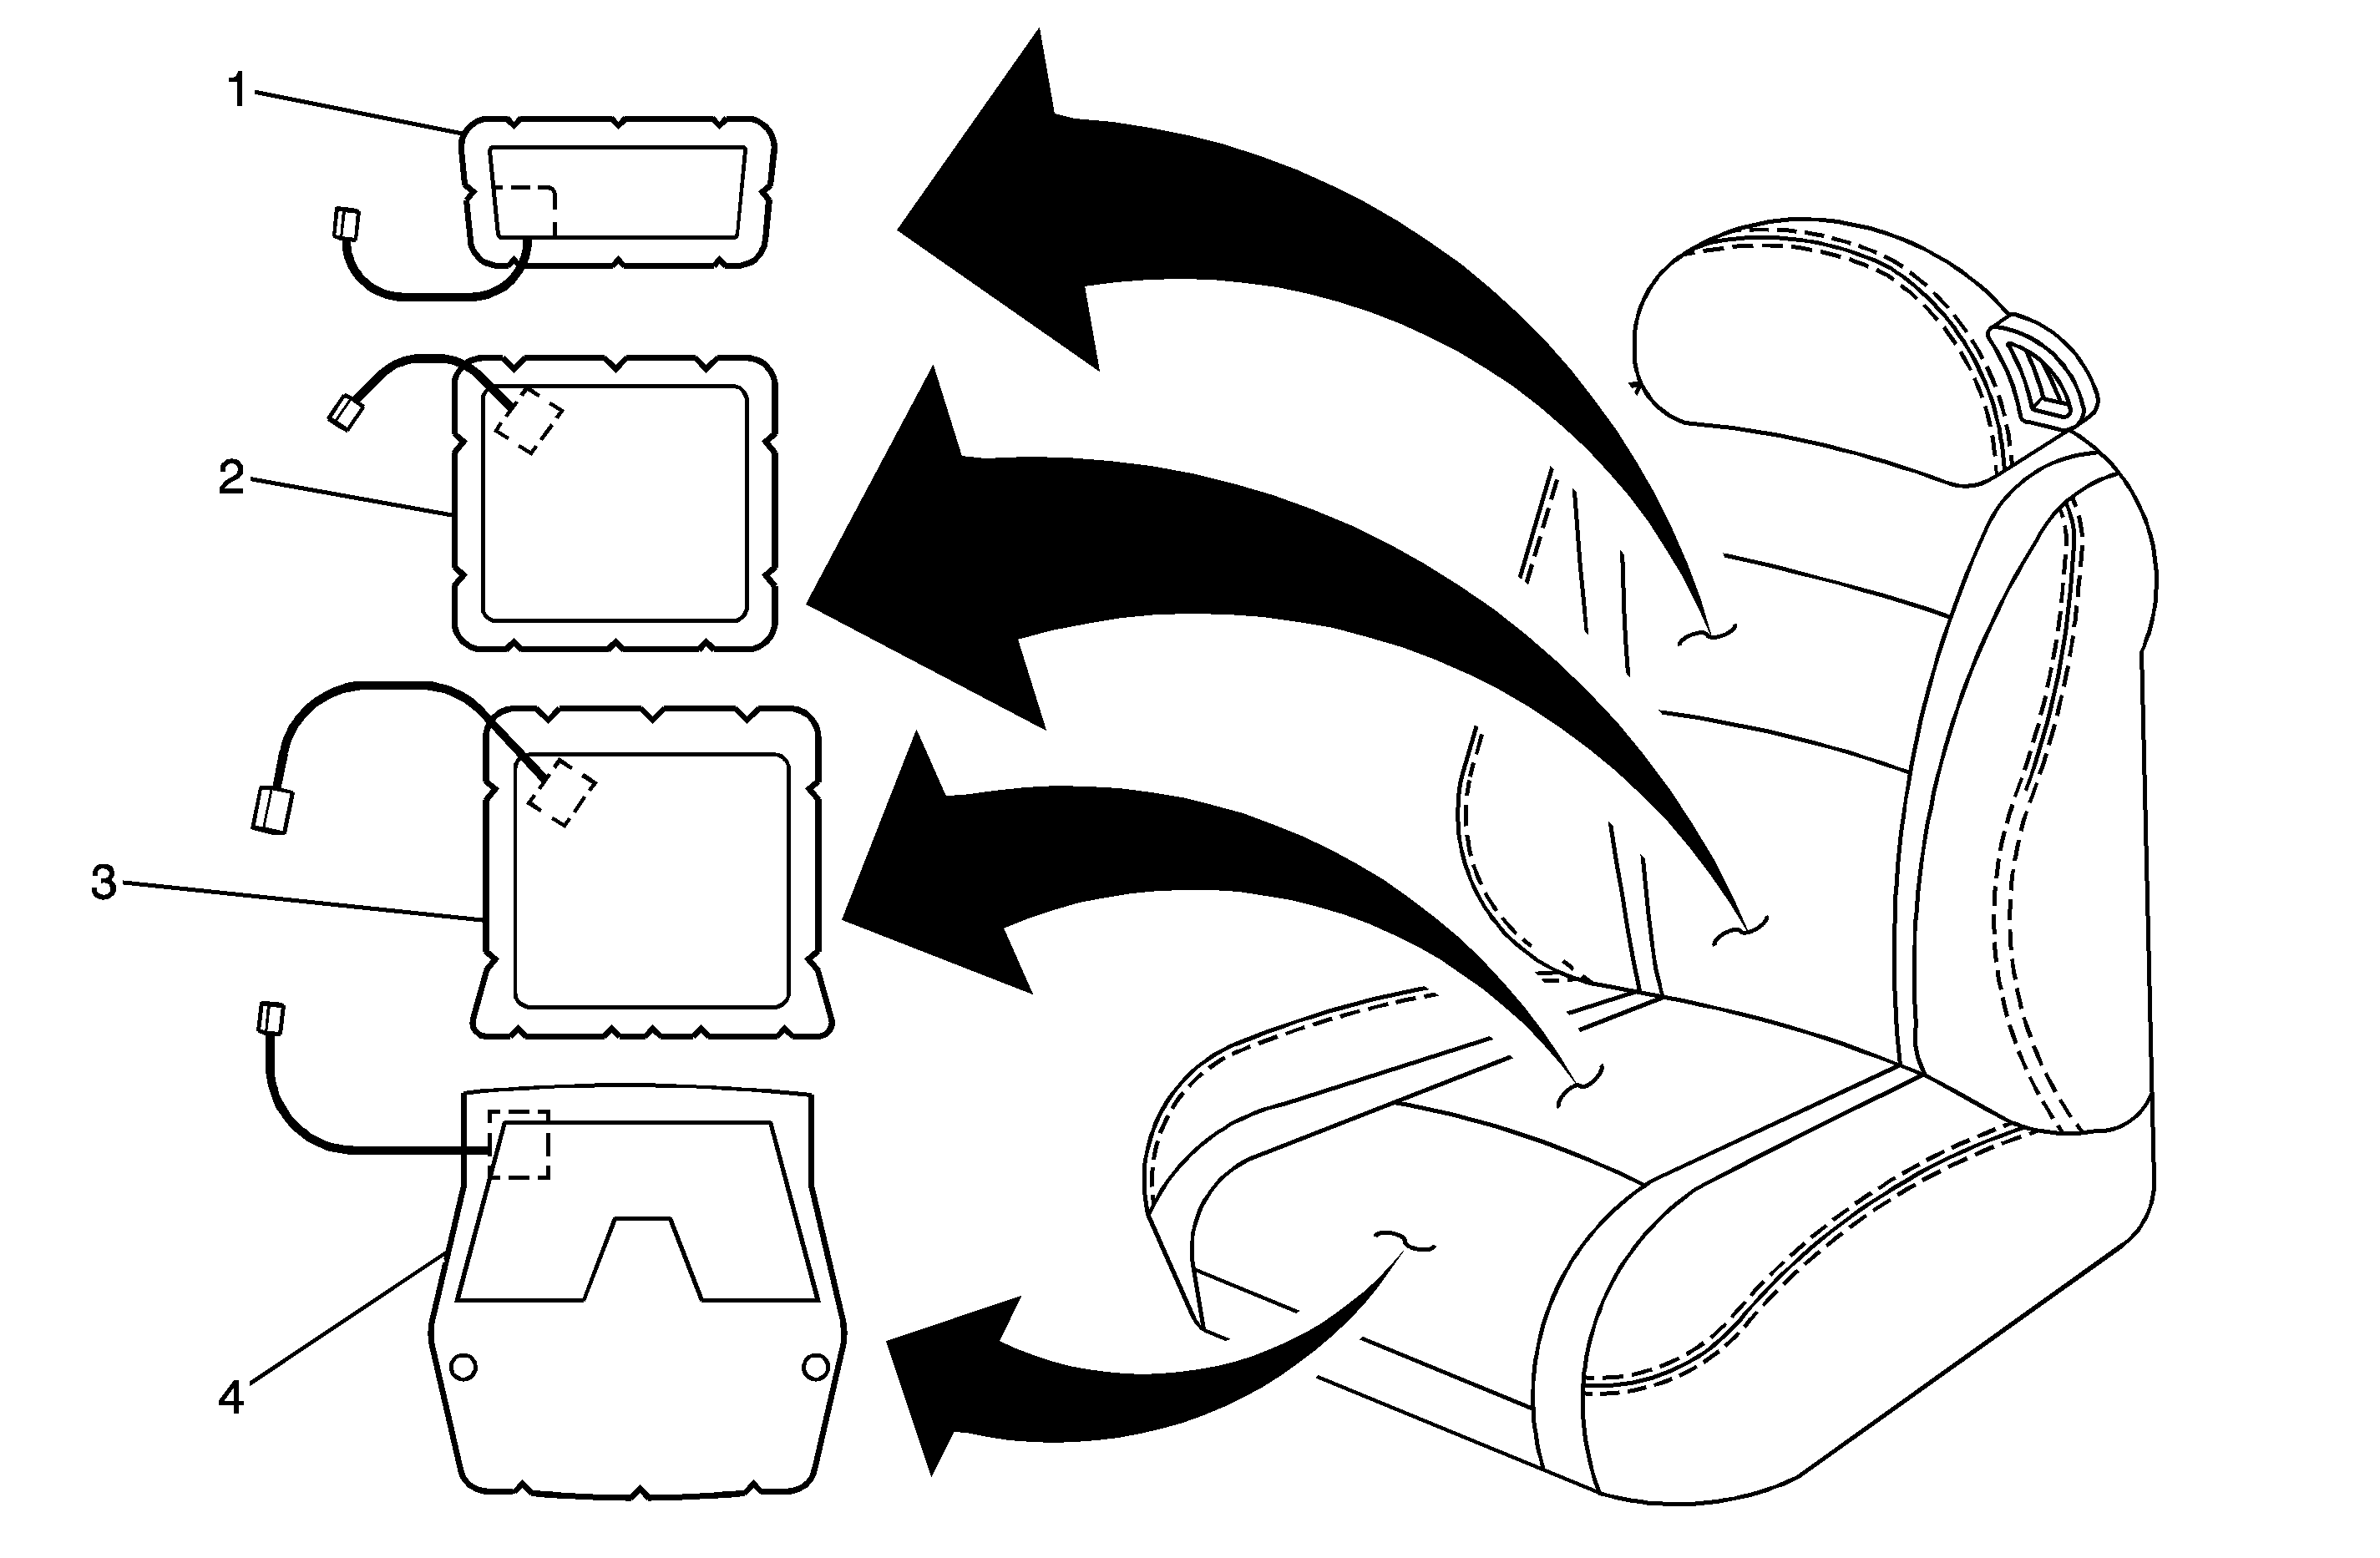
Location | Part Number | Description |
|---|---|---|
1 | 25743721 | F/Seat Back Cushion Upr Heat Element |
2 | 25743722 | F/Seat Back Cushion Ctr Heat Element |
3 | 25743720 | F/Seat Cushion Ctr Heat Element |
4 | 25743723 | F/Seat Cushion Thigh Heat Element |
Correction
- Determine which heat element is not functioning properly by measuring the resistance values of the factory heat elements. Refer to the appropriate diagnostic procedure in this bulletin.
- If the resistance values of a factory heat element are NOT within the specified range:
| • | For DeVille Models, remove the factory heat element and install a service heat element. |
| • | For Seville/Eldorado Models, install a service heat element. |
| • | Refer to the appropriate Service Heat Element Replacement/Installation Procedure in this bulletin. |
DeVille (All Models) Front Seat Diagnostic Procedure
- Remove the front seat assembly from the vehicle. Refer to Seat Replacement (DeVille) in the Seats sub-section of the appropriate Service Manual for the removal procedure.
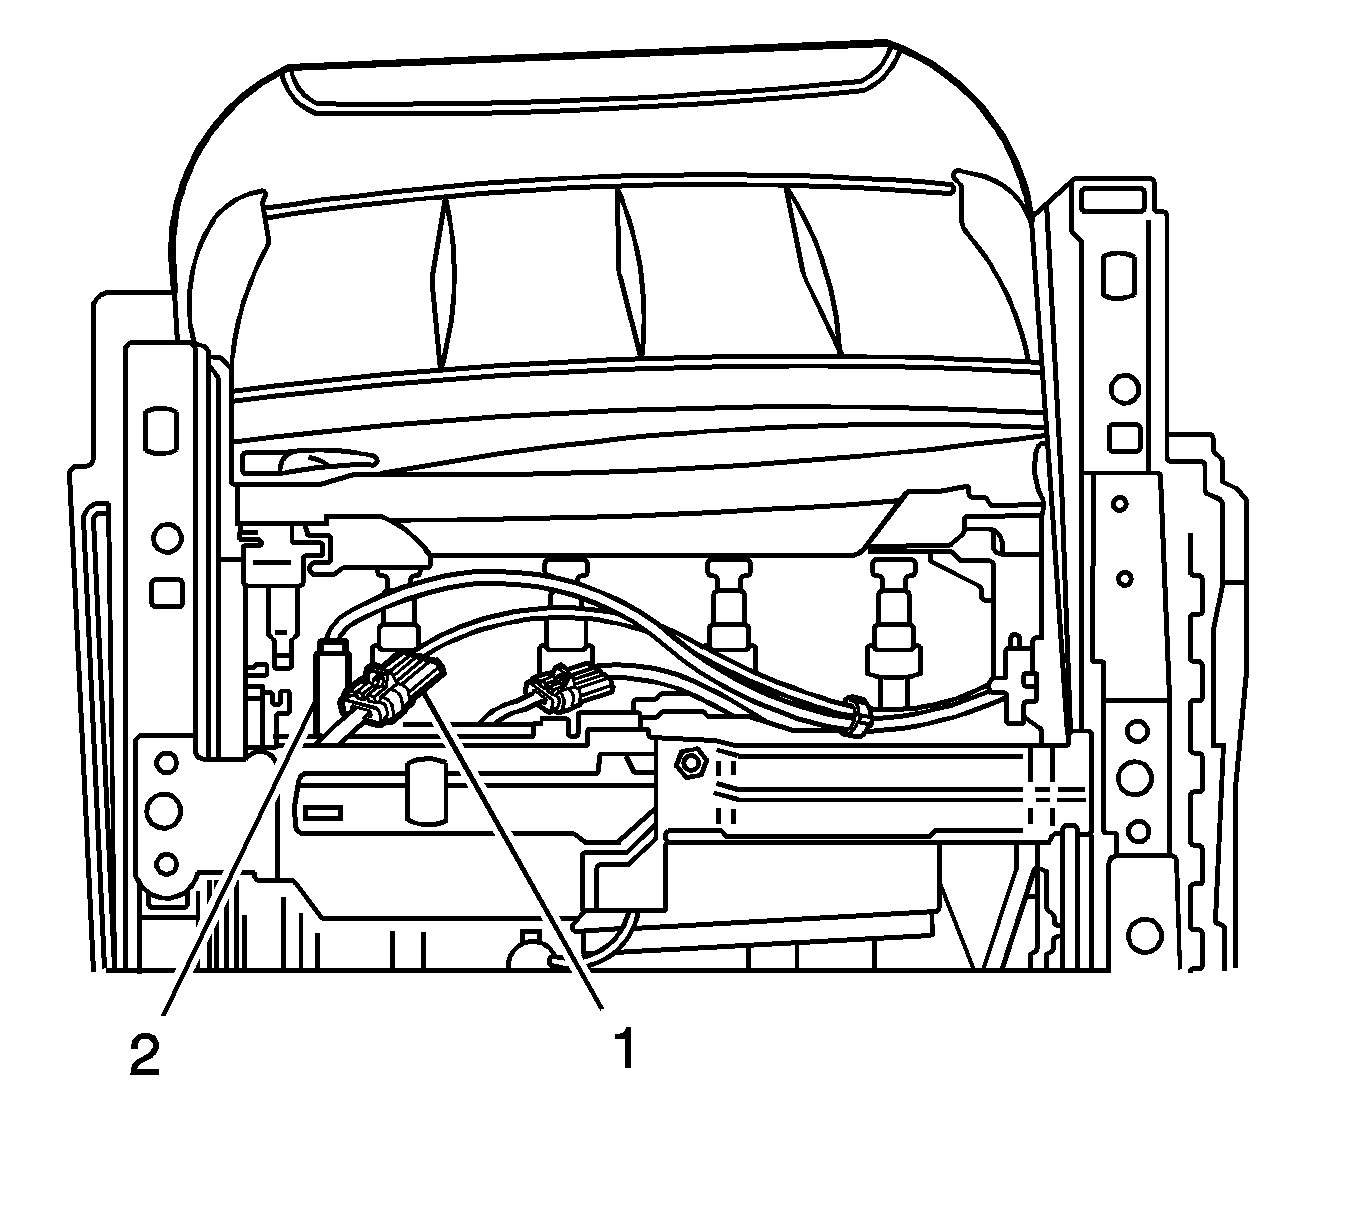
- Disconnect the green 2-way connector (2) between the seat back heat element and the heated seat module located under the seat cushion assembly.
- Measure the seat back heat element resistance between cavities A and B at the green 2-way connector. Does the resistance measure less than 5 ohms?
- Disconnect the black 4-way connector (1) between the seat cushion heat element and the heated seat module located under the seat cushion assembly.
- Measure the seat cushion thermistor resistance between cavities C and D at the black 4-way connector. Does the resistance measure between 850 ohms and 11.5 K ohms?
- Measure the seat cushion heat element resistance between cavities A and B at the black 4-way connector. Does the resistance measure less than 5 ohms?
| • | If yes, go to Step 4. |
| • | If no, replace the front seat back heat element. Refer to the DeVille Service Heat Element Replacement Procedure in this bulletin. |
Important: If the resistance is measured with the seat still warm, the resistance may vary outside of the specified range since the thermistor resistance varies with temperature.
| • | If yes, go to Step 6. |
| • | If no, replace the front seat cushion heat element. Refer to the DeVille Service Heat Element Replacement Procedure in this bulletin. |
| • | If yes, the resistance values of the heat elements are within the specified range. To find the cause of the inoperative/cold heated seat, perform the standard diagnostic procedures in the appropriate Service Manual. |
| • | If no, replace the front seat cushion heat element. Refer to the DeVille Service Heat Element Replacement Procedure in this bulletin. |
Seville/Eldorado Front Seat Diagnostic Procedure
- Remove the front seat assembly from the vehicle. Refer to Seat Replacement in the Seats sub-section of the appropriate Service Manual for the removal procedure.
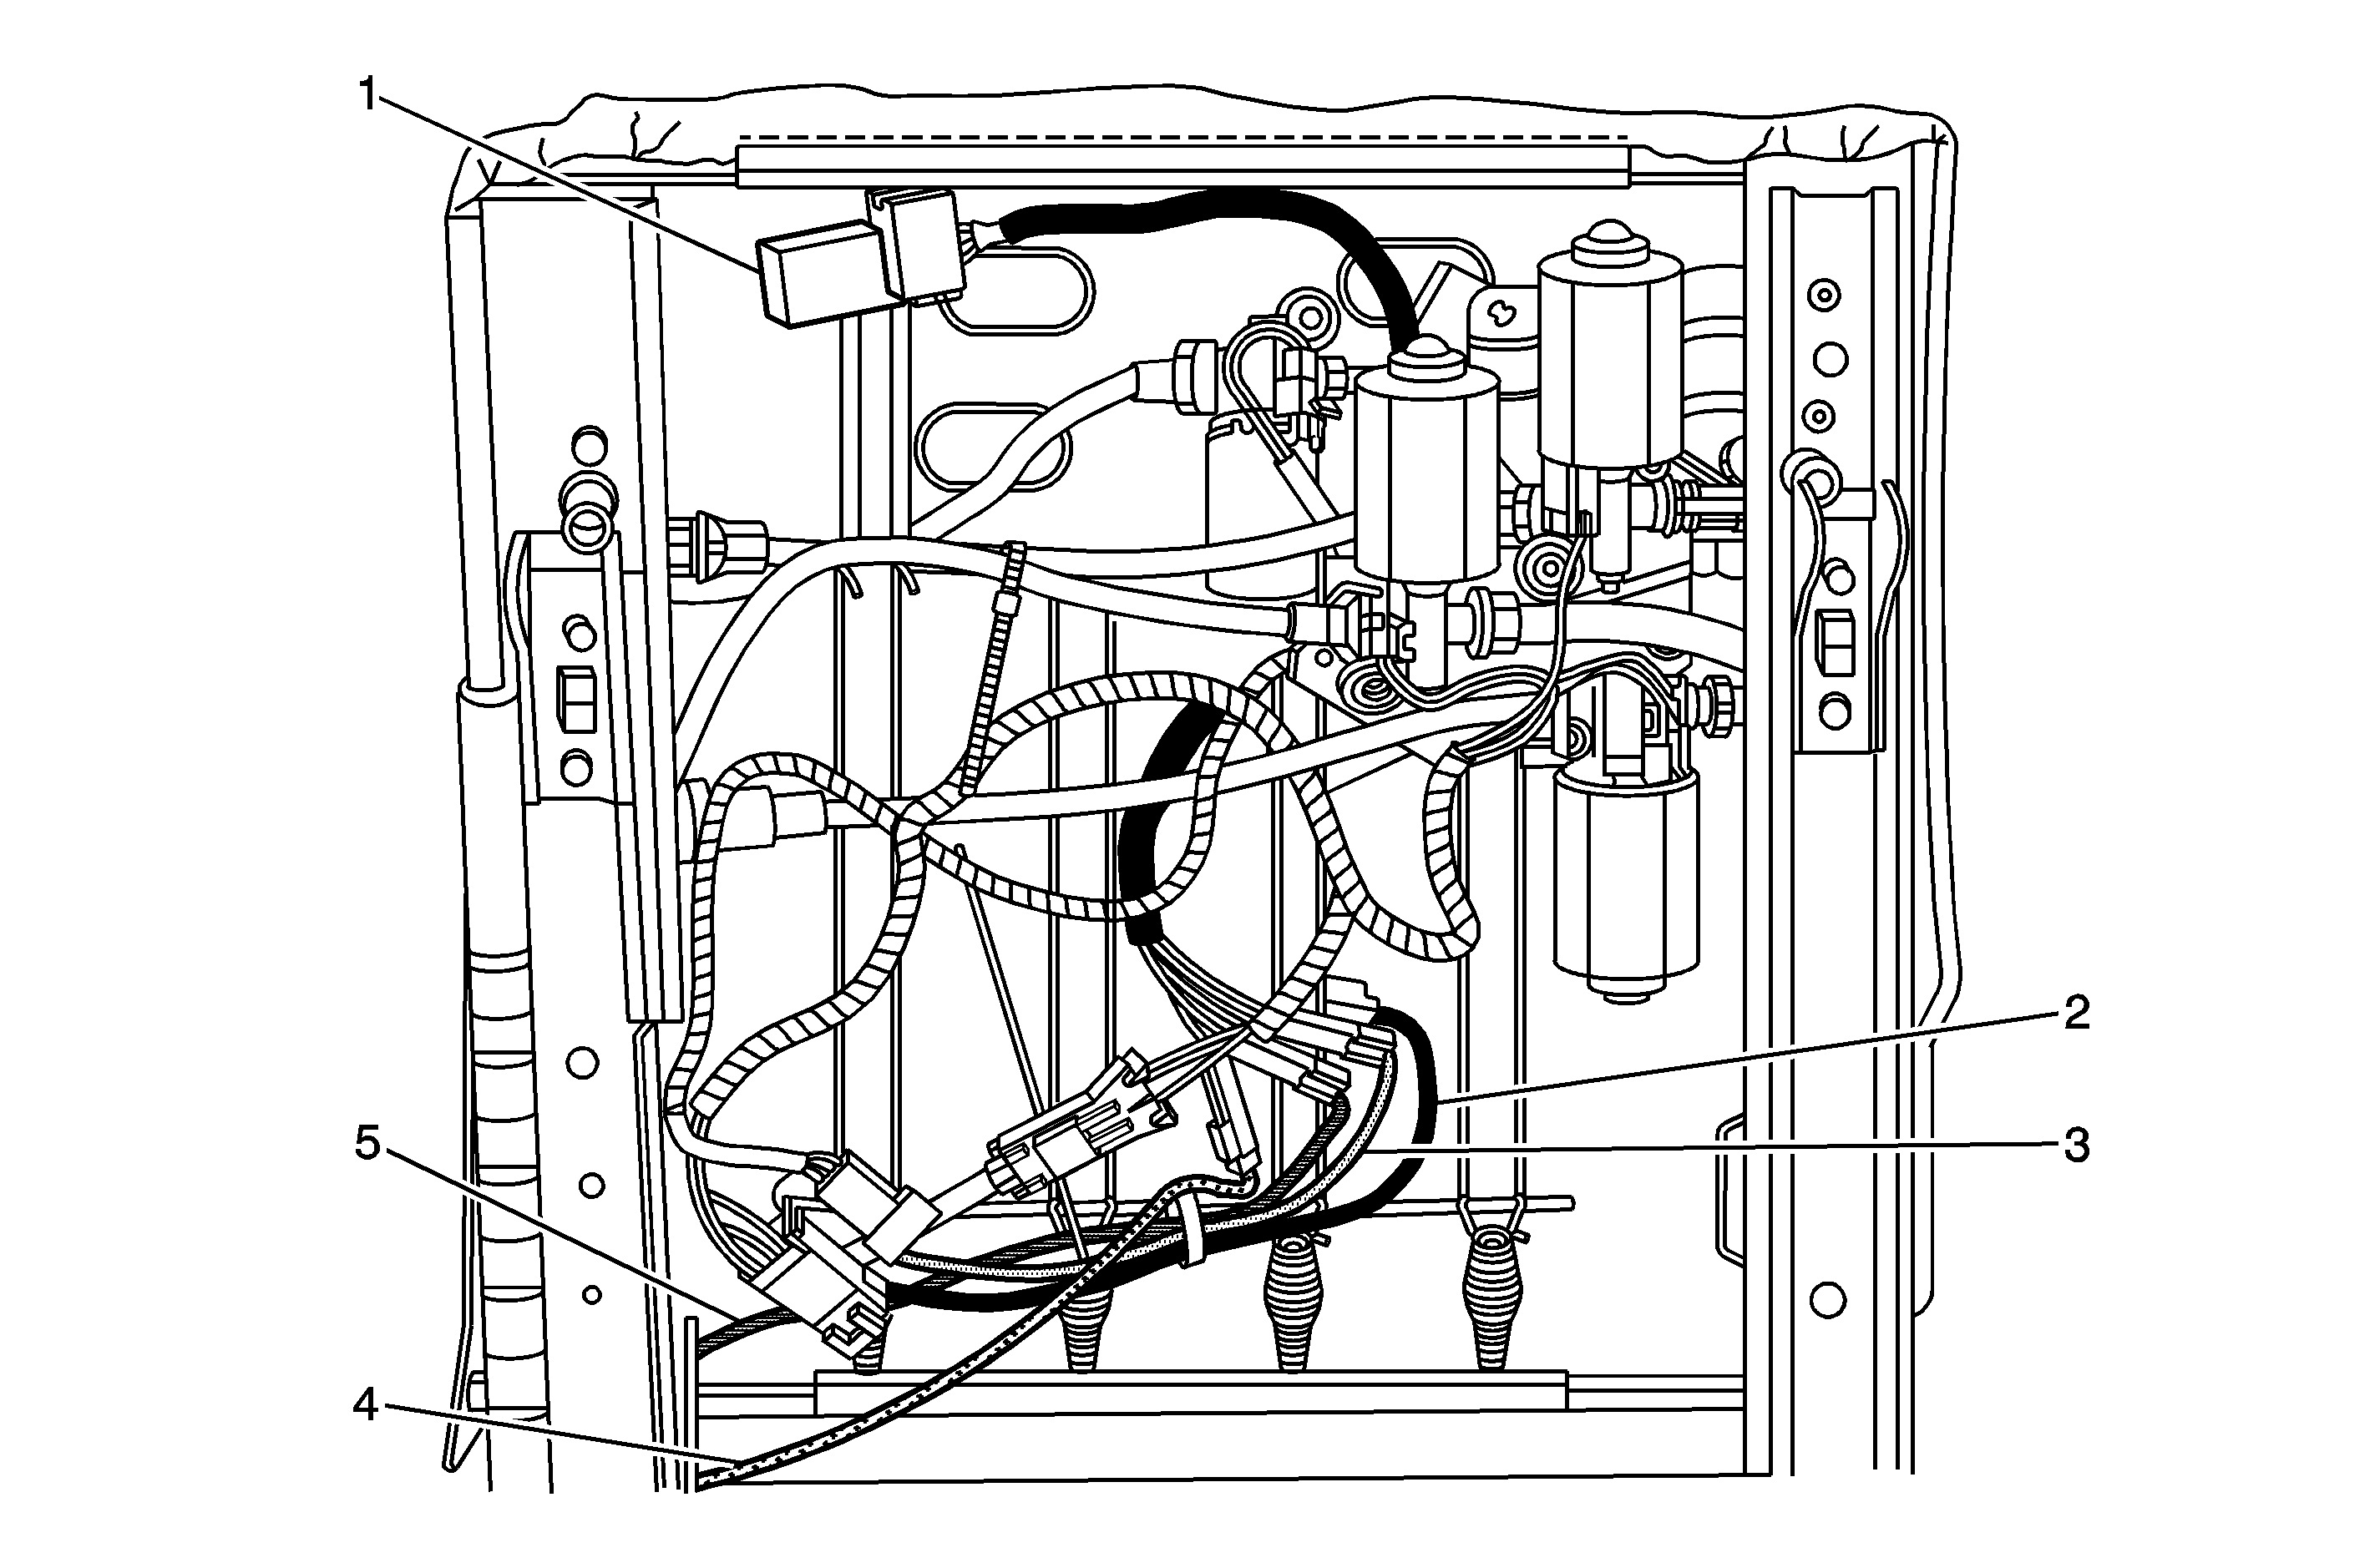
- Disconnect the green 2-way connector (4 or 5) between the seat back cushion upper heat element and the heated seat module (1) located under the seat cushion assembly.
- Measure the seat back cushion upper heat element resistance between cavities A and B at the green 2-way connector. Does the resistance measure less than 5 ohms?
- Disconnect the green 2-way connector (4 or 5) between the seat back cushion center heat element and the heated seat module (1) located under the seat cushion assembly.
- Measure the seat back cushion center heat element resistance between cavities A and B at the green 2-way connector. Does the resistance measure less than 5 ohms?
- Disconnect the green 2-way connector (3) between the seat cushion thigh heat element and the heated seat module (1) located under the seat cushion assembly.
- Measure the seat cushion thigh heat element resistance between cavities A and B at the green 2-way connector. Does the resistance measure less than 5 ohms?
- Disconnect the black 4-way connector (2) between the seat cushion center heat element and the heated seat module located under the seat cushion assembly.
- Measure the center seat cushion thermistor resistance between cavities C and D at the black 4-way connector. Does the resistance measure between 850 ohms and 11.5 K ohms?
- Measure the center seat cushion heat element resistance between cavities A and B at the black 4-way connector. Does the resistance measure less than 5 ohms?
| • | If yes, go to Step 4. |
| • | If no, install a front seat back cushion upper heat element. Refer to the Seville/Eldorado Service Heat Element Installation Procedure in this bulletin. |
| • | If yes, go to Step 6. |
| • | If no, install a front seat back cushion center heat element. Refer to the Seville/Eldorado Service Heat Element Installation Procedure in this bulletin. |
| • | If yes, go to Step 8. |
| • | If no, install a front seat cushion thigh heat element. Refer to the Seville/Eldorado Service Heat Element Installation Procedure in this bulletin. |
Important: If the resistance is measured with the seat still warm, the resistance may vary outside of the specified range since the thermistor resistance varies with temperature.
| • | If yes, go to Step 10. |
| • | If no, install a front seat cushion center heat element. Refer to the Seville/Eldorado Service Heat Element Installation Procedure in this bulletin. |
| • | If yes, the resistance values of the heat elements are within the specified range. To find the cause of the inoperative/cold heated seat, perform the standard diagnostic procedures in the appropriate Service Manual. |
| • | If no, install a front seat cushion center heat element. Refer to the Seville/Eldorado Service Heat Element Installation Procedure in this bulletin. |
DeVille Service Heat Element Removal Procedure
Important: Before installing the service heat element, verify that the resistance values are within the specified range. Refer to the following table:
Range | Description |
|---|---|
Less than 5 ohms | Seat Back Cushion Element |
Seat Cushion Element | |
Between 850 ohms and 11.5 K ohms | Seat Cushion Thermistor |
Important: It is highly recommended that this repair be done by a sublet trim repair facility. Please provide a copy of this bulletin to the repair shop.
Important: Some separation of the foam is to be expected during the trim cover removal procedure.
- Carefully remove the seat trim cover (back/cushion) with the non-functioning heat element. Refer to the appropriate seat trim cover removal procedure in the Seats sub-section of the Service Manual.
- Place the trim cover on a clean flat surface with the inside facing out.
- Use scissors or an equivalent tool to carefully remove any excess glue and foam attached to the trim cover.
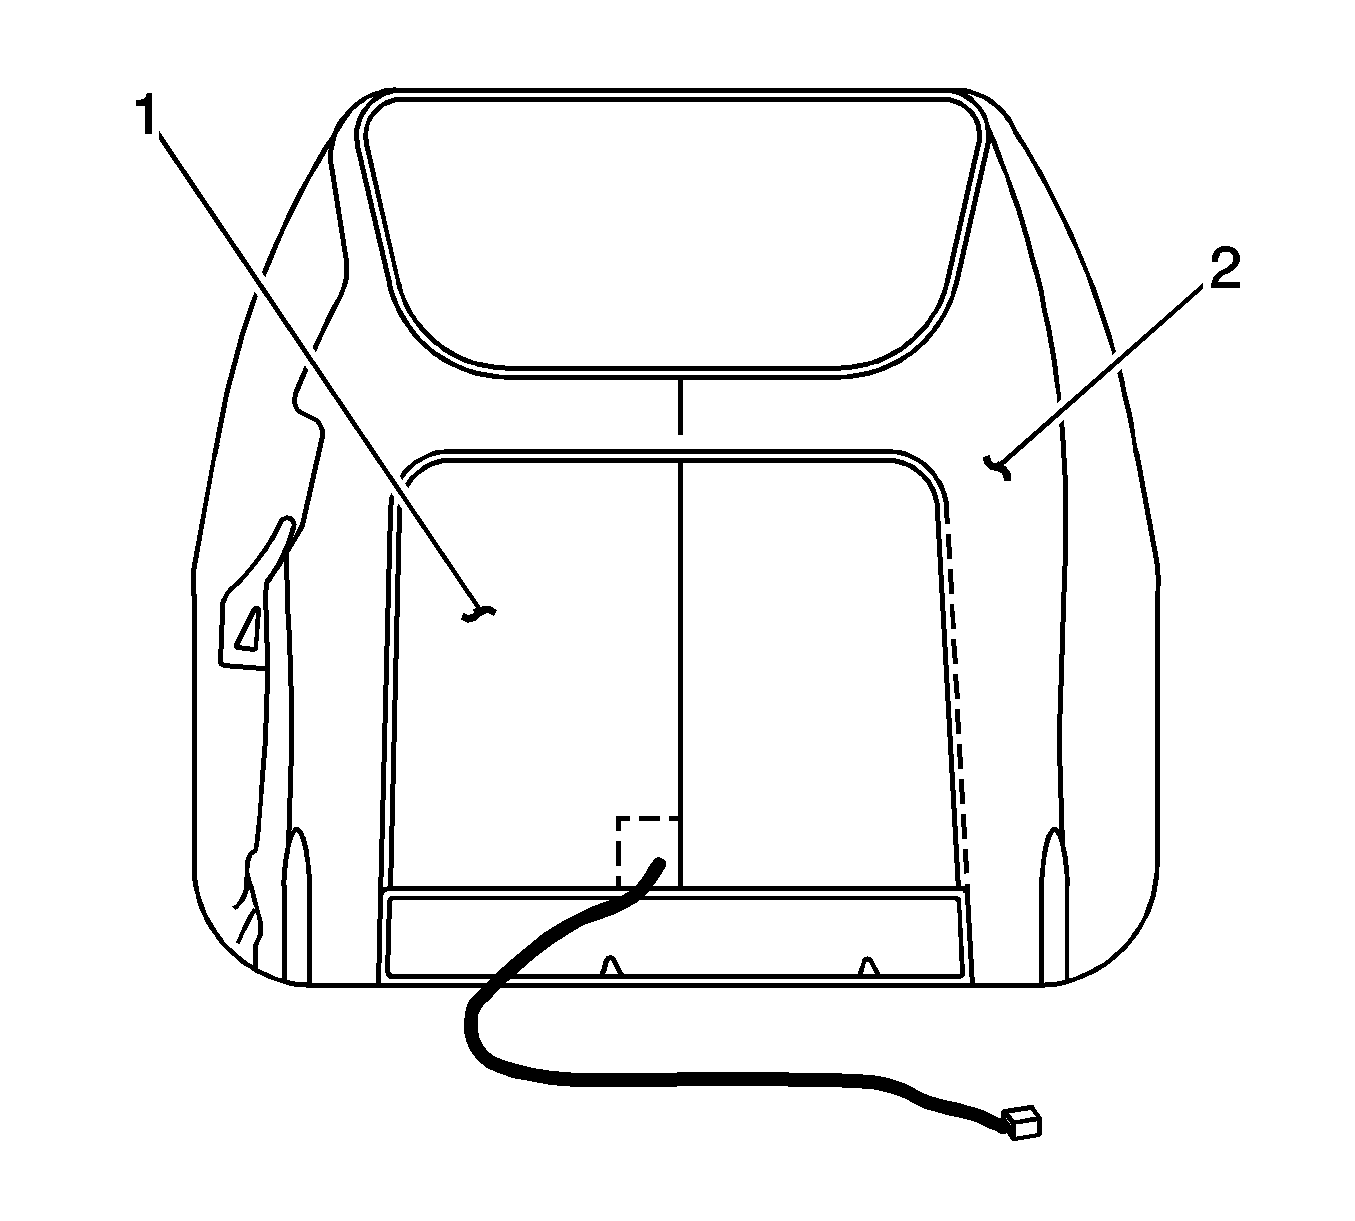
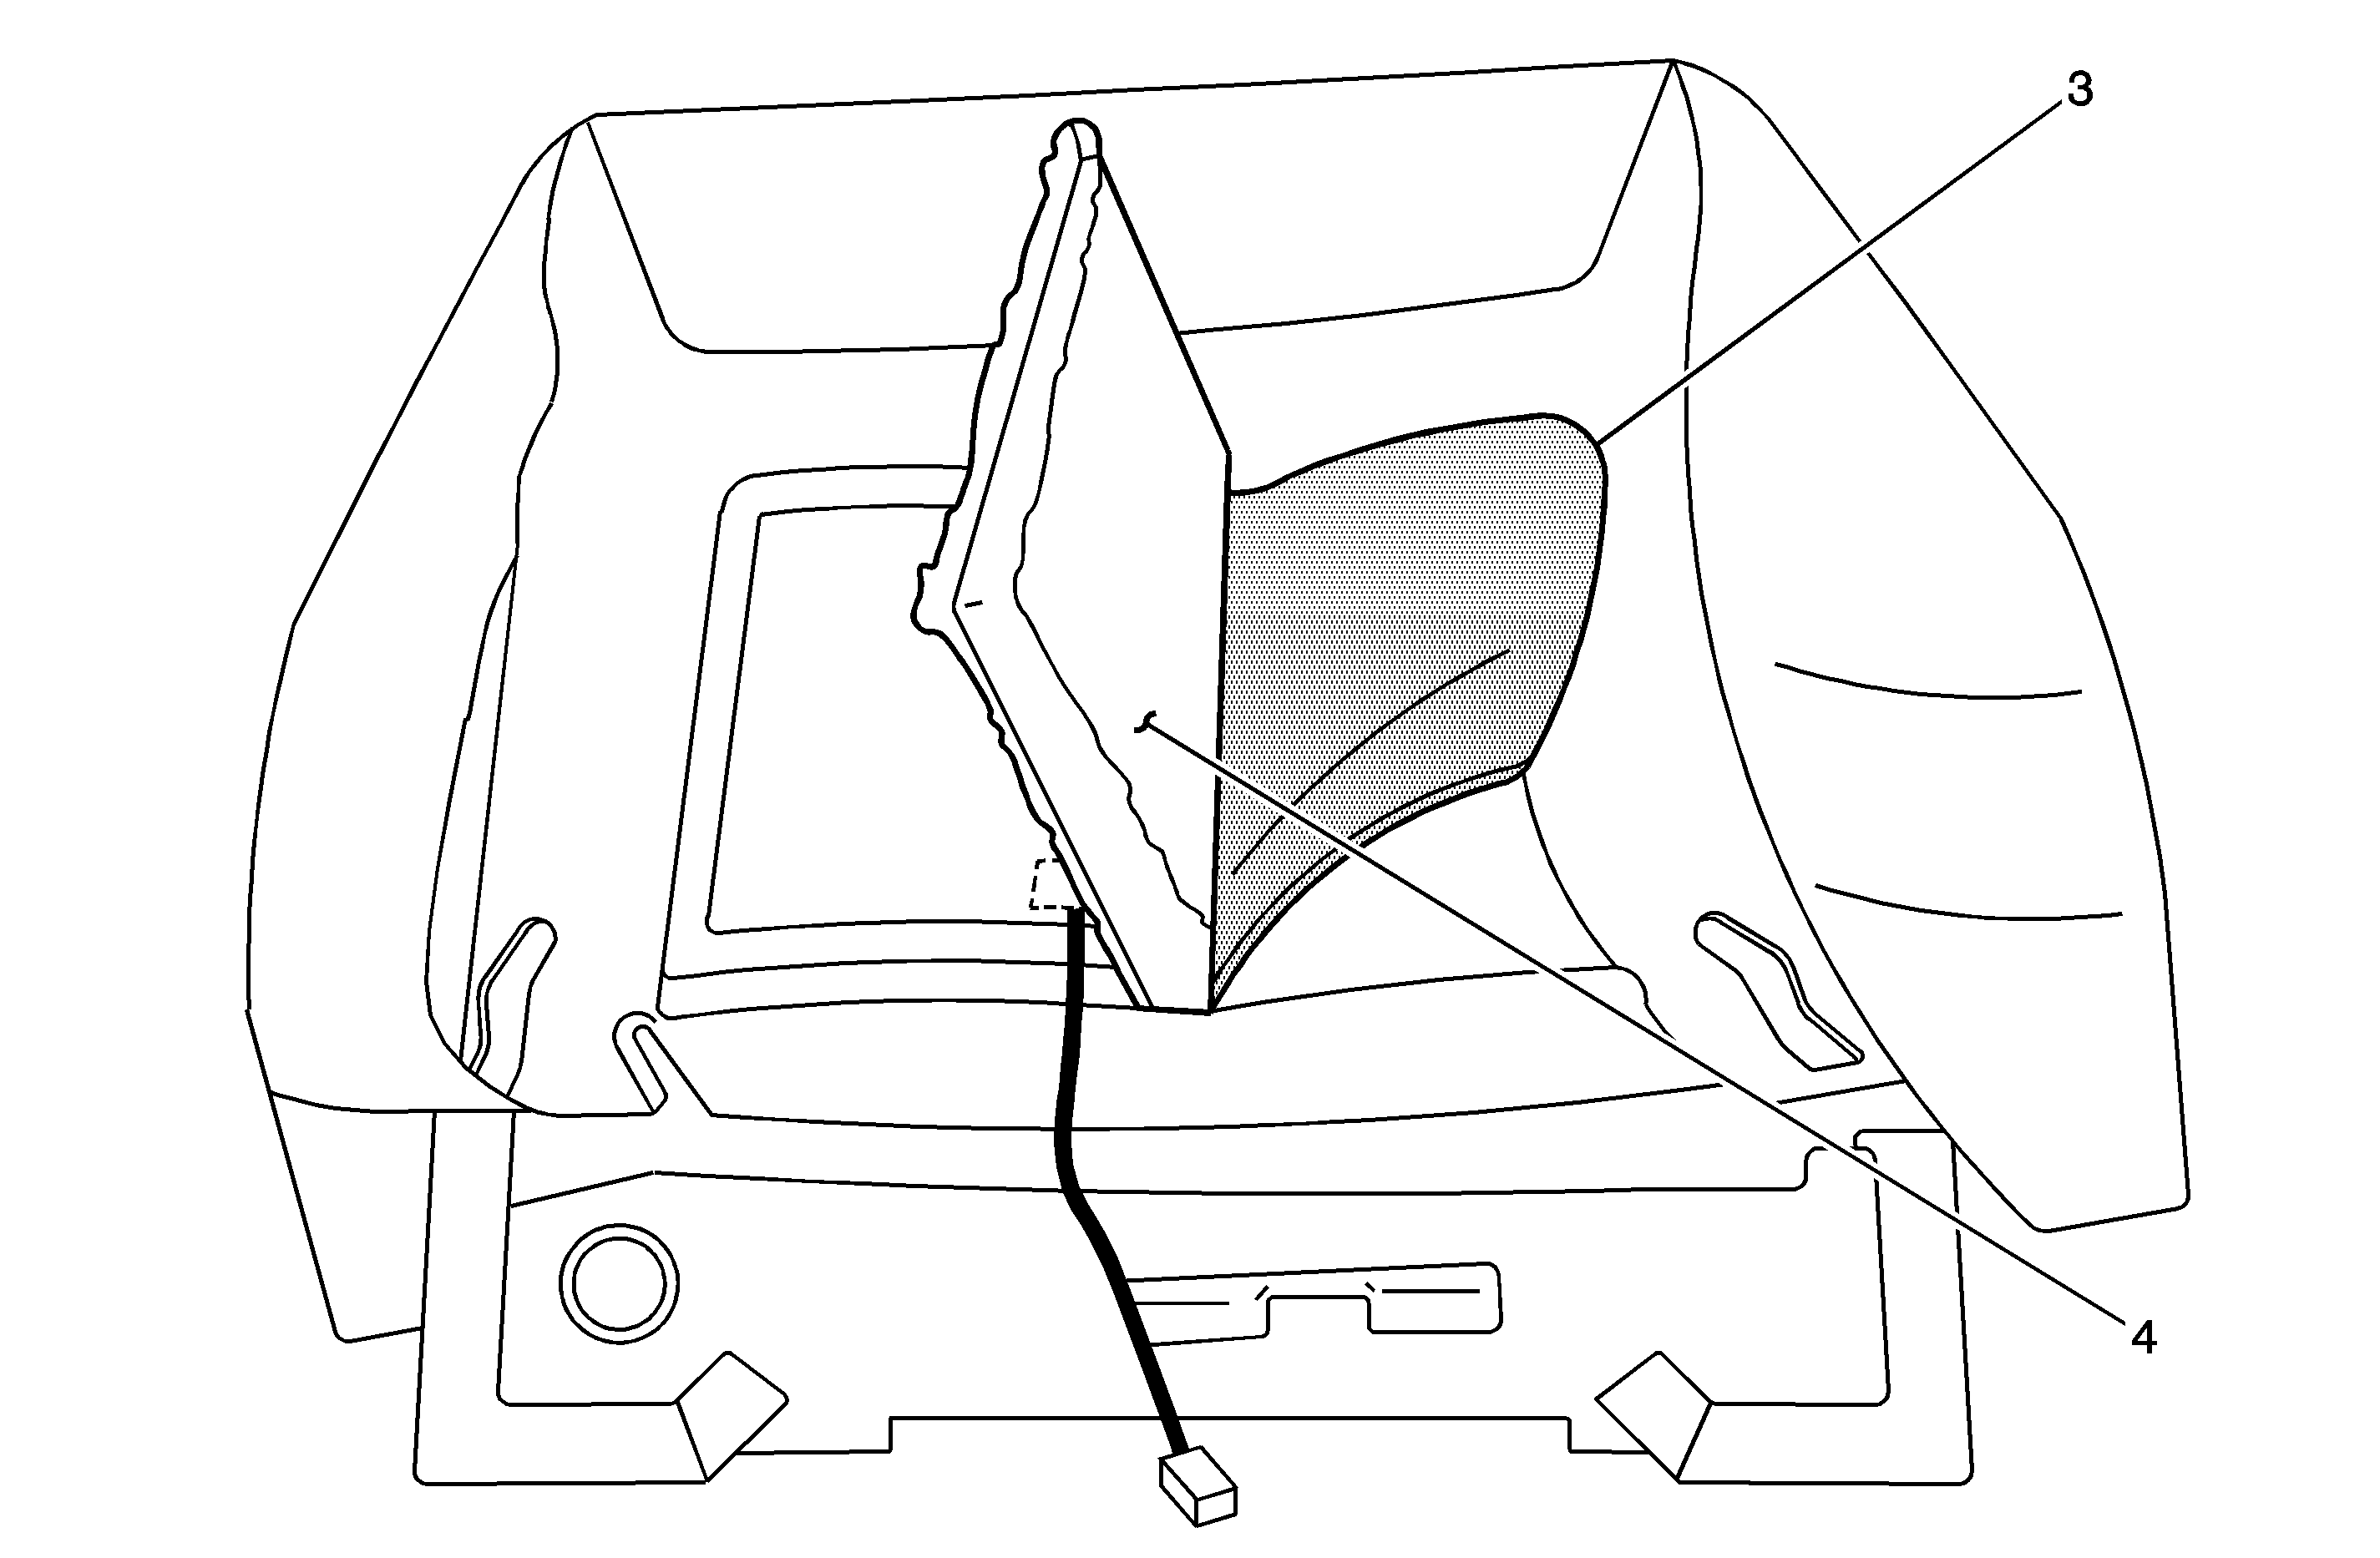
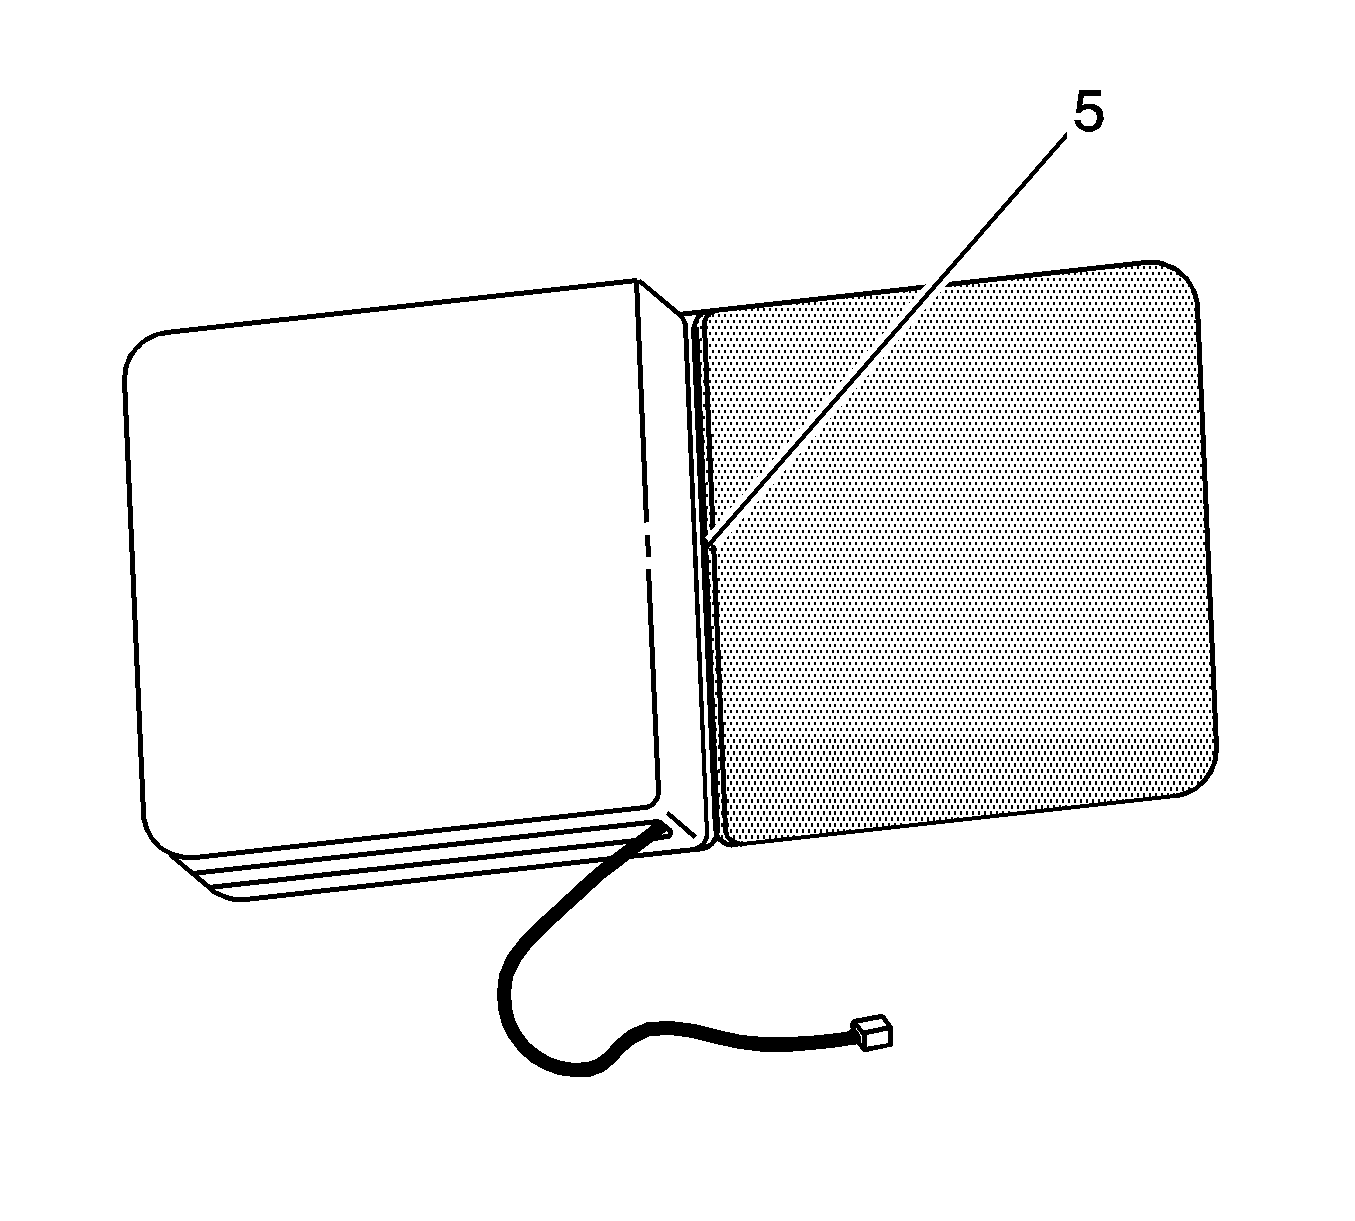
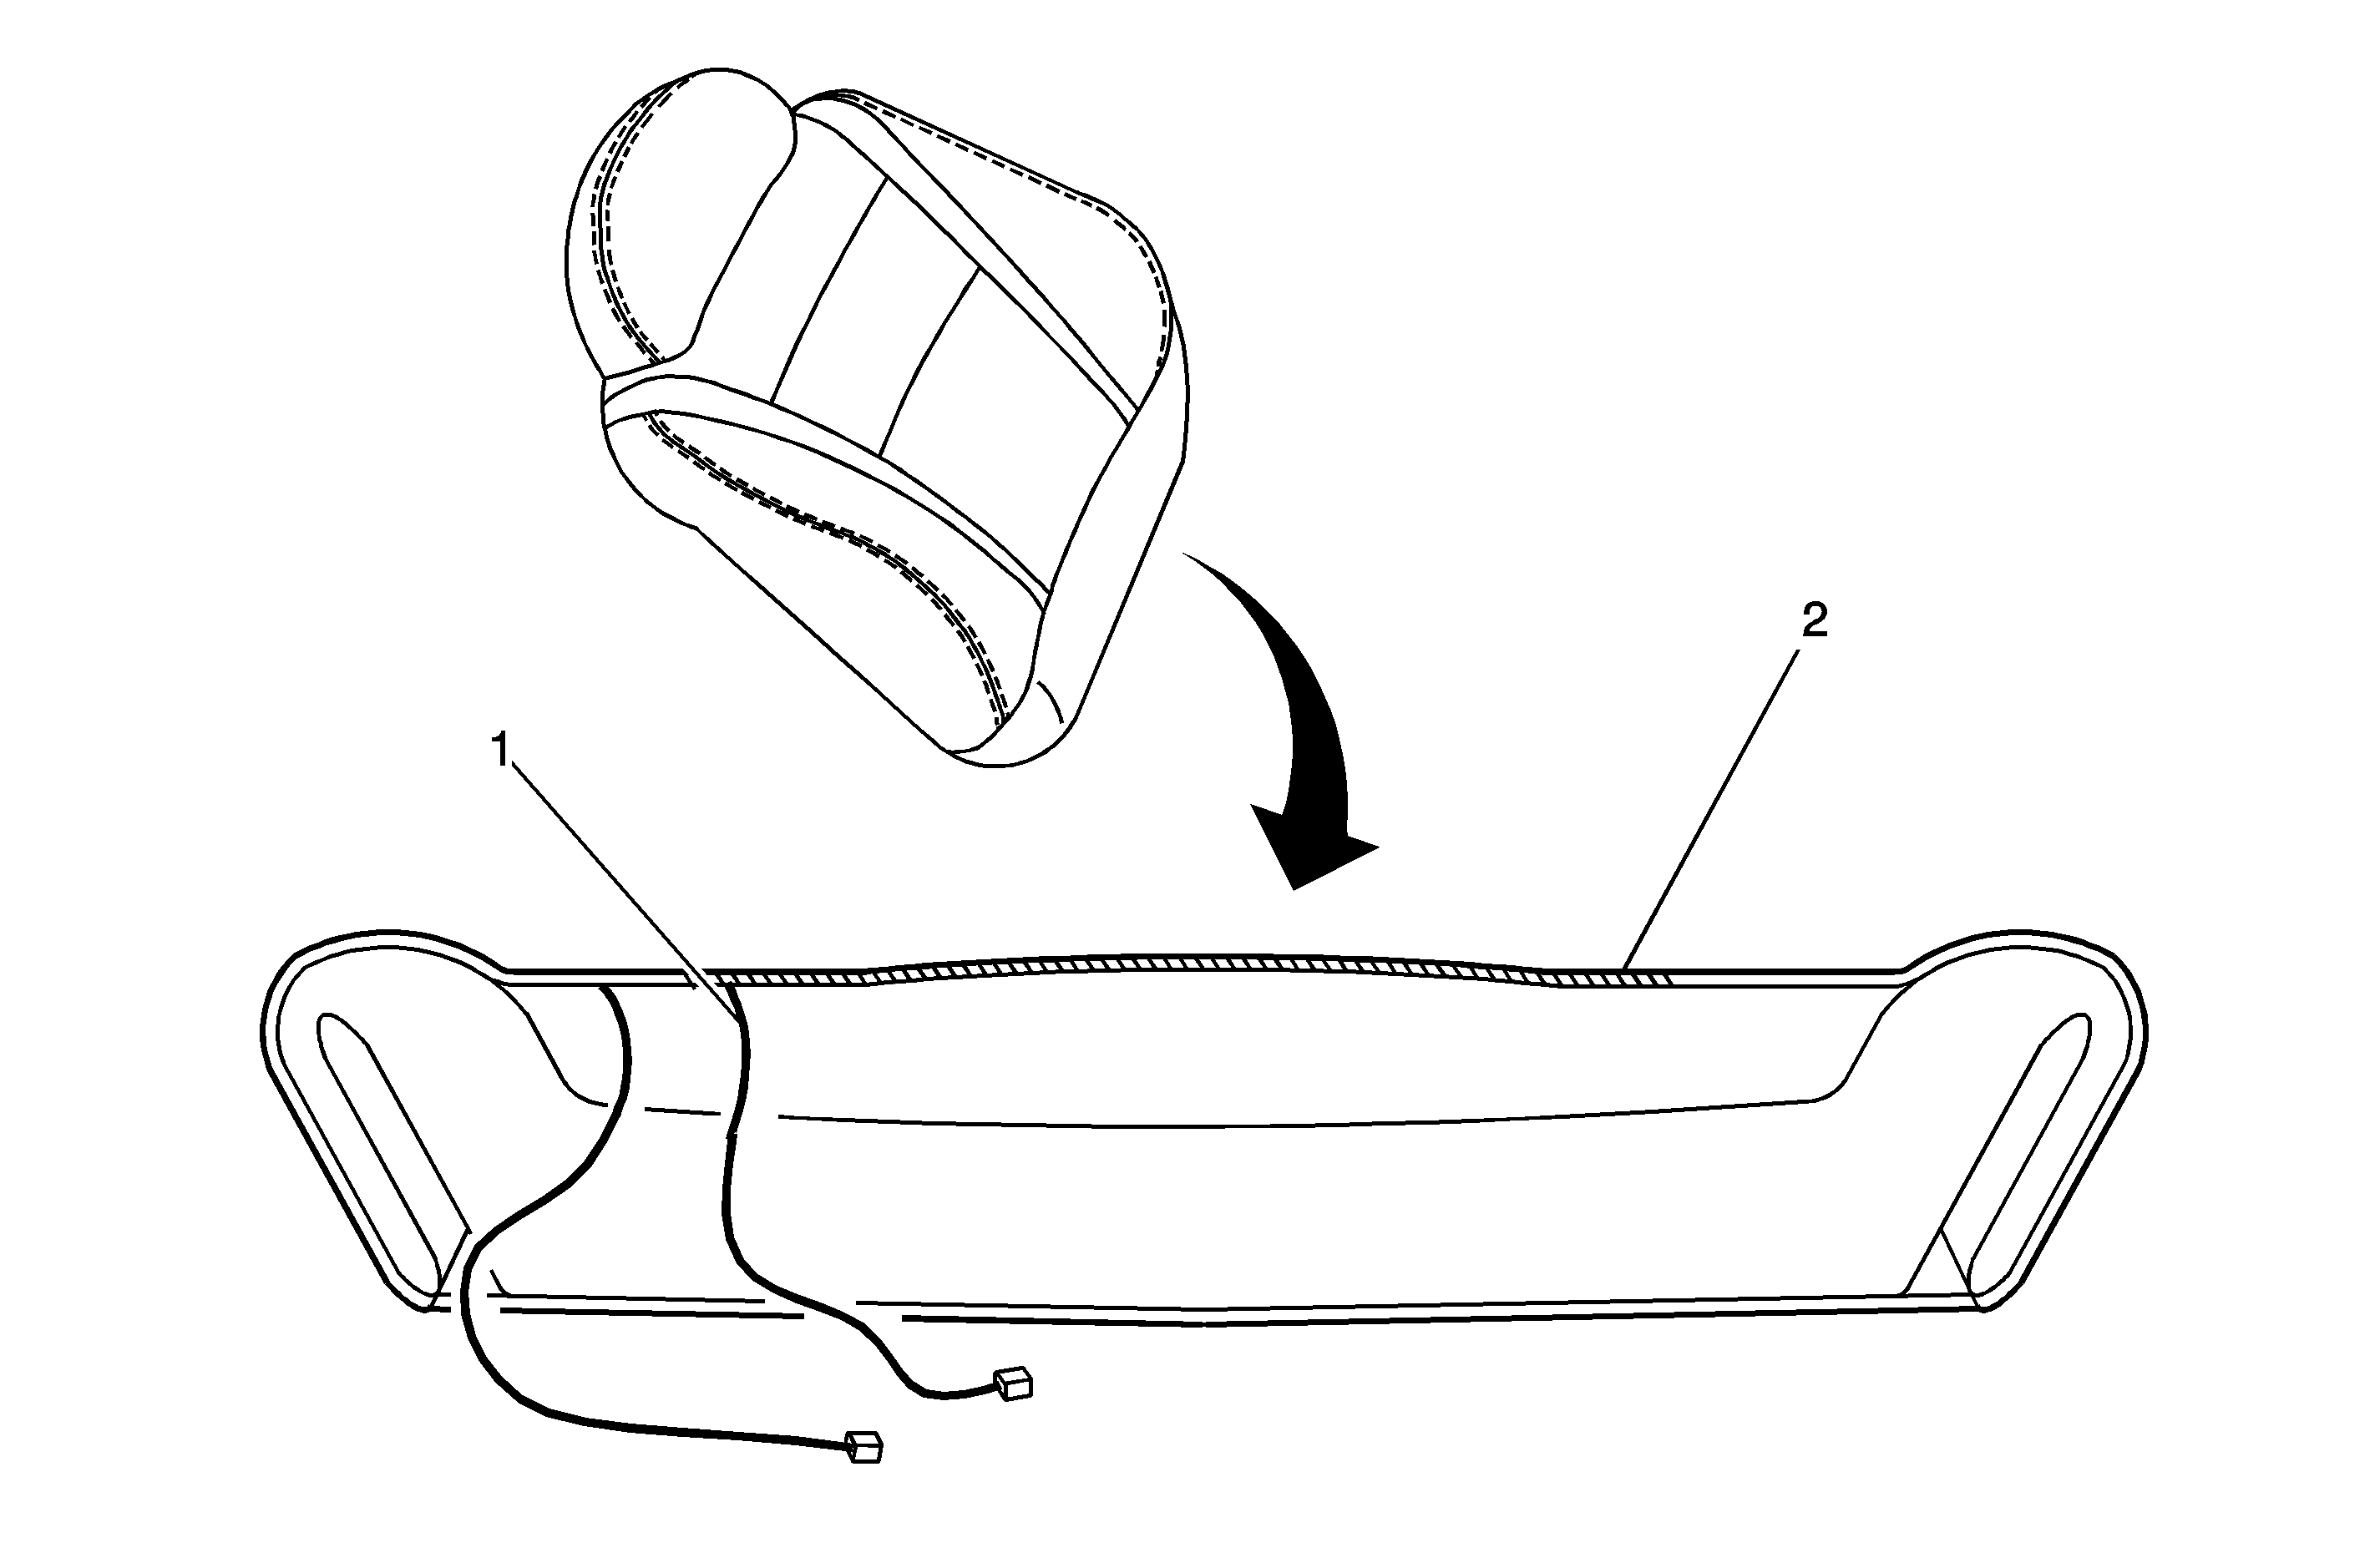
- Use a razor blade or an equivalent sharp tool to carefully cut the stitches that join the two piece center insert (1) to the trim cover (2).
- Along the outer edges (3) of the two piece center insert, carefully cut the stitches that secure the factory heat element (4). No need to separate the two leather pieces.
- Along the centerline of the two assemblies (5), carefully cut the stitches that secure the factory heat element to the two piece center insert. No need to separate the two leather pieces.
DeVille Service Heat Element Installation Procedure
- With the harness side down, element side up, place the new service heat element on a clean flat surface.
- With the leather side up, place the two piece center insert over the service heat element.
- Match up the alignment notches of the two assemblies.
- Carefully pull back the two piece leather insert and fold in half (leather to leather).
- Stitch the center of two piece leather insert to the center/trench of the service element. From the folded insert side, sew between the seam and edge.
- Stitch the outer edges of the insert to the element. From the element side, sew as close to the edge as possible.
- Stitch the two piece center insert assembly to the trim cover.
- Install the seat trim cover (back/cushion). Refer to the appropriate seat trim cover installation procedure in the Seats sub-section of the Service Manual.
- Attach the seat back assembly to the seat cushion assembly.
- Place the seat assembly inside the vehicle and connect the electrical connectors. DO NOT install at this time.
- Verify the seat heat function is operational.
- Complete the seat assembly installation. Refer to Seat Replacement in the Seats sub-section of the appropriate Service Manual for the installation procedure.
Important: DO NOT sew through the wires located in the heat element center/trench.
Important: Ensure the alignment notches match up.
Important: Ensure the center seam of the center insert is aligned with the center seam of the trim cover.
| • | Install the hinge bolts. |
| • | Install the roll pins that retain the reclining actuator to the seat back hinge. |
| • | Connect the electrical connectors between the seat back and the seat cushion. |
Seville/Eldorado Service Heat Element Installation Procedure
If a sublet trim repair facility is used, please provide a copy of this bulletin to the repair shop.
Important: Before installing the service heat element, verify that the resistance values are within the specified range. Refer to the following table:
Range | Description |
|---|---|
Less than 5 ohms | Seat Back Cushion Upr Element |
Seat Cushion Ctr Element | |
Seat Cushion Thigh Element | |
Seat Cushion Ctr Element | |
Between 850 ohms and 11.5 K ohms | Seat Cushion Ctr Thermistor |
Important: DO NOT attempt to remove the factory heat elements from the seat trim cover. The service heat element is to be installed between the existing factory heat element and the seat trim cover.
Seville/Eldorado Back Cushion Center Installation (Cushion Center Similar)
- Separate the seat back assembly from the seat cushion assembly.
- DO NOT remove the seat trim cover.
- Use a pair of diagonal side cutters to cut the center factory heat element harness wires (1) as close to the material as possible.
- Create an opening between the non-functioning factory heat element and the seat trim cover.
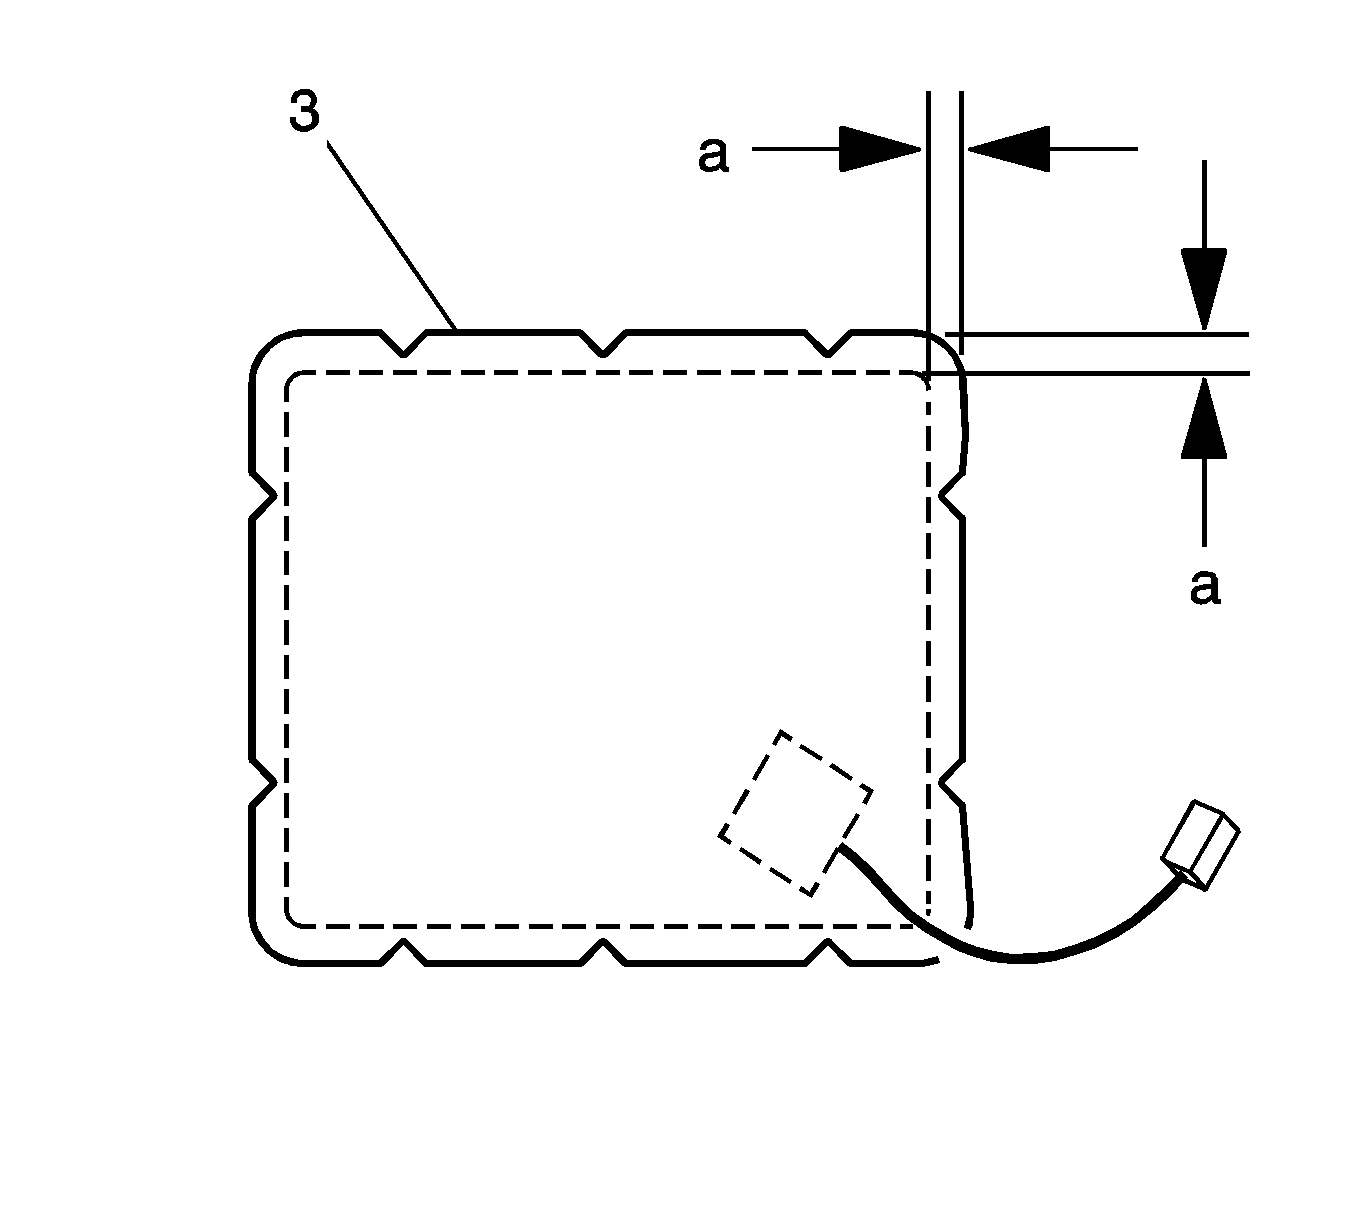
- Use scissors to remove approximately 19 mm (3/4 in) of material (a) from each side of the back cushion center heat element (3). (Cushion center heat element similar.)
- Check for proper fit.
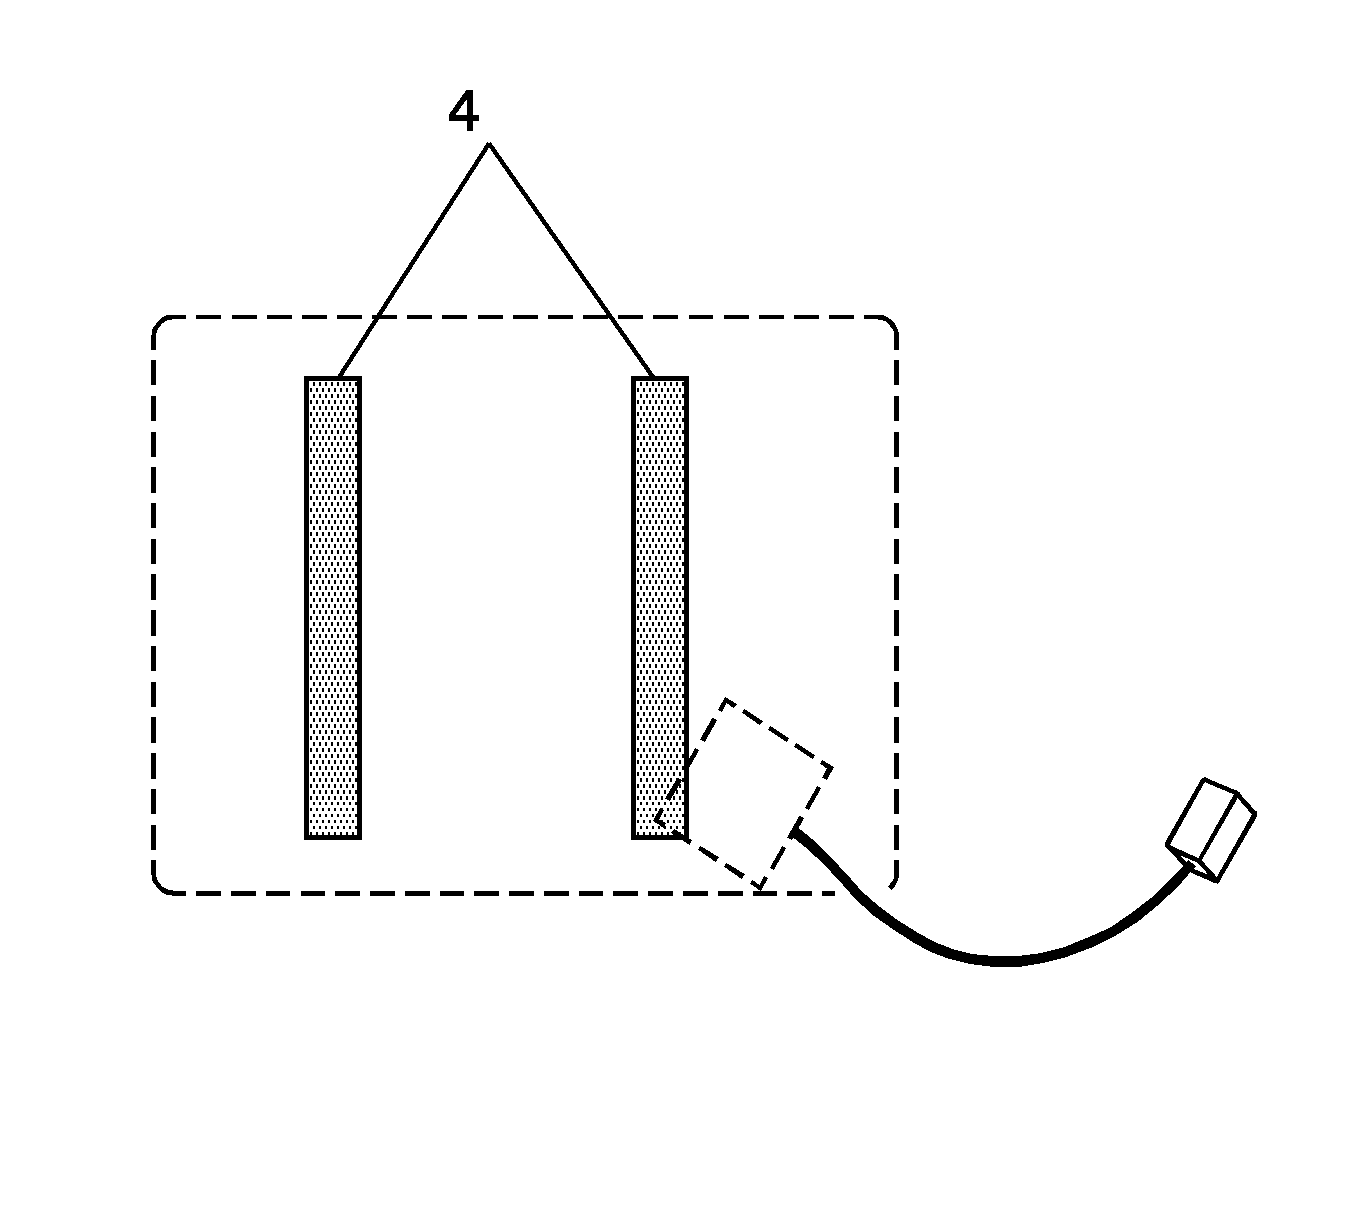
- On the harness side, place two 20 cm (8 in) vertical strips of double sided tape (4) such as 3M® Scotch Adhesive Transfer Tape, P/N 06494, or equivalent, onto the modified service heat element. DO NOT REMOVE the backing paper at this time.
- Install the modified service heat element.
- Attach the seat back assembly to the seat cushion assembly.
- Place the seat assembly inside the vehicle and connect the electrical connectors. DO NOT install at this time.
- Verify the seat heat function is operational.
- Complete the seat assembly installation. Refer to Seat Replacement in the Seats sub-section of the appropriate Service Manual for the installation procedure.
| • | Disconnect the electrical connectors between the seat back and the seat cushion. |
| • | Remove the roll pins retaining the reclining actuator to the seat back hinge. |
| • | Remove the hinge bolts. |
Important: DO NOT start the cut with a jab or poke.
| 4.1. | As close as possible to the seam (2), use a razor blade or an equivalent sharp tool and carefully slice through the factory heat element until a hole is created. |
| 4.2. | Insert your finger(s) through the hole and lift the heat element material away from the trim cover material. |
| 4.3. | Use scissors and/or a razor blade to cut the heat element material along the entire length of the seam from corner to corner. |
| Important: DO NOT cut through the embedded wiring of the service heat element. |
| 6.1. | With the harness side to the factory element, insert the service element between the leather trim cover and the existing factory heat element. |
| 6.2. | Ensure the element is laying flat, is tucked into each corner and extends to each side. |
| 6.3. | It may be necessary to remove additional material. |
Important: To ensure customer comfort and satisfaction, it is important the service heat element extends to each side and lays flat.
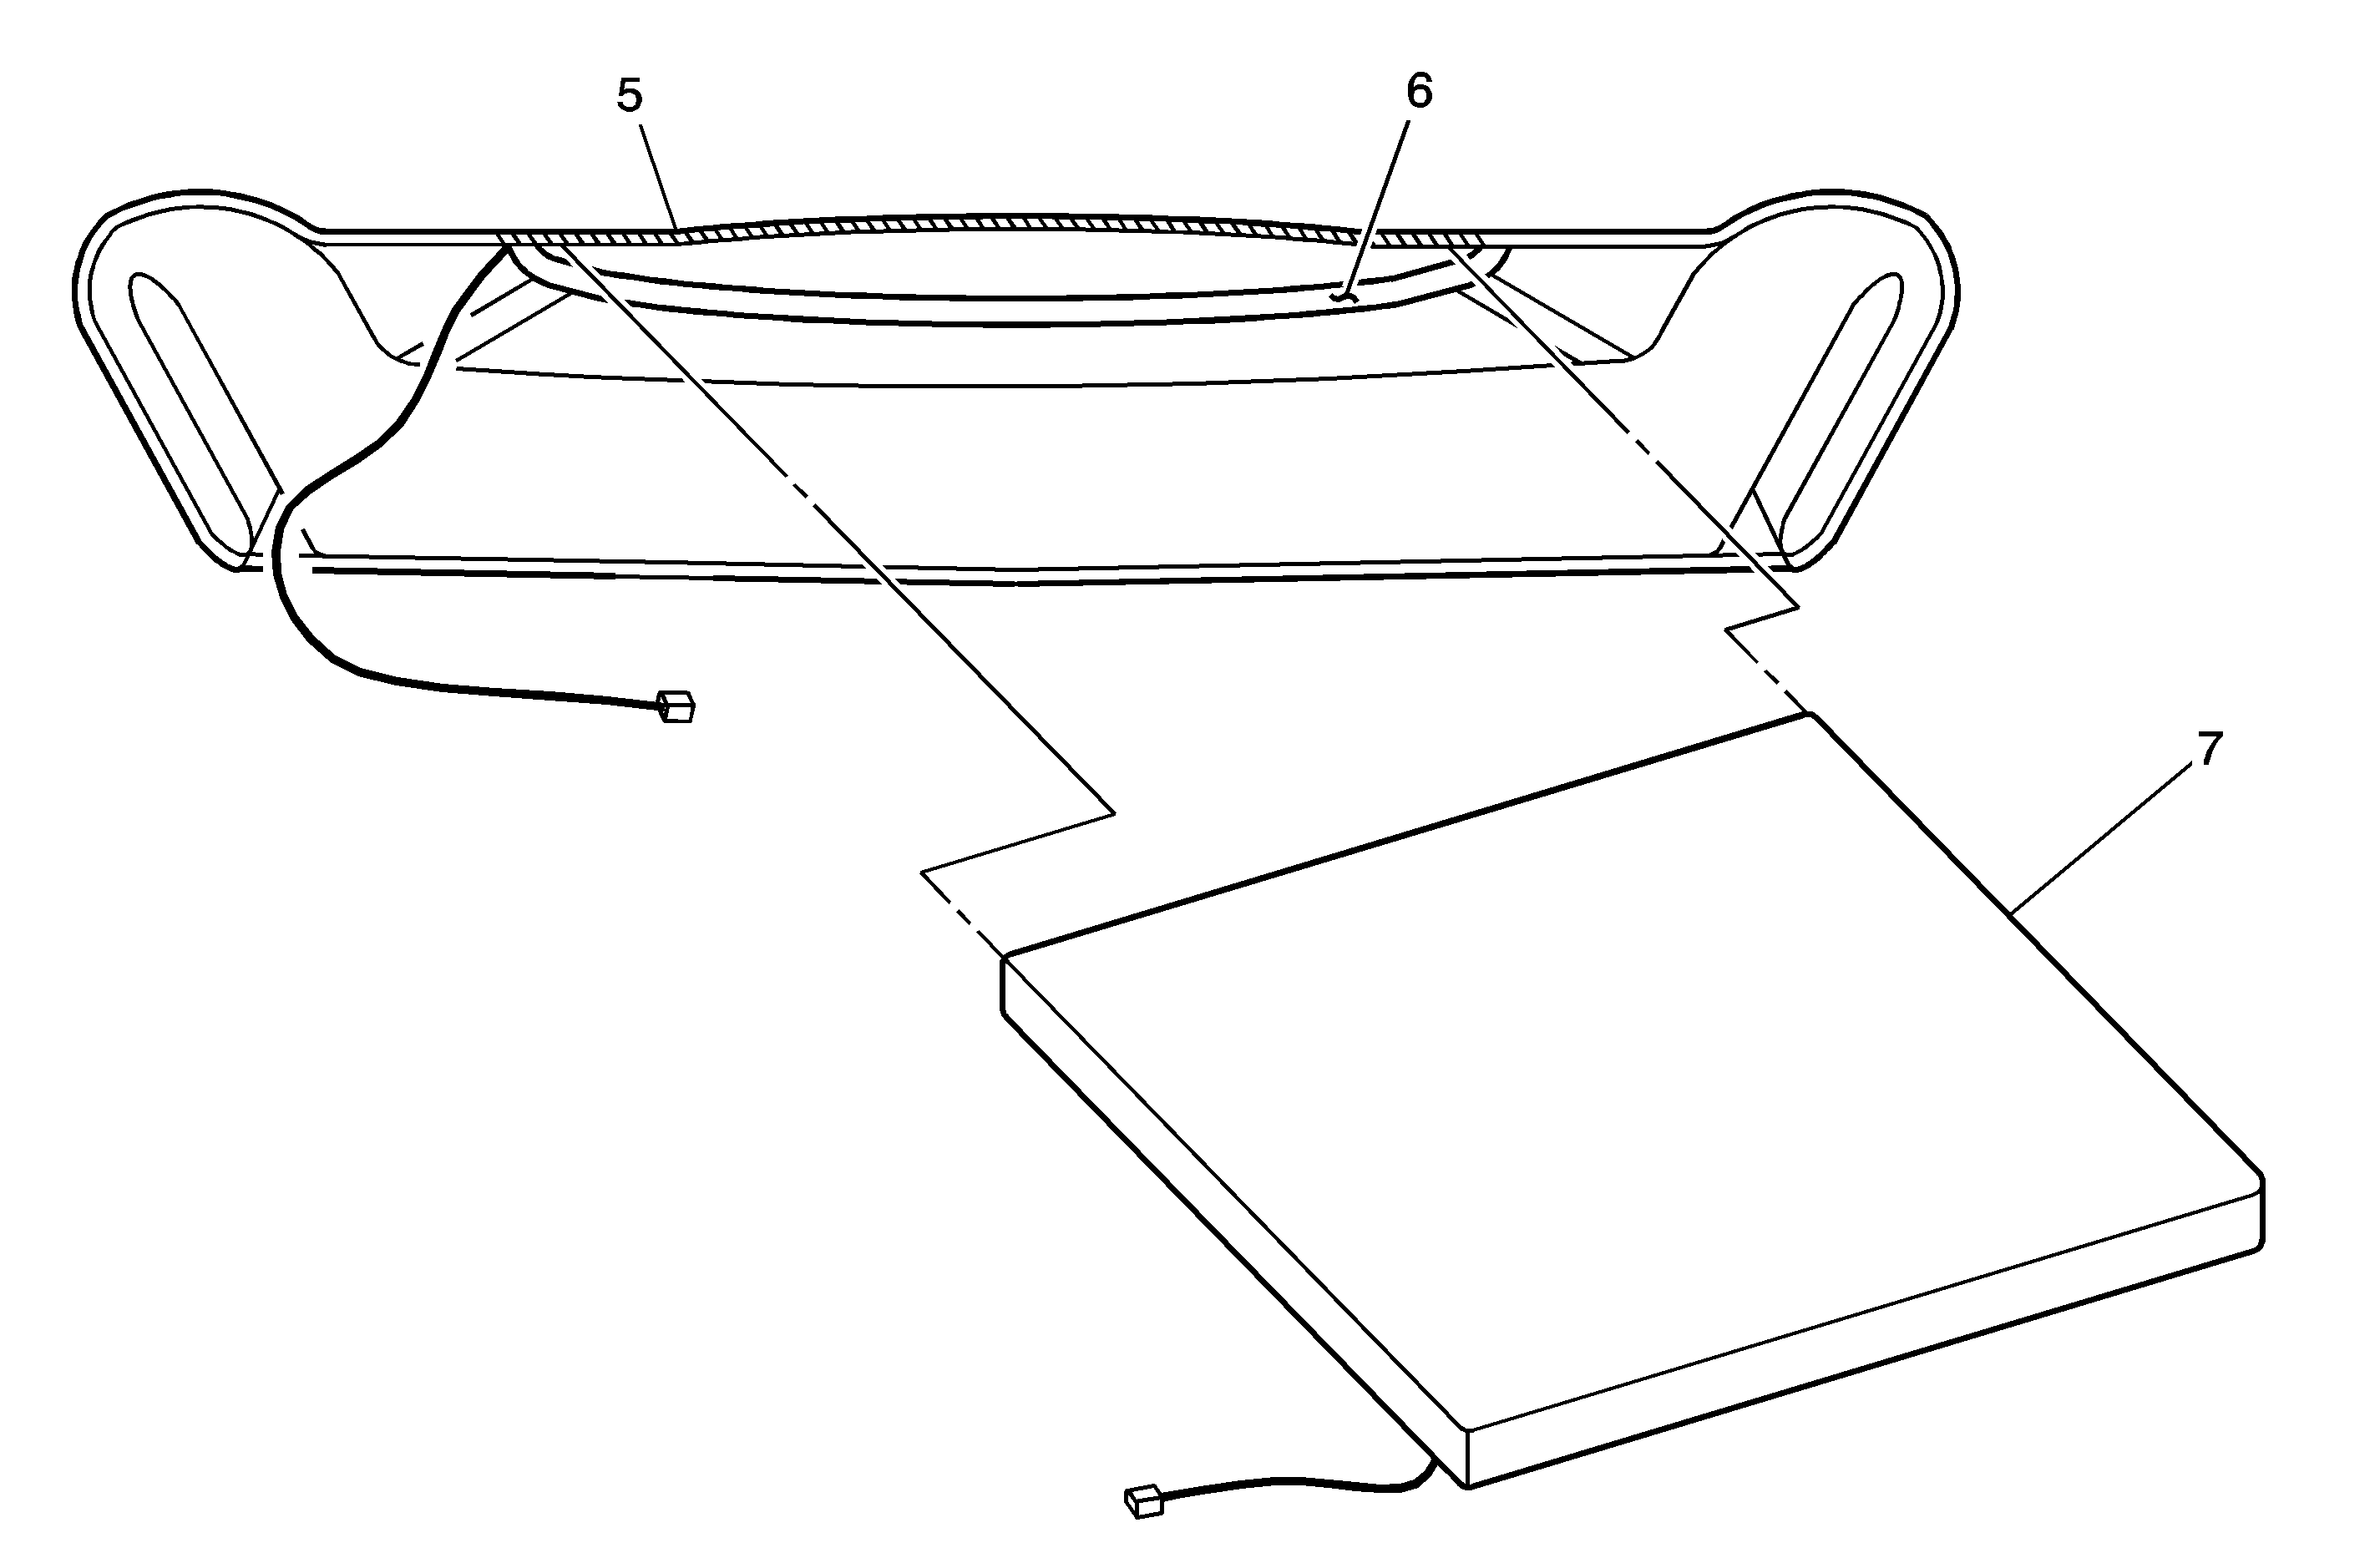
| 8.1. | With the harness side to the factory element (6), insert the modified service element (7) between the leather trim cover (5) and the existing factory heat element (6). |
| 8.2. | Ensure the service element is laying flat, is tucked into each corner and extends to each side. |
| 8.3. | Remove the backing paper from the adhesive tape. |
| 8.4. | Place the two heat elements between your hands and apply pressure. |
| 8.5. | Use 3M® Highland Cloth Duct Tape, P/N 06969, or equivalent, to cover the opening. |
| • | Install the hinge bolts. |
| • | Install the roll pins that retain the reclining actuator to the seat back hinge. |
| • | Connect the electrical connectors between the seat back and the seat cushion. |
Seville/Eldorado Cushion Thigh Installation (Back Cushion Upper Similar)
- Separate the seat back assembly from the seat cushion assembly.
- Remove the seat trim cover with the non-functioning heat element. Refer to the appropriate seat trim cover removal procedure in the Seats sub-section of the Service Manual.
- Use a pair of diagonal side cutters to cut the cushion thigh factory heat element harness wires (1) as close to the material as possible.
- Create an opening (2) between the non-functioning cushion thigh factory heat element and the seat trim cover.
- Use scissors to remove approximately 19 mm (3/4 in) of material (a) from around the cushion thigh heat element (3). (Back Cushion Upper heat element similar.)
- Check for proper fit.
- On the harness side, place two 20 cm (8 in) vertical strips of double sided tape (4) such as 3M® Scotch Adhesive Transfer Tape, P/N 06494, or equivalent, onto the modified service heat element. DO NOT REMOVE the backing paper at this time.
- Install the modified service heat element.
- Install the seat trim cover. Refer to the appropriate seat trim cover installation procedure in the Seats sub-section of the Service Manual.
- Attach the seat back assembly to the seat cushion assembly.
- Place the seat assembly inside the vehicle and connect the electrical connectors. DO NOT install at this time.
- Verify the seat heat function is operational.
- Complete the seat assembly installation. Refer to Seat Replacement in the Seats sub-section of the appropriate Service Manual for the installation procedure.
| • | Disconnect the electrical connectors between the seat back and the seat cushion. |
| • | Remove the roll pins retaining the reclining actuator to the seat back hinge. |
| • | Remove the hinge bolts. |
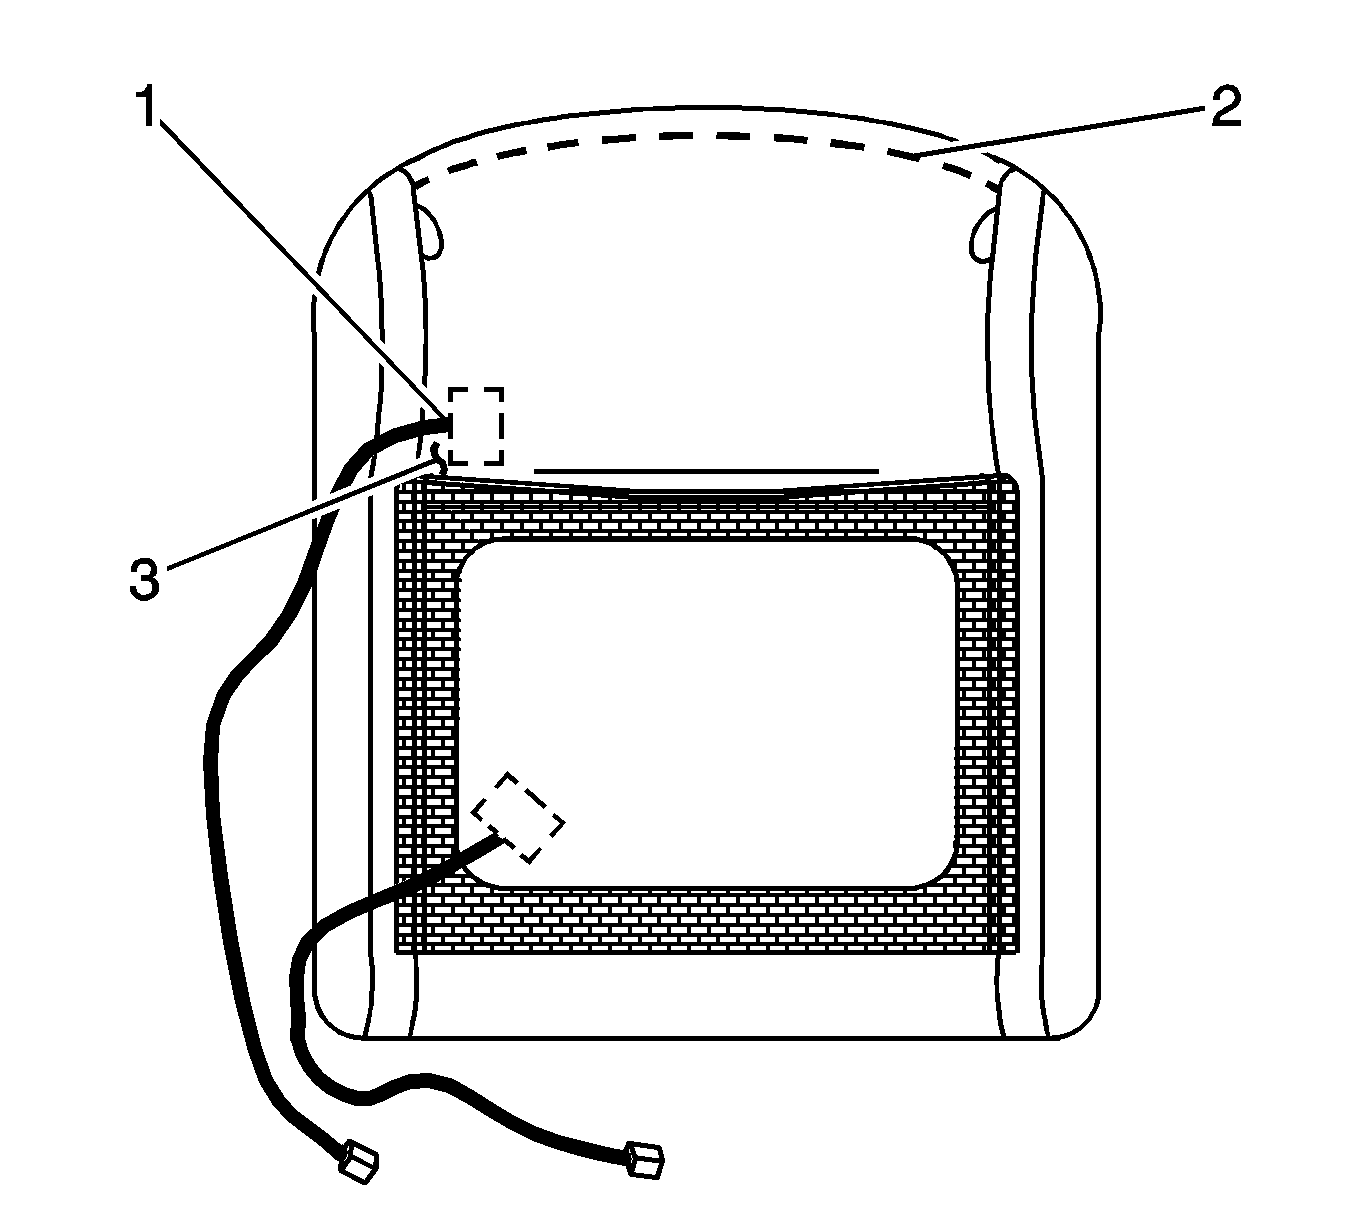
Important: DO NOT start the cut with a jab or poke.
| 4.1. | As close as possible to the seam, use a razor blade or an equivalent sharp tool and carefully slice through the factory heat element until a hole is created. |
| 4.2. | Insert your finger(s) through the hole and lift the heat element material away from the trim cover material. |
| 4.3. | Use scissors and/or a razor blade to cut the heat element material along the entire length of the seam (2) from corner to corner. |
| 4.4. | Create a small opening (3) in the corner of the existing cushion thigh factory heat element. |
| Important: DO NOT cut through the embedded wiring of the service heat element. |
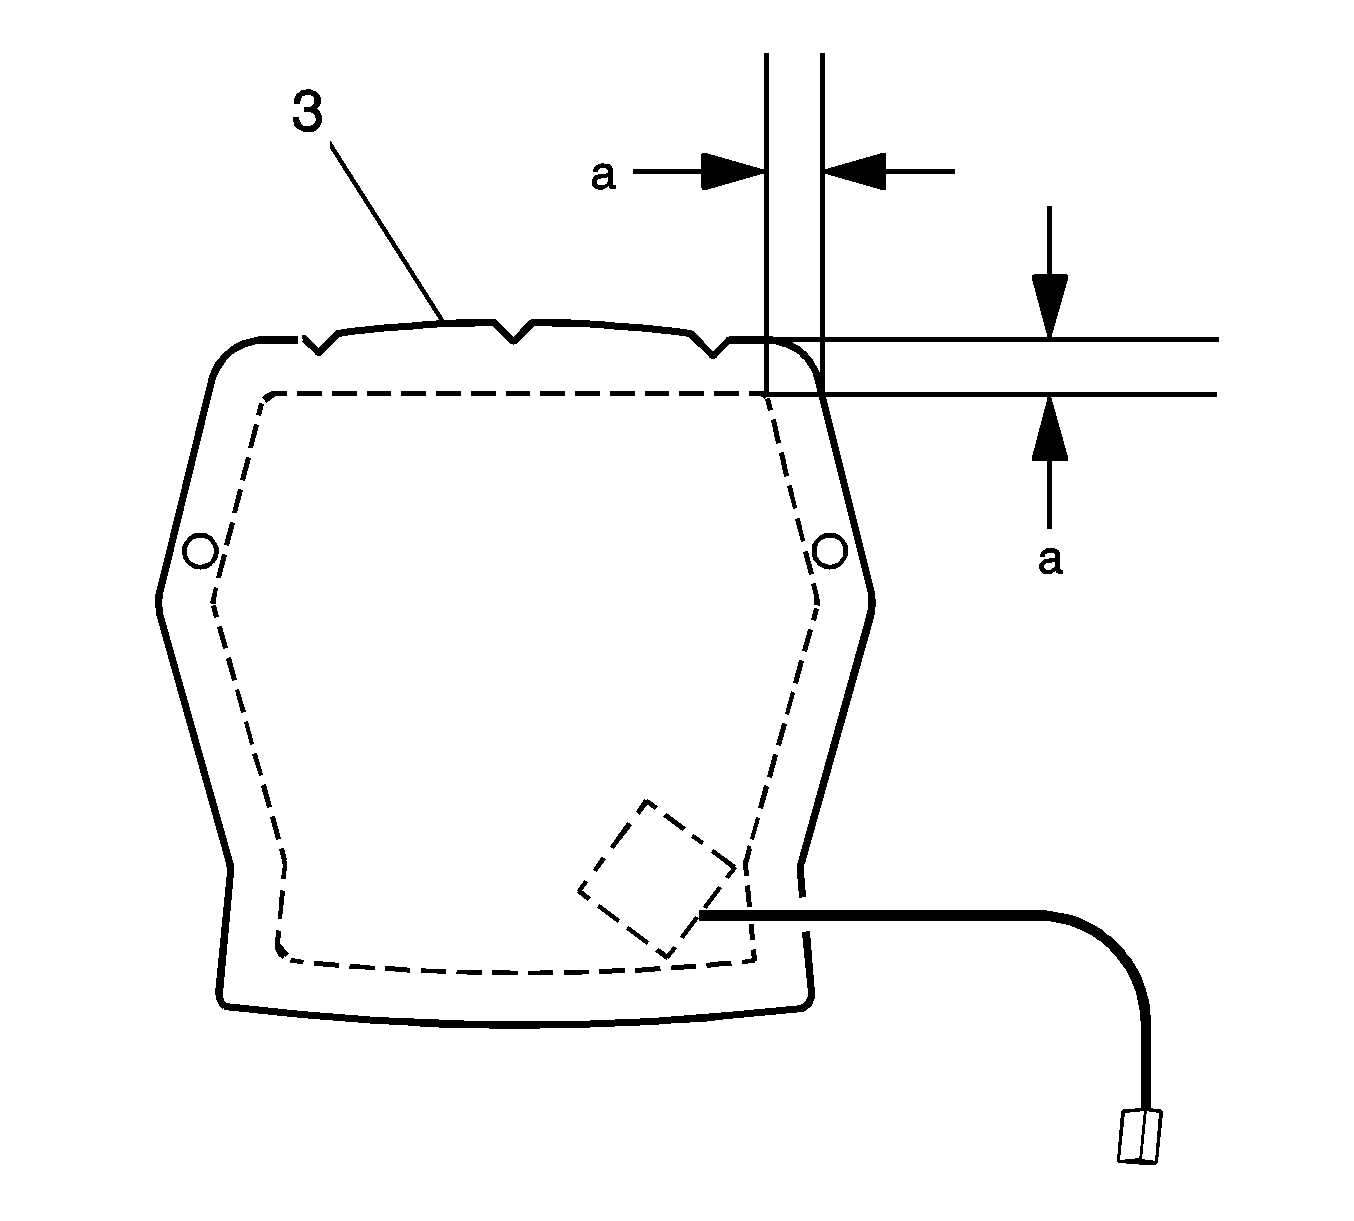
| 6.1. | With the harness side to the factory element, insert the harness through the small opening and place the service element between the leather trim cover and the existing factory heat element. |
| 6.2. | Ensure the element is laying flat, is tucked into each corner and extends to each side. |
| 6.3. | It may be necessary to remove additional material. |
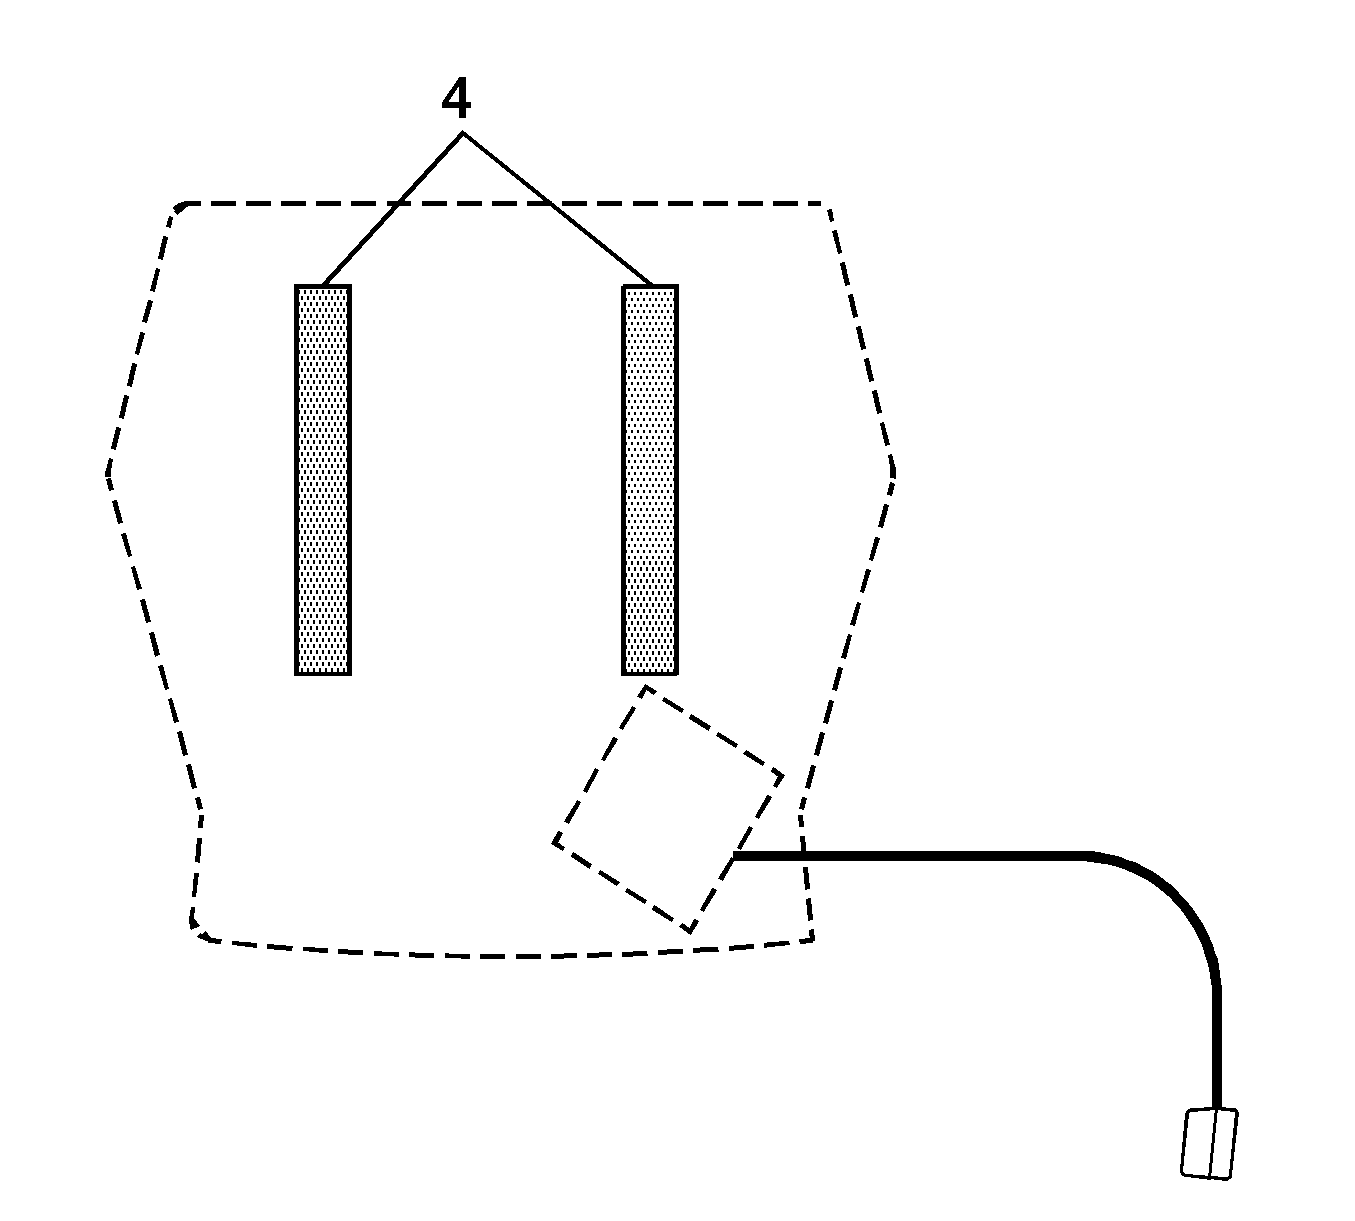
Important: To ensure customer comfort and satisfaction, it is important the service heat element extends to each side and lays flat.
| 8.1. | With the harness side to the factory element, insert the modified service element between the leather trim cover and the existing factory heat element. |
| 8.2. | Ensure the service element is laying flat, is tucked into each corner and extends to each side. |
| 8.3. | Remove the backing paper from the adhesive tape. |
| 8.4. | Place the two heat elements between your hands and apply pressure. |
| 8.5. | Use 3M® Highland Cloth Duct Tape, P/N 06969, or equivalent, to cover the opening. |
| • | Install the hinge bolts. |
| • | Install the roll pins that retain the reclining actuator to the seat back hinge. |
| • | Connect the electrical connectors between the seat back and the seat cushion. |
Parts Information
Model | Part Number | Description |
|---|---|---|
DeVille (KD) | 16793880 | Heater-F/Seat Bk Cushion |
DeVille (KD) | 25743718 | Heater-F/Seat Cushion |
DeVille (KE/KF) | 16793882 | Heater-F/Seat Bk Cushion |
DeVille (KE/KF) | 25743719 | Heater-F/Seat Cushion |
Seville/Eldorado | 25743720 | Heater-F/Seat Cushion Ctr |
Seville/Eldorado | 25743721 | Heater-F/Seat Bk Cushion Upr |
Seville/Eldorado | 25743722 | Heater-F/Seat Bk Cushion Ctr |
Seville/Eldorado | 25743723 | Heater-F/Seat Cushion Thigh |
Parts are currently available from GMSPO.
Warranty Information
For vehicles repaired under warranty, use:
Labor Operation | Description | Labor Time |
|---|---|---|
C7170 | RH Front Seat Cushion/Back Heated Seat Heating Element -- Replace | 2.6 hrs DeVille |
RH Front Seat Cushion/Back Heated Seat Heating Element -- Install | 2.4 hrs Seville/Eldorado | |
ADD | Diagnosis Time | 0.0-0.3 hr |
C7171 | LH Front Seat Cushion/Back Heated Seat Heating Element -- Replace | 2.6 hrs DeVille |
LH Front Seat Cushion/Back Heated Seat Heating Element -- Install | 2.4 hrs Seville/Eldorado | |
ADD | Diagnosis Time | 0.0-0.3 hr |
