Door Window Channel Replacement for Cadillac Eldorado 1998
Door Window Channel Replacement DeVille
Removal Procedure
Caution: This vehicle is equipped with a Supplemental Inflatable Restraint (SIR) System. Failure to follow the correct procedure could cause the following conditions:
• Air bag deployment • Personal injury • Unnecessary SIR system repairs • Refer to SIR Component Views in order to determine if you are performing service on or near the SIR components or the SIR wiring. • If you are performing service on or near the SIR components or the SIR wiring, disable the SIR system. Refer to Disabling the SIR System.
Caution: In order to prevent SIR deployment, personal injury, or unnecessary SIR system repairs, do not strike the door or the door pillar in the area of the side impact sensor (SIS). Turn OFF the ignition and remove the key when performing service in the area of the SIS.
- Disable the SIR system. Refer to Disabling the SIR System .
- Remove the trim panel. Refer to Front Side Door Trim Panel Replacement or Rear Side Door Trim Panel Replacement
- Remove water deflector. Refer to Door Water Deflector Replacement .
- Remove the sealing strip. Refer to Inner Belt Sealing Strip Replacement .
- Remove the window. Refer to Door Window Replacement .
- Remove the lower run channel fastener (2).
- Remove the front lower run channel (1).

Installation Procedure
- Install the front lower run channel (1).
- Install the bolt (2).
- Install the window. Refer to Door Window Replacement .
- Install the sealing strip. Refer to Inner Belt Sealing Strip Replacement .
- Install the water deflector. Refer to Door Water Deflector Replacement .
- Enable the SIR system. Refer to Enabling the SIR System .
- Install the trim panel. Refer to Front Side Door Trim Panel Replacement or Rear Side Door Trim Panel Replacement .
Notice: Use the correct fastener in the correct location. Replacement fasteners must be the correct part number for that application. Fasteners requiring replacement or fasteners requiring the use of thread locking compound or sealant are identified in the service procedure. Do not use paints, lubricants, or corrosion inhibitors on fasteners or fastener joint surfaces unless specified. These coatings affect fastener torque and joint clamping force and may damage the fastener. Use the correct tightening sequence and specifications when installing fasteners in order to avoid damage to parts and systems.
Tighten
Tighten the bolt to 10.5 N·m (93 lb in).
Door Window Channel Replacement Eldorado
Removal Procedure
- Remove the trim panel. Refer to Door Trim Panel Replacement .
- Remove the water deflector. Refer to Door Water Deflector Replacement .
- Remove the sealing strip. Refer to Inner Belt Sealing Strip Replacement .
- Remove the window. Refer to Door Window Replacement .
- Remove the front upstop adjuster nut.
- Remove the front upstop adjuster.
- Remove the bolt.
- Move the top of the front run channel (2) away from the mirror.
- Rotate the channel toward the bottom of the door.
- Pull upward on the bottom of the channel in order to release the channel from the retainer.
- Remove the front run channel (2).
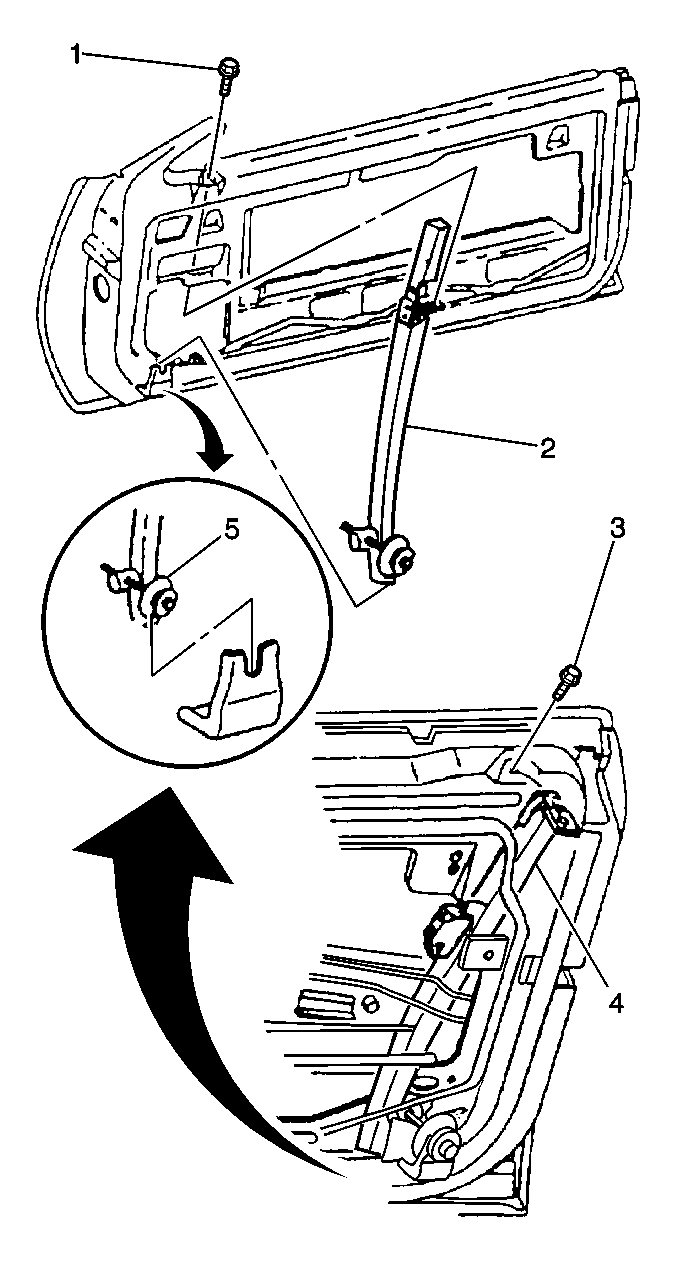
Important: Do not damage the seal.
Installation Procedure
- Install the front run channel (2) into the door, parallel to the bottom of the door.
- Align the lower adjuster into the retainer.
- Swing the top of the front run channel (2) upward.
- Align the retainer to the bolt hole.
- Install the bolt.
- Install the upstop adjuster.
- Install the nut.
- Apply a thin coat of lubricant GM P/N 99882386 or the equivalent onto the run channels.
- Perform any adjustments as needed. Refer to Door Window Adjustment .
- Install the window. Refer to Door Window Replacement .
- Install the sealing strip. Refer to Inner Belt Sealing Strip Replacement .
- Install the water deflector. Refer to Door Water Deflector Replacement .
- Install the trim panel. Refer to Door Trim Panel Replacement .
Notice: Use the correct fastener in the correct location. Replacement fasteners must be the correct part number for that application. Fasteners requiring replacement or fasteners requiring the use of thread locking compound or sealant are identified in the service procedure. Do not use paints, lubricants, or corrosion inhibitors on fasteners or fastener joint surfaces unless specified. These coatings affect fastener torque and joint clamping force and may damage the fastener. Use the correct tightening sequence and specifications when installing fasteners in order to avoid damage to parts and systems.
Tighten
Tighten the bolt to 11 N·m (97 lb in).
Tighten
Tighten the bolt to 9 N·m (80 lb in).
Important: Avoid lubrication build-up on the window run channels. Ensure that the lubricant does not contact the door window or belt line sealing strips.
