Removal Procedure
- Open the front doors.
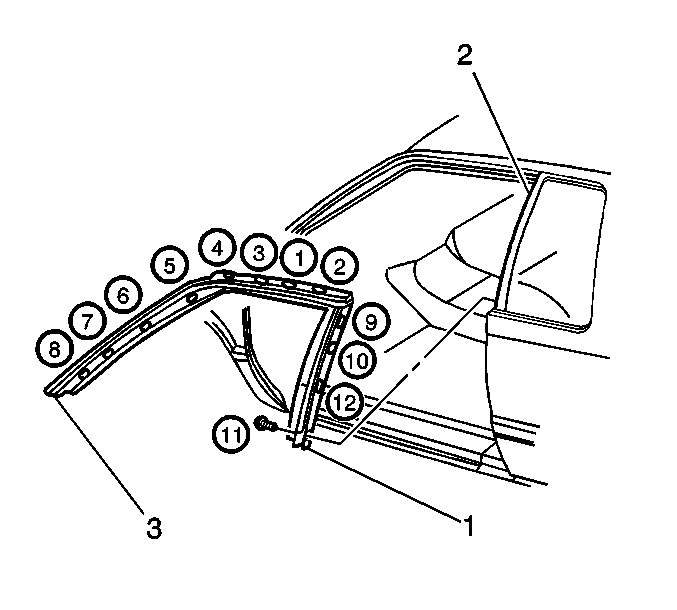
- Remove the door upper weatherstrip (1). Refer to Front Side Door Upper Auxiliary Sealing Strip Replacement .
- Remove the 12 screws securing the weatherstrip retainer to the body.
- Carefully remove the weatherstrip retainer (1).

Installation Procedure
- All the screws must be torqued in sequence to prevent any water leaks from occurring.
- Install the weatherstrip retainer (1) to the roof, A-pillar and B-pillar.
- Install the retainer over the quarter window joint plate at an angle.
- Slide the retainer rearward in order to achieve a net fit between the retainer molding and quarter window shoulder.
- When installing the screws (1-4) in sequence, apply inboard pressure in order to close the gap at the roof rail. Ensure the close-out lip does not fold onto itself, pull out as needed.
- Install the screws (1-4).
- While torquing the screws (5-8) apply inboard pressure in order to close the gap at the A-pillar.
- Insert an awl in the locator hole at the B-pillar in order to align the retainer for the screws (9-12).
- Remove the awl and torque the remaining screw to 1.5 N·m (13 lb in).
- Install the door upper weatherstrip (1). Refer to Front Side Door Upper Auxiliary Sealing Strip Replacement .
- Close the doors.
Important: Operations with the screw installation must follow the mandatory sequence as shown in the illustration.
Important: Do not use the blowout clip to force the retainer over the quarter window joint.
Notice: Use the correct fastener in the correct location. Replacement fasteners must be the correct part number for that application. Fasteners requiring replacement or fasteners requiring the use of thread locking compound or sealant are identified in the service procedure. Do not use paints, lubricants, or corrosion inhibitors on fasteners or fastener joint surfaces unless specified. These coatings affect fastener torque and joint clamping force and may damage the fastener. Use the correct tightening sequence and specifications when installing fasteners in order to avoid damage to parts and systems.
Tighten
Tighten the screws in sequence (1-4) to 1.5 N·m
(13 lb in).
Tighten
Tighten the screws (5-8) to 1.5 N·m (13 lb in).
Tighten
Tighten the screws (9,10,12) to 1.5 N·m (13 lb in).
