Tools Required
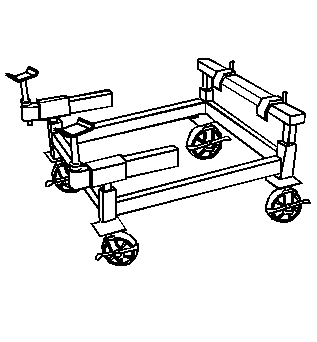
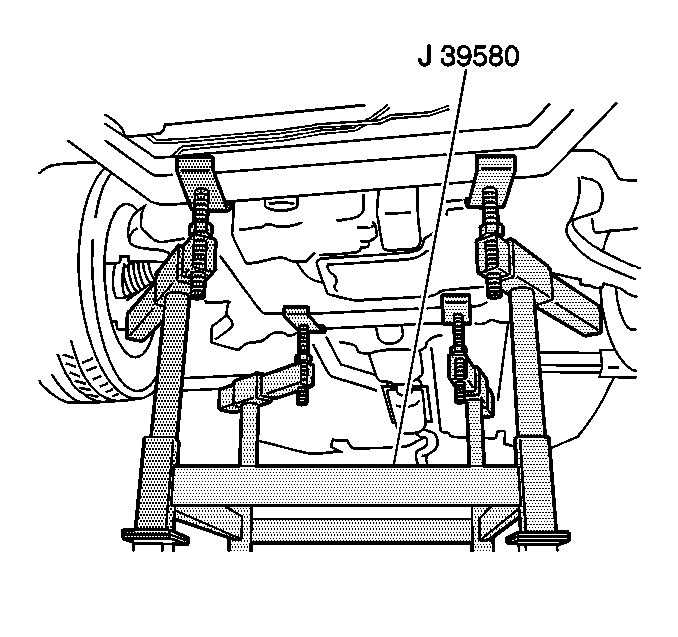
J 39580 Engine Support Table
Removal Procedure
- Install the engine support fixture. Refer to Engine Support Fixture in Engine Mechanical-4.6L.
- Raise and support the vehicle. Refer to Lifting and Jacking the Vehicle in General Information.
- Remove the front tires and wheels. Refer to Tire and Wheel Removal and Installation in Tires and Wheels.
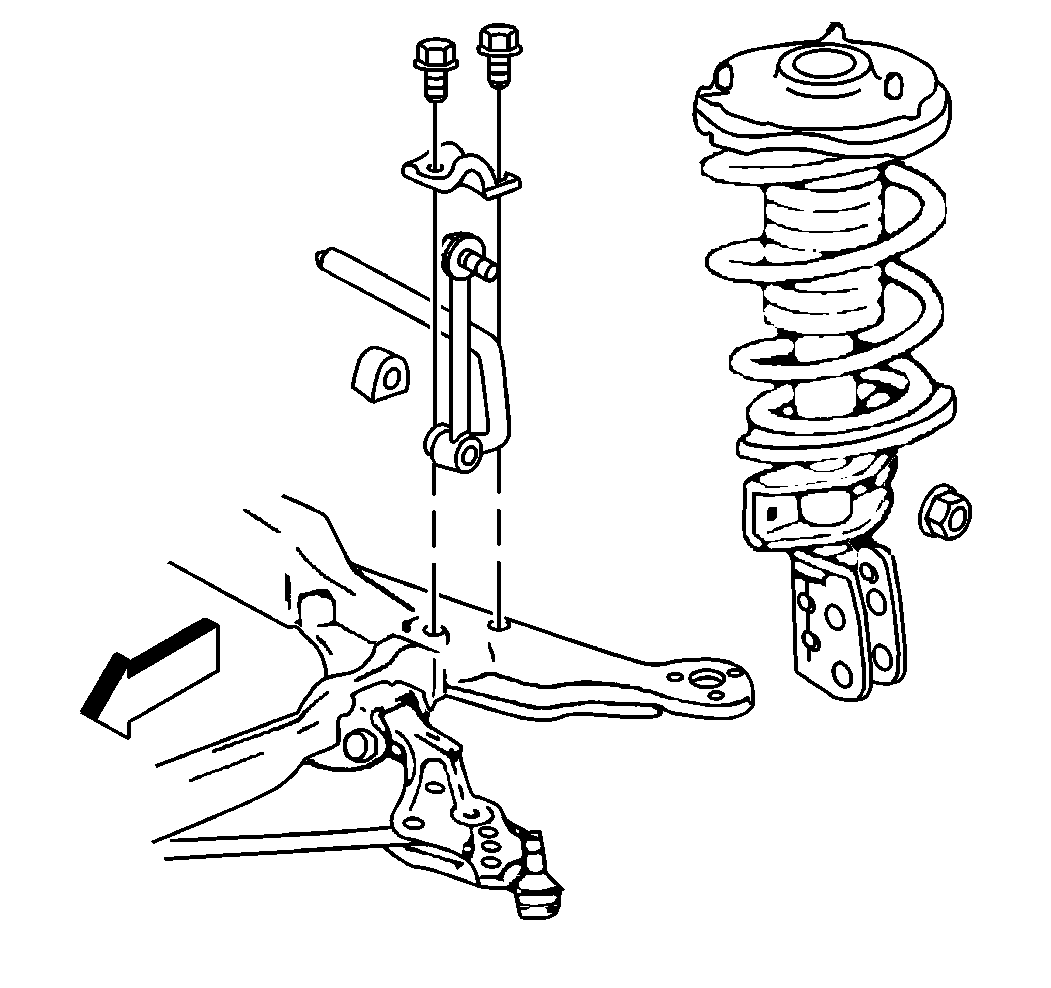
- Remove the lower control arms. Refer to Lower Control Arm Replacement in Front Suspension.
- Remove the front air deflector. Refer to Front Air Deflector Replacement in Body Front End.
- Remove the engine splash shield. Refer to Engine Splash Shield Replacement in Body Front End.
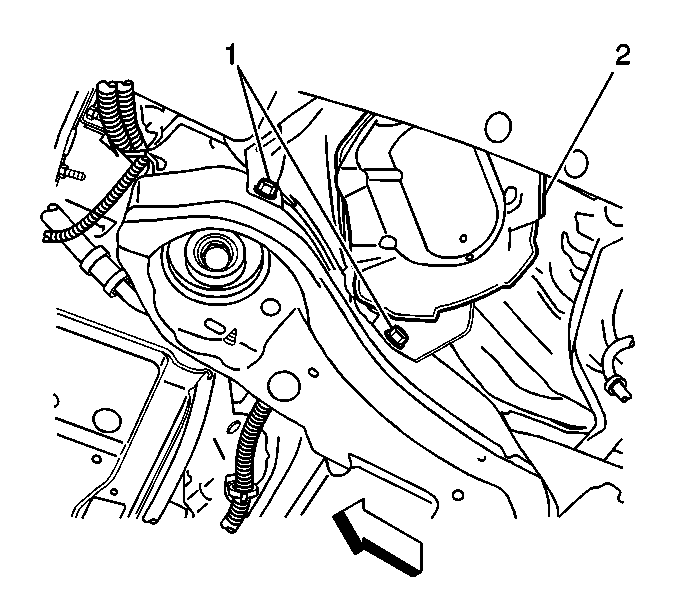
- Remove the secondary air injection pump (2). Refer to Secondary Air Injection Pump Replacement in Engine Controls-4.6L.
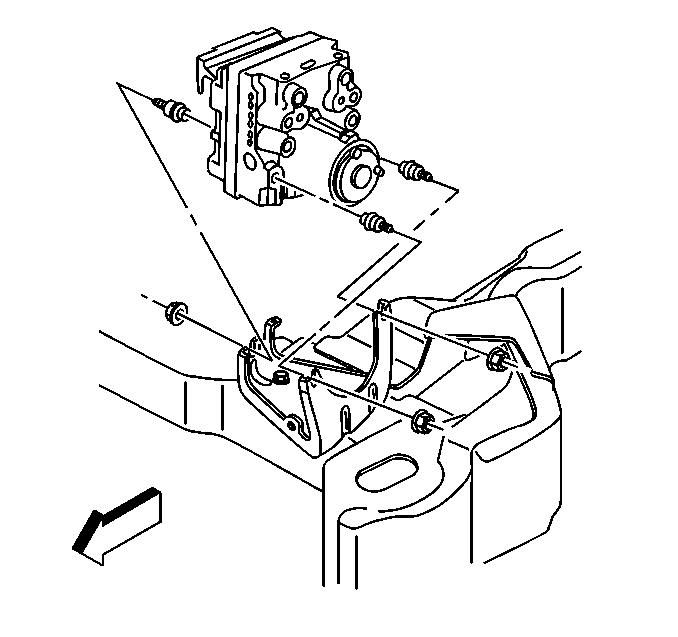
- Remove the brake pressure modulator valve (BPMV). Refer to Brake Pressure Modulator Valve Replacement in Antilock Brake System.
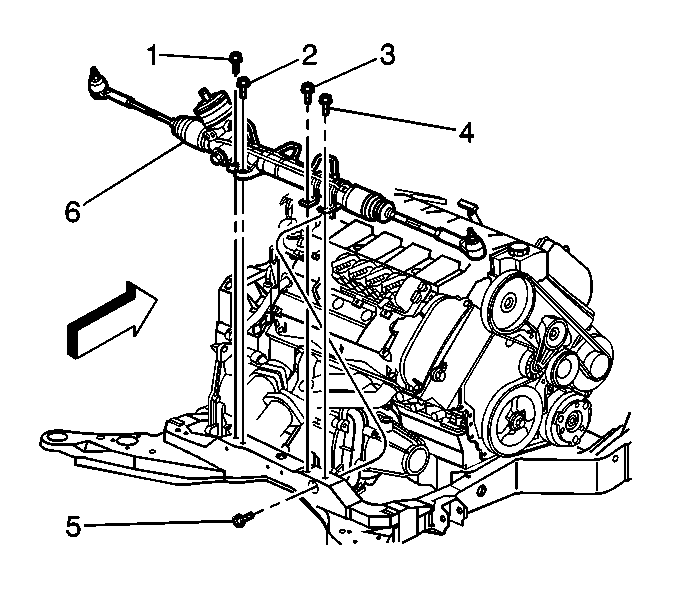
- Remove the fasteners (1,2,3,4) and the horizontal fastener (5) retaining the rack and pinion (6) to the engine frame. Refer to Steering Gear Replacement in Power Steering System.
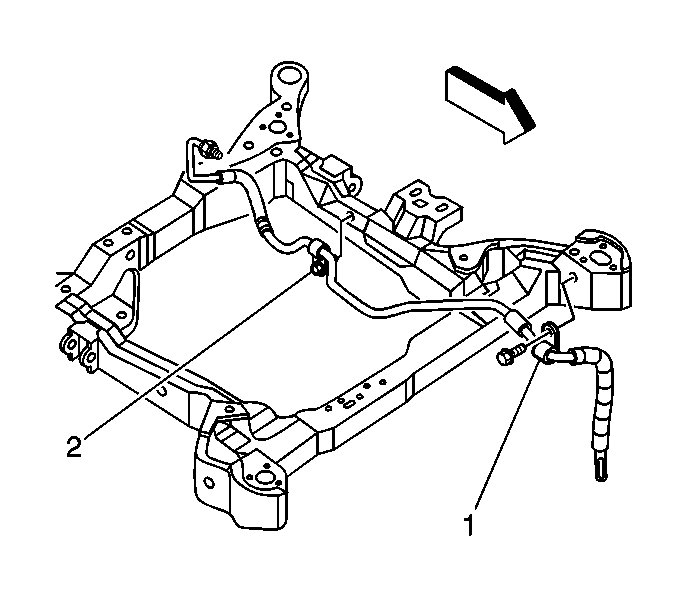
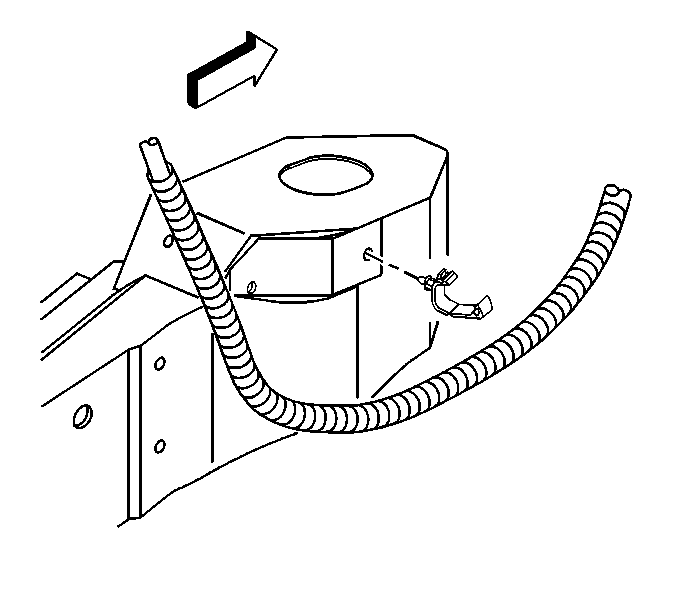
- Remove the bracket bolt (1) and the retainer clip (2) securing the power steering gear outlet hose to the frame.
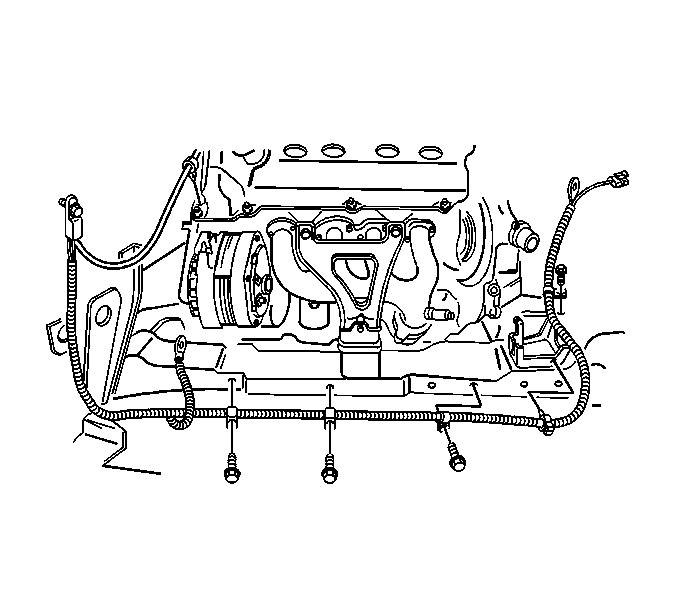
- Remove the fasteners retaining the positive battery cable to the front of the engine frame.
- Disconnect the retainer securing the cable to the brake pressure modulator valve bracket.
- Secure the battery cable away from the frame.
- Disconnect the brake pipe line from the retainer clips on the engine frame.
- Disconnect the engine electrical harness from the retainer clips and position away from the frame.
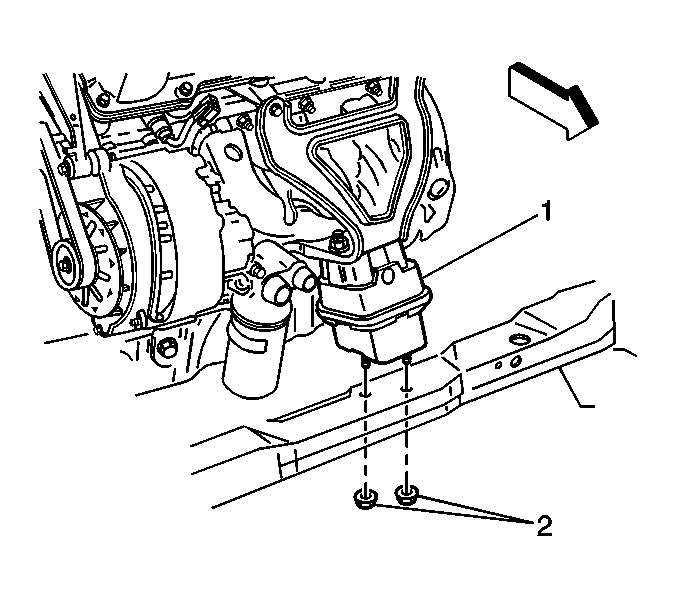
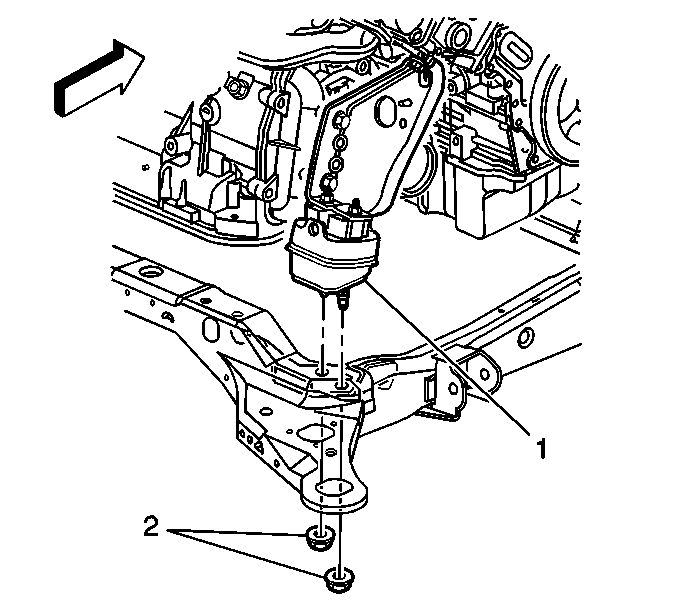
- Remove the fasteners (2) retaining the front engine mount (1) to the engine frame. Refer to Engine Front Mount Replacement in Engine Mechanical-4.6L.
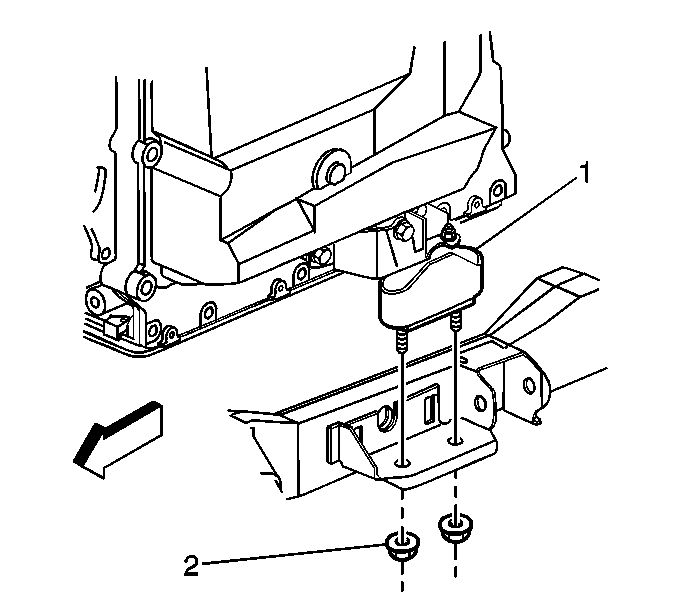
- Remove the fasteners (2) retaining the right transaxle mount (1) to the engine frame. Refer to Automatic Transmission Mount Replacement - Right Side in Transmission/Transaxle.
- Remove the fasteners (2) securing the left transaxle mount (1) to the engine frame. Refer to Transmission Mount Replacement - Left Side in Transmission/Transaxle.
- Remove the stabilizer. Refer to Stabilizer Shaft Replacement in Suspension.
- Lower the vehicle until the engine frame rests on theJ 39580 or on suitable jack stands.
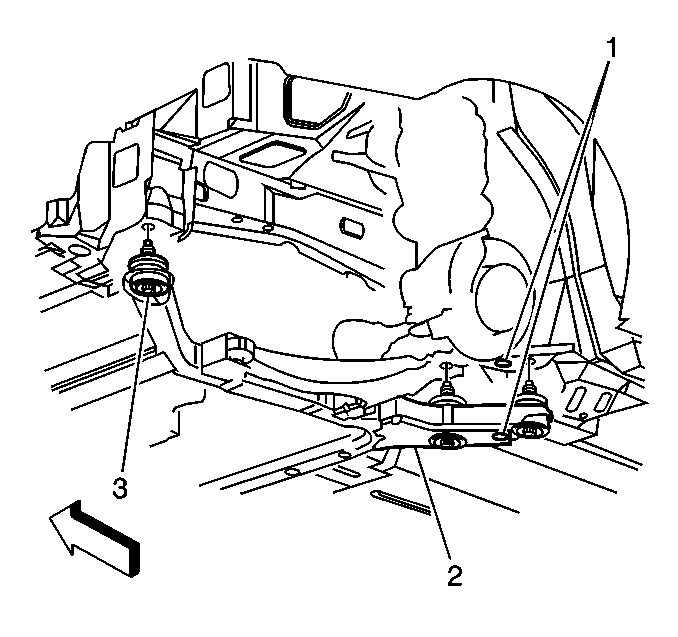
- Remove the engine frame insulator fasteners (3) retaining the engine frame (2) to the vehicle (1).
- Raise the vehicle from the supported engine frame (2).
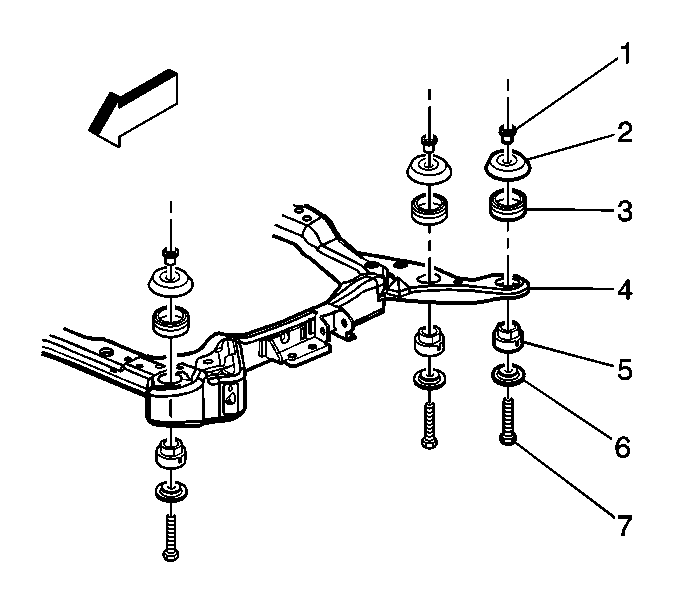
- Separate the engine frame insulators (3,5) from the engine frame (4). Refer to Frame Cushion or Insulator Replacement .
- With the aid from an assistant, remove the frame from the J 39580 or the suitable jack stands.
Notice: Ensure that lowering the frame does not interfere with the bumper fascia or fascia damage may result.
Installation Procedure
- With the aid from an assistant, position the new frame onto the J 39580 or suitable jack stands.
- Install the lower control arms to the frame. Refer to Lower Control Arm Replacement in Suspension.
- Assemble the engine frame insulators , in sequence, to the engine frame (4). Refer to Frame Cushion or Insulator Replacement .
- Lower the vehicle onto the supported engine frame (2).
- Using 203 mm (8 in) x 16 mm (0.63 in) dowel pins in the right and left rear alignment holes (1), align the engine frame (2) to the vehicle.
- Install the engine frame insulator fasteners (3) to retain the engine frame (2) to the vehicle.
- Raise the vehicle away from the J 39580 or the suitable jack stands.
- Remove the J 39580 or suitable jack stands from under the vehicle.
- Install the bolts in order to retain the stabilizer shaft. Refer to Stabilizer Shaft Replacement in Suspension.
- Install the fasteners (2) in order to secure the left transaxle mount (1) to the engine frame. Refer to Transmission Mount Replacement - Left Side in Transmission/Transaxle.
- Install the fasteners (2) retaining the front engine mount (1) to the engine frame. Refer to Engine Front Mount Replacement in Engine Mechanical-4.6L.
- Install the fasteners (2) retaining the front right transaxle mount (1) to the engine frame. Refer to Automatic Transmission Mount Replacement - Right Side in Transmission/Transaxle.
- Install the fasteners in sequence (1,2,3,4) and the horizontal fastener (5) retaining the rack and pinion to the engine frame. Refer to Steering Gear Replacement in Power Steering System.
- Connect the engine electrical harness to the retainer clips in order to secure.
- Position the positive battery cable to the front of the engine frame.
- Install the fasteners in order to secure the positive battery cable to the engine frame.
- Secure the retainer for the battery cable to the brake pressure modulator valve bracket.
- Attach the brake pipe line to the retainer clips at the front of the engine frame in order to secure.
- Install the bracket bolt (1) and engage the retainer clip (2) in order to secure the power steering gear outlet hose to the frame.
- Close the retainer clip in order to retain the power steering line to the engine frame. Refer to Power Steering Cooler Pipe/Hose Replacement in Steering.
- Install the brake pressure modulator valve (BPMV). Refer to Brake Pressure Modulator Valve Replacement in Antilock Brake System.
- Install the secondary air injection pump (2). Refer to Secondary Air Injection Pump Replacement in Engine Controls-4.6L.
- Install the engine splash shield. Refer to Engine Splash Shield Replacement in Body Front End.
- Install the air deflector. Refer to Front Air Deflector Replacement in Body Front End.
- Install the front tires and wheels. Refer to Tire and Wheel Removal and Installation in Tires and Wheels.
- Lower the vehicle.
- Remove the engine support fixture. Refer to Engine Support Fixture in Engine Mechanical-4.6L.
- Torque the lower control arm bolts. Refer to Lower Control Arm Replacement in Front Suspension.
Important: Apply vehicle weight to the front suspension before tightening the lower control arm retaining bolts.
Notice: Use the correct fastener in the correct location. Replacement fasteners must be the correct part number for that application. Fasteners requiring replacement or fasteners requiring the use of thread locking compound or sealant are identified in the service procedure. Do not use paints, lubricants, or corrosion inhibitors on fasteners or fastener joint surfaces unless specified. These coatings affect fastener torque and joint clamping force and may damage the fastener. Use the correct tightening sequence and specifications when installing fasteners in order to avoid damage to parts and systems.
Tighten
Tighten the fasteners to 98 N·m (72 lb ft).
Notice: Use the correct fastener in the correct location. Replacement fasteners must be the correct part number for that application. Fasteners requiring replacement or fasteners requiring the use of thread locking compound or sealant are identified in the service procedure. Do not use paints, lubricants, or corrosion inhibitors on fasteners or fastener joint surfaces unless specified. These coatings affect fastener torque and joint clamping force and may damage the fastener. Use the correct tightening sequence and specifications when installing fasteners in order to avoid damage to parts and systems.
Tighten
Tighten the fasteners to 6 N·m (53 lb in).
Tighten
Tighten the bracket bolt (1) to 17 N·m (13 lb ft).
Important: Apply vehicle weight to the front suspension before tightening the lower control arm retaining bolts.
