Brake Pressure Modulator Valve Replacement With JL4
Removal Procedure
- Raise and support the vehicle. Refer to Lifting and Jacking the Vehicle .
- Clean all dirt and debris from the BPMV assembly and the brake pipe fittings.
- Disconnect the electronic brake control module (EBCM) electrical connector.
- Release the brake pipe retaining clip (1) from the frame.
- Disconnect the rear brake pipe fittings (2) and (4) from the BPMV (6).
- Remove the rear brake pipes (3) and (5) from the BPMV (6).
- Disconnect the front brake pipe fitting (7) from the BPMV (6).
- Remove the front brake pipe (8) from the BPMV (6) and the retaining clip (9).
- Disconnect the front brake pipe fittings (10) from the BPMV (6).
- Remove the front brake pipes (11) from the BPMV (6).
- Loosen the BPMV bracket bolts.
- Slide the BPMV and bracket assembly toward the front of the vehicle and remove the assembly from the vehicle frame.
- If necessary, remove the EBCM from the BPMV. Refer to Electronic Brake Control Module Replacement .
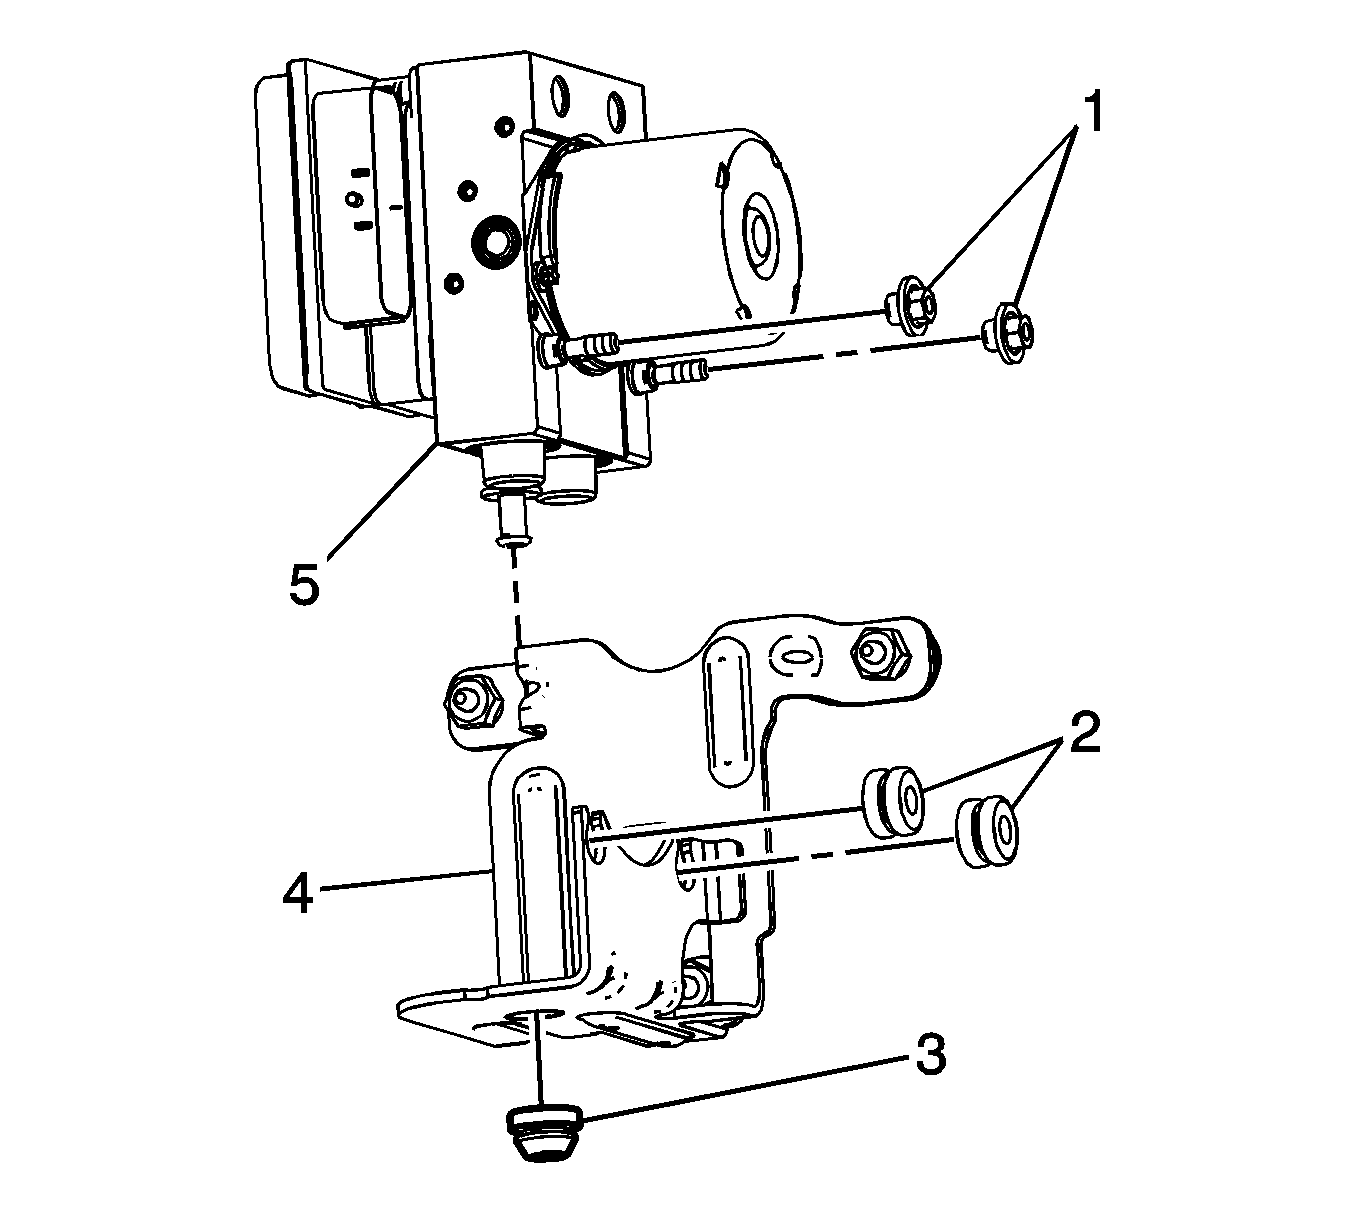
- If removing the BPMV bracket (4) from the BPMV (5), loosen the BPMV mounting nuts (1).
- Carefully lift the BPMV from the bracket to release the front grommets (2).
- Release the BPMV from the lower grommet (3).
Caution: Refer to Brake Fluid Irritant Caution in the Preface section.
Notice: Refer to Brake Fluid Effects on Paint and Electrical Components Notice in the Preface section.
Important: Cap the brake pipes to prevent brake fluid loss and contamination.
Important: Note the location of the brake pipes to the BPMV for proper installation.
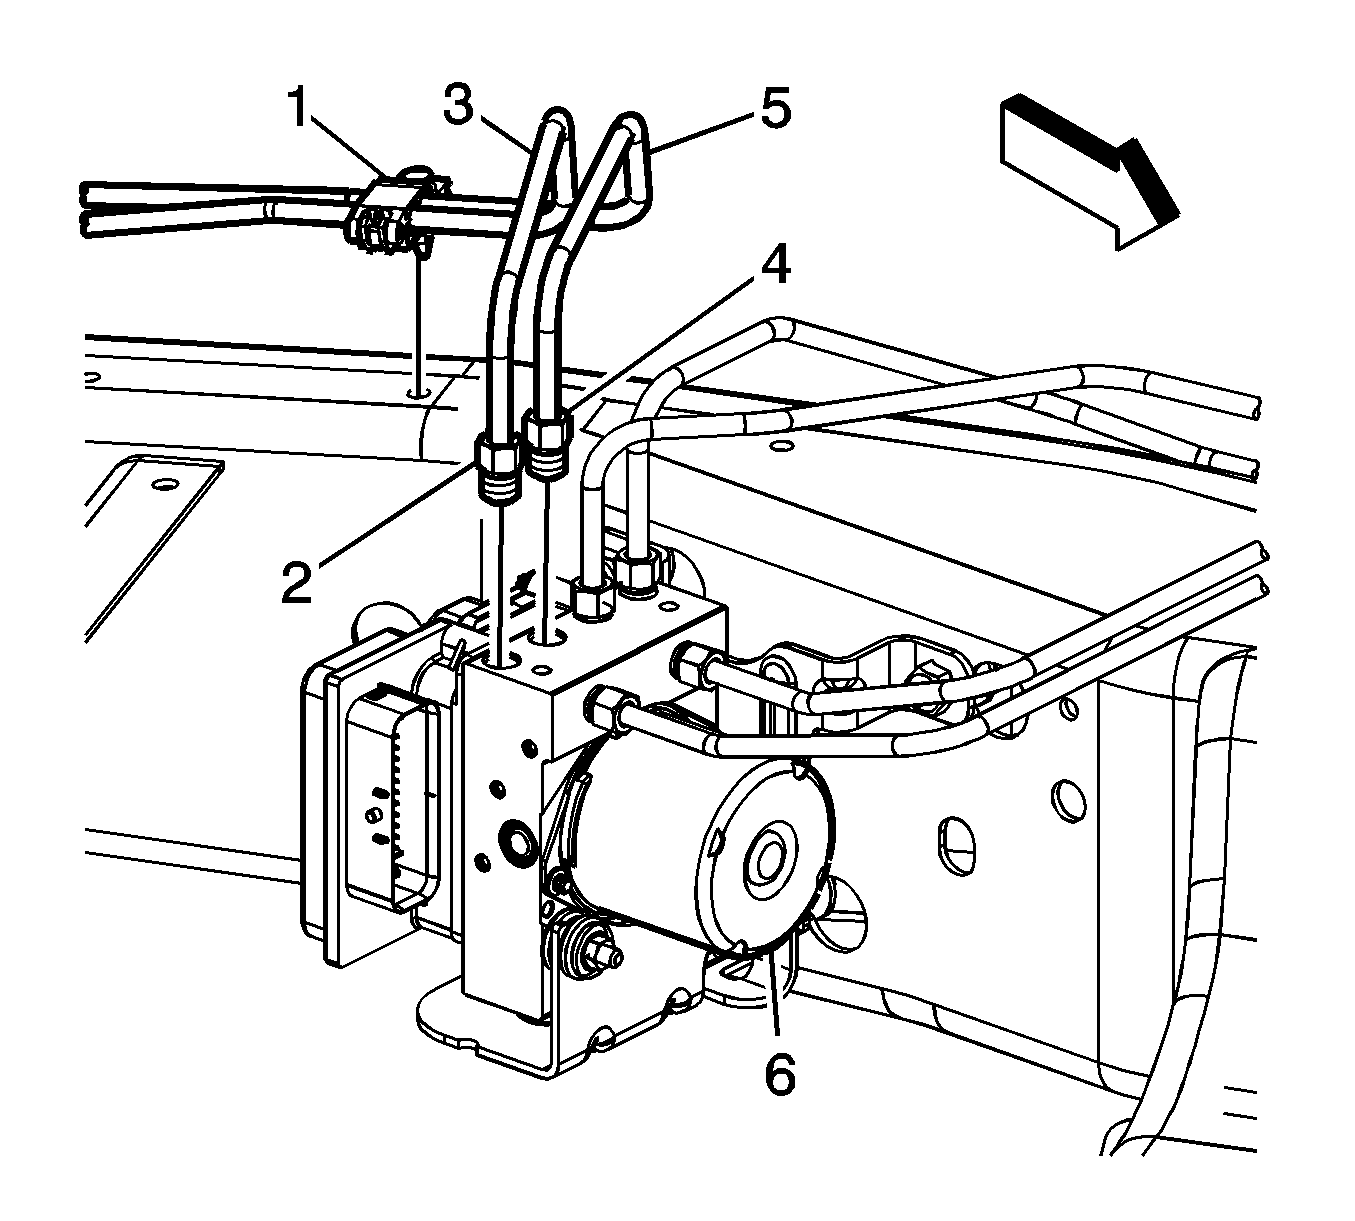
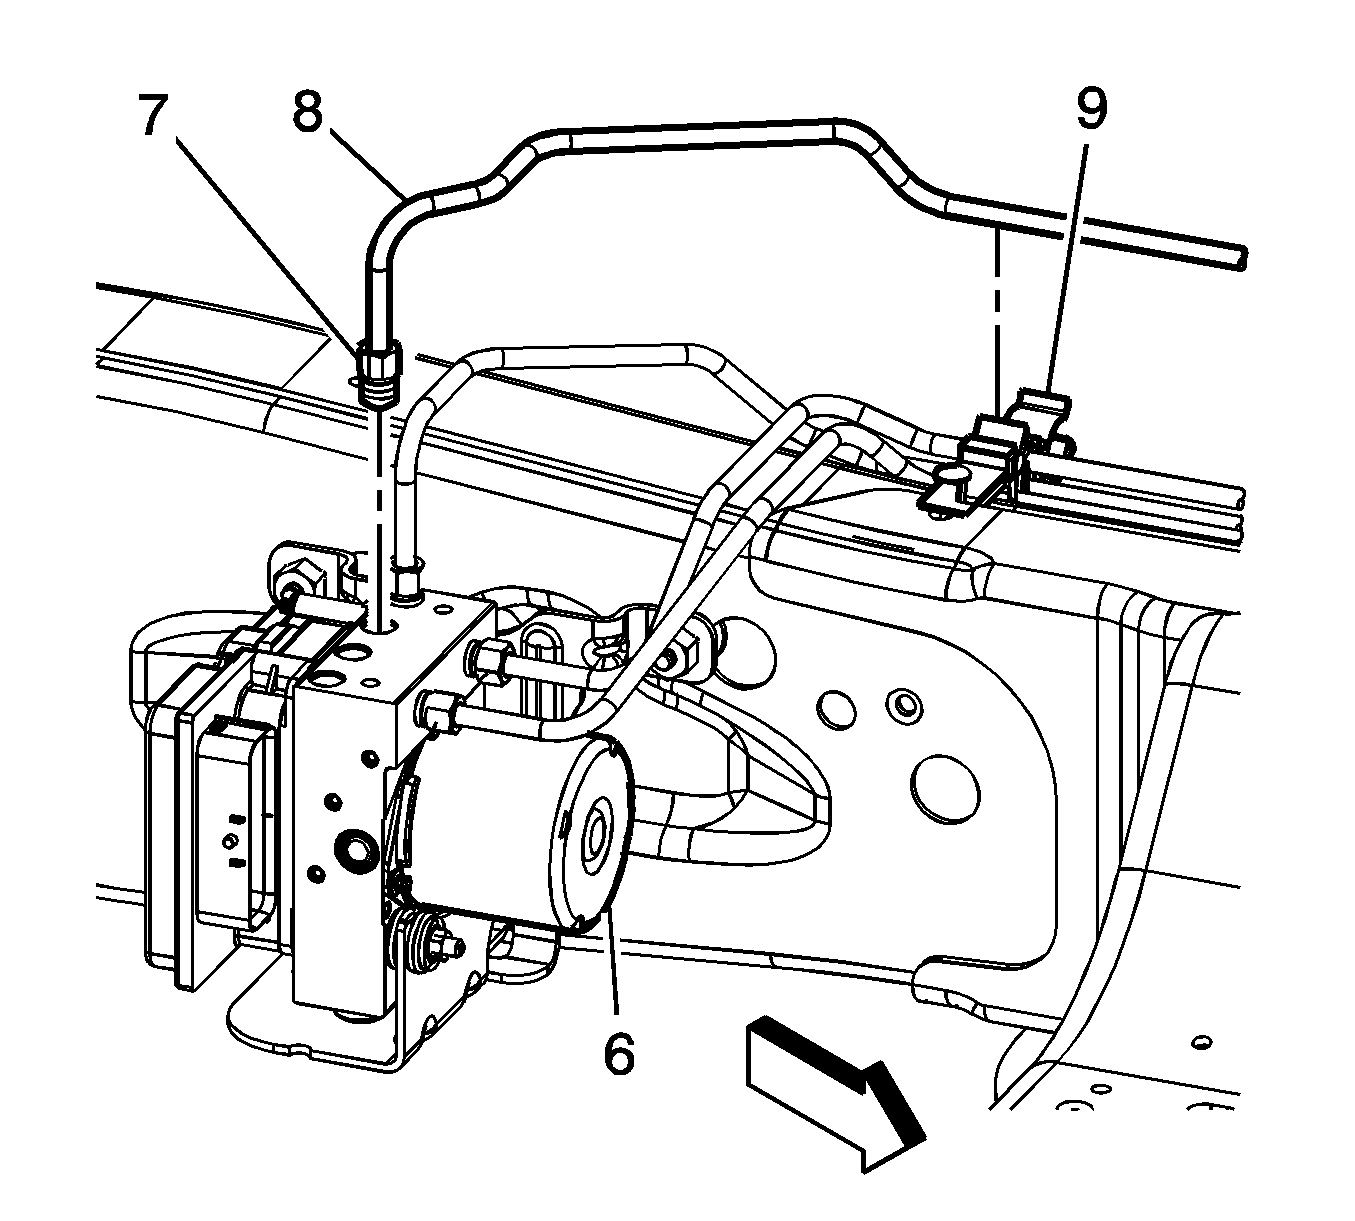
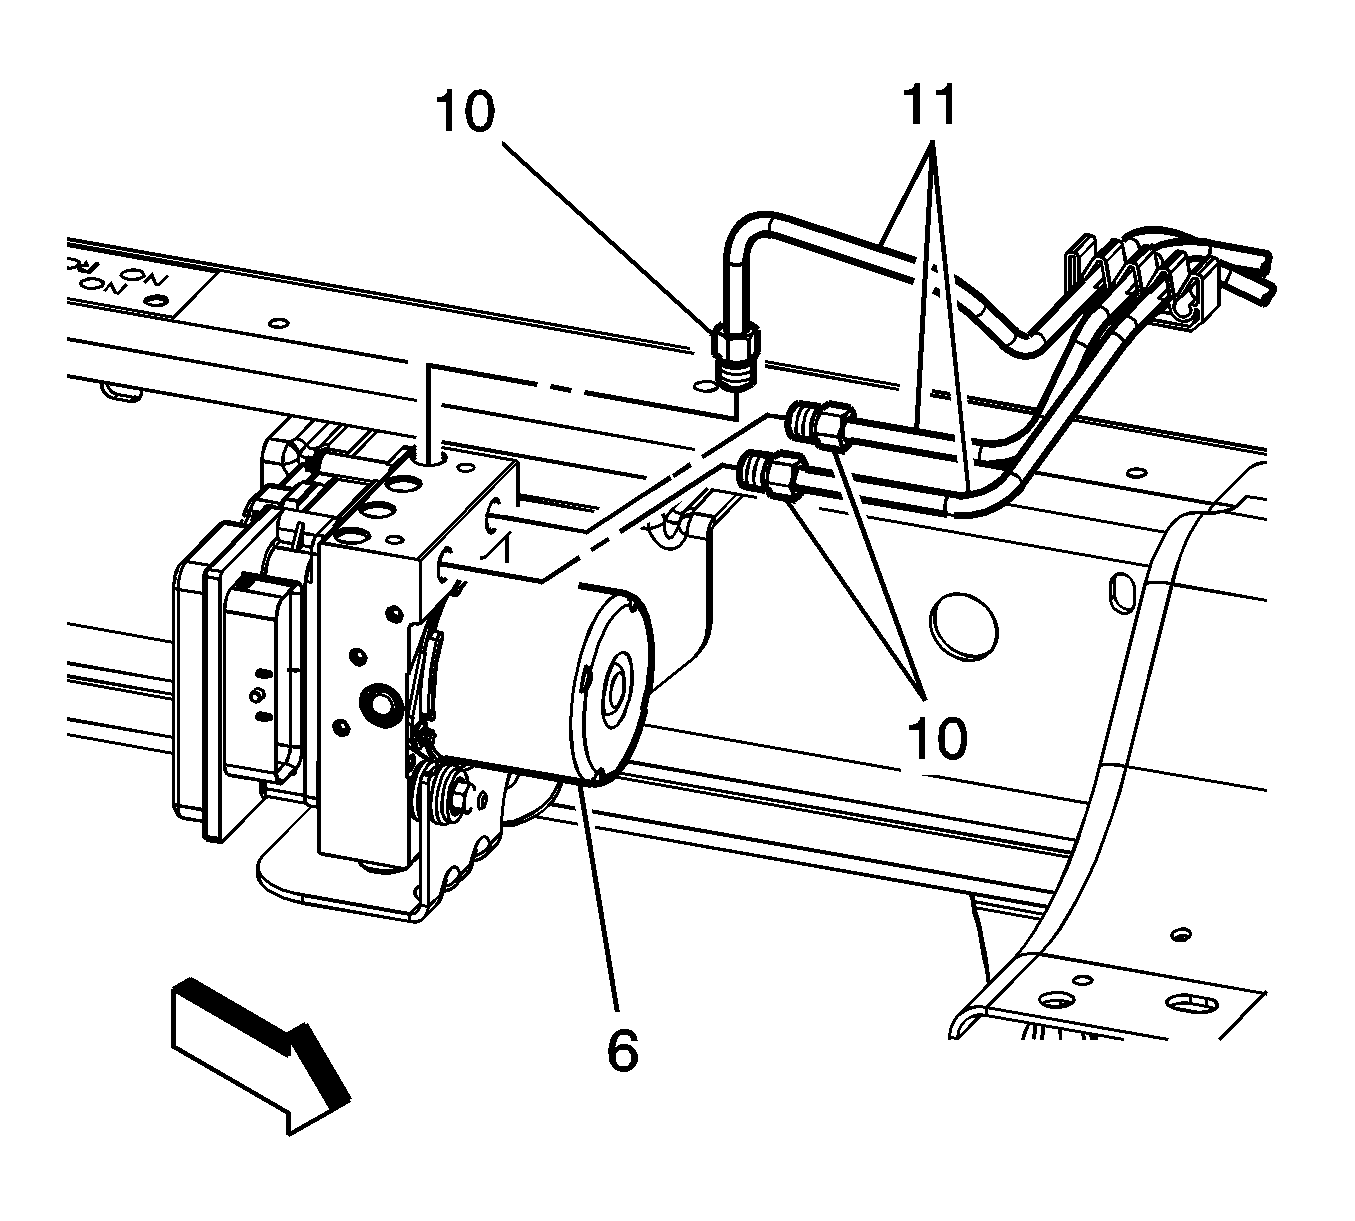
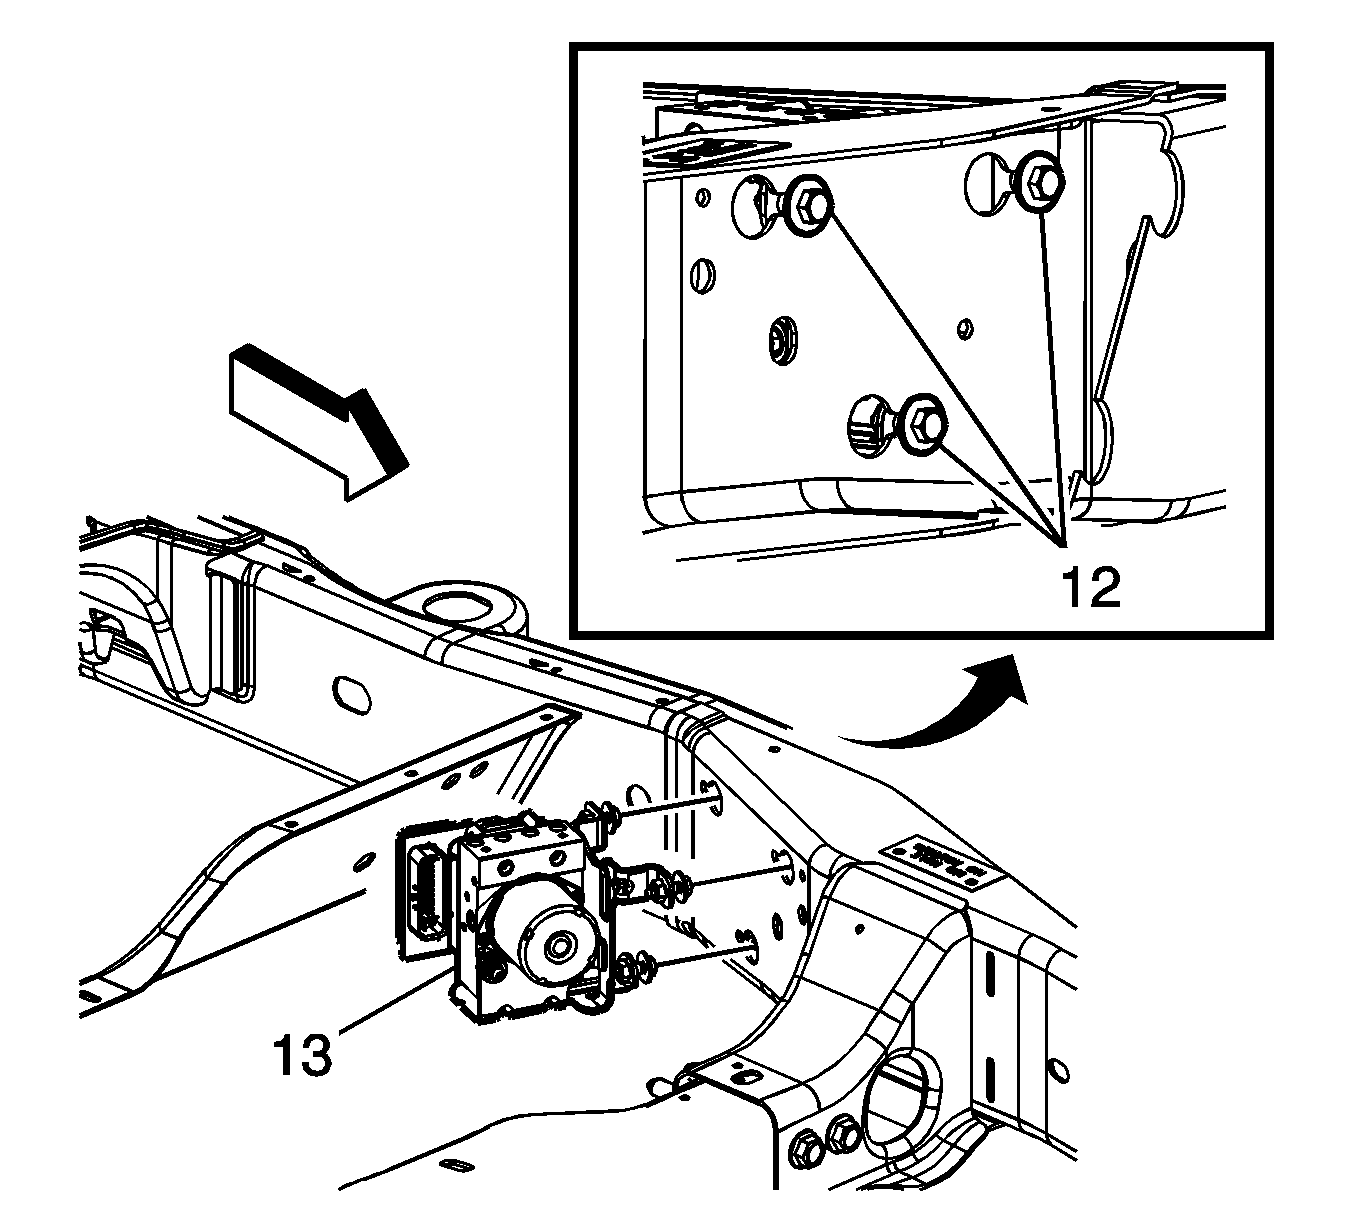
Important: It is not necessary to remove the BPMV bracket bolts.
Important: DO NOT pry against the accumulator piston caps on the bottom of the BPMV.
Installation Procedure
- If removed, install the EBCM. Refer to Electronic Brake Control Module Replacement .
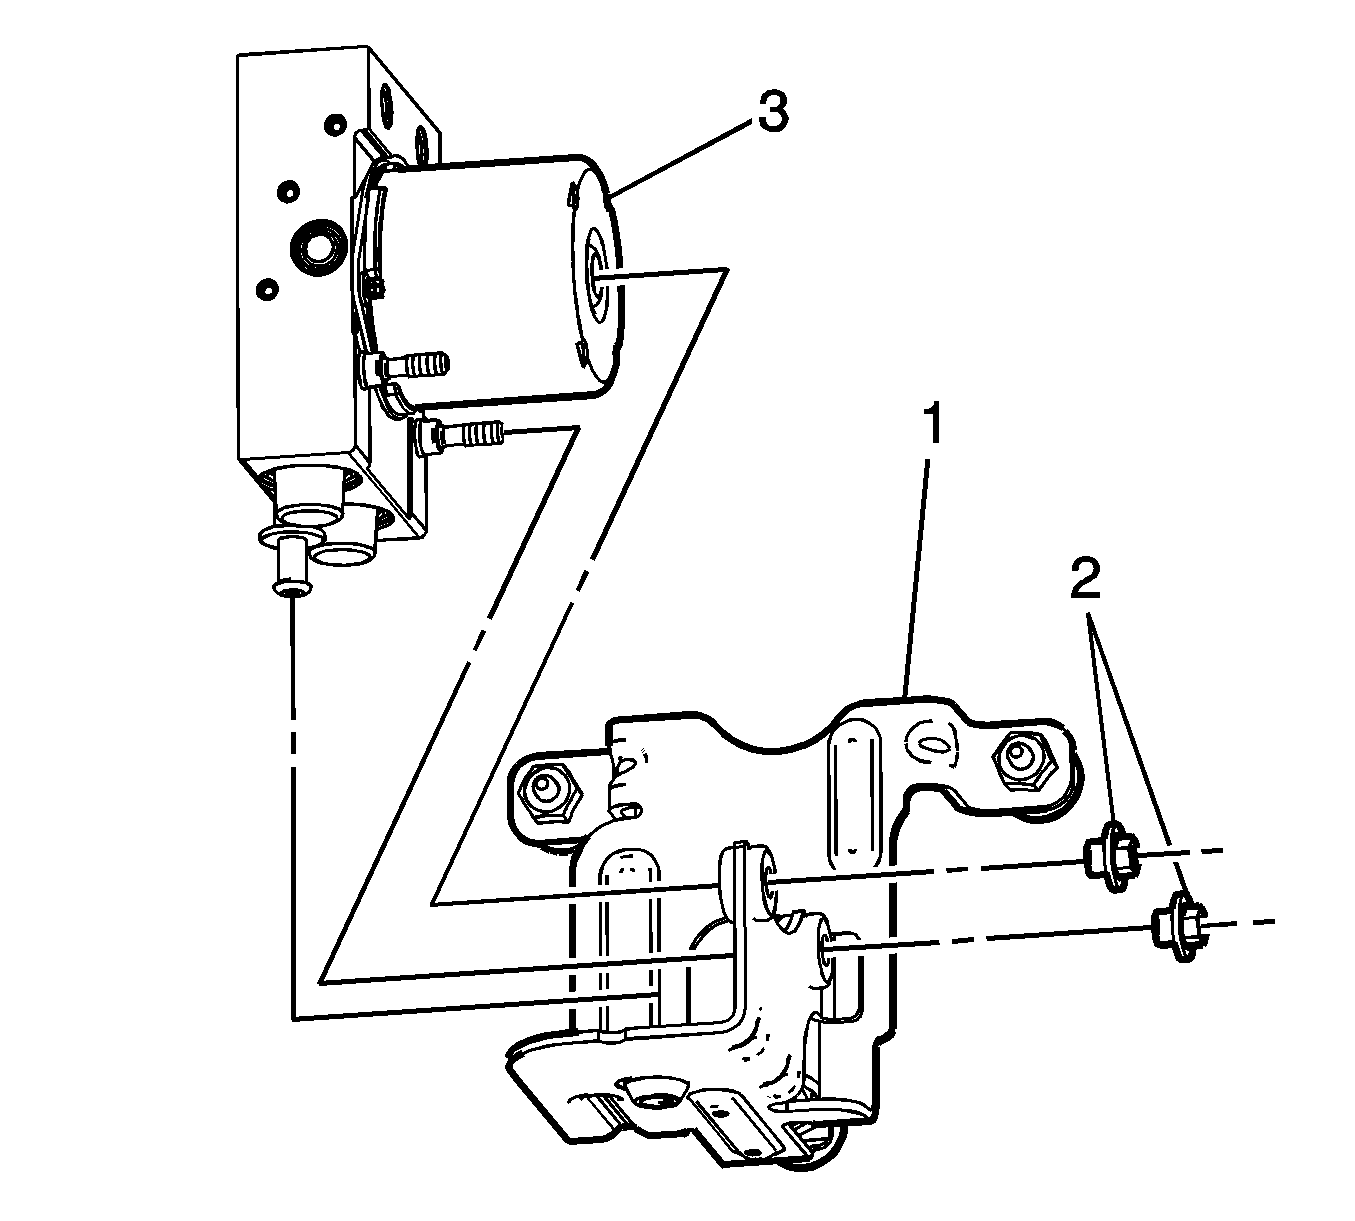
- Position the BPMV (3) to the mounting bracket (1).
- Install the retaining nuts (2) to the BPMV (3).
- Position the BPMV and bracket assembly (13) to the frame.
- Slide the BPMV assembly toward the rear of the vehicle.
- Install the BPMV bracket bolts (12).
- Position the front brake pipes (11) to the BPMV (6).
- Install the front brake pipe fittings (10).
- Position the front brake pipe (8) to the BPMV.
- Install the front brake pipe fitting (7).
- Position the retaining clip (9) to the frame.
- Position the rear brake pipes (3) and (5) to the BPMV (6).
- Install the rear brake pipe fittings (2) and (4).
- Position the retaining clip (1) to the frame.
- Connect the EBCM electrical connector.
- Bleed the BPMV. Refer to Antilock Brake System Automated Bleed Procedure .
- Calibrate the brake pressure sensor. Refer to Electronic Brake Control Module Programming and Setup .
Notice: Refer to Fastener Notice in the Preface section.
Tighten
Tighten to 9 N·m (80 lb in).

Tighten
Tighten the bolts to 22 N·m (16 lb in).

Tighten
Tighten the fittings to 18 N·m (13 lb ft).

Tighten
Tighten the fitting to 18 N·m (13 lb ft).

Tighten
Tighten the fittings to 18 N·m (13 lb ft).
Brake Pressure Modulator Valve Replacement Without JL4
Removal Procedure
Caution: Refer to Brake Fluid Irritant Caution in the Preface section.
Notice: Refer to Brake Fluid Effects on Paint and Electrical Components Notice in the Preface section.
Important: Cap the brake pipe fittings to prevent brake fluid loss and contamination.
- Raise and support the vehicle. Refer to Lifting and Jacking the Vehicle .
- Clean all dirt and debris from the brake pressure modulator valve (BPMV) assembly and the brake pipe fittings.
- Disconnect the electronic brake control module (EBCM) electrical connector.
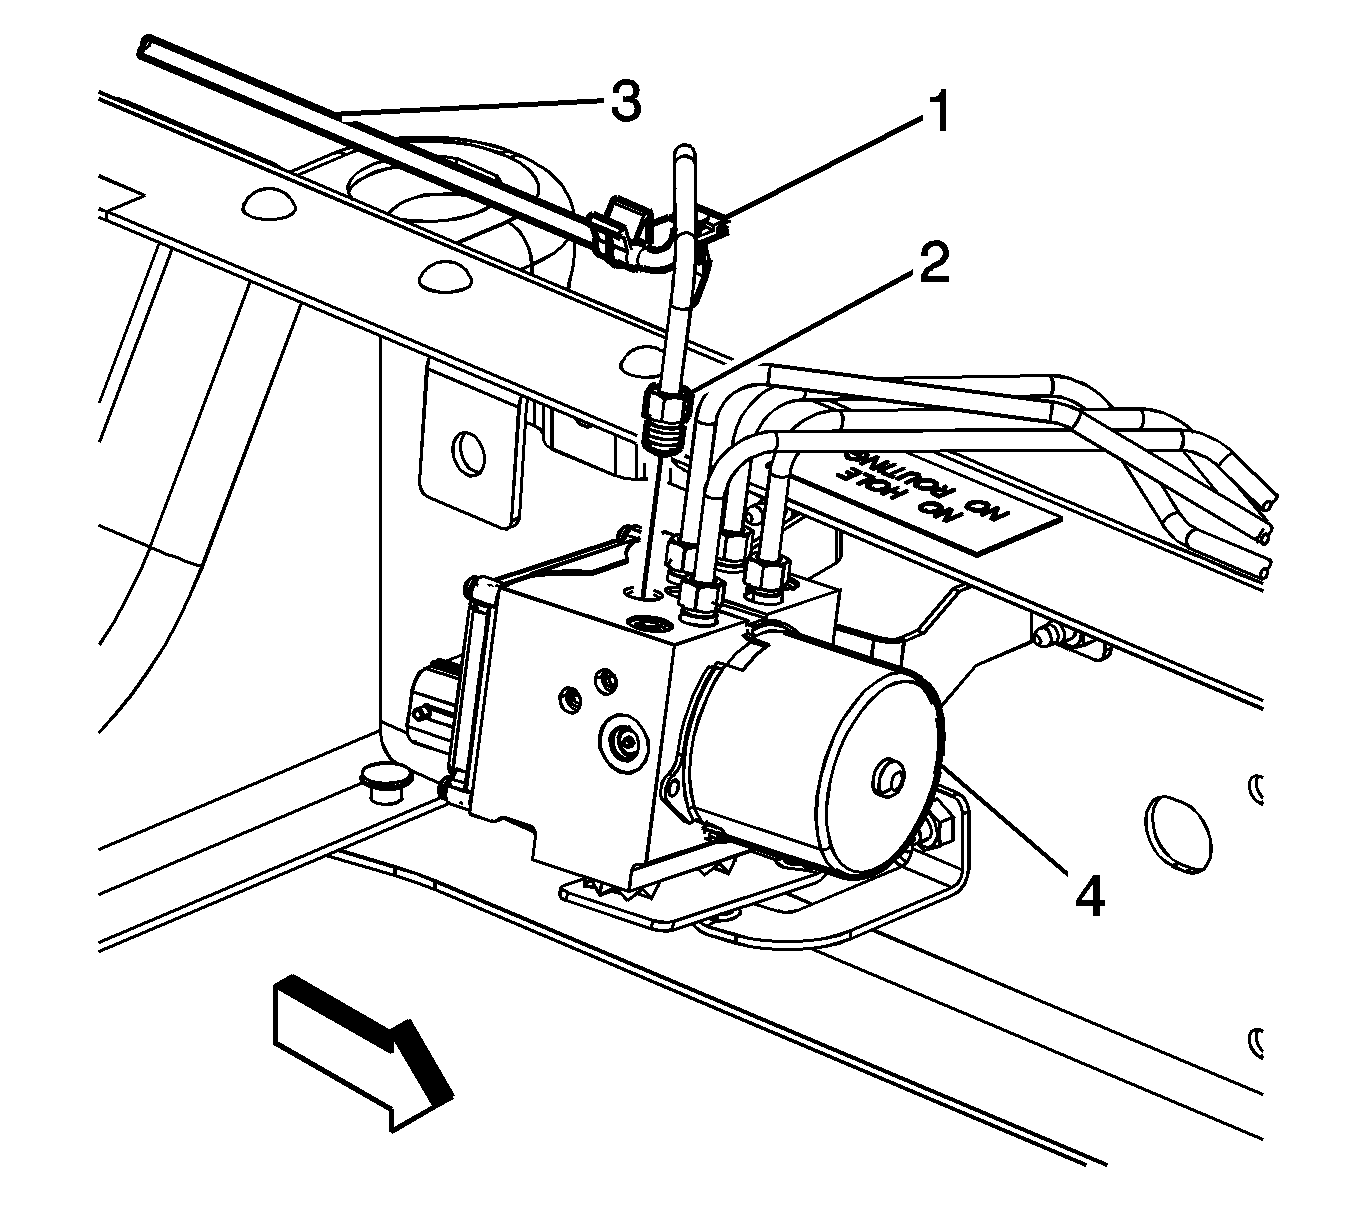
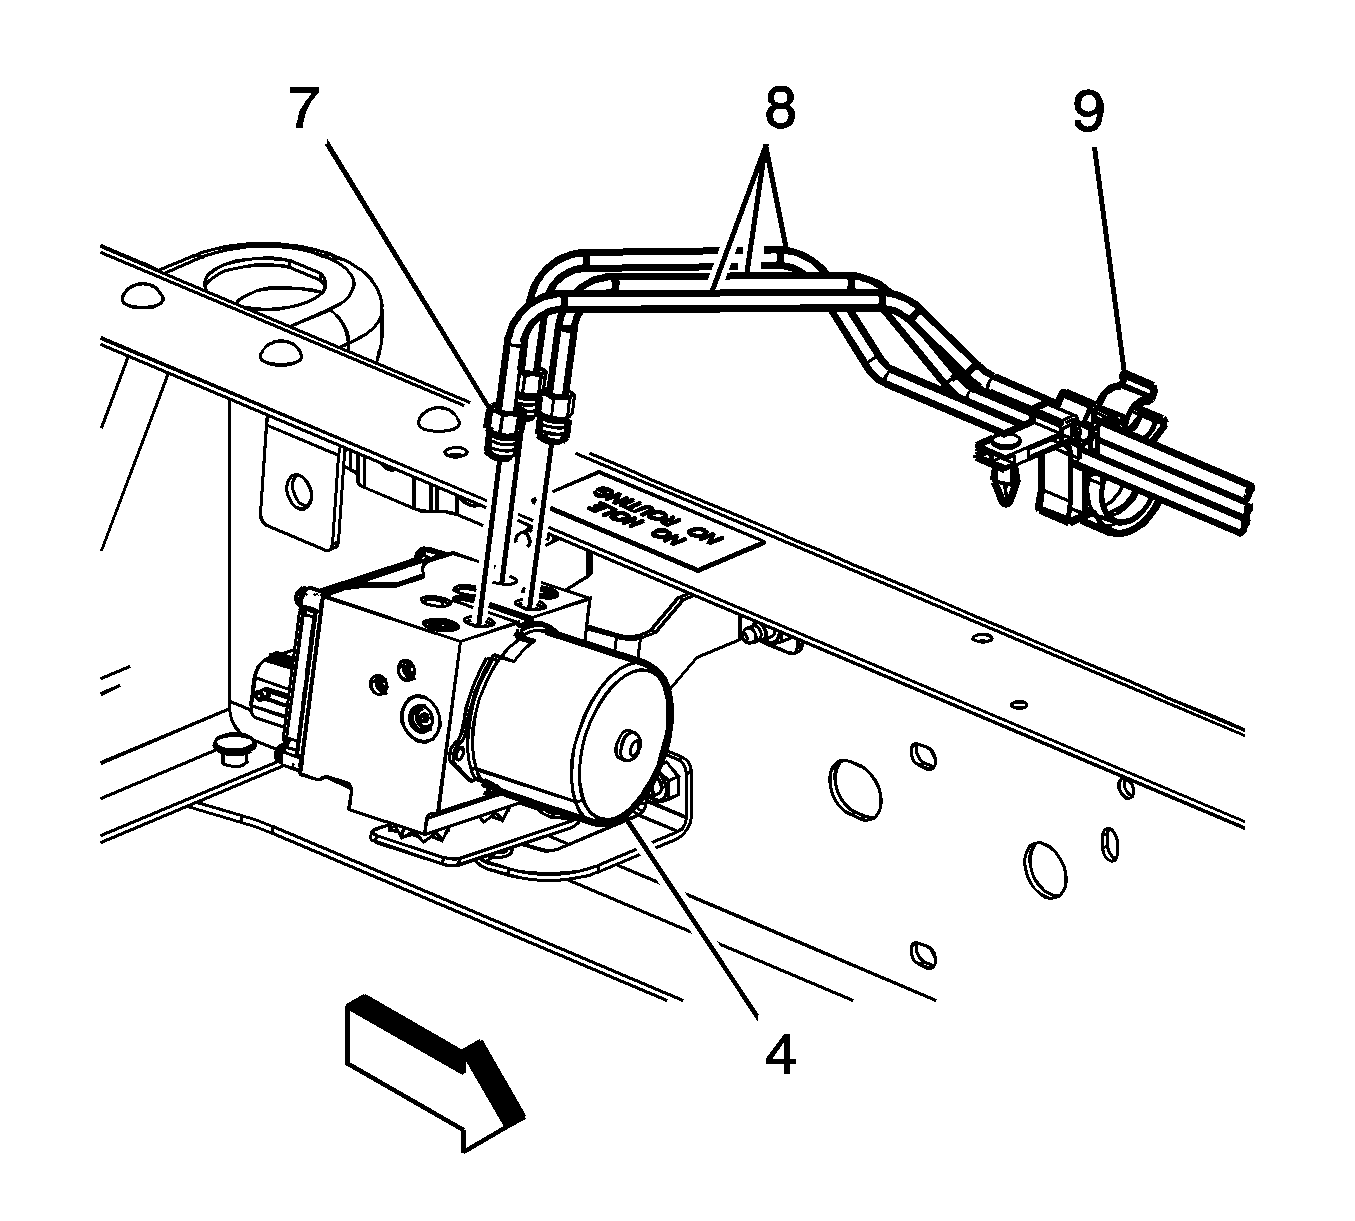
- Release the brake pipe retaining clip (1) from the frame.
- Disconnect the rear brake pipe fitting (2) from the BPMV (4).
- Remove the rear brake pipe (3) from the BPMV (4).
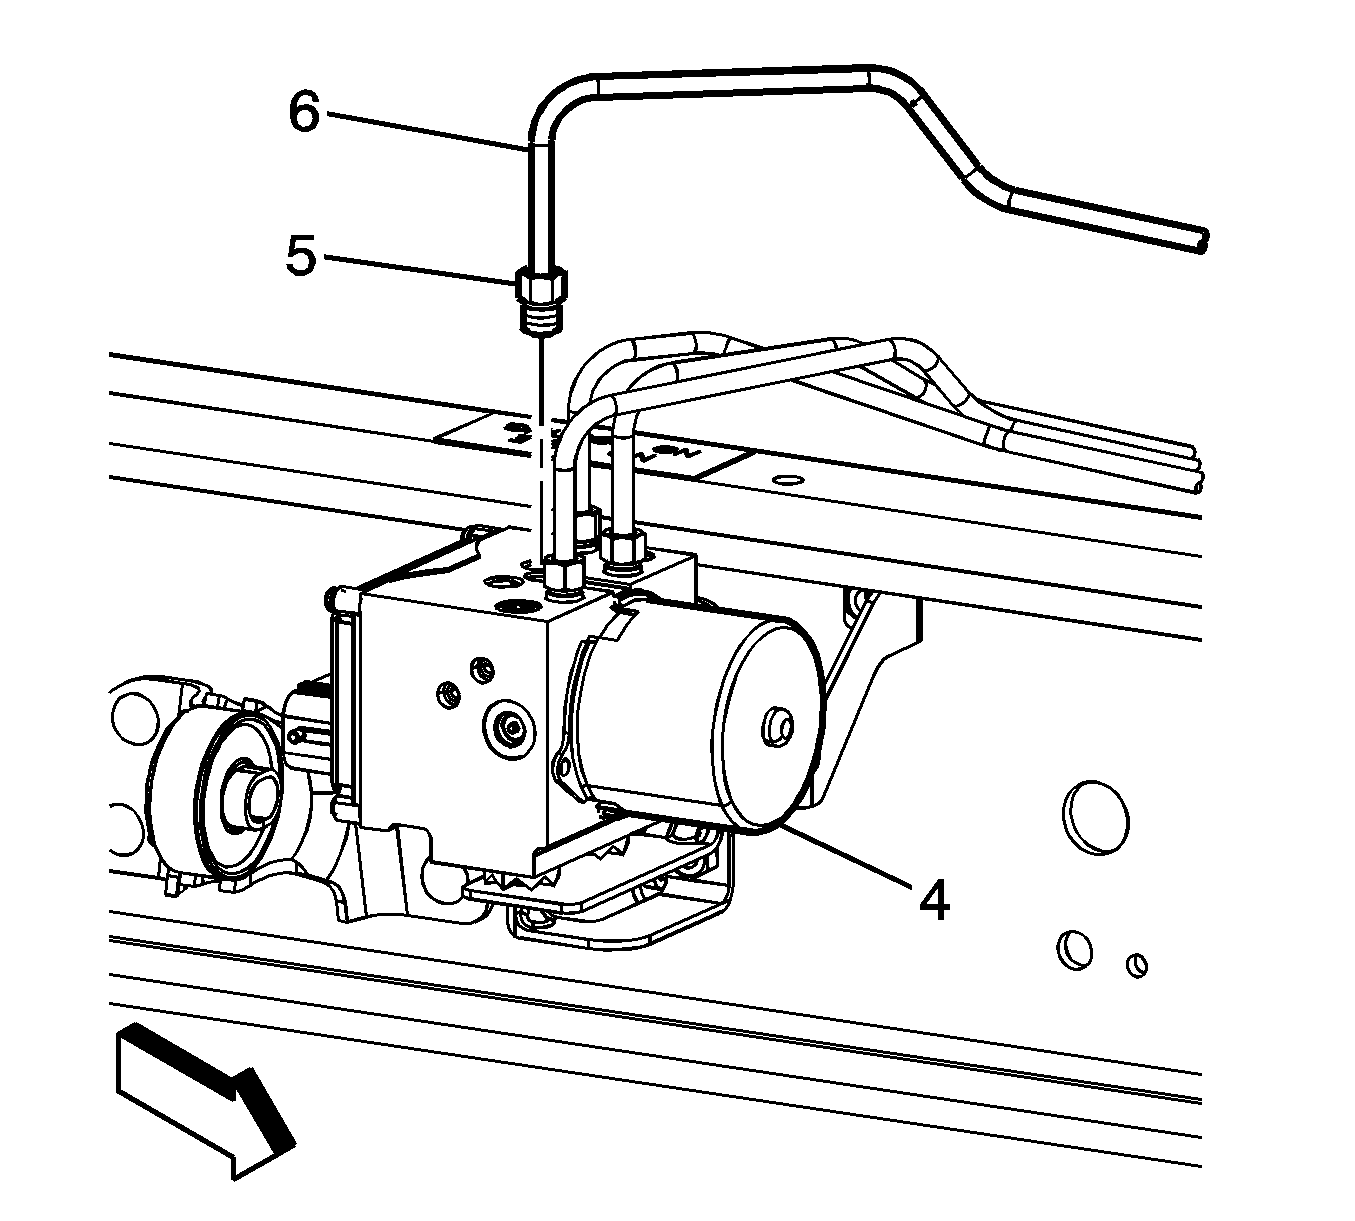
- Disconnect the front brake pipe fitting (5) and remove the front brake pipe (6).
- Disconnect the front brake pipe fittings (7).
- Remove the front brake pipes (8) and the frame retainer (9).
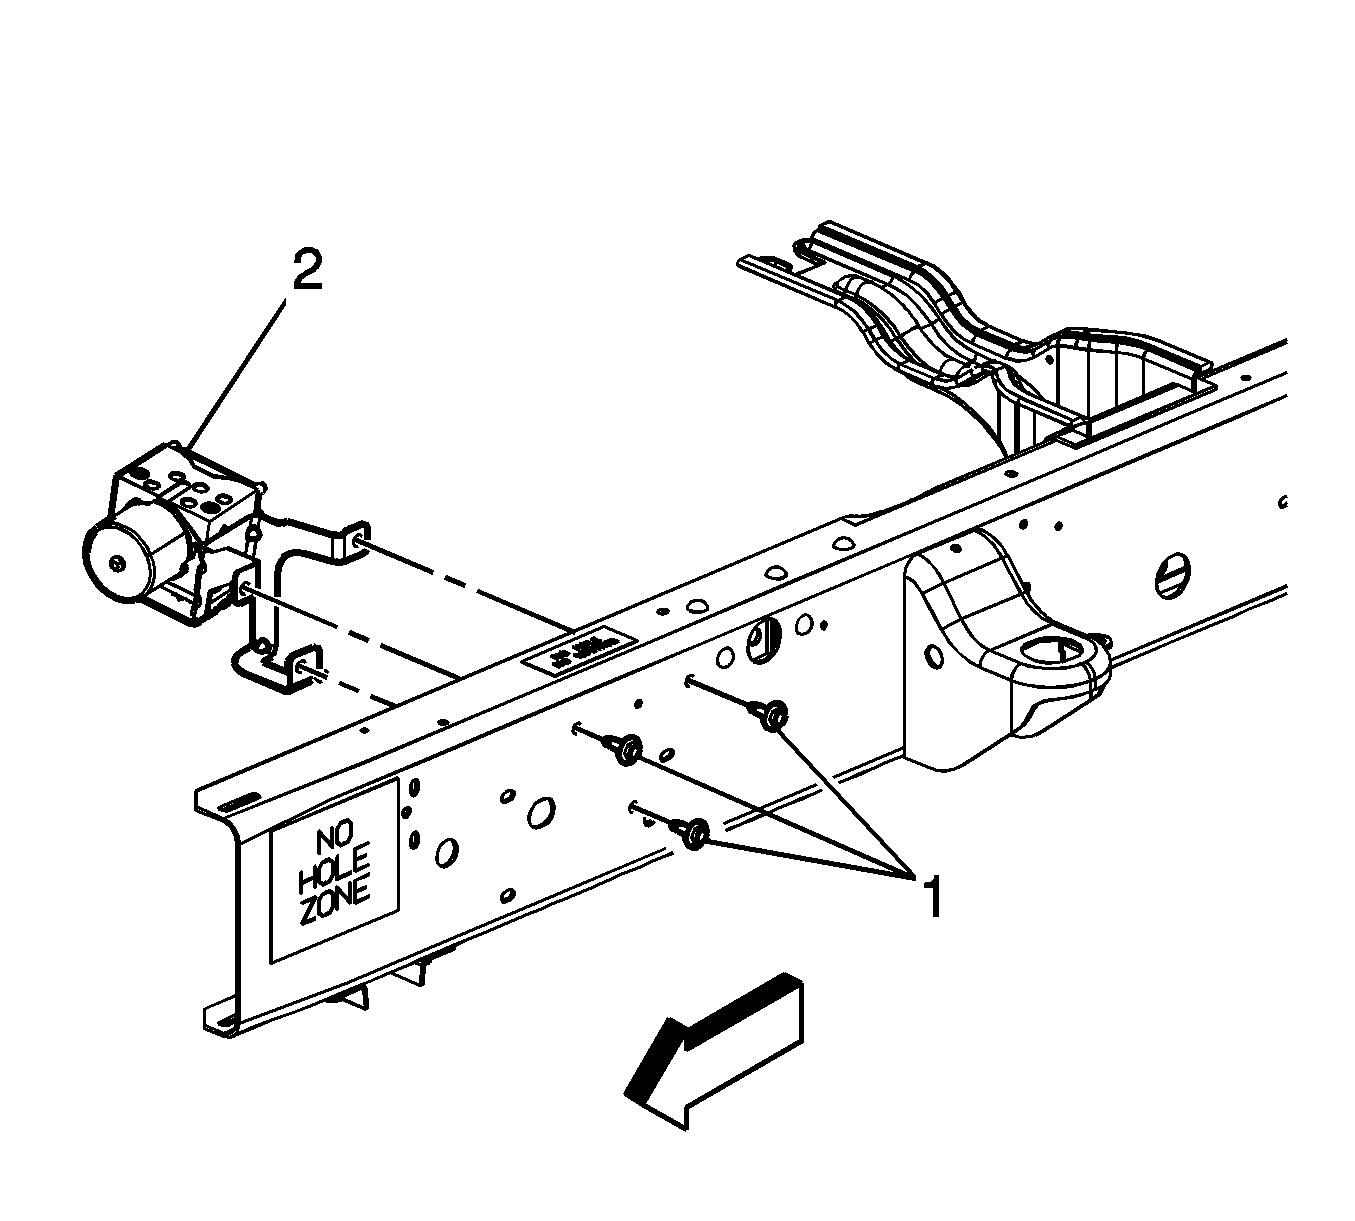
- Remove the BPMV bracket bolts (1).
- Remove the BPMV.
- If necessary, remove the EBCM. Refer to Electronic Brake Control Module Replacement .
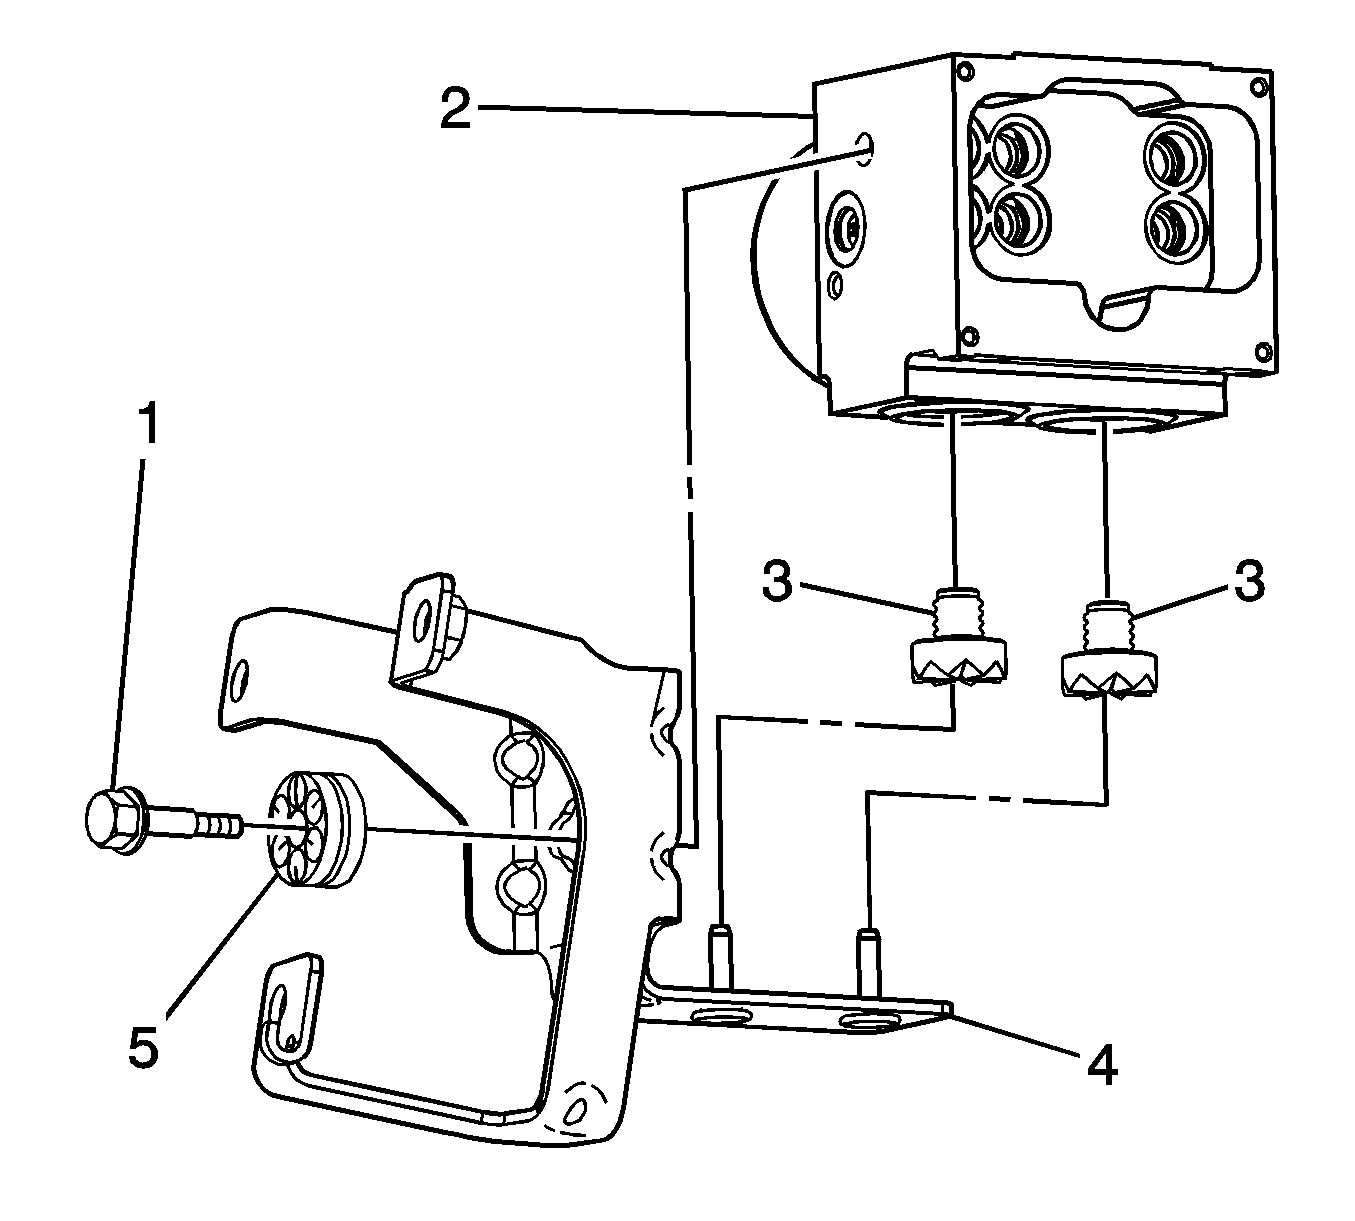
- If removing the BPMV bracket from the BPMV, remove the BPMV mounting bolt (1).
- Lift the BPMV from the mounting bracket.
- Remove the grommets from the BPMV and the bracket.
Important: Note the location of the brake pipes to the BPMV for proper installation.
Installation Procedure
- If removed, install the EBCM. Refer to Electronic Brake Control Module Replacement .
- If removed, install the bottom grommets (3) to the BPMV (2).
- Install the side grommet (5) to the BPMV bracket.
- Install the BPMV (2) on the mounting bracket.
- Install the retaining bolt (1) to the BPMV (4).
- Position the BPMV (2) to the frame.
- Install the BPMV bracket bolts (1).
- Position the brake pipes (8) to the BPMV (4) and secure the retaining clip (9).
- Install the brake pipe fittings (7).
- Position the front brake pipe (6) to the BPMV (4).
- Install the brake pipe fitting (5).
- Position the rear brake pipe (3) to the BPMV (4) and secure the clip (1).
- Install the brake pipe fitting (2).
- Connect the EBCM electrical connector.
- Bleed the BPMV. Refer to Antilock Brake System Automated Bleed Procedure .
- Calibrate the brake pressure sensor. Refer to Electronic Brake Control Module Programming and Setup .

Notice: Refer to Fastener Notice in the Preface section.
Tighten
Tighten the bolt to 10 N·m (89 lb in).

Tighten
Tighten the bolts (1) to 22 N·m (16 lb ft).

Tighten
Tighten the fittings to 18 N·m (13 lb ft).

Tighten
Tighten the fitting to 18 N·m (13 lb ft).

Tighten
Tighten the fitting to 18 N·m (13 lb ft).
