SERVICE INFO. & PACKAGES DISTRESSED 4TH CLUTCH

MODELS AFFECTED: 1989-1990 DE VILLES, FLEETWOODS, ELDORADOS, SEVILLES, AND ALLANTES
Some 1989-1990 DeVilles, Fleetwoods, Eldorados, Sevilles, and Allantes with transaxles built between 01/02/89 (Julian Date 002) and 01/15/90 (Julian Date 015) may experience a condition of no drive or reverse due to 4th clutch distress. Other symptoms of the 4th clutch distress would be: leak from left axle seal, leak from side cover to channel plate gasket or side cover nuts loose, shudder in 1st gear, slips in all gears, burned transaxle fluid, or vehicle can be pushed with engine off only.
The 4th clutch distress may be caused by the manual valve being positioned between the neutral and D4 position, applying the input clutch in 4th gear. When this occurs, the input clutch will try to drive the input sun gear while the 4th clutch is trying to hold it.
The mispositioning of the manual valve may be caused in part by friction or drag in the shift cable which exceeds the spring force applied to the inside detent lever. If the detent lever does not seat properly, the manual valve can be mispositioned.
NOTE: Other conditions that may cause 4th clutch distress include: damaged 3-4 accumulator piston seal, loose channel plate torx head bolt, leaking driven sprocket, 4th clutch piston seals or missing #1 check ball from a previous repair or leaking #5 check ball.
Service Procedure:
F7 (Allante) - Replace transaxle.
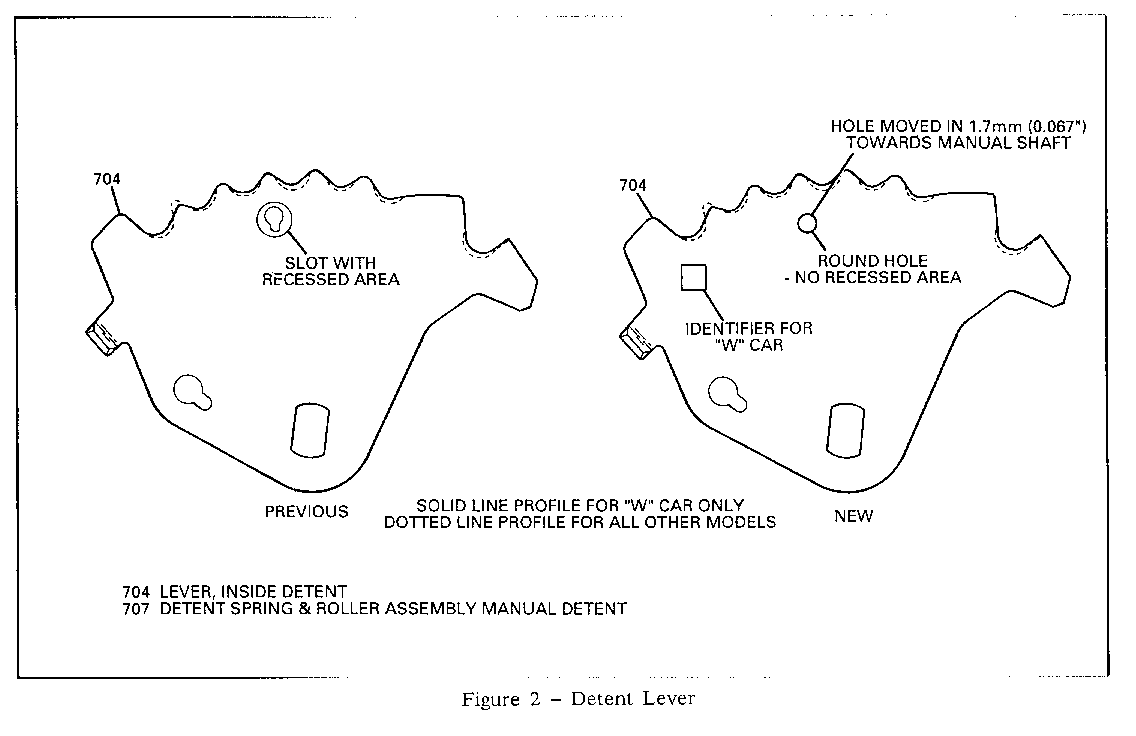
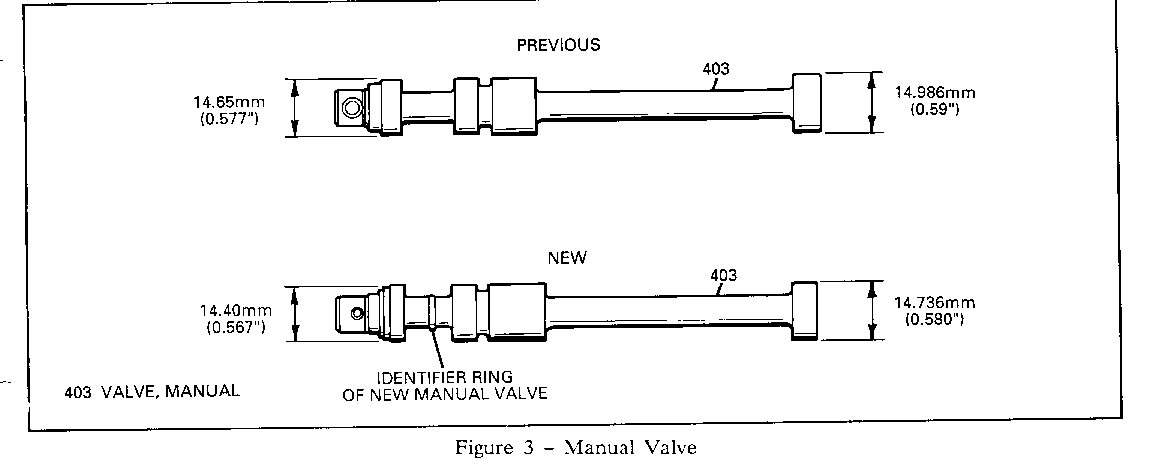
4T60 - In addition to replacing other damaged parts, replace the channel plate assembly, manual valve, and inside detent lever with new service parts. Refer to Figures 1-4 for parts changes.
IMPORTANT: THE NEW MANUAL VALVE AND INSIDE DETENT LEVER MUST BE USED WITH THE NEW SERVICE CHANNEL PLATE. PARTS ARE NOT INTERCHANGEABLE WITH PREVIOUS DESIGNS.
When you complete the repair of a distressed 4th clutch, inspect and set the shift cable according to procedures outlined in Section 7A-1 of the appropriate Service Information Manual. To ensure proper cable set, place the shift lever inside the passenger compartment against the "reverse side" of the neutral gate in the column or console prior to setting the cable at the transaxle.
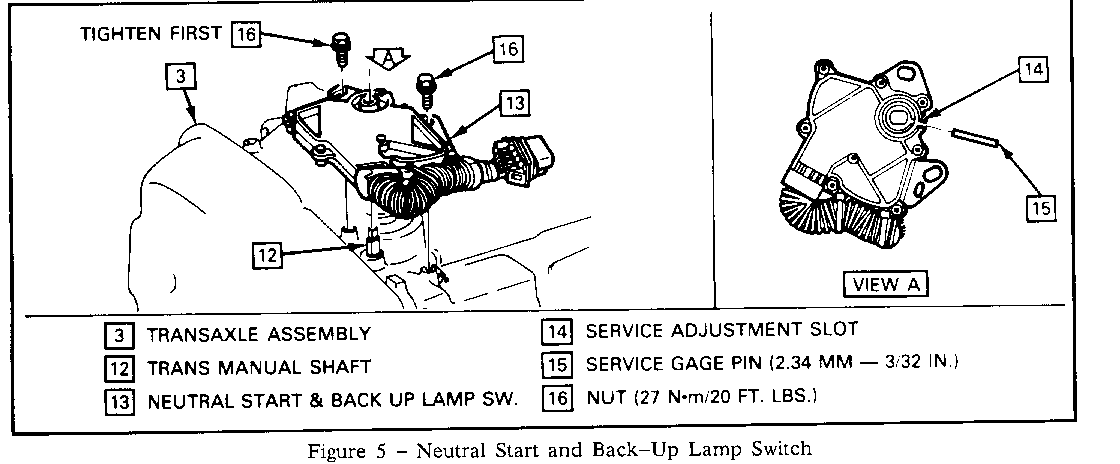
NEUTRAL START AND BACK-UP LAMP SWITCH ADJUSTMENT
The neutral start and back-up lamp switch should be adjusted so that the engine will start in park or neutral only. Refer to Figure 5.
CAUTION:
Personal injury may result if the engine can be started in a drive position.
Adjust:
1. Place transaxle manual linkage lever shaft in the neutral position. Ensure proper shift control adjustment as previously described.
2. Loosen switch attaching screws.
3. Rotate switch on shifter assembly to align service adjustment hole with carrier tang hole.
Insert 2.34mm (3/32") maximum diameter gage pin to a depth of 12mm (15/32").
Tighten two attaching screws (16) to 27 N-m (20 ft. lbs.).
4. Remove gage pin.
NOTICE: When servicing requires that "T" latch type wiring connector be disconnected, care must be taken to ensure proper reassembly of the connector. Failure to do so may result in an intermittent failure of the switch.
Service Parts Operation:
P/N Description Model Usage --- ----------- ----------- 8668993 Channel Plate Assembly-Complete AAH, ABH, ACH, ADH, AFH, (includes manual valve and inside AHH, AJH, ANH, ATH detent lever)
WARRANTY INFORMATION VEHICLES SERIES Operation Description Operation Number C D E J K V
Channel Plate and/or K7460 5.5 6.1 6.1 Gasket Replace


General Motors bulletins are intended for use by professional technicians, not a "do-it-yourselfer". They are written to inform those technicians of conditions that may occur on some vehicles, or to provide information that could assist in the proper service of a vehicle. Properly trained technicians have the equipment, tools, safety instructions and know-how to do a job properly and safely. If a condition is described, do not assume that the bulletin applies to your vehicle, or that your vehicle will have that condition. See a General Motors dealer servicing your brand of General Motors vehicle for information on whether your vehicle may benefit from the information.
