POPPING OR GURGLING NOISE ON VEHICLE WITH A SUNROOF

SUBJECT: POPPING OR GURGLING NOISE ON SUNROOF VEHICLES (PROCEDURES)
VEHICLES AFFECTED: 1989-91 'C' (WITH OPTION CF5)
Some 1989-1991 DeVilles and Fleetwoods built with sunroofs may produce a gurgling, popping, or tapping noise during rainy conditions or immediately after a car wash. This condition may be caused by a restriction in one of the sunroof drain hoses causing the hose to hold water. A pressure build up from the HVAC blower or outside air passing by the hose end pushes air through the trapped water, resulting in the noise.
To repair this condition, follow the procedures below. Reference Section 10-9 of the Service Information Manual as necessary during these procedures for specific information pertaining to the sunroof and drain hoses.
Inspect:
--------- Inspect for an excessively long drain hose hanging below the vehicle. If a hose is evident, skip to the appropriate procedure for front or rear drain hose noise and perform the operations on the identified long hose. If no long hose is evident, duplicate the noise using the following procedure.
Duplicate Noise/Test: ---------------------- This procedure is used to duplicate the noise complaint and later to verify that the noise has been eliminated. Once the suspect hose has been identified, perform all operations on the suspect hose only.
1. Open the sunroof glass. Slowly pour a cupful of water (approximately four ounces) into each drain hose at the sunroof housing outlets located in the four corners of the housing.
2. Close the sunroof glass. In a car wash type set up, flow water over the roof surface so that the entire sunroof glass seal is wetted and remains wet throughout testing. This is important to create an air-tight vehicle environment. A continual spray over the entire roof surface provides the best results.
3. Turn the blower up to high. Listen for the gurgling, popping, or tapping noise. It may take a short time to develop enough pressure to produce the sound.
4. Locate the drain hose which is the source of the noise.
5. Continue with the proper procedure for front or rear drain hose.
Front Drain Hose Noise:
If the noise is from one of the front drain hoses, perform the following procedure:
1. Loosen door frame moulding along A-pillar. Remove windshield garnish moulding and fasteners.
2. Remove the screws securing the front wheel opening moulding and wheel house filler at the rear of the wheel opening to gain access to the lower pillar area. Remove the insulator attached to the lower pillar.
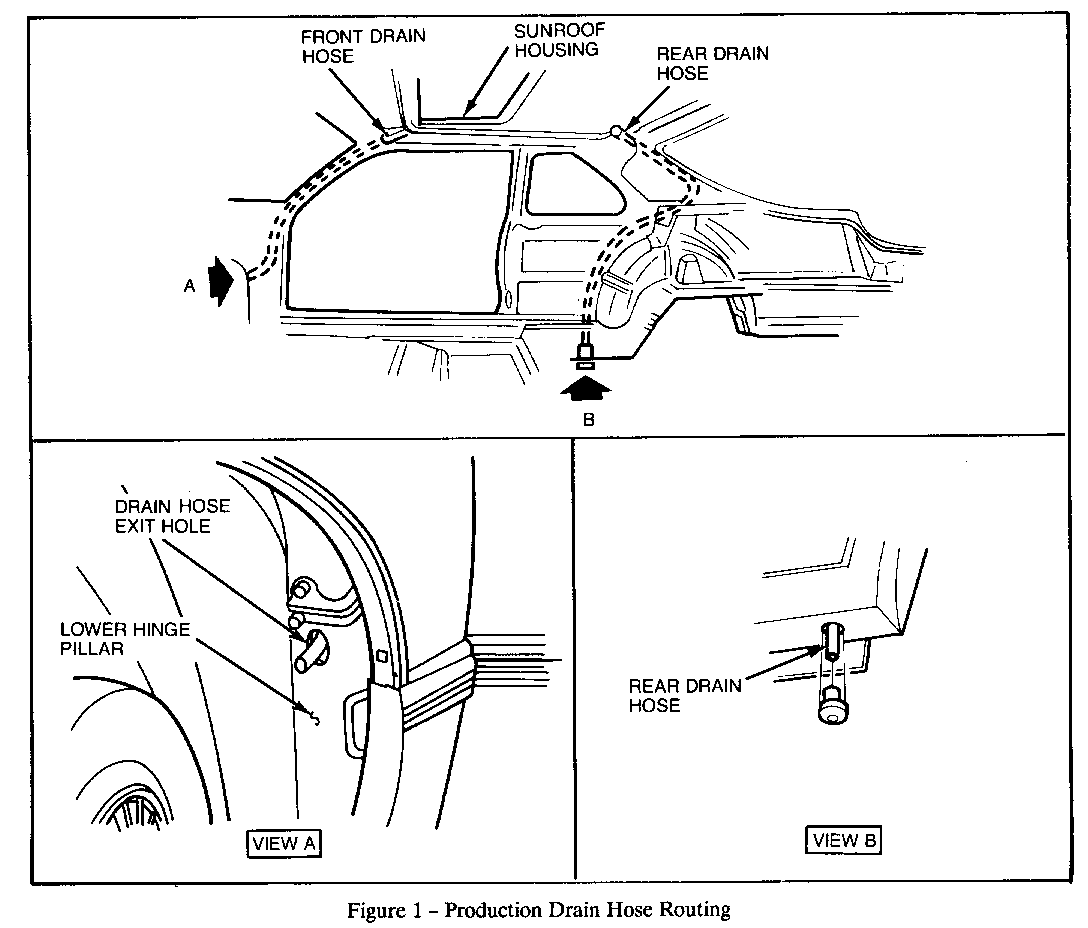
3. Locate end of hose at exit from pillar. Refer to Figure 1 for drain hose routing. Tug gently to eliminate excess hose. If end of hose cannot be located, route a new hose.
4. Blow out the drain hose using pressurized air at the housing outlet to remove any restrictions.
5. Perform test to duplicate noise (in this bulletin). If noise still present, continue with step 9.
6. If noise is gone, reinstall pillar moulding ensuring that hose is clear from molding fastener locations and will not be pinched by the push-in fasteners. Reinstall door opening moulding.
7. Trim excess hose leaving approximately 10 cm (four inches) into wheel opening. Cut a small hole in the insulator pad for the drain hose. Position the wheelhouse insulator over the hose and to the body; secure with screws.
8. Reattach the wheelhouse filler panel and moulding ensuring that the hose is not pushed upward and trapped by the filler.
9. Remove sun visor and centre clip, pull strap, and headliner lace and drop corner of headliner to access top of drain hose. Inspect hose from sunroof housing to pillar for kinks or bends which may trap and hold water.
10. If hose is kinked, remove hose from housing and reposition if possible so as to remove kink or bend and allow water to drain. If bend is set in hose, insert a small diameter rod or socket to straighten. Gradually apply heat to the area with a heat gun to soften and reform hose. Allow hose to cool.
11. Eliminate any excess hose by pulling the bottom, if possible, or trimming the top end. The hose should not dip between the sunroof housing and the pillar.
If trimming the top of the hose is necessary, be sure enough of the expanded hose end remains to reconnect to the housing.
12. Reassemble hose and retest.
13. If noise is still present, a new hose is necessary.
14. If noise is eliminated, trim bottom end of hose approximately four inches below exit from pillar. Cut a small hole in the insulator pad for the drain hose to pass through. Position the wheelhouse insulator over the hose and to the body; secure with screws.
15. Reattach the wheelhouse filler panel and moulding ensuring that the hose is not pushed upward and trapped by the filler.
16. Reassemble the sun visor and centre clip, pull strap, headliner, and sunroof opening lace.
17. Reinstall pillar moulding ensuring that hose is clear from moulding fastener locations and will not be pinched by push-in fasteners.
18. Reinstall door opening moulding.
Rear Drain Hose Noise:
1. Locate and remove the drain valve at the bottom of the rocker in front of the rear wheel opening. Refer to Figure 1 for basic production drain hose routing.
2. Gently pull the hose to remove any excess length from the body.
3. Use an air hose at the housing outlet to blow out the drain hose and remove any restrictions.
4. Perform the test to duplicate the noise (in this bulletin).
5. If noise has been eliminated, trim hose leaving approximately 2" (50mm) below rocker. Reassemble valve to hose; assemble valve to rocker.
If noise is still present, continue with the procedure.
6. Remove quarter trim panel. Reference Service Information Manual, Section 10-7, for proper procedure.
7. Inspect the drain hose for kinks or areas where excess hose may trap water.
8. Reroute hose as necessary to remove obstruction. Be sure path of hose on interior of vehicle follows the path specified by indentations in the sheet metal or the quarter trim substrate/insulator to ensure proper clearance is maintained.
9. Trim excess hose.
10. Reassemble vehicle.
Use the most applicable Labour Operation and Time from the Canadian Labour Time guide.
General Motors bulletins are intended for use by professional technicians, not a "do-it-yourselfer". They are written to inform those technicians of conditions that may occur on some vehicles, or to provide information that could assist in the proper service of a vehicle. Properly trained technicians have the equipment, tools, safety instructions and know-how to do a job properly and safely. If a condition is described, do not assume that the bulletin applies to your vehicle, or that your vehicle will have that condition. See a General Motors dealer servicing your brand of General Motors vehicle for information on whether your vehicle may benefit from the information.
