BODY SIDE MOLDING GAP TO BODY (ADD RETAINERS)

SUBJECT. BODY SIDE MOLDING GAP TO BODY (ADD RETAINERS) MODELS: 1993-94 FLEETWOOD AND FLEETWOOD BROUGHAM
THIS BULLETIN IS BEING REVISED TO ADD THE 1994 MODEL YEAR, AND TO CHANGE THE T-OP'S FROM THOSE PREVIOUSLY USED. PLEASE DISCARD BULLETIN 331059.
CONDITION:
Some owners may experience body side moldings at rear of front fender, front door,' rear door and rear quarter may gap to the body. CAUSE: Body side molding contour does not match contour of body side panels. In addition, the retaining clips do not provide enough tension to pull the molding in to the body panel surface. CORRECTION: Remove the rub strip and install additional retainers, P/N 10121502, to hold the moldings in contact with the body. Be careful not to over bend the rub strip.
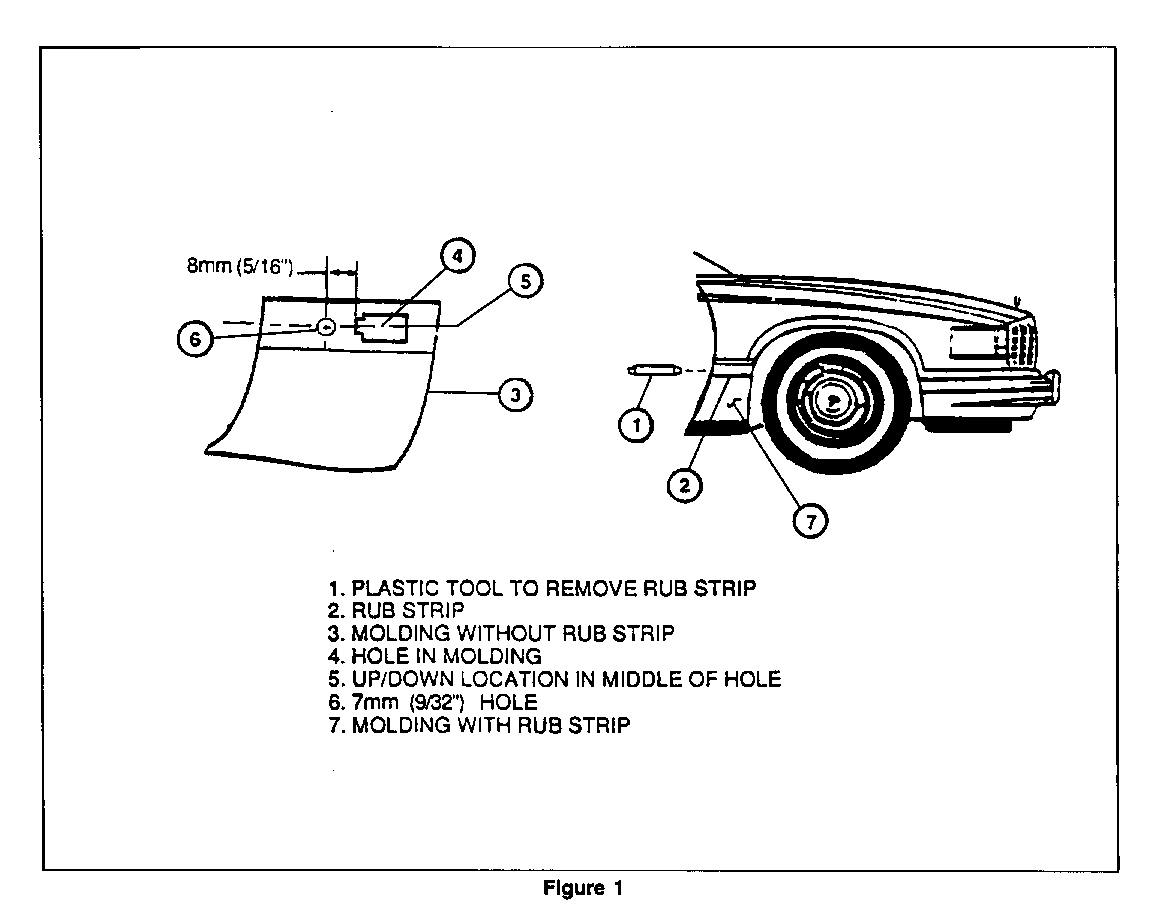
Front Fender Rear Molding 1. Use a flat plastic tool to pry behind the rub strip and remove the rub strip from the molding. Lay rub strip on clean dry shop towels to prevent marring or scratching the surface. See Figure 1. 2. Clean up old adhesive on. rub strip and molding using 3M General Purpose Adhesive Cleaner #08984 or equivalent and a narrow tool such as a putty knife or equivalent with a sharp edge. Be careful not to damage other areas of the vehicle. 3. Measure hole location and center punch. See Figure 1. Use a 15 mm (1/2") drill stop and drill a 3 mm (1/8") hole through the molding and front fender. 4. Use a 15 mm (1/2") drill stop and drill a 7 mm (9/32') hole at the same location. NOTE: Molding and body panel both need corrosion protection after holes are drilled. 5. Use Q-tips or small artist brush to apply zinc rich primer to the new holes and allow to dry. 6. For additional corrosion protection, use Q-tips or small artist brush to apply (U.S. P/N 12345489 Anti-Corrosion Compound, Canada P/N 08892 3M Rust Fighter-1 or equivalent) to the new holes. 7. Install retainer P/N 10121502 through the holes to secure the molding to the fender. 8. Install 3M #06382 Scotch Mount Super Automotive Affachment Tape or equivalent along the top and bottom edge of the rub strip. 9. Remove the release paper and install the rub strip to the molding starting at the front edge. Press firmly in place with a roll pin or equivalent.
Front Door Molding 1. Check molding alignment and adjust if necessary. Refer to Service Manual Section 10-6 for fastener attachment. 2. Use a flat plastic tool to pry behind the rub strip and remove the rub strip from the molding. Lay rub strip on clean dry shop towels to prevent marring or scratching the surface. See Figure 2. 3. Clean up old adhesive on rub strip and molding using 3M General Purpose Adhesive Cleaner #08984 or equivalent and a narrow tool such as a putty knife or equivalent with a sharp edge. Be careful not to damage other areas of the vehicle.
NOTE: Before proceeding, make sure that the window is all the way up. 4. Measure three hole locations and center punch. See Figure 2. Use a 15 mm (1/2") drill stop and drill 3 mm (1/8") holes through the molding and door panel. 5. Use a 15 mm (1/2") drill stop and drill three (3) 7 mm (9/32") holes at the same locations. NOTE: Molding and body panel both need corrosion protection after holes are drilled. 6. Use Q-tips or small artist brush to apply zinc rich primer to the new holes and allow to dry. 7. For additional corrosion protection, use Q-tips or small artist brush to apply (U.S. P/N 12345489 Anti-Corrosion Compound, Canada P/N 08892 3M Rust Fighter-1 or equivalent) to the new holes. 8. Install retainer P/N 10121502 through the holes to secure the molding to the door. Cut off tip of retainer if it is too long. 9. Install 3M #06382 Scotch Mount Super Automotive Attachment Tape or equivalent along the top and bottom edge of the rub strip. 10. Remove the release paper and install the rub strip to the molding starting at the front edge. Press firmly in place with a roll pin or equivalent.
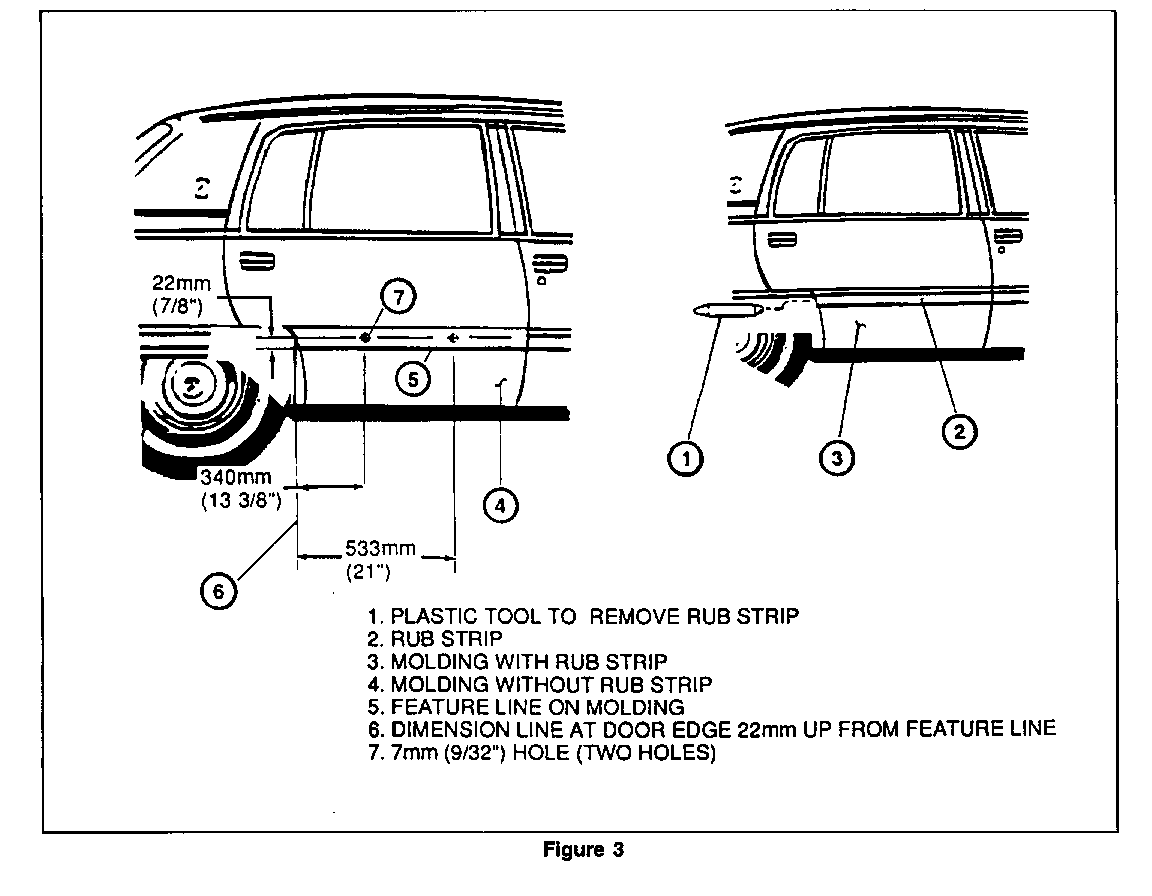
Rear Door Molding 1. Check molding alignment and adjust if necessary. Refer to Service Manual Section 10-6 for fastener anachment. If necessary, reference Service Bulletin number 331031 (Cadillac additional rear door molding alignment T-93-124 and GM of Canada 93-10-235) for additional rear door molding alignment procedures. 2. Use a flat plastic tool to pry behind the rub strip and remove the rub strip from the molding. Lay rub strip on clean dry shop towels to prevent marring or scratching the surface. See Figure 3. 3. Clean up old adhesive on rub strip and molding using 3M General Purpose Adhesive Cleaner #08984 or equivalent and a narrow tool such as a putty knife or equivalent with a sharp edge. Be careful not to damage other areas of the vehicle. NOTE: Before proceeding, make sure that the window is all the way up. 4. Measure two hole locations and center punch. See Figure 3. Use a 15 mm (1/2") drill stop and drill 3 mm (1/8") holes through the molding and door panel. 5. Use a 15 mm (1/2") drill stop and drill three (3) 7 mm (9/32") holes at the same locations. NOTE: Molding and body panel both need corrosion protection after holes are drilled. 6. Use Q-tips or small artist brush to apply zinc rich primer to the new holes and allow to dry. 7. For additional corrosion protection, use Q-tips or small artist brush to apply (U.S. P/N 12345489 Anti-Corrosion Compound, Canada P/N 08892 3M Rust Fighter-1 or equivalent) to the new holes. 8. Install retainer P/N 10121502 through the holes to secure the molding to the door. Cut off tip of retainer if it is too long. 9. Install 3M #06382 Scotch Mount Super Automotive Attachment Tape or equivalent along the top and bottom edge of the rub strip. 10. Remove the release paper and install the rub strip to the molding starting at the front edge. Press firmly in place with a roll pin or equivalent.
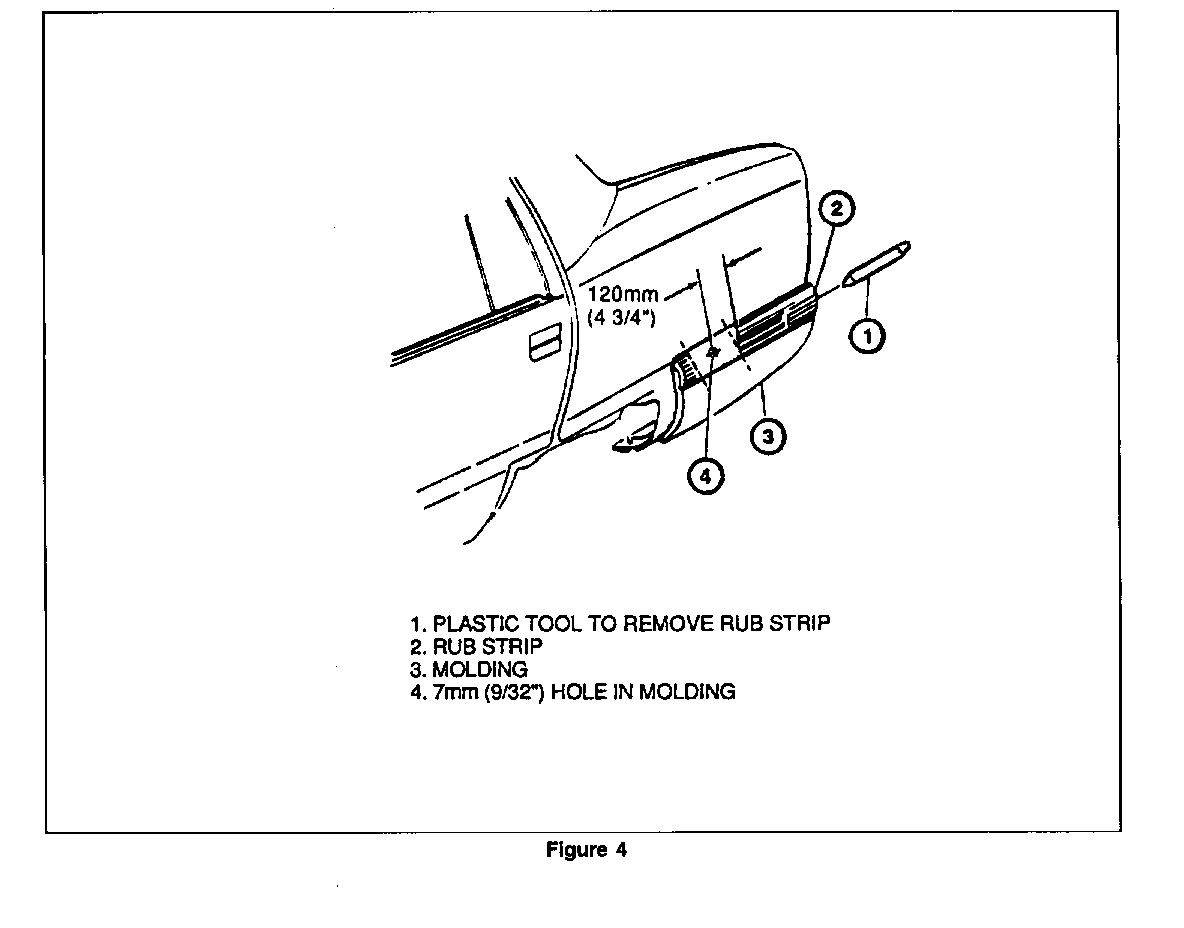
Rear Quarter Molding 1. Use a flat plastic tool to pry behind the rub strip and remove the rub strip from the molding. Lay rub strip on clean dry shop towels to prevent marring or scratching the surface. See Figure 4. 2. Clean up old adhesive on rub strip and molding using 3M General Purpose Adhesive Cleaner #08984 or equivalent and a narrow tool such as a putty knife or equivalent with a sharp edge. Be careful not to damage other areas of the vehicle. 3. Measure location for hole and center punch. See Figure 4. Use a 15 mm (1/2") drill stop and drill a 3 mm (1/8") hole through the molding and rear quarter panel. 4. Use a 15 mm (1/2") drill stop and drill a 7 mm (9/32") hole at the same location. NOTE: Molding and body panel both need corrosion protection after holes are drilled. 5. Use Q-tips or small artist brush to apply zinc rich primer to the new holes and allow to dry. Access to quarter panel hole may be easier through the trunk compartment after moving trunk trim. 6. For additional corrosion protection, use Q-tips or small artist brush to apply (U.S. P/N 12345489 Anti-Corrosion Compound, Canada P/N 08892 3M Rust Fighter-1 or equivalent) to the new holes. 7. Install retainer P/N 10121502 through the hole to secure the molding to the quarter panel. Re-install trunk trim if it was removed. 8. Install 3M #06382 Scotch Mount Super Automotive Affachment Tape or equivalent along the top and bottom edge of the rub strip. Trim away excess tape around the sidemarker lamp opening. 9. Remove the release paper and install the rub strip to the molding, locating it around the sidemarker lamp. Press rub strip firmly in place with a roll pin or equivalent.
PART AVAILABILITY-.
Parts are currently available from GMSPO.
WARRANTY INFORMATION:
For vehicles repaired under warranty use:
Labor Operation Labor Time T3401 Left Front Fender 0.4 Hr. T3402 Left Front Door 0.6 Hr. T3403 Left Rear Door 0.5 Hr. T3404 Left Rear Quarter 0.7 Hr. T3432 Right Front Fender 0.4 Hr. T3433 Right Front Door 0.6 Hr. T3434 Right Rear Door 0.5 Hr. T"3435-Right Rear Quarter 0.7 Hr.

General Motors bulletins are intended for use by professional technicians, not a "do-it-yourselfer". They are written to inform those technicians of conditions that may occur on some vehicles, or to provide information that could assist in the proper service of a vehicle. Properly trained technicians have the equipment, tools, safety instructions and know-how to do a job properly and safely. If a condition is described, do not assume that the bulletin applies to your vehicle, or that your vehicle will have that condition. See a General Motors dealer servicing your brand of General Motors vehicle for information on whether your vehicle may benefit from the information.
