SERVICE PROCEDURE CODE E39

MODELS AFFECTED: 1985-1989 DE VILLES AND FLEETWOODS (FWD) 1986-1989 ELDORADOS AND SEVILLES
Some DeVilles, Fleetwoods, Eldorados or Sevilles equipped with THM 44OT4 transaxles may experience a Code E39 (EO39), which indicates that there is a problem with the VCC control, excessive VCC slippage, or transaxle slippage. The ECM does not set a Code E39 until the following code testing conditions are met.
I. CODE E39 TEST CONDITIONS ------------------------
1. VCC must be commanded on - the VCC status light on. 2. 4th gear - 4th gear status light on. 3. Closed loop operation - status light on. 4. Throttle applied (throttle switch open) - status light off. 5. Brake not applied - brake switch closed. 6. Gear selector must be in a drive range.
NOTE: Diagnostic status lights can be used to make sure the car is in the testing condition, however, a code cannot set while in diagnostics. Code E39 will usually be displayed as a history code because of the test conditions that must be met. The code IS NOT considered intermittent if it is stored as a history code.
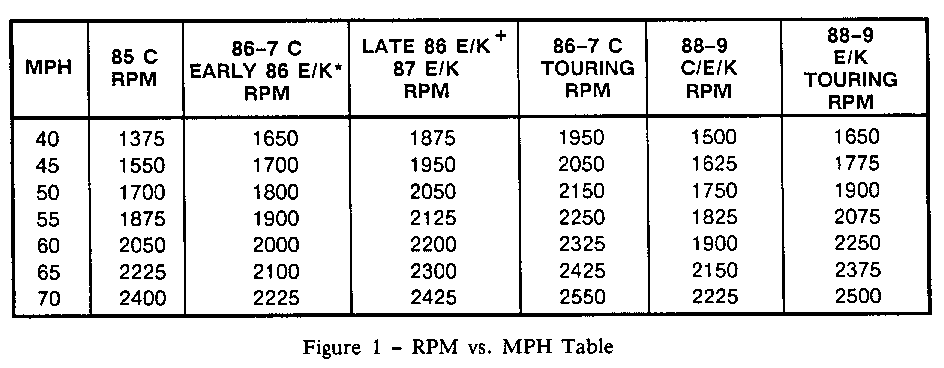
Once the above test conditions are met, a Code E39 will set when the ECM detects that engine speed (rpm) is greater than expected for a given vehicle speed (mph). The ECM compares the actual engine speed and vehicle speed values to the expected rpm and mph values in the ECM PROM. If the actual engine rpm is higher than the value programmed into the ECM PROM for at least 10 seconds on 1985-1987 vehicles or at least five seconds on 1988-1989 vehicles, the ECM will set a Code E39.
Some example values are shown in Figure 1 for 1985-1989 Cadillacs. If rpm is greater than the value listed in Figure 1 at the corresponding mph for at least 10 seconds on 1985-1987 vehicles or at least five seconds on 1988-1989 vehicles, a Code 39 will set.
* Early 1986 E/K Cars have ECM PROM ID 303 (FED) or 321 (CAL)
+ Late 1986 E/K Cars have ECM PROM ID numbers greater than 303 (FED) or 321 (CAL)
II. DIAGNOSIS ---------
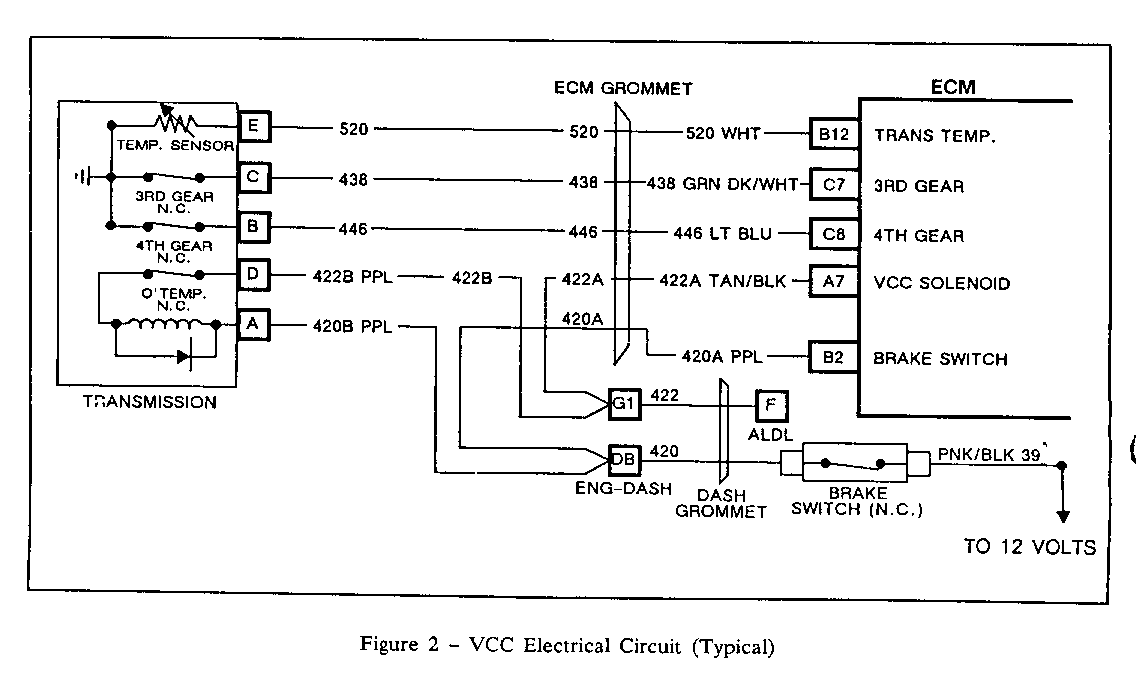
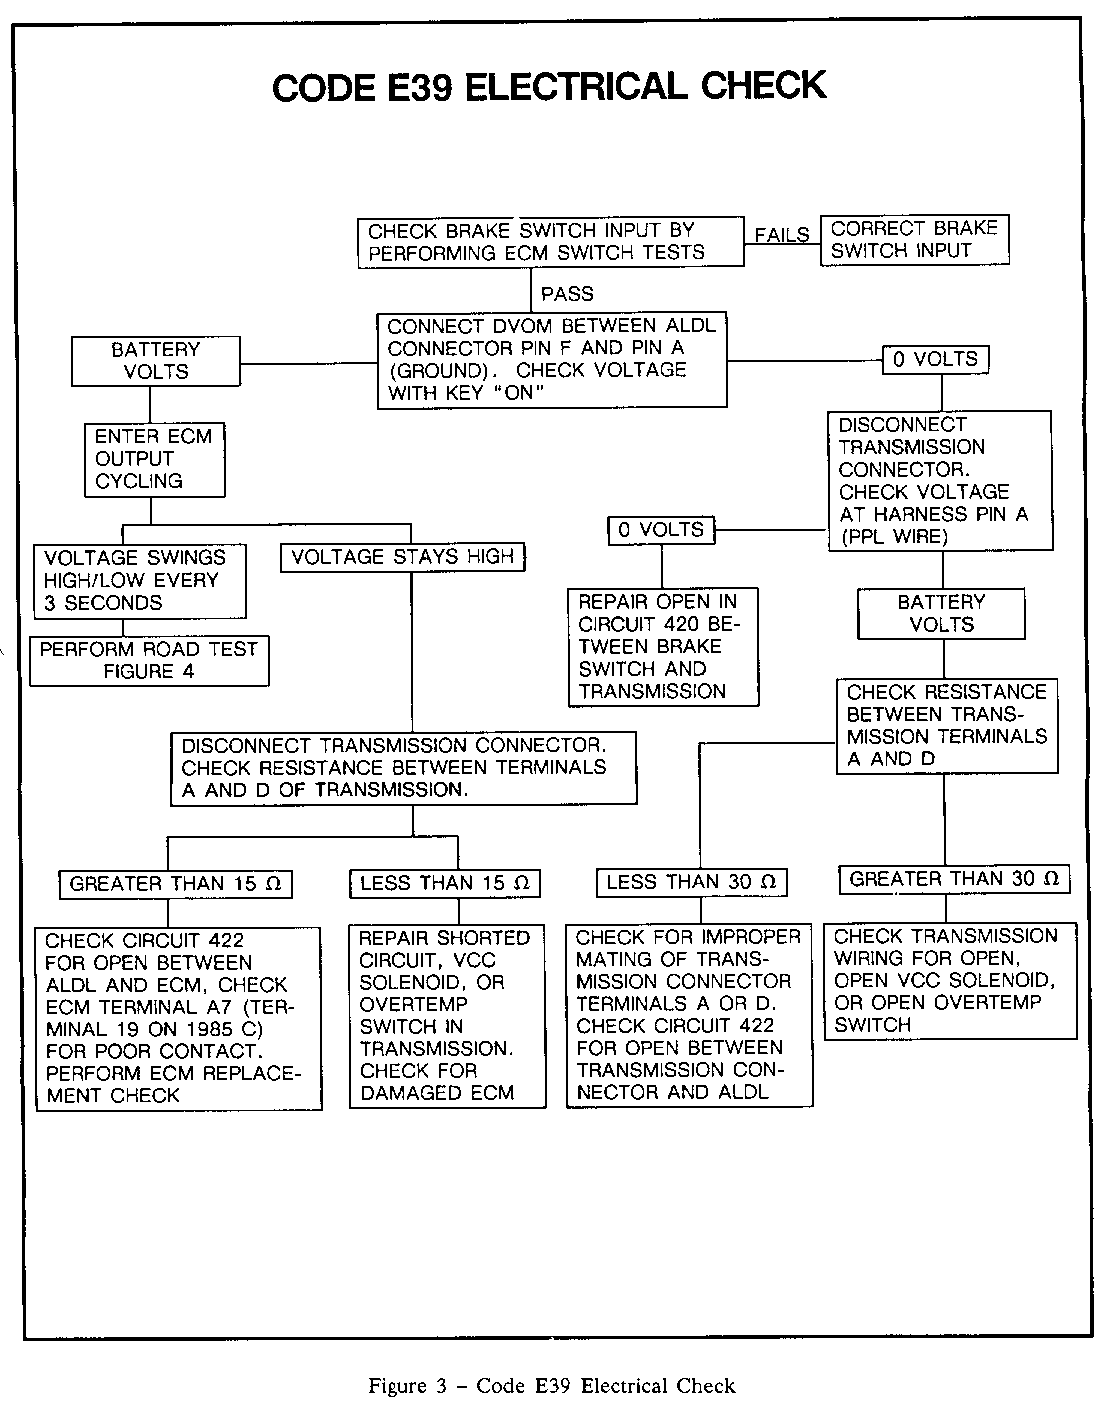
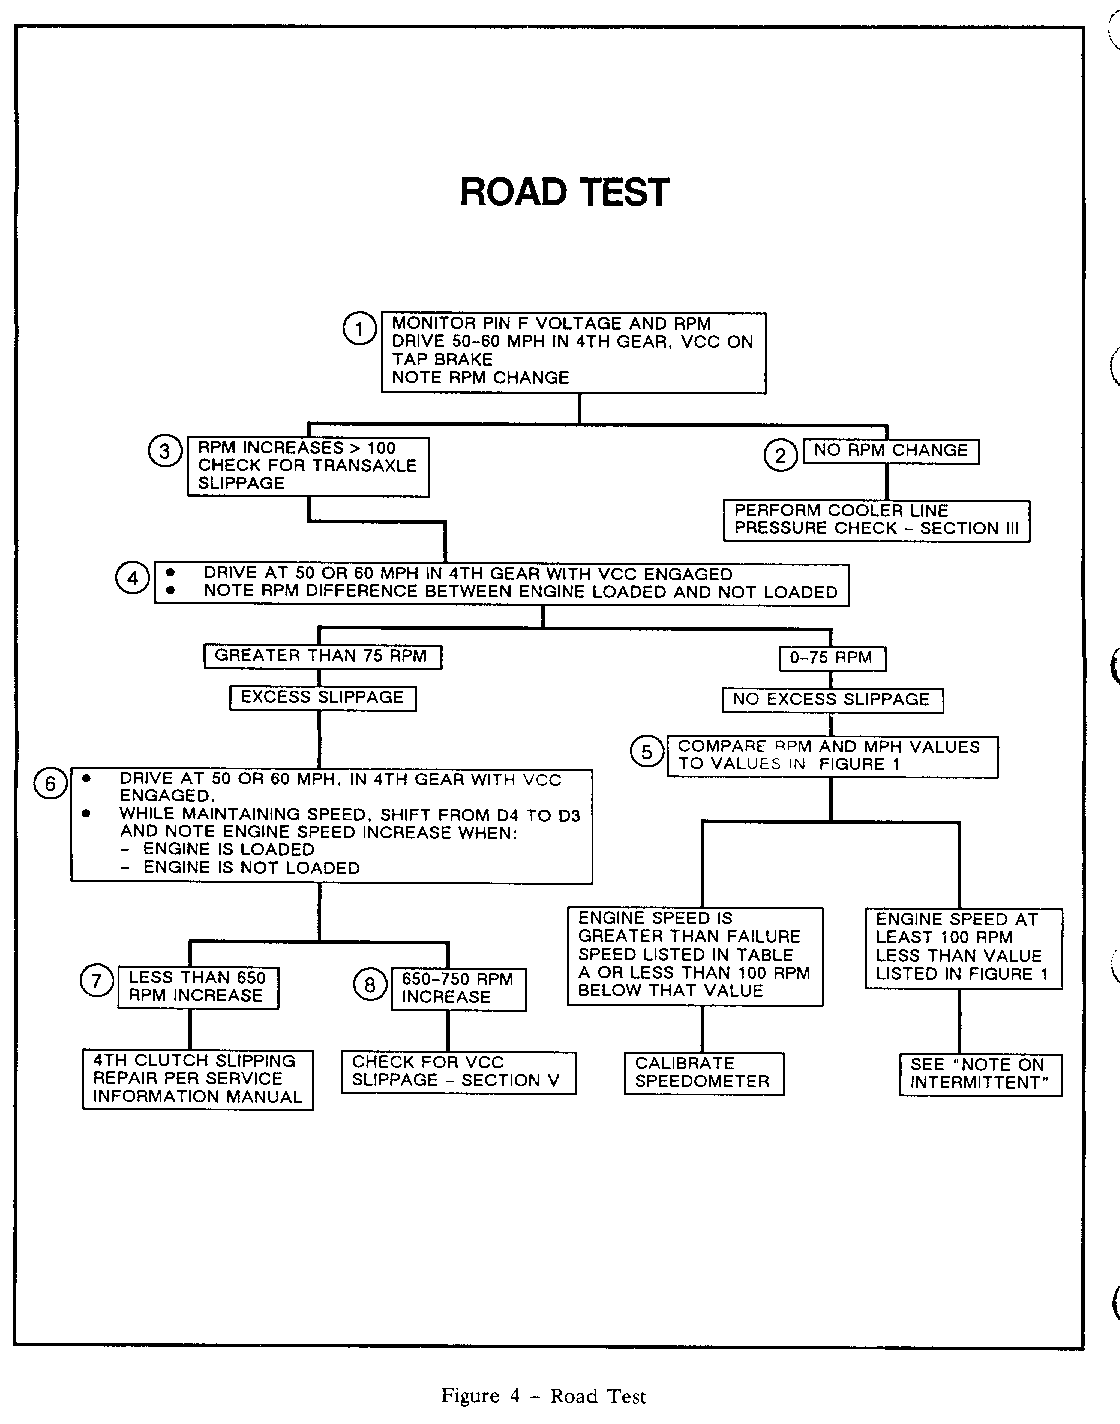
A schematic of the VCC electrical circuit is shown in Figure 2, for circuit reference purpose, The first step in diagnosing a Code 39 is to perform the "CODE E39 ELECTRICAL CHECK" refer to Figure 3. This check will determine if there is an electrical problem or if a road test required, refer to "ROAD TEST", Figure 4.
Notes on Figure 4 - ROAD TEST
1. If the VCC electrical circuit checks good in Figure 3, a road test must be performed to determine if the VCC is applying. The DVOM should remain connected to pin F of the ALDL connector during this test to determine if the ECM is commanding the VCC on. Normal voltage readings from the DVOM are as follows:
Battery volts: Anytime the key is ON and the ECM is NOT commanding VCC operation.
.1 - .4 volts: ECM commanding VCC ON by grounding circuit 422 (status light on).
0.00-0.10 volts: Open exists in VCC electrical circuit, such as when brake is applied (brake switch opens).
NOTE: The ECM may disable VCC apply for up to 15 minutes after initial start-up.
o Drive at 50-60 mph with the VCC commanded on (DVOM - .1-.4v) in 4th gear.
o Tap brake to disable VCC (DVOM - 0.00-0.10v) and note rpm change. Engine speed should inerease at least 100 rpm.
2. If no rpm change is noticed, the VCC is not applying. Perform the "Cooler Line Pressure Check", refer to Section III.
3. If the engine speed does increase 100 rpm or greater, the VCC is applying. However, since Code E39 is stored the ECM has detected excessive VCC slippage at some time; and the road test must include "worst case" driving conditions. To induce an excessive VCC slippage driving condition, drive the car under a heavy load, such as up hills. If there are no hills in the test drive area, apply the parking brake while driving. A heavy load condition (driving up hills or park brake applied) would be indicated by a minimum "Manifold Absolute Pressure" (MAP) value of 85 kPa (engine vacuum 4-5" Hg) on 1985-1987 vehicles.
NOTE: Due to the "pump-to-set" parking brake on Eldorado and Seville the service brake can be used in place of the park brake after jumpering circuits 39 and 420 together at the brake switch.
4. Excessive slippage is indicated if the engine speed LOADED is 100 rpm or greater than engine speed UNLOADED at the same vehicle speed. Since the ECM monitors only rpm vs. mph, it does not know if the excessive slippage is due to the VCC or other transaxle components. A Code E39 may be caused by slippage in the 2nd and/or 4th clutches since they are the only clutches that transmit torque in 4th gear. If the 2nd clutch is slipping, a slip or flare should occur during 1-2 upshifts.
5. Normal viscous clutch slippage is 0-75 rpm when VCC is engaged and engine is loaded. Compare the engine rpm and mph readings obtained in the road test to those in Figure 1.
If VCC slippage is NOT excessive, the engine rpm readings from the road test should be at least 100 rpm less than the failure speed listed in Figure 1. If the engine rpm is greater than the failure speed, or within 100 rpm of the failure speed, a speedometer calibration problem may exist.
6. To check for 4th gear slippage, note the engine speed increase when downshifted D4 to D3 at 50 or 60 mph with VCC engaged.
7. If the rpm increase is less than 650 rpm, there is slippage in the 4th clutch. Refer to the appropriate Cadillac Service Information Manual for repairs.
8. If engine speed increases 650-750 rpm when shifted from D4 to D3, 4th clutch is not slipping and there is excessive slippage in the VCC. Refer to Section V for diagnosis and repair.
NOTE ON INTERMITTENT
If all checks indicate normal operation, the problem should be considered intermittent.
To diagnose, the problem must be duplicated while road testing, (manipulating circuits 420 and 422 may be required) monitoring and noting the following readings:
o voltage at pin F of ALDL connector
o engine speed (rpm)
DeVille and Fleetwood
o Monitor engine rpm with an external tachometer (Code E39 cannot set in diagnostic mode).
Eldorado and Seville
o Engine rpm can be monitored on the CCDIC ("engine data").
After Code E39 sets and the service soon light comes on:
If pin F voltage = .1 - .4 volts --------------------------------
Check for an rpm change when tapping the brake.
o If there is no rpm change, refer to Section IV. o If the rpm increases, refer to Section V.
If pin F voltage = Battery Voltage ----------------------------------
There is an intermittent open in circuit 422 between the ALDL and the ECM. Repair open at the ECM connector, edgeboard or circuit 422 wiring. If circuit 422 checks good, perform the "ECM Replacement Check".
If pin F voltage = 0.00 - 0.10 volts ------------------------------------
Repair open that is in either:
o circuit 420 or, o internal transaxle wiring to VCC solenoid and/or VCC overtemp switch or, o circuit 422 between the transaxle and the ALDL connector
NOTE: If pin F voltage = 0.00-0.10 volts only after extended driving, the overtemp switch may be opening due to excessive transaxle fluid temperatures. If this is occurring, the switch will close after the transaxle fluid cools. Refer to the Cadillac Service Information Manual for potential causes of transaxle overheating.
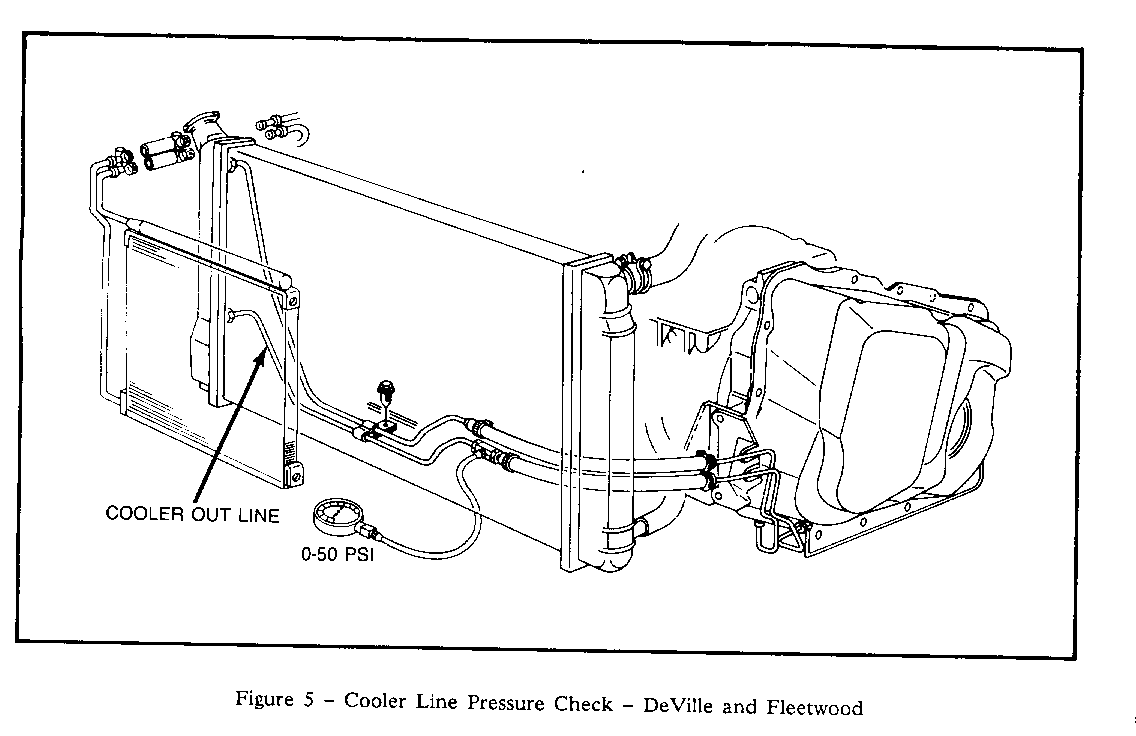
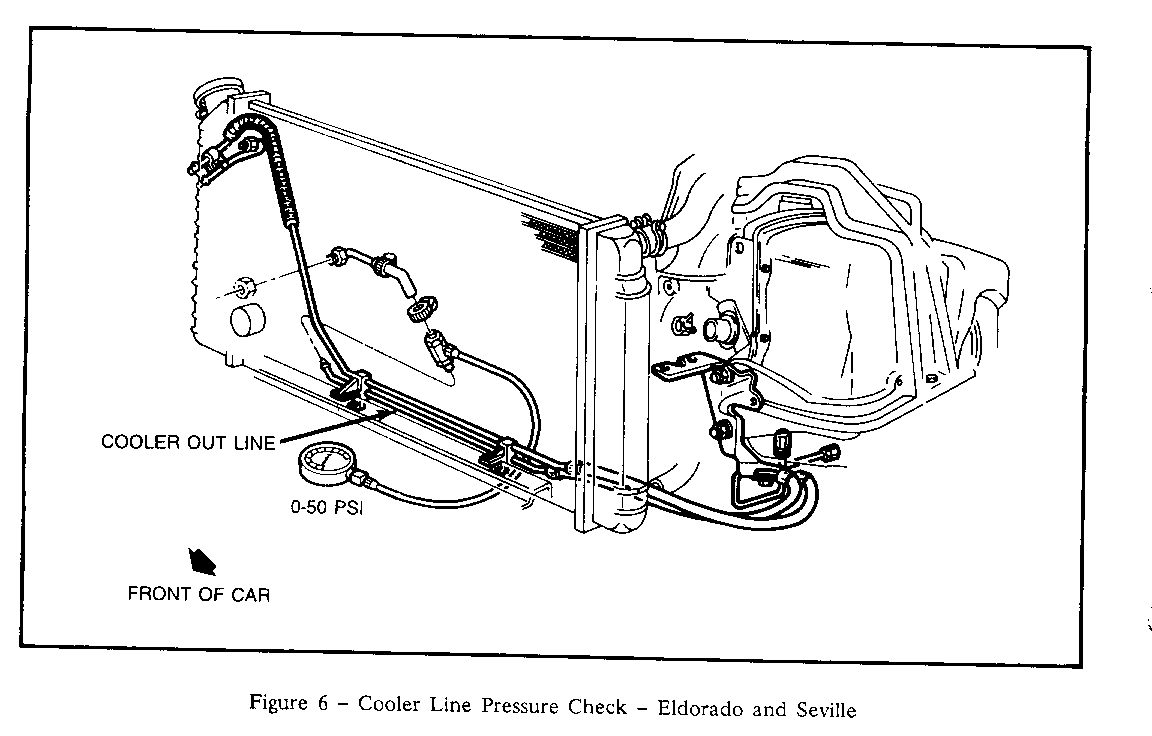
III. COOLER LINE PRESSURE CHECK --------------------------
ROAD TEST, indicates the VCC is not applying because there is no rpm change when the VCC is commanded on and off.
Monitoring the transaxle outlet cooler line pressure while the VCC is commanded on and off will determine if the VCC apply valve is shifting.
Use the following procedure to determine if the VCC apply valve is shifting:
1. Install a 0-50 psi pressure gauge into the transaxle outlet line to the cooler. This line has a black check ball fitting at the transaxle and runs to the bottom fitting at the radiator, refer to Figure 5 for DeVilles and Fleetwoods, or Figure 6 for Eldorados and Sevilles.
2. Connect one end of a jumper wire to pin F of the ALDL connector (the wire should be long enough so the pressure gage can be read while grounding the opposite end the of wire).
3. Raise car on a hoist until the front wheels are off the ground.
4. Start engine, shift transaxle into D2 and run until a 1-2 upshift is obtained.
NOTE: D2 is used because second gear oil is required to shift the VCC apply valve and the ECM cannot command VCC on when the transaxle is in the D2 range.
5. Monitor cooler line pressure, normally 25-30 psi (approximately 1/3 of line pressure). While in 2nd gear, ground the jumper wire to engage VCC and note the needle movement on the pressure gage.
o Cooler line pressure reading decreases 1-2 psi (gage needle flickers) and then gradlually increases to previous pressure each time pin F is grounded or opened - apply valve is shifting. If there were no electrical faults found in Figure 3 and Figure 4 indicated no rpm change, go to Section V - Viscous Converter Clutch Slippage.
o Cooler line pressure reading does not change or flicker as pin F of the ALDL is grounded or opened - apply valve is not shifting, go to Section IV - VCC Apply Valve Does Not Move.
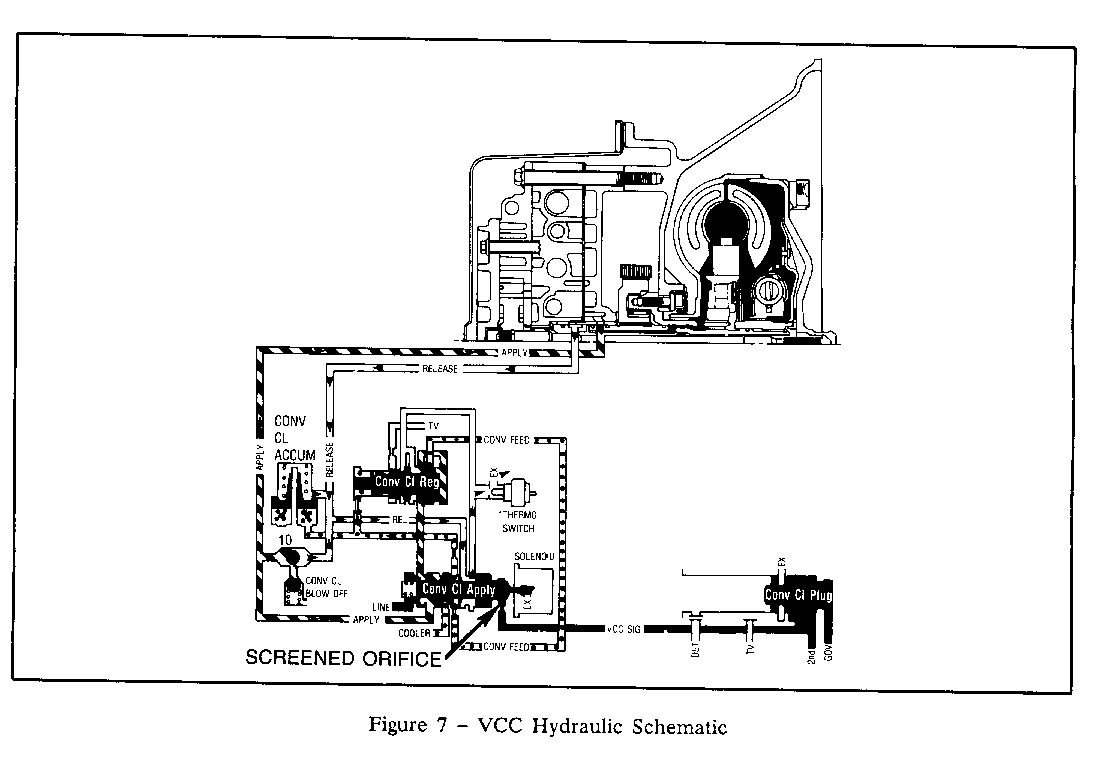
NOTE: The VCC apply valve is functioning normally when the pressure gage needle flickers 1-2 psi each time pin F of the ALDL is grounded or opened. The needle movement will appear to be a flicker rather than a direct pressure reading. This flicker is caused by a change in oil flow through the VCC apply valve to the cooler as the apply valve shifts. Refer to Figure 7 for a hydraulic schematic of the VCC system.
IV. CONVERTER CLUTCH APPLY VALVE DOES NOT MOVE -------------------------------------------
This section should be used if the converter clutch apply valve is not moving when the VCC is commanded on (no cooler line pressure change in Section M) and the electrical system checks good (Figure 1).
Inspect for the following:
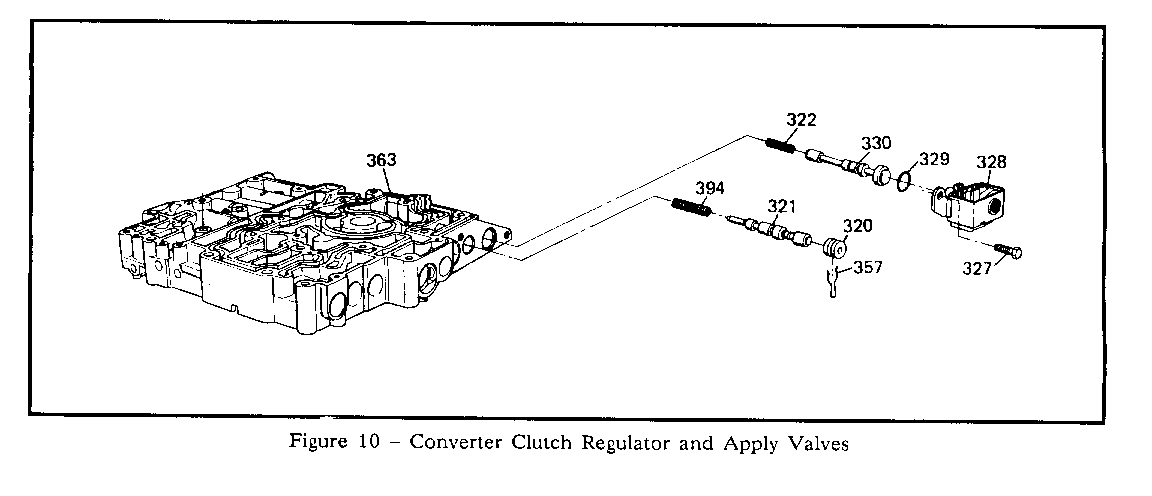
o Faulty VCC solenoid - verify that the check ball seals when the solenoid is energized and the solenoid O-ring is sealing properly (#328 Figure 10).
o Sticking VCC apply valve (#330 Figure 10).
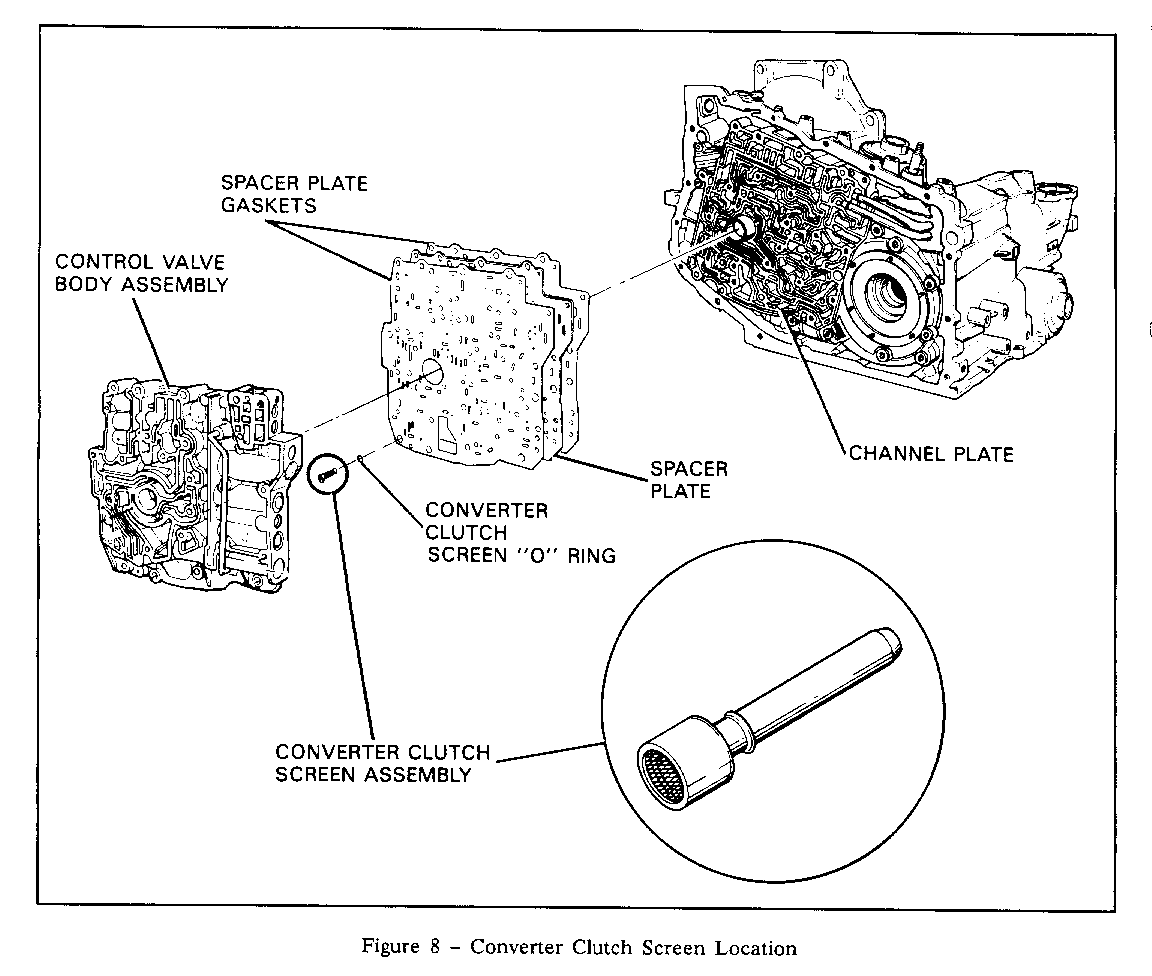
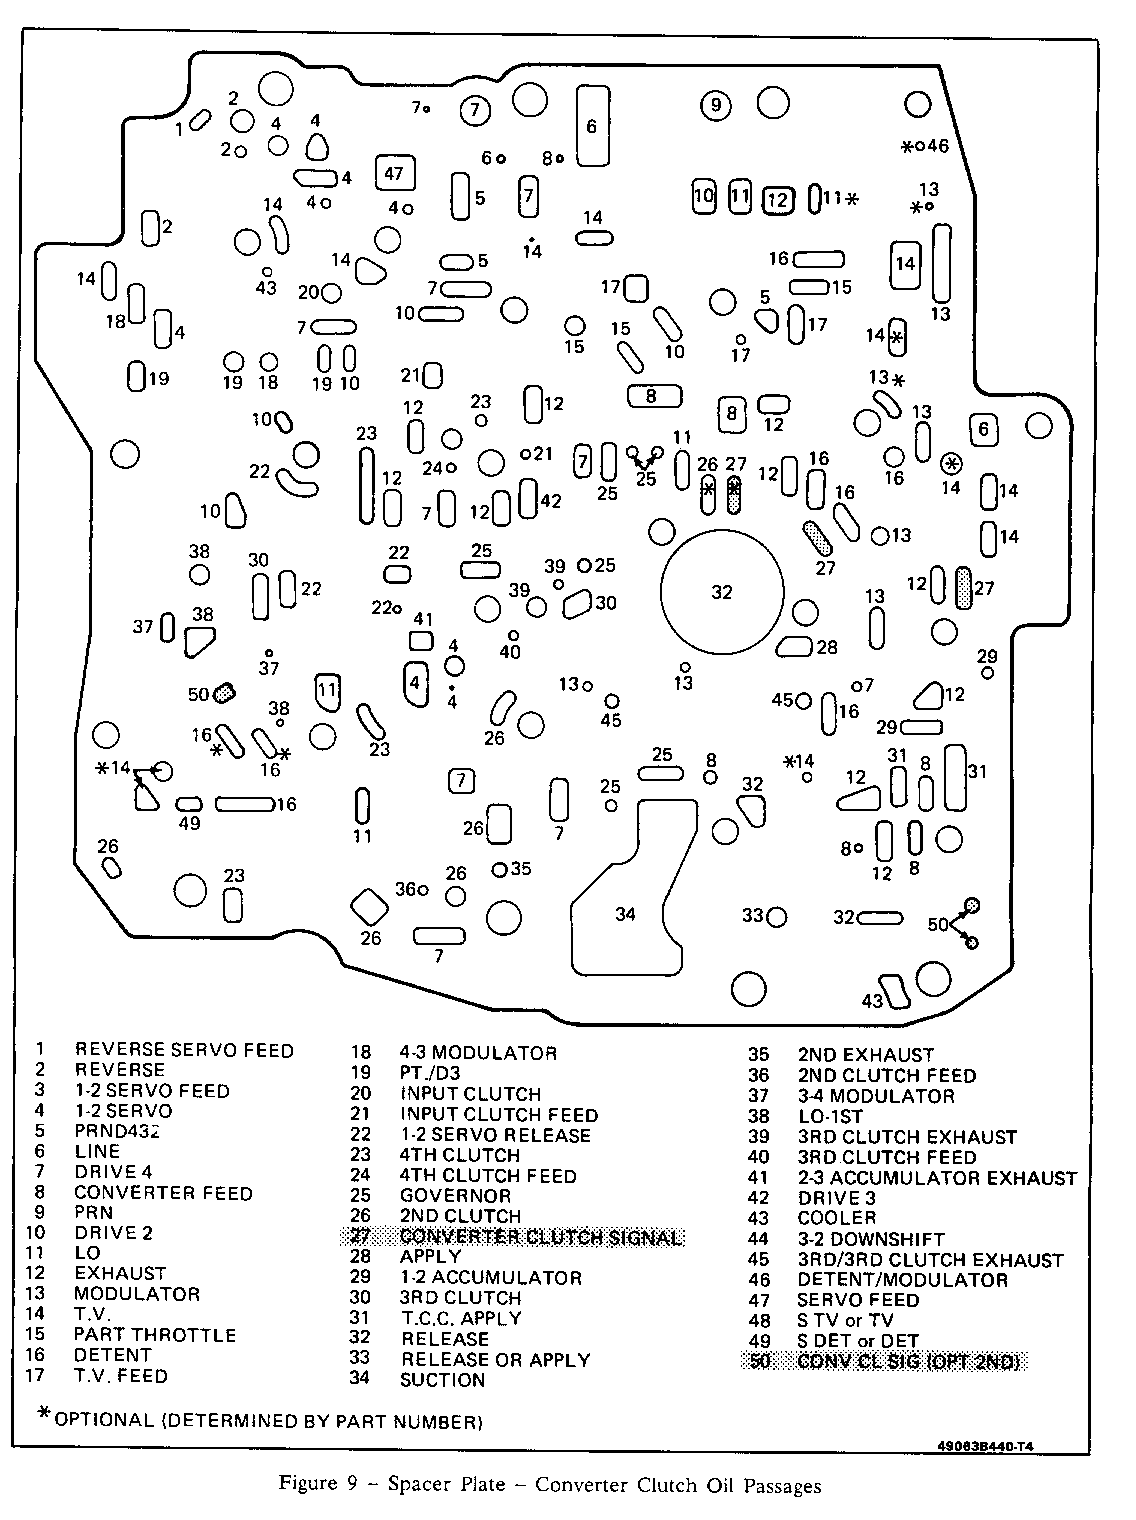
o Blockage or restriction of the VCC signal oil passages to the VCC solenoid - verify that the converter clutch screen (Figure 8) and spacer plate passages #27 and #50 (Figure 9) are not restricted.
V. VISCOUS CONVERTER CLUTCH SLIPPAGE ---------------------------------
If previous checks indicate the VCC is slipping, either the clutch apply pressure is low or the viscous clutch is faulty. To determine what is causing the VCC slippage, proceed as follows:
1. Check minimum and maximum line pressures and vacuum supply to the modulator as outlined in the appropriate Cadillac Service Information Manual, and correct any problems found.
2. If line pressures and vacuum check good, the transaxle must be inspected for leakage in the converter clutch apply passages. Check for VCC apply pressure leakage at:
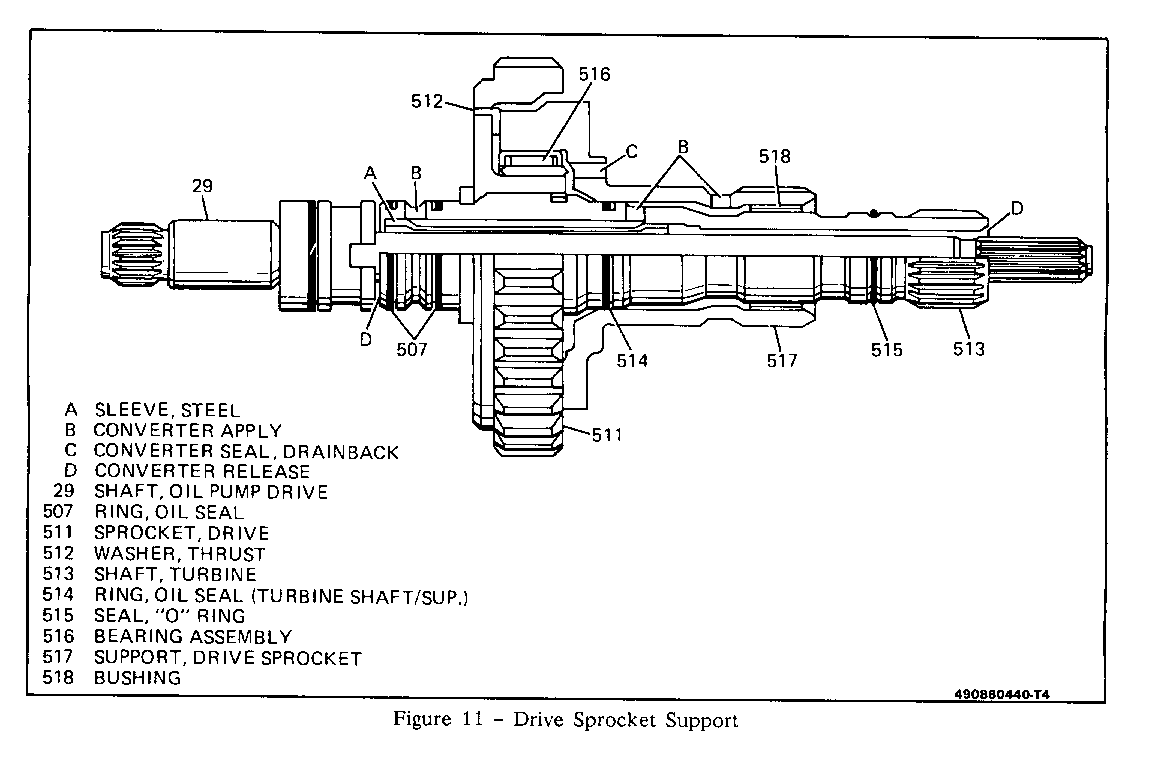
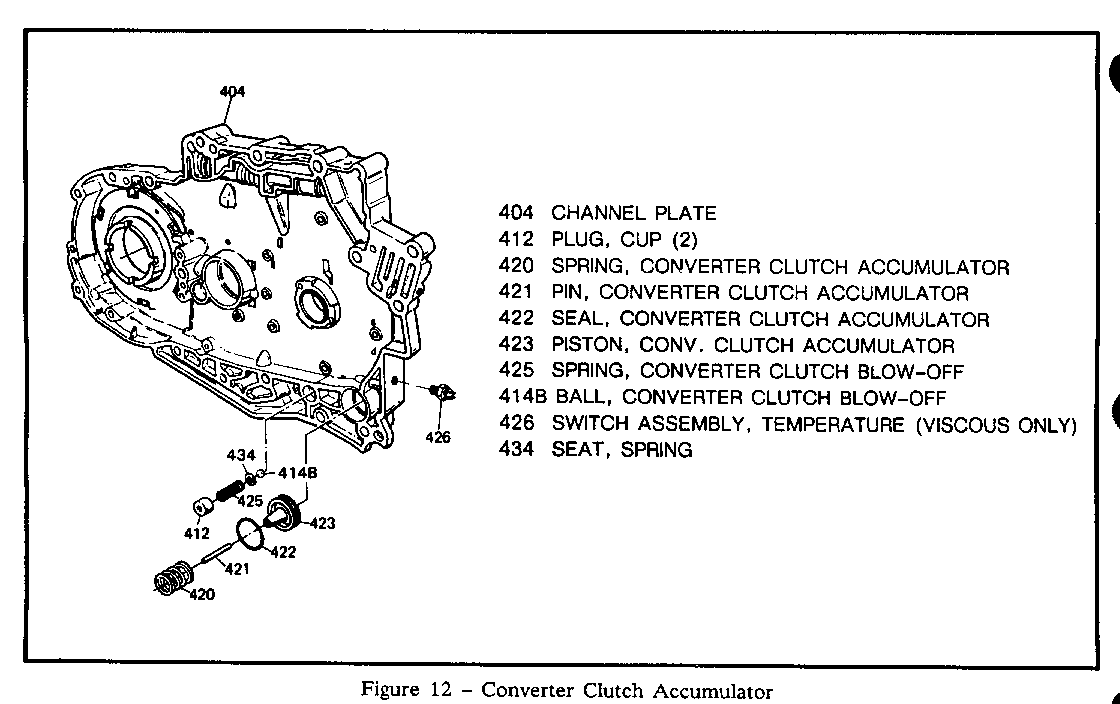
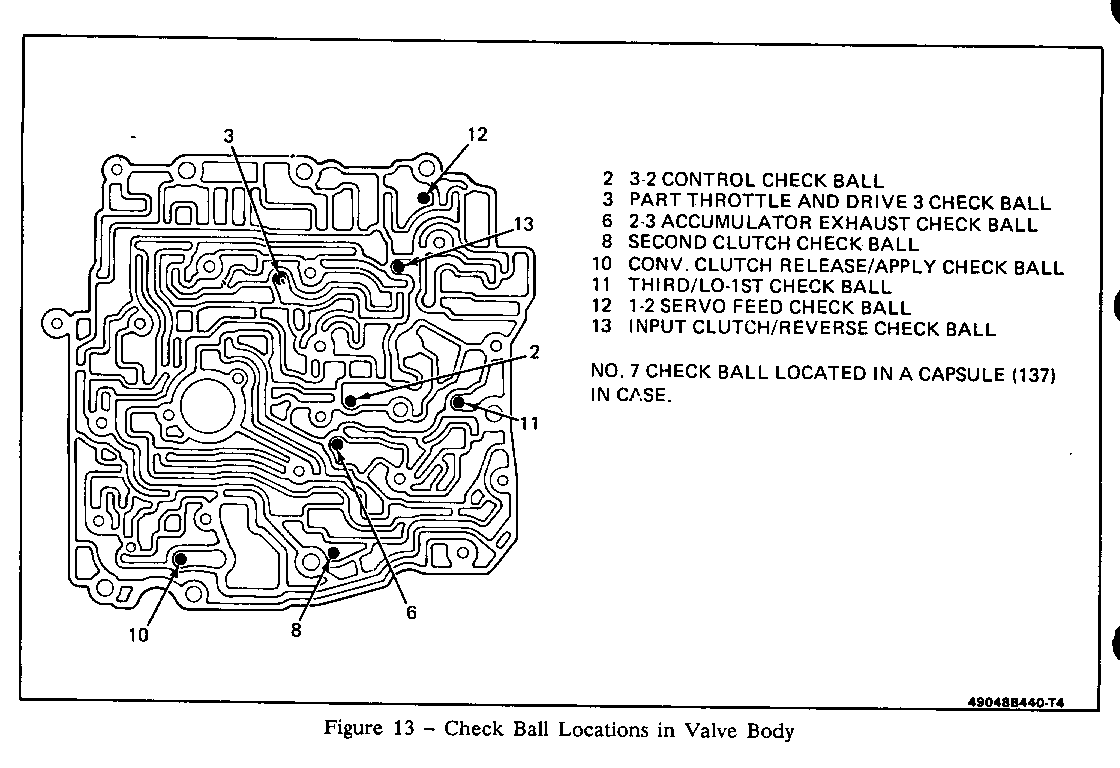
o converter clutch accumulator (#423, Figure 12) o converter clutch blow-off check ball (414B Figure 12) o check ball #10 seat (Figure 13) o converter clutch regulator valve (#321 Figure 10) o apply passages in the drive sprocket support (passage B in Figure 11) o missing/damaged turbine shaft seals or bushings (#507, #514, #518 Figure 11)
3. If no problems are found with the hydraulic portion of the VCC apply circuit, replace the torque converter.
NOTE: If the transaxle fluid has an unusual odor, and/or a thick liquid material that is clear/milky in color is found in the pan, the viscous fluid has leaked out of converter clutch assembly. If this condition is noted, the transaxle must be disassembled, thoroughly cleaned, and the cooler flushed to remove all viscous fluid from the transaxle. When reassembling the transaxle, replace the torque converter, all fiber clutch plates, and bands.
General Motors bulletins are intended for use by professional technicians, not a "do-it-yourselfer". They are written to inform those technicians of conditions that may occur on some vehicles, or to provide information that could assist in the proper service of a vehicle. Properly trained technicians have the equipment, tools, safety instructions and know-how to do a job properly and safely. If a condition is described, do not assume that the bulletin applies to your vehicle, or that your vehicle will have that condition. See a General Motors dealer servicing your brand of General Motors vehicle for information on whether your vehicle may benefit from the information.
