LEAN DRIVEABILITY CODES 13/45 SERVICE PROCEDURE

MODELS AFFECTED: 1985 FWD FLEETWOOD AND DEVILLES
Some 1985 FWD Devilles and Fleetwoods may experience a lean driveability condition and possibly ECM diagnostic codes 13 and/or 45. Symptoms of a lean driveability condition can include chuggle, surge, sag, or reduced engine performance. This condition may be caused by a voltage difference between the oxygen sensor ground (the engine block) and the ECM oxygen sensor ground reference, circuit 413, which connects to the generator bracket. Should a poor ground exist, the voltage difference between these two grounds is added to the oxygen sensor voltage signal, falsely indicating a rich (high voltage) oxygen sensor signal at the ECM. The ECM compensates for a high oxygen sensor voltage by commanding a lean mixture.
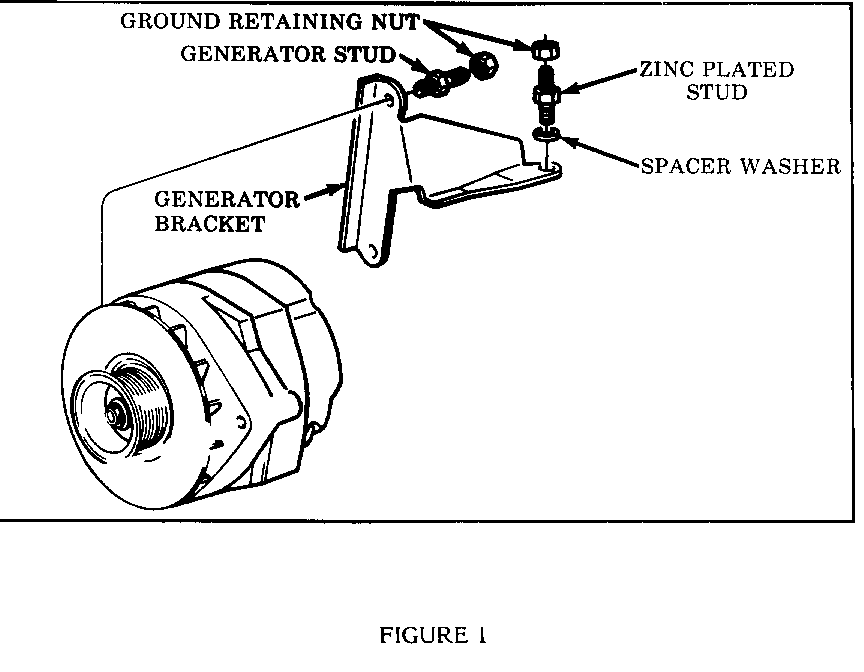
Before diagnosing a lean driveability condition or diagnostic codes 13 and/or 45, the procedure below should be followed (refer to Figure 1).
1. Inspect the generator stud.
If the generator stud has a black or brown wire ring terminal on it, then the ECM oxygen sensor ground must be relocated. Proceed to step 2.
If the generator stud does not have a black or brown wire ring terminal on it, then the ECM oxygen sensor ground has been relocated. Proceed to the 1985 FWD Deville, Fleetwood Service Information Manual for diagnosis.
2. Remove the ground retaining nut and ring terminals from the generator stud.
3. Early production cars have two ring terminals on the generator stud. Reinstall the dual black wire ring terminal on the generator stud. Do not install the single black wire ring terminal at this time; this is the ECM oxygen sensor ground (circuit 413) which will be relocated later.
Late production cars have three ring terminals on the generator stud. Reinstall the two black single wire ring terminals on the generator stud. Do not install the single tan wire ring terminal at this time; this is the ECM oxygen sensor ground (circuit 413) which will be relocated later.
4. Re-torque the ground retaining nut to 28-37 ft. lbs. (38-50 N.m).
5. Remove the generator bracket rear bolt.
6. Install spacer washer, part number 10019493, onto zinc plated stud, part number 1634167 (refer to Figure 1). The spacer washer is needed to prevent the stud from bottoming out in the generator bracket rear bolt hole.
7. Install the zinc plated stud, part number 1623567, into the generator bracket rear bolt hole and torque to 28-37 ft.-lbs. (38-50 N.m).
8. Route the ECM oxygen sensor ground wire which was left disconnected in step 8 to the zinc plated stud and install the ring terminal on the stud. Do not put any sharp bends in the ECM oxygen sensor ground wire.
9. Install the zinc plated nut, part number 11504039, on the stud and torque to 27-46 ft. lbs. (20-34 N.m).
IMPORTANT: Zinc plated stud, P/N 1623567, and nut, P/N 11504039, must be used to ensure good electric conductivity. Because of the low current and sensitivity to even a slight vottage drop, a standard bolt and nut must not be used.
10. Disconnect and connect the negative battery cable to erase the ECM's Block Learn. This will allow the ECM to "re-learn" the vehicles operating characteristics.
11. Test drive the vehicle. Enter diagnostics and monitor the "Auto" light and the "ECON" light. With the engine in closed loop, "Auto" light on, observe the "ECON" light (oxygen sensor status).
12. If the "ECON" light is off all or most of the time, proceed to Chart A-7 Section 6E of the Service Information Manual.
13. If the "ECON" light is on all or most of the time, proceed to chart A-8 Section 6E of the Service Information Manual.
14. If the "ECON" light turns off and on at least once every 2 seconds and the problem still persists proceed to symptom diagnosis in sub Section B of Section 6E in the Service Information Manual.
The following parts are necessary to complete the above procedure:
PART QUANTITY PART NUMBER ---- -------- ------------ Zinc Plated Stud 1 1623567 Spacer Washer 1 10019493 Zinc Plated Nut 1 11504039
For warranty purposes, use labor Operation No. T6116 at .3 hour.

General Motors bulletins are intended for use by professional technicians, not a "do-it-yourselfer". They are written to inform those technicians of conditions that may occur on some vehicles, or to provide information that could assist in the proper service of a vehicle. Properly trained technicians have the equipment, tools, safety instructions and know-how to do a job properly and safely. If a condition is described, do not assume that the bulletin applies to your vehicle, or that your vehicle will have that condition. See a General Motors dealer servicing your brand of General Motors vehicle for information on whether your vehicle may benefit from the information.
