A/C COMPRESSOR NOISE DIAGNOSIS- REPAIR PROCEDURES

MODELS AFFECTED: 1985-86 DE VILLES AND FLEETWOODS EQUIPPED WITH HT4100 ENGINE
This bulletin supersedes bulletins T-84-102A and T-85-100 which should both be destroyed.
Some 1985-1986 FWD De Villes and Fleetwoods may experience a rattle, buzz, growl, whine or moaning noise at certain engine speeds with the air conditioning (A/C) compressor engaged. This may be caused by vibration of the A/C compressor clutch driver, A/C hoses and/or lines or A/C compressor pumping pulses. These pressure pulses are transmitted through the A/C compressor hose assembly, condenser, evaporator and accumulator assemblies. Compressor pulsation noise is more pronounced when operating at maximum cooling demand (high ambient temperatures and humidity). The following procedure should be followed to properly diagnose and correct these conditions.
DIAGNOSIS
1. Start car. Set Electronic Climate Controt (ECC) to 60 DEG AUTO mode, LO fan. Allow car to warm up by idling 3-4 minutes.
2. Enter ECM diagnostic parameter P.1.1 (engine RPM) as described in the Service Information Manual.
3. With the transaxle in "Park", note the intensity and type of noise(s) when the compressor is engaged at the following engine speeds:
A. 1730 RPM B. 1650 RPM C. 1500 RPM D. 1100 RPM E. 950 RPM
4. Set the ECC to 60 F ECON mode, LO fan to disengage the compressor. Again note the intensity and type of noise(s) at the listed engine speeds. If the noise level does NOT decrease when the A/C compressor is off (ECON mode), then the noise is NOT A/C related and the following procedures are not applicable.
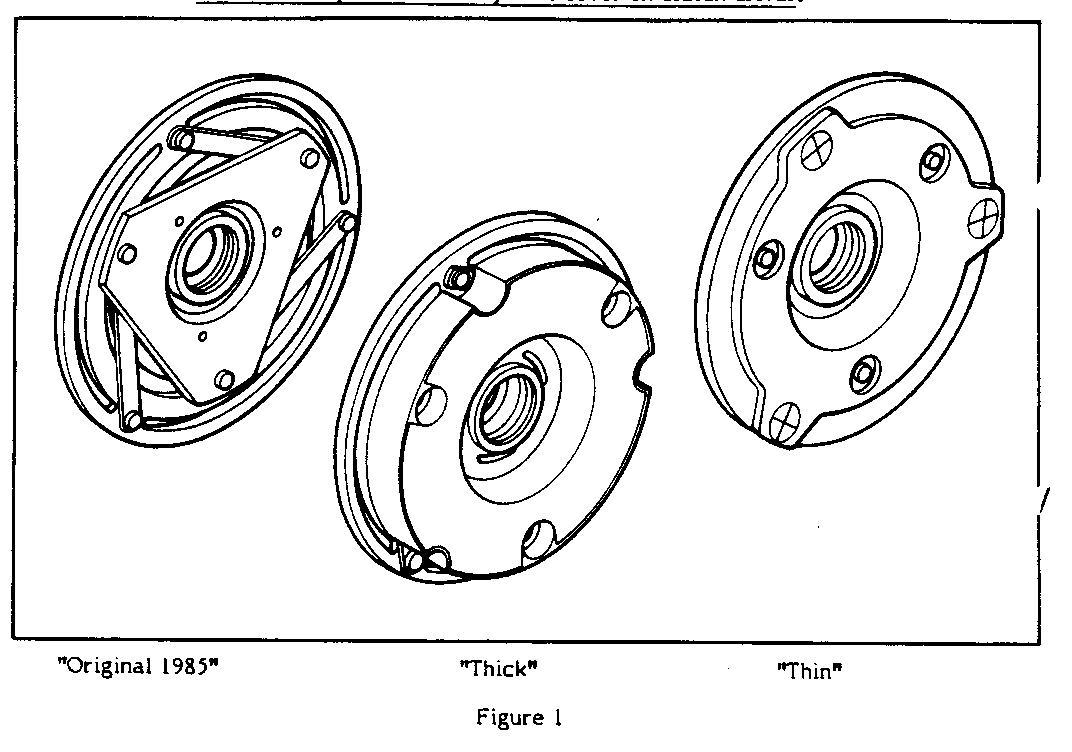
NOISE @ 1100 AND/OR 1650 RPM ---------------------------- For a noise noted at 1100 and/or 1650 RPM the "thin" damped A/C clutch driver kit (PIN 3092084) should be installed (Figure 1). Refer to Section A, "Noises at 1100 or 1650 RPM" for repair procedure.
NOTE: 1986 De Villes built after broadcast number 239841 already have the thin damped A/C clutch driver installed.
NOISE PRESENT AT OTHER THAN 1100 & 1650 RPM
Noise transmitted can be reduced by isolating the accumulator, hoses and liquid lines as outlined in Section B. Noises noted other than at 1100 and/or 1650 RPM are a result of normal pumping pulsations from the compressor. Refer to Section B, "Noises Other Than 1100 or 1650 RPM" for procedure to isolate A/C components from transmitting noise into the passenger compartment.
REPAIR PROCEDURE
Begin by performing a BCM PROM check and replacing as required, per Serviceman Bulletin T-85-86A "Insufficient A/C Cooling at Idle."
A. NOISES AT 1100 OR 1650 RPM -------------------------- NOTICE: Do not attempt to install any dust cover on clutch driver.
1. Remove drive belt from compressor pulley and hoist vehicle.
2. Remove engine splash shield from inside right front wheel house by disengaging the four retainers.
3. Remove right front frame bolt plastic dust cover.
4. Loosen frame bolt as required to provide clearance for clutch driver removal/installation.
5. Remove A/C compressor clutch driver dust cover Torx screws and remove cover, if applicable. Discard the dust cover since it cannot be used with the new clutch driver. The new clutch driver has an integral dust cover. Remove clutch driver nut.
6. Remove clutch driver from compressor using tool J-33013-B as described in the Front-Wheel-Drive De Ville and Fleetwood Service Information Manual.
7. Thoroughly clean any grease or oll film from clutch face on pulley.
8. Position new clutch driver on compressor shaft. Be sure that the key and keyway are properly aligned. Using tool J-33013-B, install new clutch driver on compressor shaft as described in the Front-Wheel-Drive De Ville and Fleetwood Service information Manual. When using this procedure, substitute special tool J-25030 (clutch hub holding tool) for tool J-33027. Install clutch driver nut.
9. Install/tighten frame bolt and dust cover which were loosened or removed in steps C and D. Lower vehicle.
10. Reinstall the drive belt on the A/C compressor pulley.
11. With the engine running, cycle the A/C compressor "OFF" and "ON" several times to burnish the clutch surface and ensure proper operation.
For warranty purposes, use Operation Number D4240 at .6 hour.
B. NOISES OTHER THAN 1100 OR 1650 RPM ----------------------------------
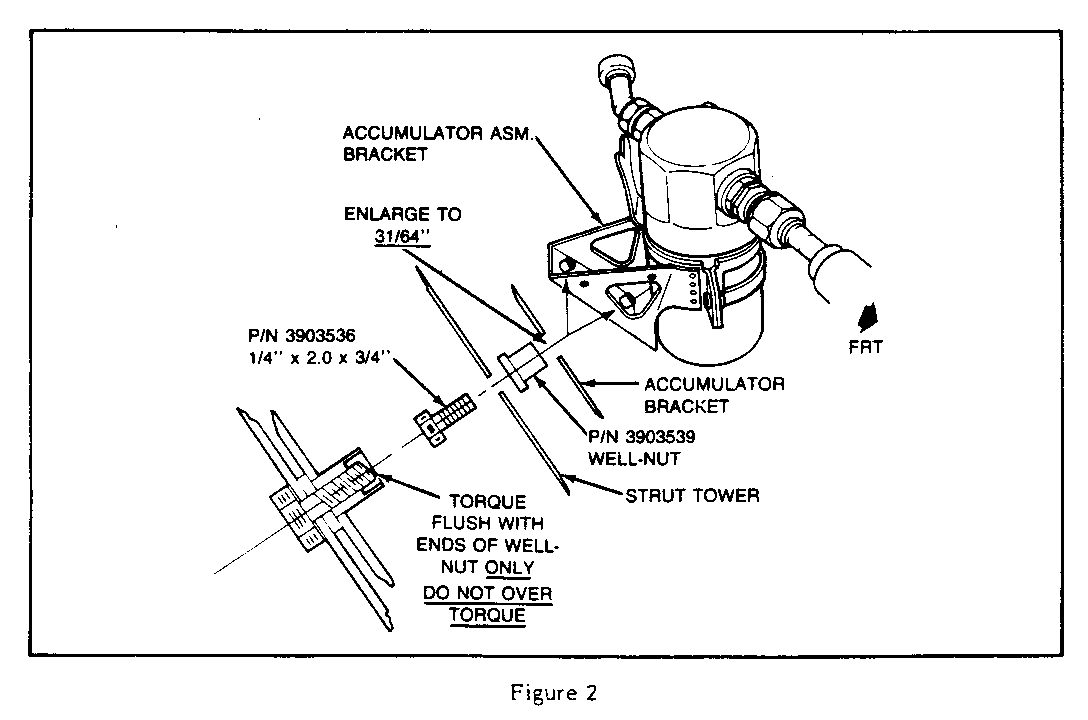
1. To Isolate the accumulator: --------------------------- a. Remove the accumulator bracket and enlarge the existing attachment holes with a 31/64" drill bit. Do not enlarge the hole sizes in the right strut tower. Drill only the accumulator bracket.
b. Install "well nuts" (P/N 3903539) in the enlarged holes in the accumulator bracket as shown in Figure 2. (The rubber shoulder of the "well nut" must be to the strut tower of the bracket.)
c. Reinstall the accumulator bracket using new bolts PIN 3903536. Tighten the bolt, using a hand ratchet and socket until the threaded end of the bolt is just flush with the end of the "well nut." This will provide the proper loading on the "Well nut" to isolate the bracket and accumulator from the right strut tower. Do not over torque the rubber portion of the "well nut"or it will become ineffective as an isolating unit.
2. To Isolate the liquid line: --------------------------- a. If equipped, remove the front liquid line clip and discard.
b. Remove liquid line portion of clip at strut tower if so equipped (early 1985 vehicles).
c. Wrap the liquid line with closed cell foam rubber and relocate into the larger opening (toward the engine) of the "plastic" clip located under the accumulator. Reform the liquid line so it does not contact any part of the vehicle including the right strut tower or clip.
3. To Isolate the compressor hose: ------------------------------- If compressor hose assembly does not have a muffler mounted at the starter, install new compressor hose assembly P/N 1634230, (includes larger, baffled muffler). Use refrigerant oil on o-rings. A new starter stud (P/N 1634280) and nut (P/N 11507036) are required to attach the muffler to the starter.
Ensure that the condenser and compressor hoses are not contacting the body.


General Motors bulletins are intended for use by professional technicians, not a "do-it-yourselfer". They are written to inform those technicians of conditions that may occur on some vehicles, or to provide information that could assist in the proper service of a vehicle. Properly trained technicians have the equipment, tools, safety instructions and know-how to do a job properly and safely. If a condition is described, do not assume that the bulletin applies to your vehicle, or that your vehicle will have that condition. See a General Motors dealer servicing your brand of General Motors vehicle for information on whether your vehicle may benefit from the information.
