Inflatable Restraint Sensing and Diagnostic Module Replacement for Cadillac SRX 2006
Removal Procedure
- Disable the SIR system. Refer to SIR Disabling and Enabling .
- Remove the center console. Refer to Front Floor Console Replacement in Instrument Panel, Gages and Console.
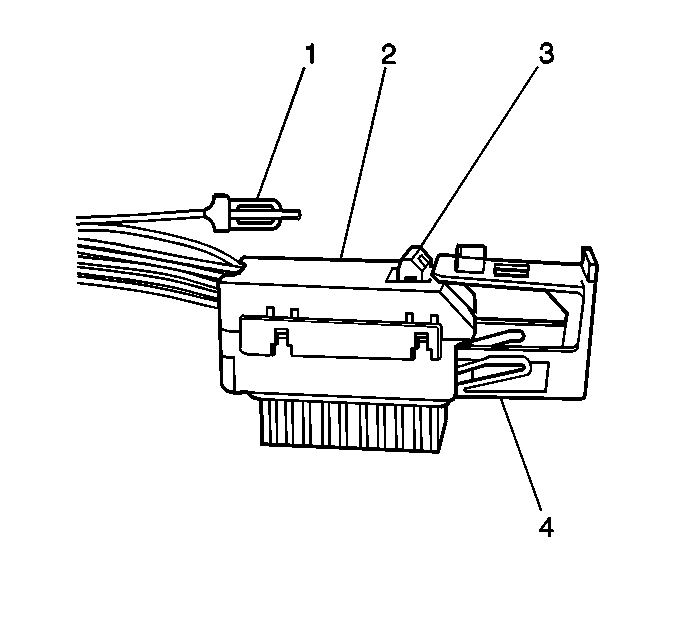
- Remove the connector position assurance (CPA) (1) from the wiring harness connector (2) to the inflatable restraint sensing and diagnostic module (SDM).
- Push the flex lock button (3) down and move the sliding connector locking cover (4) to the OPEN position.
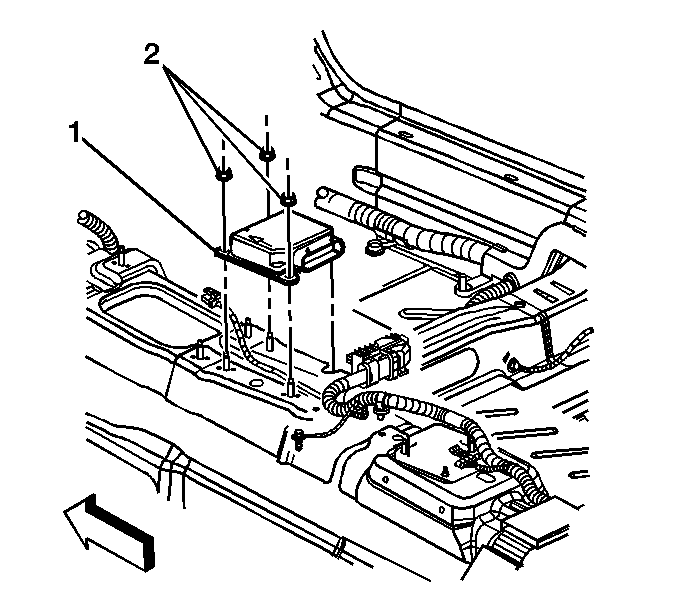
- Disconnect the wiring harness connector from the SDM (1).
- Remove the SDM mounting fasteners (2).
- Remove the SDM from the console floor.
Caution: Refer to SIR Caution in the Preface section.
Caution: Do not strike or jolt the inflatable restraint sensing and diagnostic module (SDM). Before applying power to the SDM, make sure that it is securely fastened with the arrow facing toward the front of the vehicle. Failure to observe the correct installation procedure could cause SIR deployment, personal injury, or unnecessary SIR system repairs.
Important: The SDM is shown with the carpet removed for illustration purposes only. Removal of the front carpet or the front seats is not necessary to service the SDM.
Installation Procedure
- Remove any dirt, grease, or other impurities from the mounting surface.
- Install the SDM (1) horizontally to the console floor.
- Point the arrow on the SDM toward the front of the vehicle.
- Install the SDM mounting fasteners (2).
- Connect the wiring harness connector (1) to the SDM.
- Push the flex lock button (3) down and move the sliding connector locking cover (4) to the CLOSE position.
- Install the CPA (1) to the wiring harness connector (2) to the inflatable restraint SDM.
- Install the console. Refer to Front Floor Console Replacement in Instrument Panel, Gages and Console.
- Install the driver and the passenger seats to the original position.
- Enable the SIR system. Refer to SIR Disabling and Enabling .
- Program the new SDM into the dash integration module. Refer to Body Control Module (BCM) Programming/RPO Configuration in Computer/Integrating Systems.
- Refer to Control Module References for programming and setup information.
Notice: Use the correct fastener in the correct location. Replacement fasteners must be the correct part number for that application. Fasteners requiring replacement or fasteners requiring the use of thread locking compound or sealant are identified in the service procedure. Do not use paints, lubricants, or corrosion inhibitors on fasteners or fastener joint surfaces unless specified. These coatings affect fastener torque and joint clamping force and may damage the fastener. Use the correct tightening sequence and specifications when installing fasteners in order to avoid damage to parts and systems.
Tighten
Tighten fasteners to 9 N·m (80 lb in).
Important: The AIR BAG indicator may remain ON after the SDM has been replaced. DTC B1001 may set requiring the SDM part number to be set in multiple modules. If the indicator remains ON after enabling the SIR system, perform the diagnostic system check and follow the steps thoroughly to ensure that the SDM is set properly.
