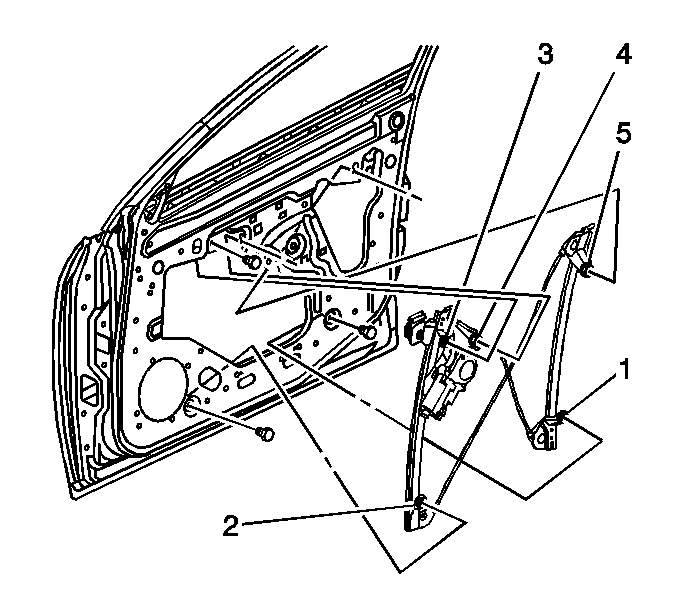
For 1990-2009 cars only
Removal Procedure
- Raise the window to the full up position.
- Remove the door trim panel. Refer to Front Side Door Trim Panel Replacement .
- Remove the water deflector. Refer to Front Side Door Water Deflector Replacement .
- Raise and support the window in the full up position.
- Through the access holes in the inner door panel, loosen the window clamp nuts 4 revolutions.
- Connect the door trim panel wiring harness.
- Lower the window regulator 3/4 of the way down.
- Disconnect the electrical connector from the window regulator motor.
- Remove the window regulator bolts (1, 2, 3, 4, 5).
- Remove the window regulator from the door.

Installation Procedure
- Install the window regulator into the door.
- Install the window regulator bolts (1, 2, 3, 4, 5).
- Remove the support from the window.
- Lower the window into the window regulator clamps.
- Connect the power window motor electrical connector.
- Start the vehicle.
- Raise the window to the full up position.
- Inspect the window for proper operation and fit.
- Shut off the vehicle.
- Install the water deflector. Refer to Front Side Door Water Deflector Replacement .
- Install the door trim panel. Refer to Front Side Door Trim Panel Replacement .
- Reprogramming the power window regulator. Refer to Window Regulator Motor Programming and Setup .

Notice: Refer to Fastener Notice in the Preface section.
Tighten
Tighten the bolts to 9 N·m (80 lb in).
The window must be fully rearward into the window channel when it is seated in the window clamps.
Important: Start the vehicle to ensure maximum power to the window motor. This is required to fully seat the window for adjustment.
Tighten
Tighten the window clamp nuts to 11 N·m (95 lb in).
