Rear Propeller Shaft Replacement AWD
Notice: The propeller shaft must be supported during removal and/or installation so that the CV joint does not articulate more than 8 degrees. Allowing the propeller shaft to articulate greater than 8 degrees could cause damage to the CV boot. Damage to boot could lead to contamination or loss of lubrication which could lead to CV joint damage.
Removal Procedure
- Raise and support the vehicle. Refer to Lifting and Jacking the Vehicle.
- Remove the rear muffler. Refer to Exhaust System Replacement.
- Using a suitable jack stand, support the propeller shaft at the center support bearing.
- Remove the mounting bolts (1) for the center support bearing.
- Remove the propeller shaft nuts (4), bolts (6), and the washers (5) from the propeller shaft.
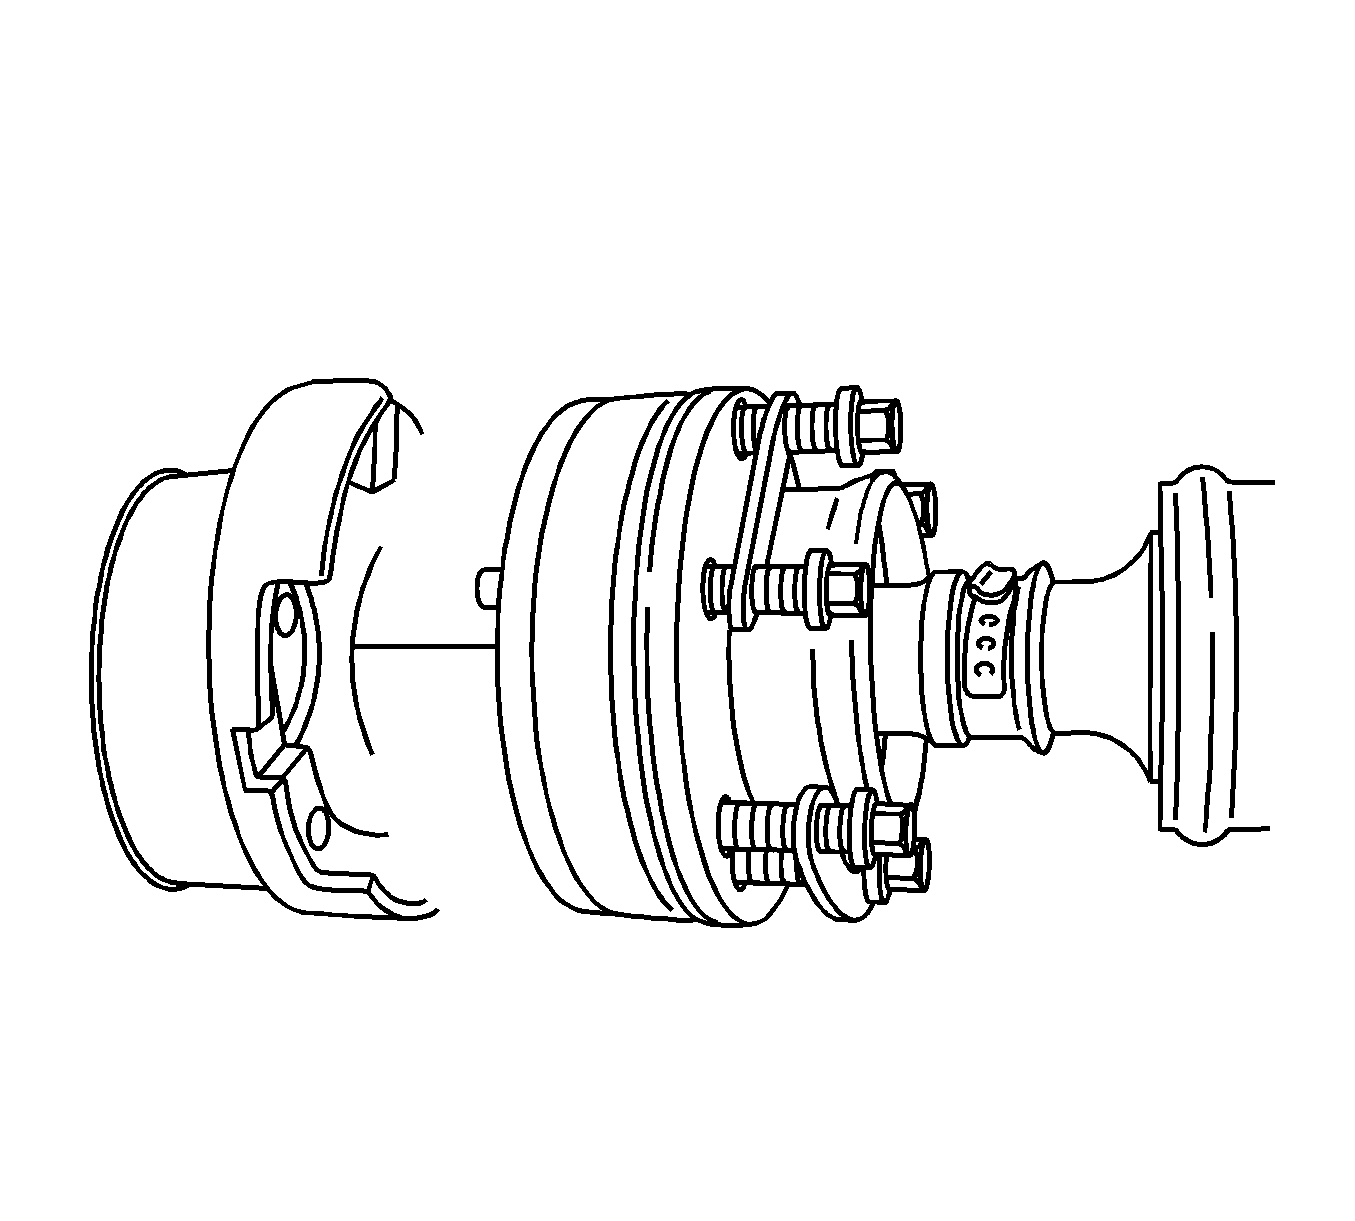
- Remove the bolts from the CV joint on the propeller shaft to the transmission /transfer case flange.
- Using a flat bladed screw driver, remove the propeller shaft from the transmission /transfer case flange.
- Remove the jack stand from the center support bearing.
- Remove the propeller shaft from the rear differential flange.
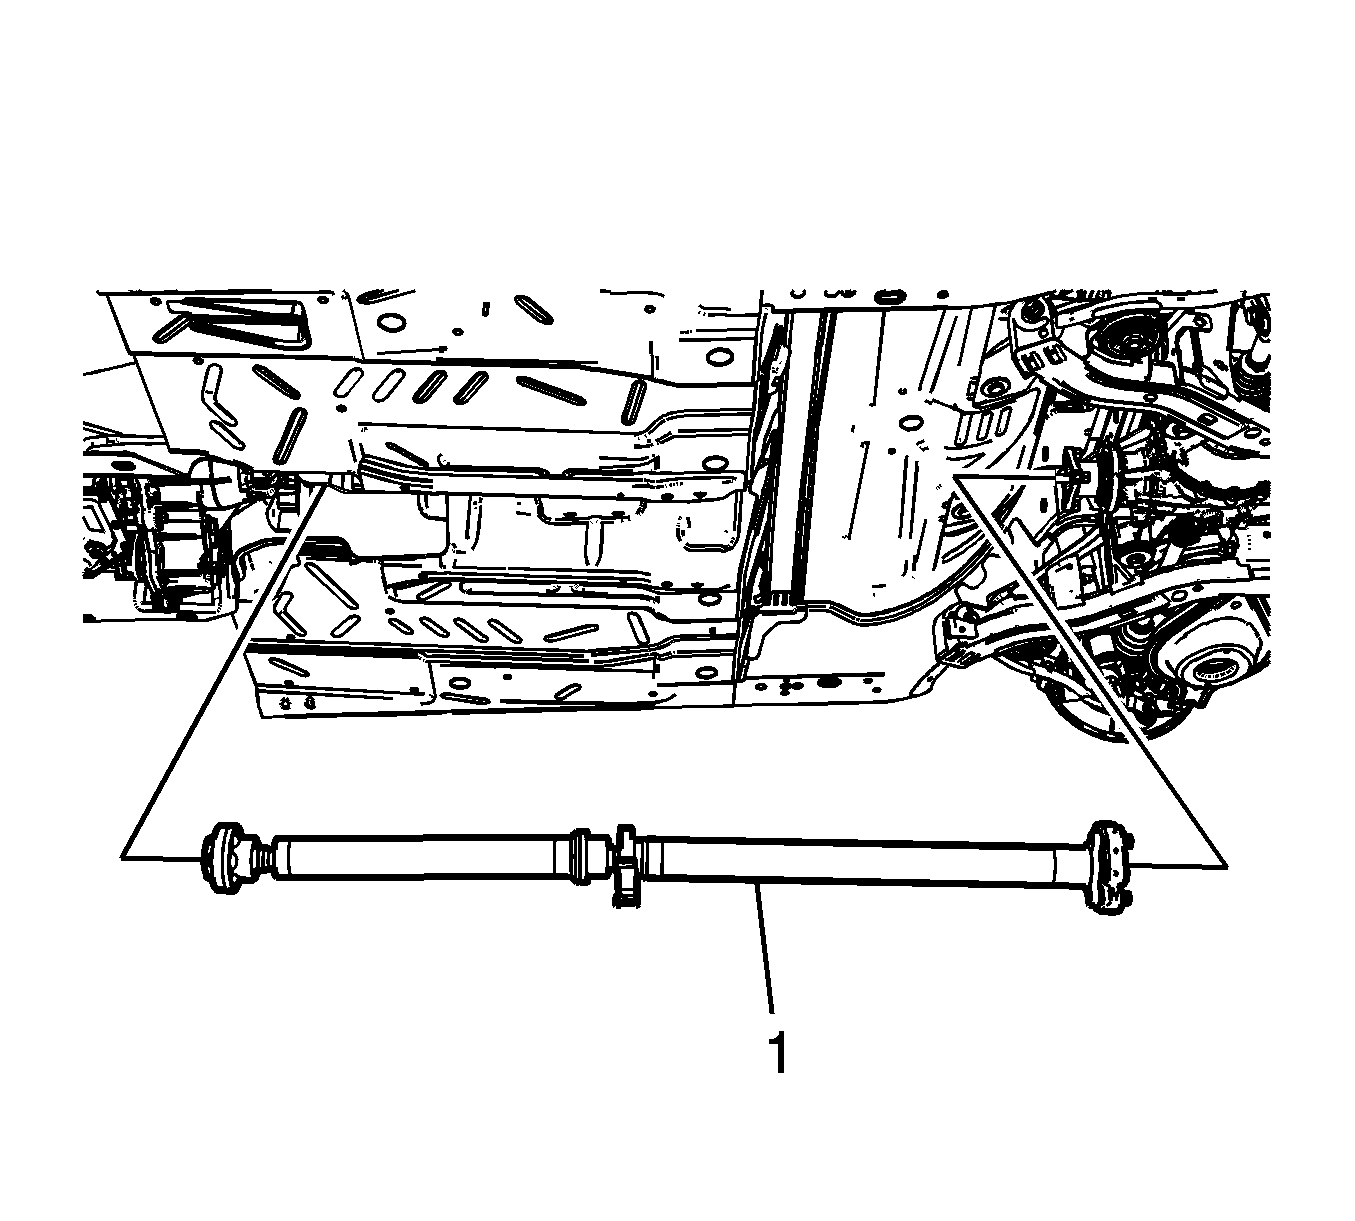
- Remove the propeller shaft (1) from the vehicle.
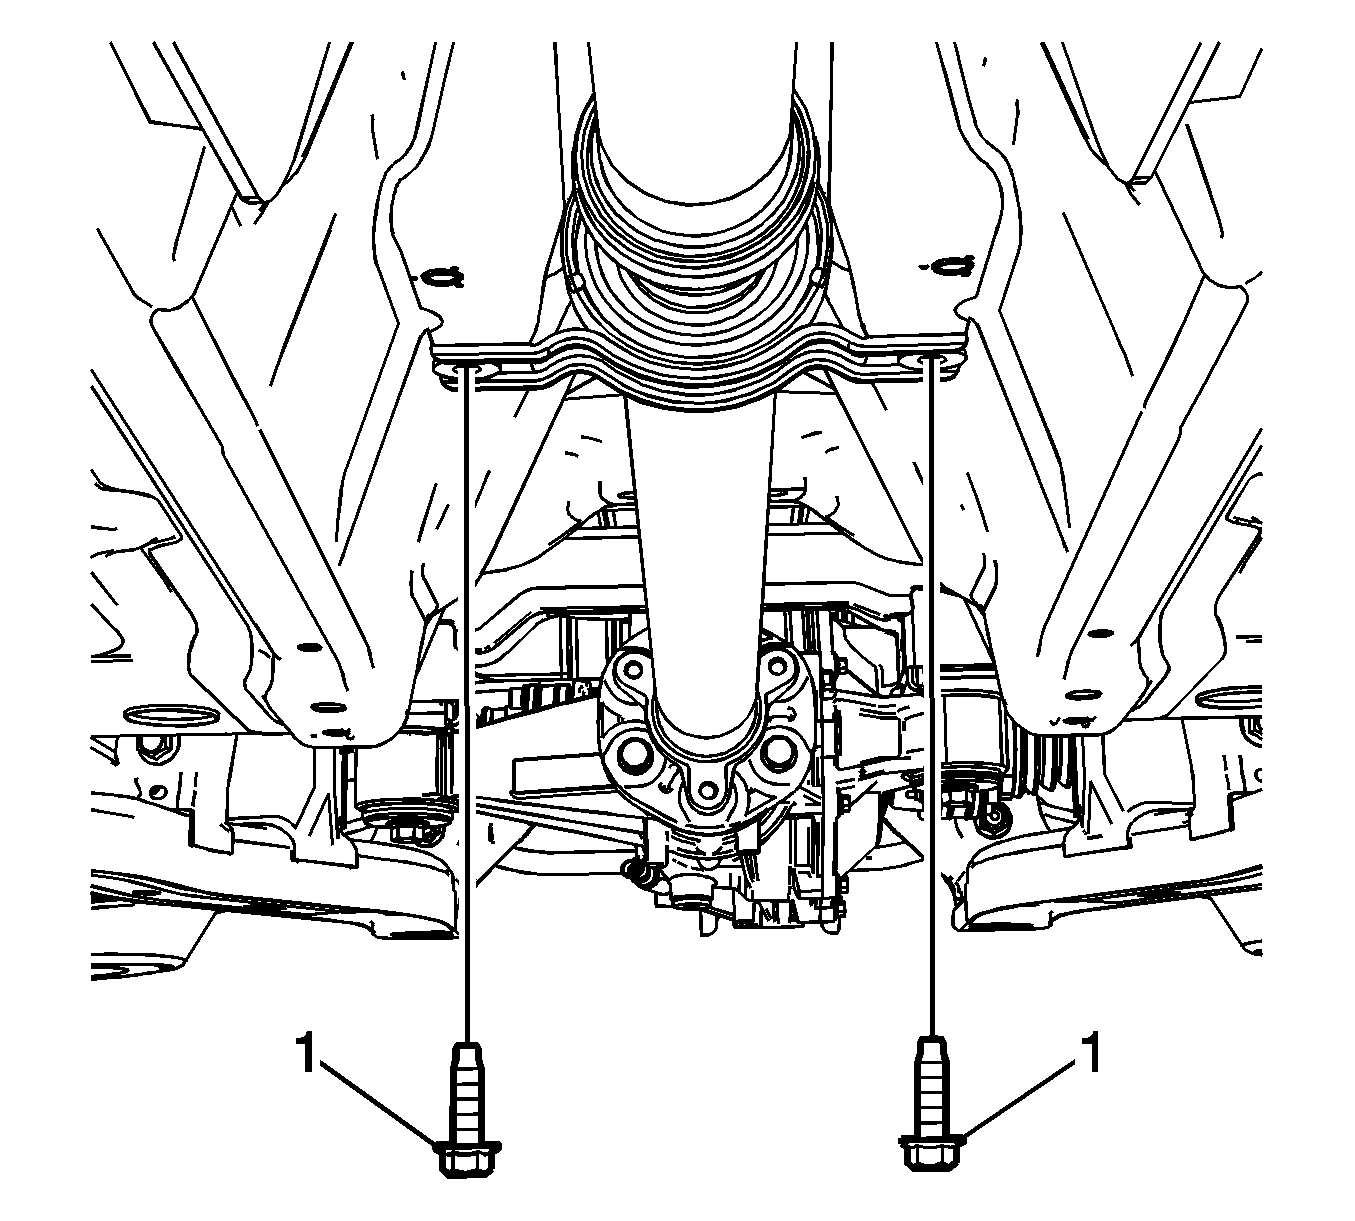
Important: Some vehicles are equipped with shims between the center support bearing and the mounting bracket for the center support bearing for the proper driveshaft angle.
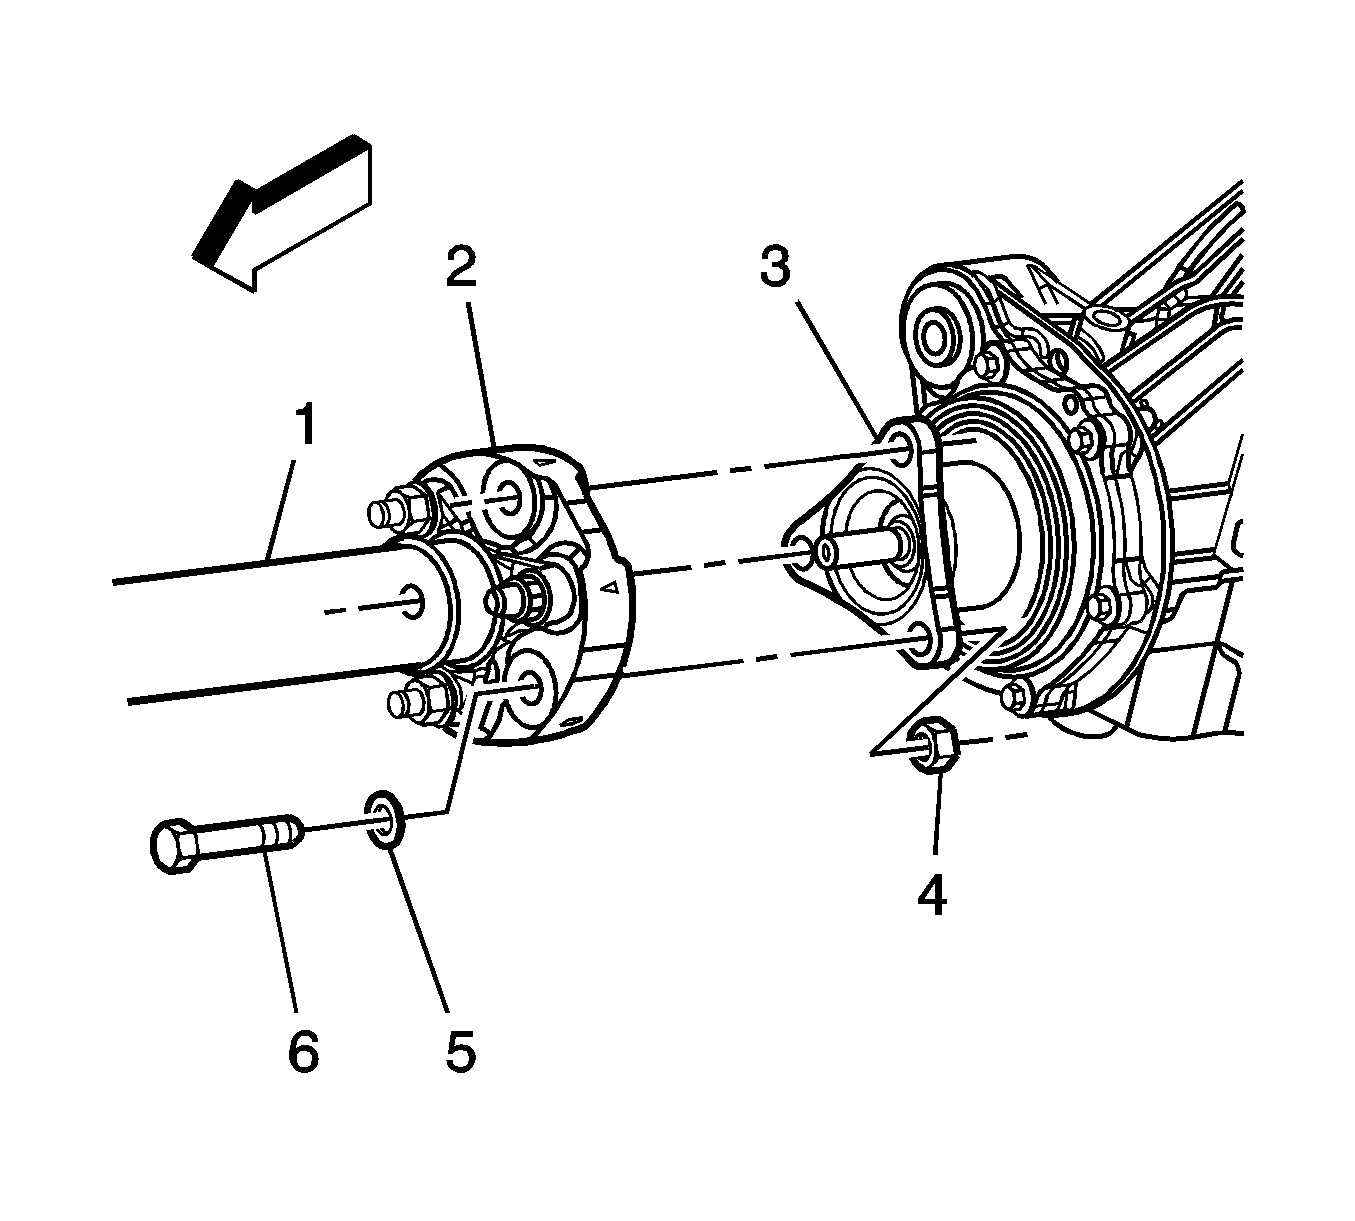
Important: Remove only the propeller shaft coupler-to-differential flange bolts. DO NOT remove the coupler from the propeller shaft.
Important: If the bolts and washers are found to be damaged or are excessively worn, DO NOT reuse the bolts and washers. Replace with new.
Installation Procedure
- Apply a small amount of lubricant GM P/N 1051344 (Canadian P/N 993037), or equivalent, to the rear propeller shaft center bushing and rear differential flange pilot shaft.
- With the aide of an assistant, position the propeller shaft in the vehicle.
- Install the propeller shaft center support bearing and the shims, if equipped.
- Install the mounting bolts (1) for the center support bearing.
- Align the orange paint mark (1) on the rear differential with the one yellow paint mark (2) on the propeller shaft.
- Thoroughly clean the threads using denatured alcohol, or equivalent, and allow to dry. Apply threadlocker GM P/N 12345493 (Canadian P/N 10953488), or equivalent, to the propeller shaft to the flange bolt. Ensure that there are no gaps in the threadlocker along the length of the filled area of the bolt. Allow the threadlocker to cure approximately 10 minutes before installation.
- Install the rear propeller shaft (1) coupler (2) on the differential flange (3).
- Install the bolt (6), and the washer (5).
- Install the propeller shaft coupler-to-differential flange nuts (4).
- Install the propeller shaft CV joint to transfer case flange bolts.
- Install the exhaust system. Refer to Exhaust System Replacement.
- Lower the vehicle.

Important: When installing the propeller shaft, install the propeller shaft to the transmission drive flange and the rear differential flange prior to install the center support bearing.

Important: Failure to install the shims could lead to an improper driveshaft angle and could cause damage to the other propeller shaft components.
Tighten
Tighten the support bearing bolts to 50 N·m (37 lb ft).
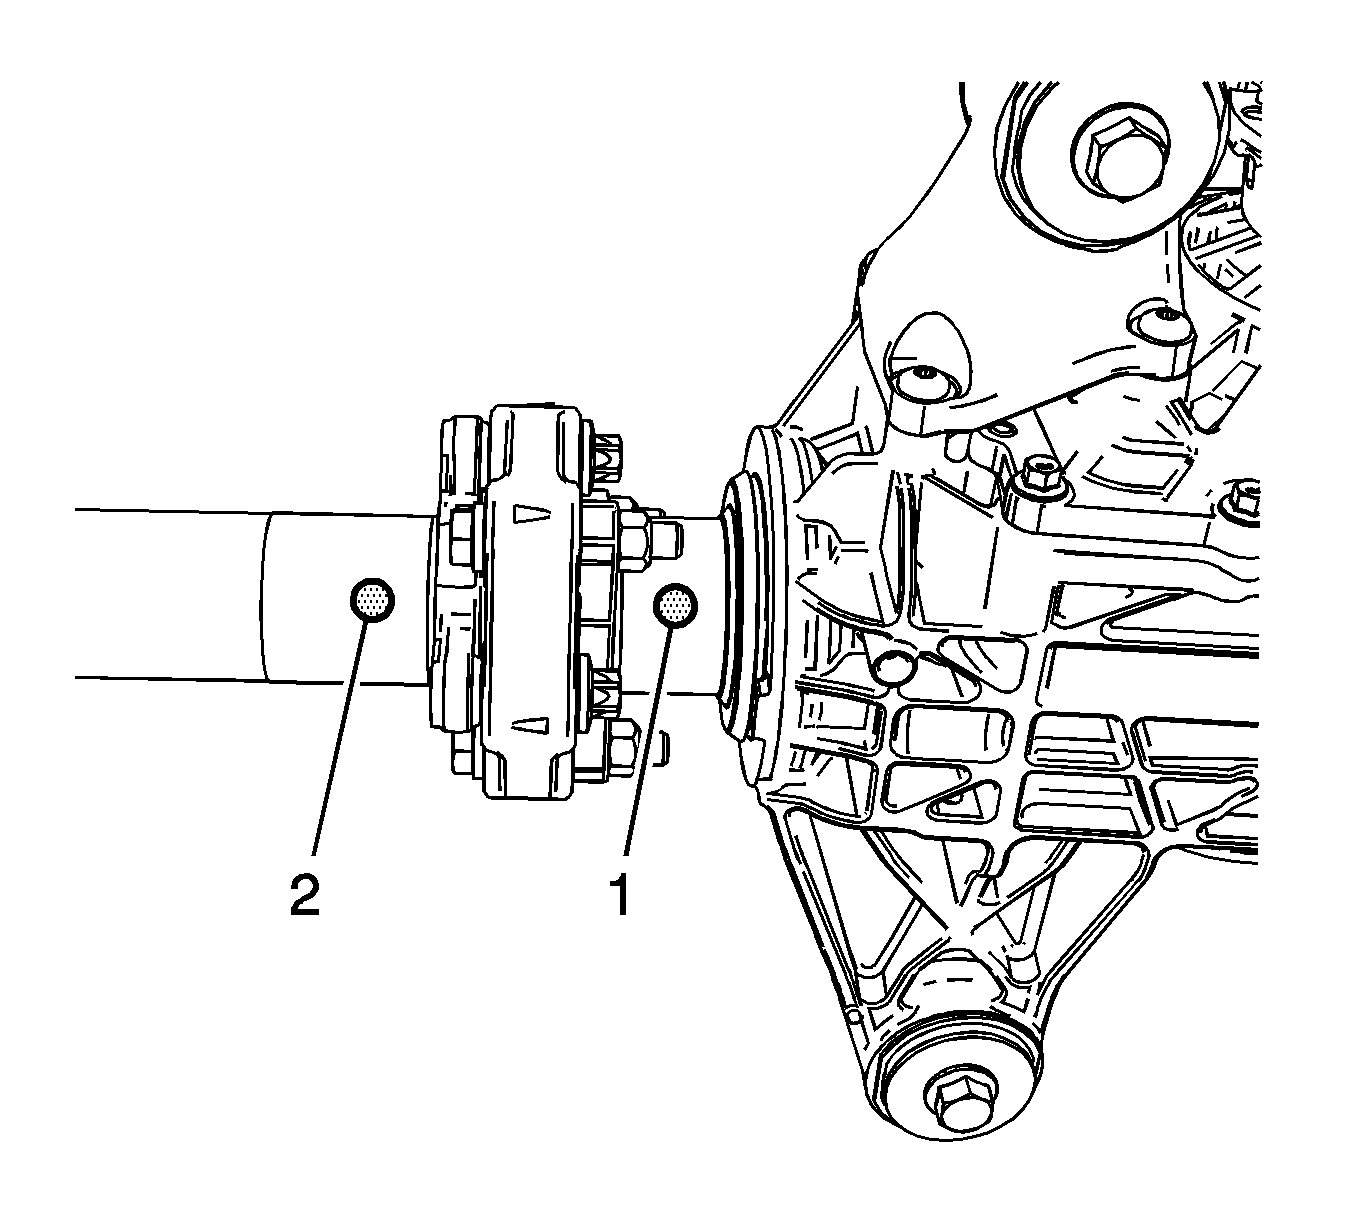
Important: Align the yellow and orange dots on the propeller shaft and the drive flange. Failure to do so could cause a drive line vibration and possible damage to the propeller shaft.
Important: If reusing the propeller shaft-to-flange nuts and bolts, to ensure proper adhesion and fastener retention, the threads must be free of debris prior to the application of threadlocker.

Notice: Refer to Fastener Notice in the Preface section.
Tighten
Tighten the nuts (4) to 85 N·m (63 lb ft).
Important: If reusing the propeller shaft to flange nuts and bolts, refer to step 5 for the proper application of the thread locker.
Tighten
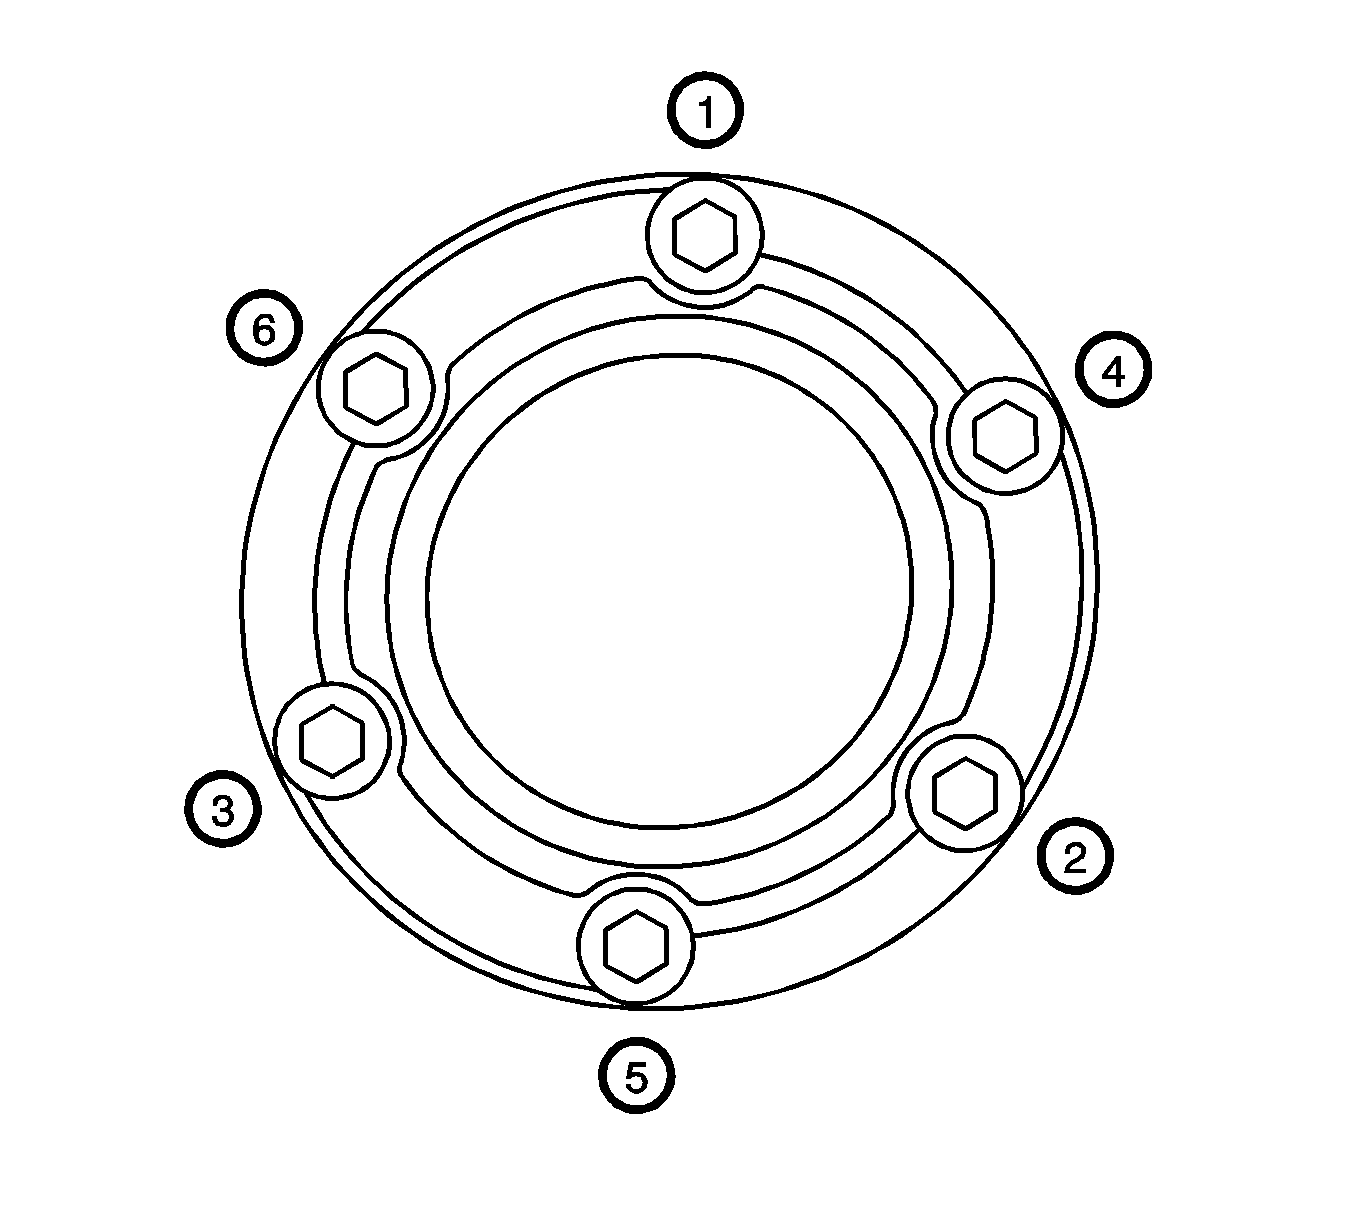
Tighten the propeller shaft CV joint to transfer case flange bolts in sequence (1-6) to36 N·m (27 lb ft).
Rear Propeller Shaft Replacement RWD
Notice: The propeller shaft must be supported during removal and/or installation so that the CV joint does not articulate more than 8 degrees. Allowing the propeller shaft to articulate greater than 8 degrees could cause damage to the CV boot. Damage to boot could lead to contamination or loss of lubrication which could lead to CV joint damage.
Removal Procedure
- Raise and support the vehicle. Refer to Lifting and Jacking the Vehicle.
- Remove the exhaust system. Refer to Exhaust System Replacement.
- Remove the propeller shaft coupler-to-transmission flange bolts (4), nuts (6) and washers (5).
- Remove the propeller shaft coupler-to-differential flange bolts (6), nuts (4) and washers (5).
- Support the propeller shaft at the support bearing.
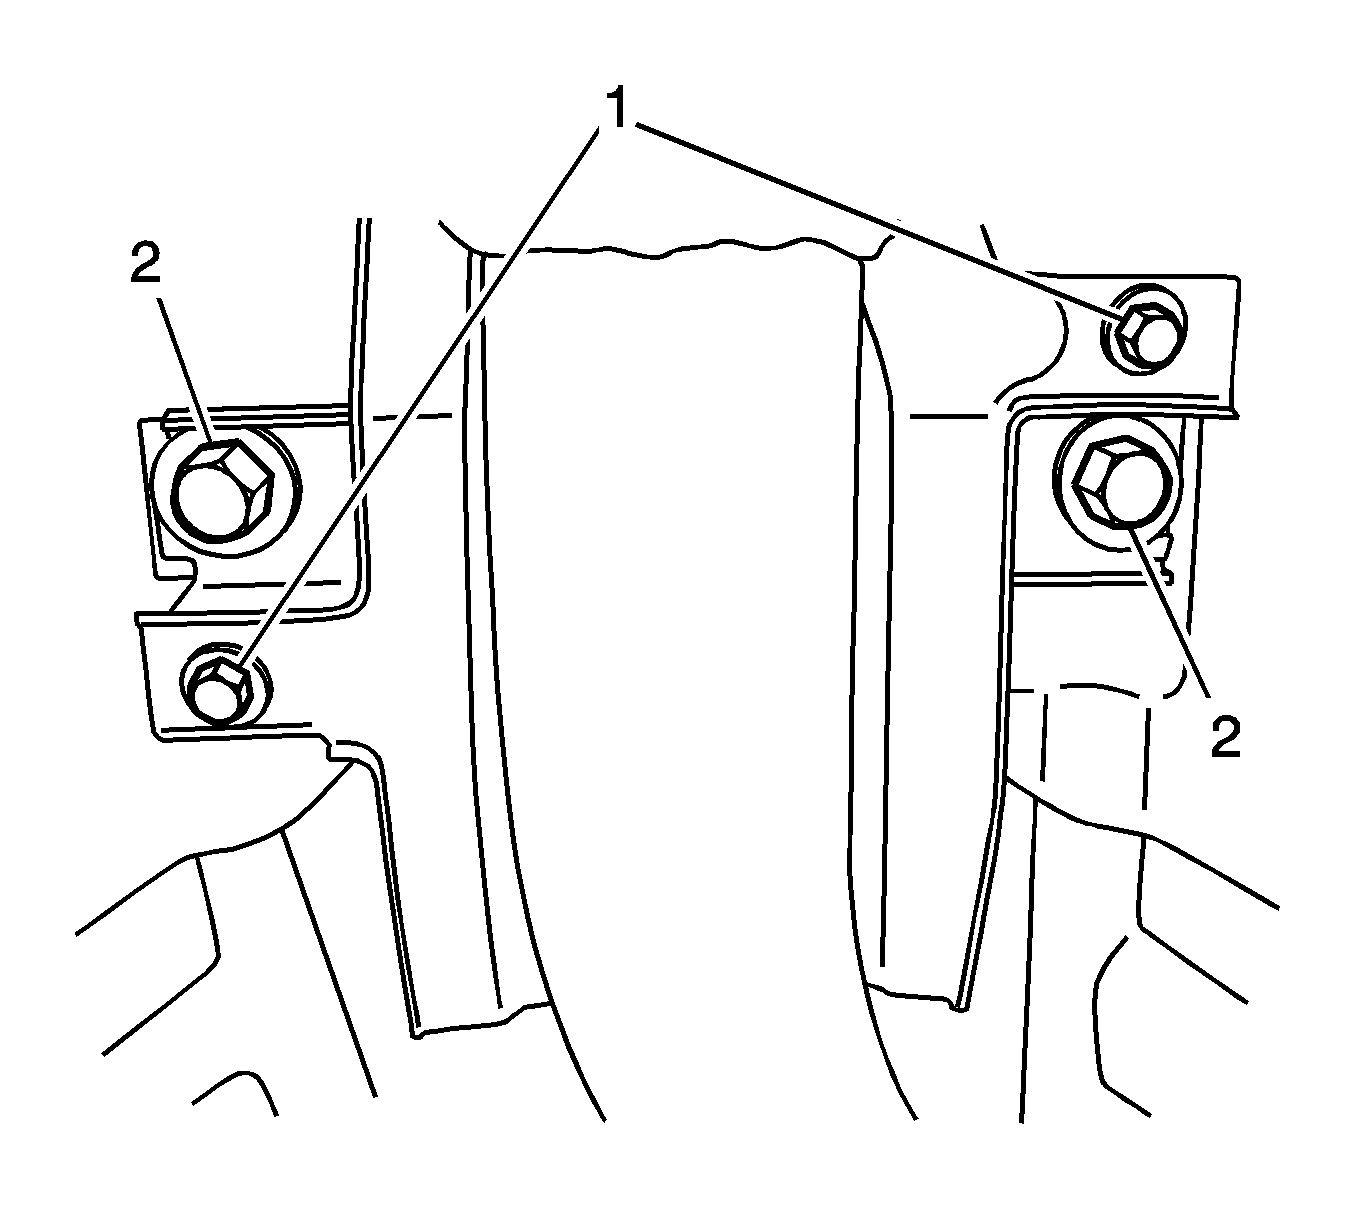
- Remove the bolts (2) securing the support bearing to the vehicle underbody.
- Push the front propeller shaft (3) toward the rear of the vehicle in order to release the propeller shaft coupler (2) from the transmission flange (1).
- While holding the front propeller shaft (3), lower the support device under the propeller shaft support bearing.
- Remove the support bearing from the mounting studs.
- Pull the rear propeller shaft (1) forward to release the coupler (2) from the differential flange (3).
- Note the number and location of the shim packs between the support bearing mounting bracket and the underbody to ensure proper assembly.
- Remove the propeller shaft from the vehicle.
- Inspect the propeller shaft coupler for the following conditions:
- If any of the above conditions are found, the propeller shaft requires replacement.
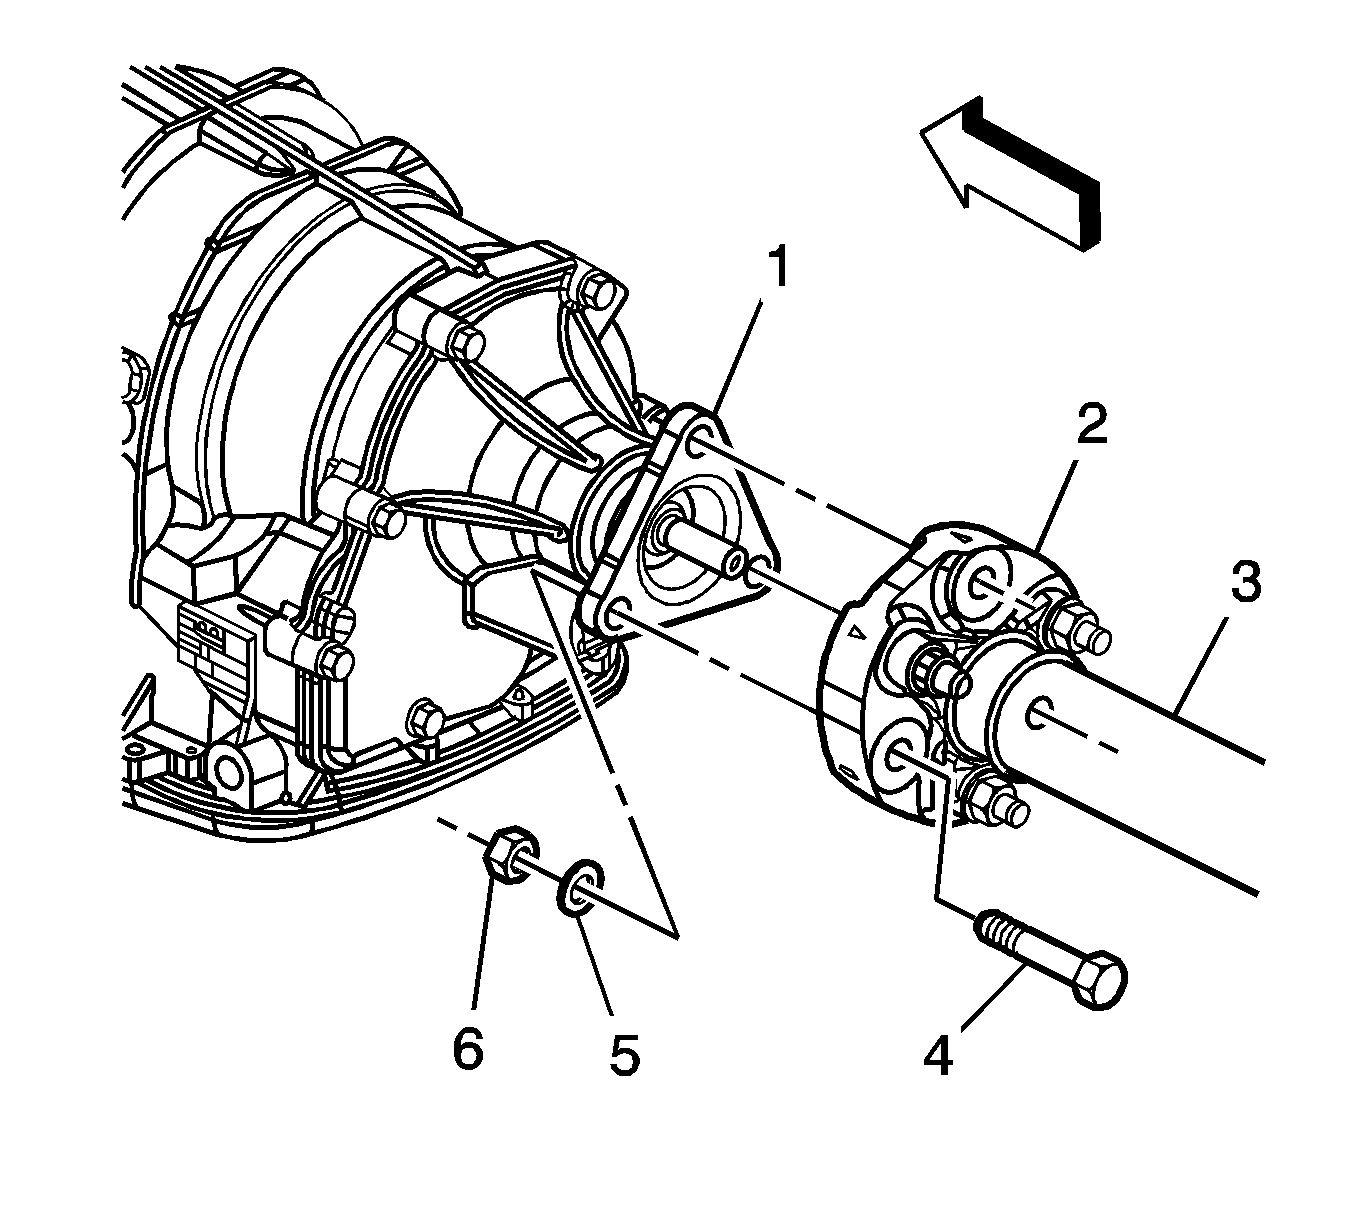
Important: Remove only the propeller shaft coupler-to-transmission flange bolts. Do NOT remove the coupler from the propeller shaft.

Important: Remove only the propeller shaft coupler-to-differential flange bolts. Do NOT remove the coupler from the propeller shaft.


| • | Splitting of the coupler |
| • | Deep cracking. Minor superficial cracking of the coupler is acceptable. |
| • | Looseness at the propeller shaft mounting bolts |
| • | Distorted or missing mounting bolt bushings |
Installation Procedure
- Using a clean shop towel clean the following:
- Apply a small amount of lubricant GM P/N 1051344 (Canadian P/N 993037), or equivalent, to the front and rear propeller shaft centering bushings.
- Inspect the propeller shaft to flange nuts (4), bolts (6) and washers (5). Replace if damaged or worn.
- Install the rear propeller shaft coupler (2) to the differential flange (3).
- Rest the support bearing on the support device.
- Thoroughly clean the threads using denatured alcohol, or equivalent, and allow to dry. Apply threadlocker GM P/N 12345493 (Canadian P/N 10953488), or equivalent, to the propeller shaft to the flange bolt. Ensure that there are no gaps in the threadlocker along the length of the filled area of the bolt. Allow the threadlocker to cure approximately 10 minutes before installation.
- Install the propeller shaft coupler-to-differential flange washers (5) to the propeller shaft coupler-to-differential flange bolts (6).
- Install the propeller shaft coupler-to-differential flange bolts (6) and washers (5) to the differential flange (3) and propeller shaft coupler (2).
- Install the propeller shaft coupler-to-differential flange nuts (4).
- Push the front propeller shaft (3) to the rear of the vehicle and install the propeller shaft coupler (2) to the transmission flange (1).
- Thoroughly clean the threads using denatured alcohol, or equivalent, and allow to dry. Apply threadlocker GM P/N 12345493 (Canadian P/N 10953488), or equivalent, to the propeller shaft to the flange bolt. Ensure that there are no gaps in the threadlocker along the length of the filled area of the bolt. Allow the threadlocker to cure approximately 10 minutes before installation.
- Install the front propeller shaft coupler-to-transmission flange bolts (4) to the transmission flange (1) and propeller shaft coupler (2).
- Install the propeller shaft coupler-to-transmission flange washers (5) and nuts (6).
- Install the center support bearing to the vehicle underbody.
- Raise the support device in order to hold the support bearing in position.
- Install the center support bearing bolts (2) to the studs on the vehicle underbody.
- Remove the support device from under the support bearing.
- Install the exhaust system. Refer to Exhaust System Replacement.
- Lower the vehicle.
| • | The differential flange centering pin |
| • | The transmission flange centering pin |
| • | The front propeller shaft centering bushing |
| • | The rear propeller shaft centering bushing |

Important: If reusing the propeller shaft-to-flange nuts and bolts, to ensure proper adhesion and fastener retention, the threads must be free of debris prior to the application of threadlocker.
Notice: Refer to Fastener Notice in the Preface section.
Tighten
Tighten the propeller shaft coupler-to-differential flange bolts and nuts to 85 N·m (63 lb ft).

Important: If reusing the propeller shaft-to-flange nuts and bolts, to ensure proper adhesion and fastener retention, the threads must be free of debris prior to the application of threadlocker.
Tighten
Tighten the propeller shaft coupler-to-transmission bolts and nuts to 85 N·m (63 lb ft).

Important: Ensure that the shim packs on the support bearing are installed in their original positions.
Tighten
Tighten the support bearing bolts to 50 N·m (37 lb ft).
