Radiator Outlet Hose Replacement LH2 - Standard Cooling
Tools Required
J 38185 Hose Clamp Pliers
Removal Procedure
- Drain the coolant. Refer to Cooling System Draining and Filling.
- Remove the air cleaner outlet duct. Refer to Air Cleaner Outlet Duct Replacement.
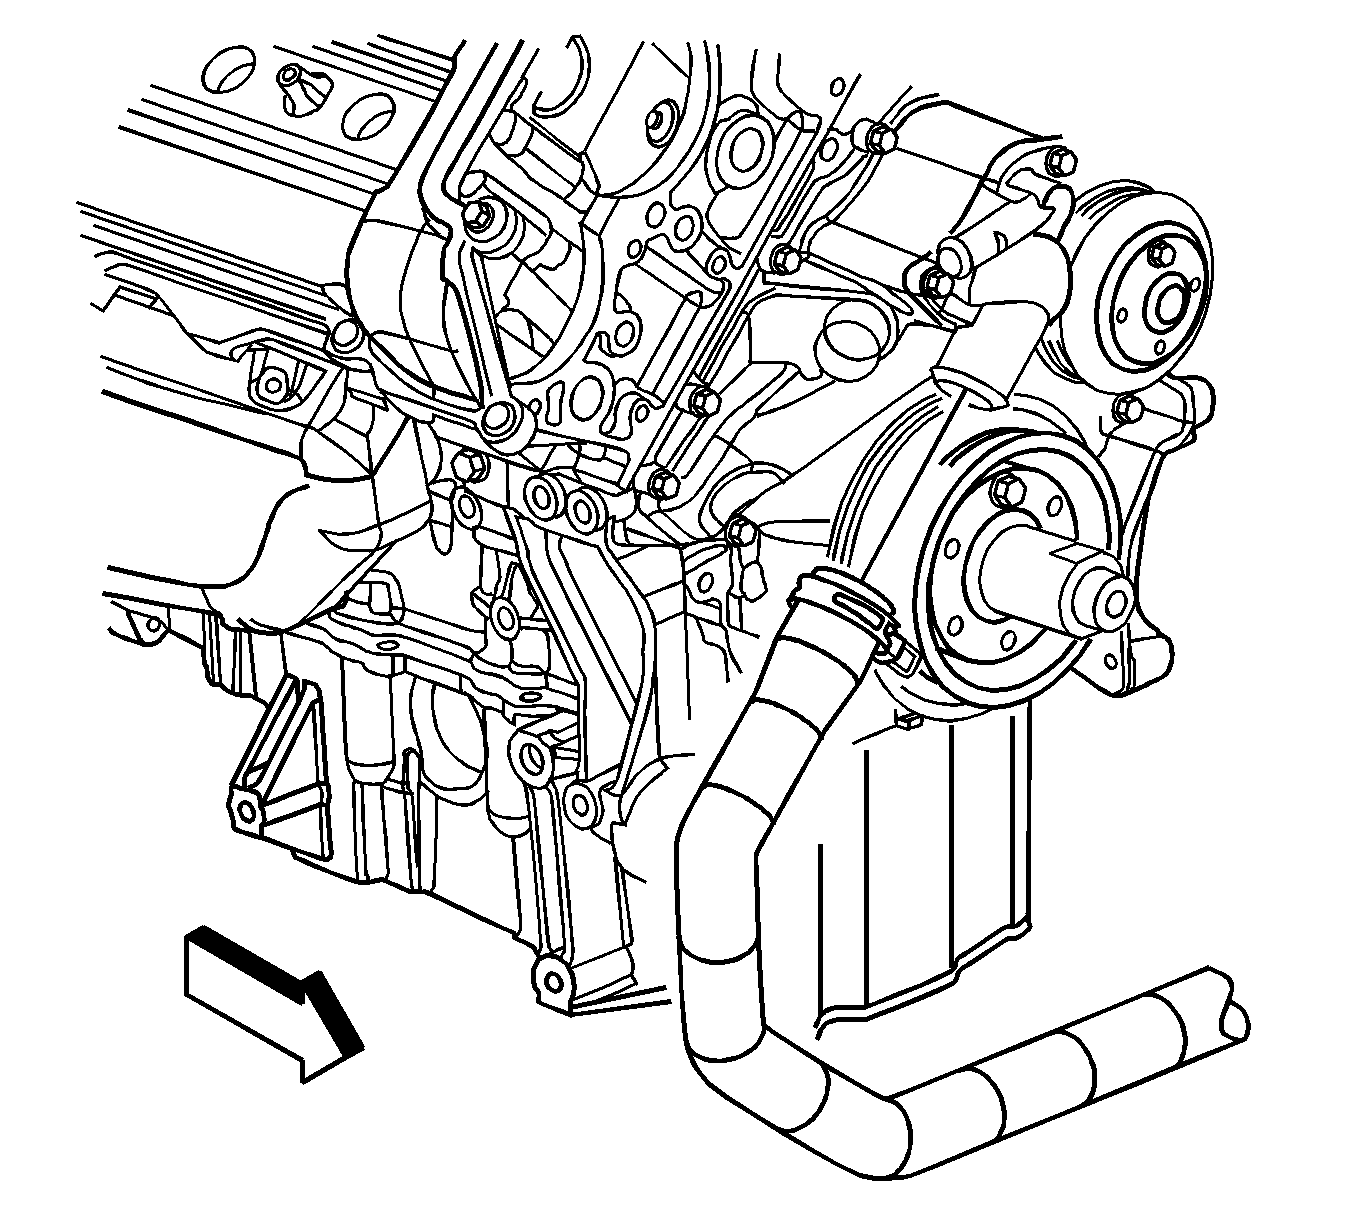
- Using the J 38185 , disengage the tension on the hose clamp and remove the radiator outlet hose from the thermostat housing.
- Disconnect the radiator outlet hose from the support bracket.
- Raise the vehicle. Refer to Lifting and Jacking the Vehicle.
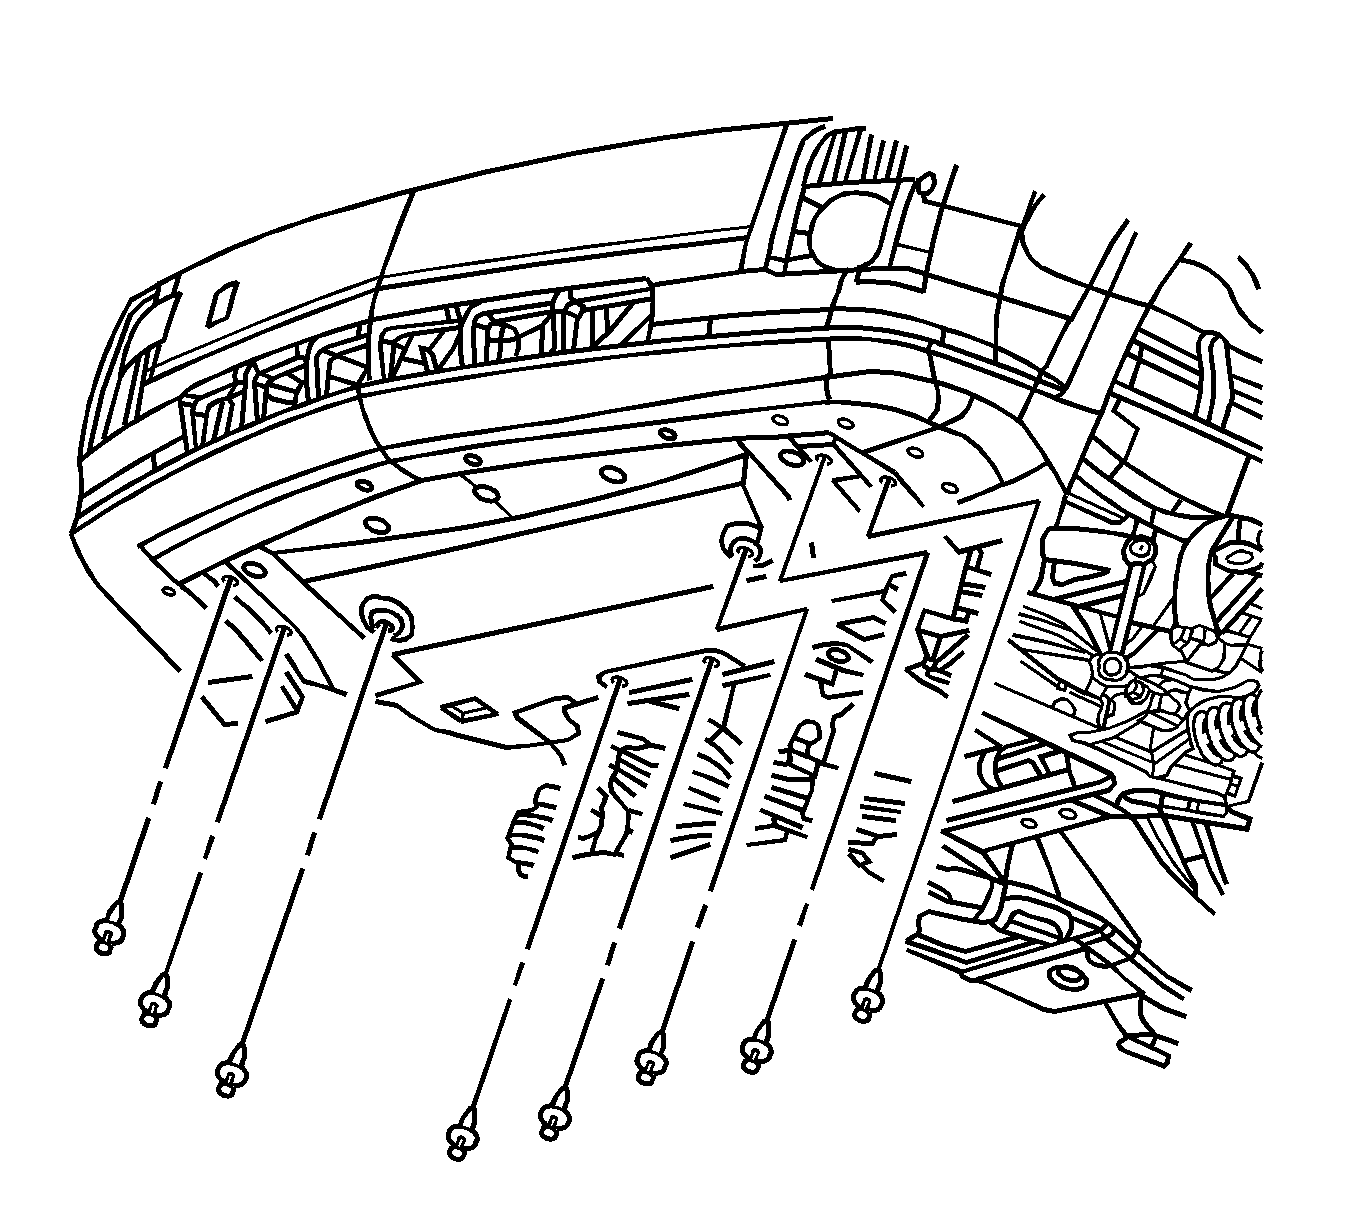
- Remove the front air deflector retainers.
- Remove the front air deflector.
- Remove the ECM mounting nuts and reposition ECM aside.
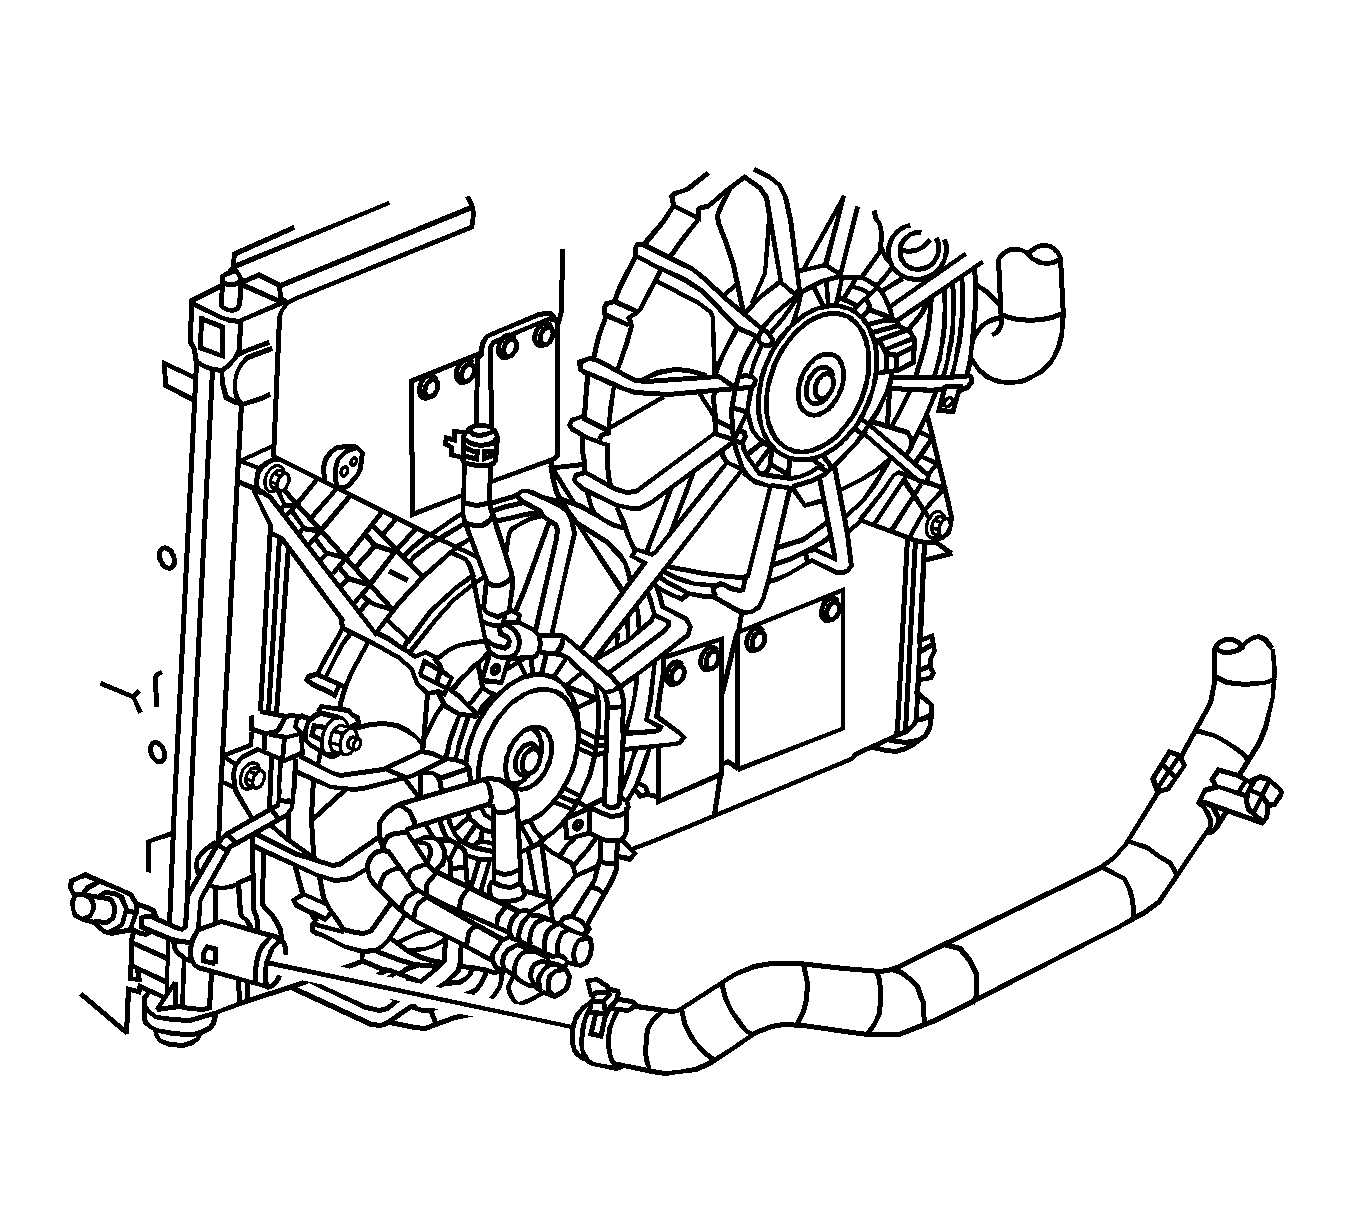
- Using the J 38185 , disengage the tension on the hose clamp and remove the radiator outlet hose from the radiator.
- Lower the vehicle.
- Remove the radiator outlet hose from the vehicle.


Installation Procedure
- Install the radiator outlet hose to the vehicle.
- Raise the vehicle.
- Using the J 38185 , disengage the tension on the hose clamp and install the radiator outlet hose to the radiator.
- Using the J 38185 slide the clamp into the original position.
- Position ECM on the mounting bracket.
- Install the ECM to mounting nuts.
- Install the front air deflector.
- Install the front air deflector retainers.
- Lower the vehicle.
- Using the J 38185 , disengage the tension on the hose clamp and install the radiator outlet hose to the thermostat housing.
- Using the J 38185 slide the clamp into the original position.
- Install the radiator outlet hose to the support bracket.
- Install the air intake duct. Refer to Air Cleaner Outlet Duct Replacement.
- Fill the cooling system. Refer to Cooling System Draining and Filling.
Important: Lubricate the inside diameters of the hoses with clean coolant prior to installation.

Notice: Use the correct fastener in the correct location. Replacement fasteners must be the correct part number for that application. Fasteners requiring replacement or fasteners requiring the use of thread locking compound or sealant are identified in the service procedure. Do not use paints, lubricants, or corrosion inhibitors on fasteners or fastener joint surfaces unless specified. These coatings affect fastener torque and joint clamping force and may damage the fastener. Use the correct tightening sequence and specifications when installing fasteners in order to avoid damage to parts and systems.
Tighten
Tighten the nuts to 8 N·m (71 lb in).


Radiator Outlet Hose Replacement LY7
Tools Required
J 38185 Hose Clamp Pliers
Removal Procedure
- Drain the coolant. Refer to Cooling System Draining and Filling .
- Remove the radiator inlet hose. Refer to Radiator Inlet Hose Replacement .
- Using the J 38185 , disengage the tension on the hose clamp and remove the radiator outlet hose from the thermostat housing.
- Disconnect the radiator outlet hose from the engine support bracket.
- Remove the air cleaner intake duct. Refer to Air Cleaner Inlet Duct Replacement .
- Using the J 38185 , disengage the tension on the hose clamp and remove the radiator outlet hose from the radiator.
- Remove the radiator outlet hose from the vehicle.

Installation Procedure
- Install the radiator outlet hose to the vehicle.
- Using the J 38185 , disengage the tension on the hose clamp and install the radiator outlet hose to the radiator.
- Using the J 38185 slide the clamp into the original position.
- Using the J 38185 , disengage the tension on the hose clamp and install the radiator outlet hose to the thermostat housing.
- Using the J 38185 slide the clamp into the original position.
- Install the radiator outlet hose to the engine support bracket .
- Install the radiator inlet hose. Refer to Radiator Inlet Hose Replacement .
- Fill the cooling system. Refer to Cooling System Draining and Filling .
Important: Lubricate the inside diameters of the hoses with clean coolant prior to installation.

Radiator Outlet Hose Replacement LH2 - Heavy Duty Cooling
Tools Required
J 38185 Hose Clamp Pliers
Removal Procedure
- Drain the coolant. Refer to Cooling System Draining and Filling.
- Remove the air cleaner outlet duct. Refer to Air Cleaner Outlet Duct Replacement.
- Using the J 38185 , disengage the tension on the hose clamp and remove the radiator outlet hose from the thermostat housing.
- Disconnect the radiator outlet hose from the support bracket.
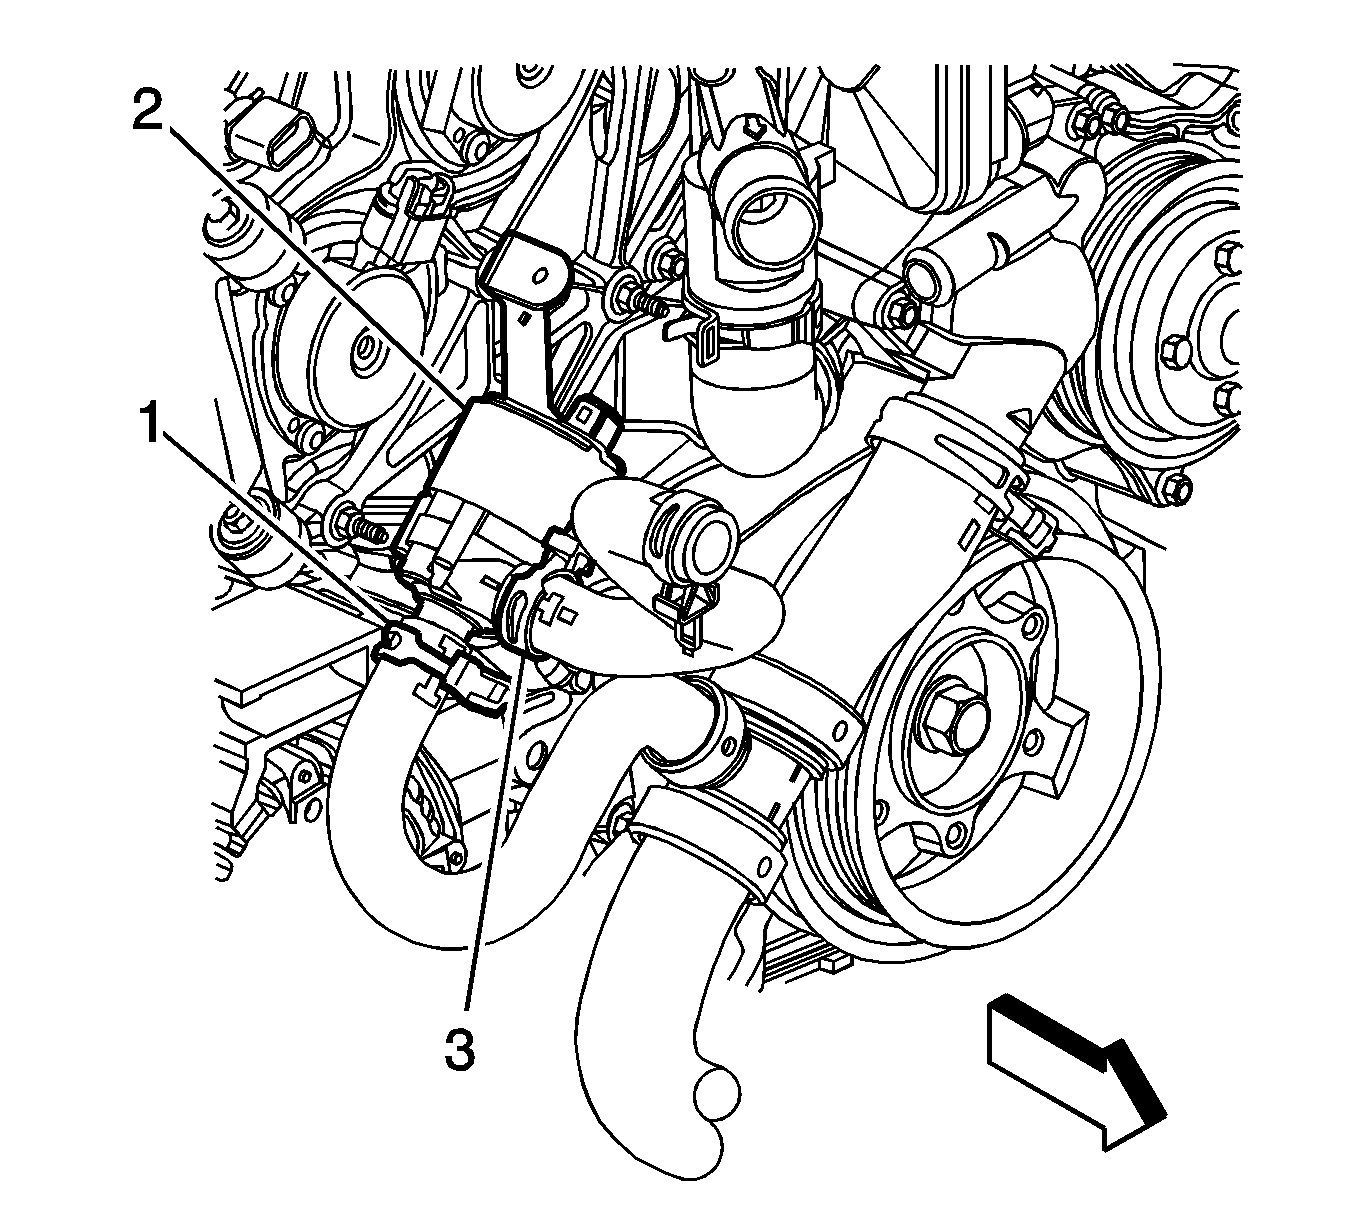
- Using the J 38185 , disengage the tension on the radiator outlet hose (1) clamp.
- Disconnect the radiator outlet hose (1) from the afterboil coolant pump.
- Raise the vehicle. Refer to Lifting and Jacking the Vehicle.
- Remove the front air deflector retainers.
- Remove the front air deflector.
- Remove the engine control module (ECM) mounting nuts and reposition ECM aside.
- Using the J 38185 , disengage the tension on the hose clamp and remove the radiator outlet hose from the radiator.
- Lower the vehicle.
- Remove the radiator outlet hose from the vehicle.


Installation Procedure
- Install the radiator outlet hose to the vehicle.
- Raise the vehicle.
- Using the J 38185 , disengage the tension on the hose clamp and install the radiator outlet hose to the radiator.
- Using the J 38185 slide the clamp into the original position.
- Position ECM on the mounting bracket.
- Install the ECM to mounting nuts.
- Install the front air deflector.
- Install the front air deflector retainers.
- Lower the vehicle.
- Connect the radiator outlet hose (1) to the afterboil coolant pump.
- Using the J 38185 , reposition the radiator outlet hose (1) clamp to secure the radiator outlet hose to the afterboil coolant pump.
- Using the J 38185 , disengage the tension on the hose clamp and install the radiator outlet hose to the thermostat housing.
- Using the J 38185 slide the clamp into the original position.
- Install the radiator outlet hose to the support bracket.
- Install the air intake duct. Refer to Air Cleaner Outlet Duct Replacement.
- Fill the cooling system. Refer to Cooling System Draining and Filling.
Important: Lubricate the inside diameters of the hoses with clean coolant prior to installation.
Notice: Use the correct fastener in the correct location. Replacement fasteners must be the correct part number for that application. Fasteners requiring replacement or fasteners requiring the use of thread locking compound or sealant are identified in the service procedure. Do not use paints, lubricants, or corrosion inhibitors on fasteners or fastener joint surfaces unless specified. These coatings affect fastener torque and joint clamping force and may damage the fastener. Use the correct tightening sequence and specifications when installing fasteners in order to avoid damage to parts and systems.
Tighten
Tighten the nuts to 8 N·m (71 lb in).


