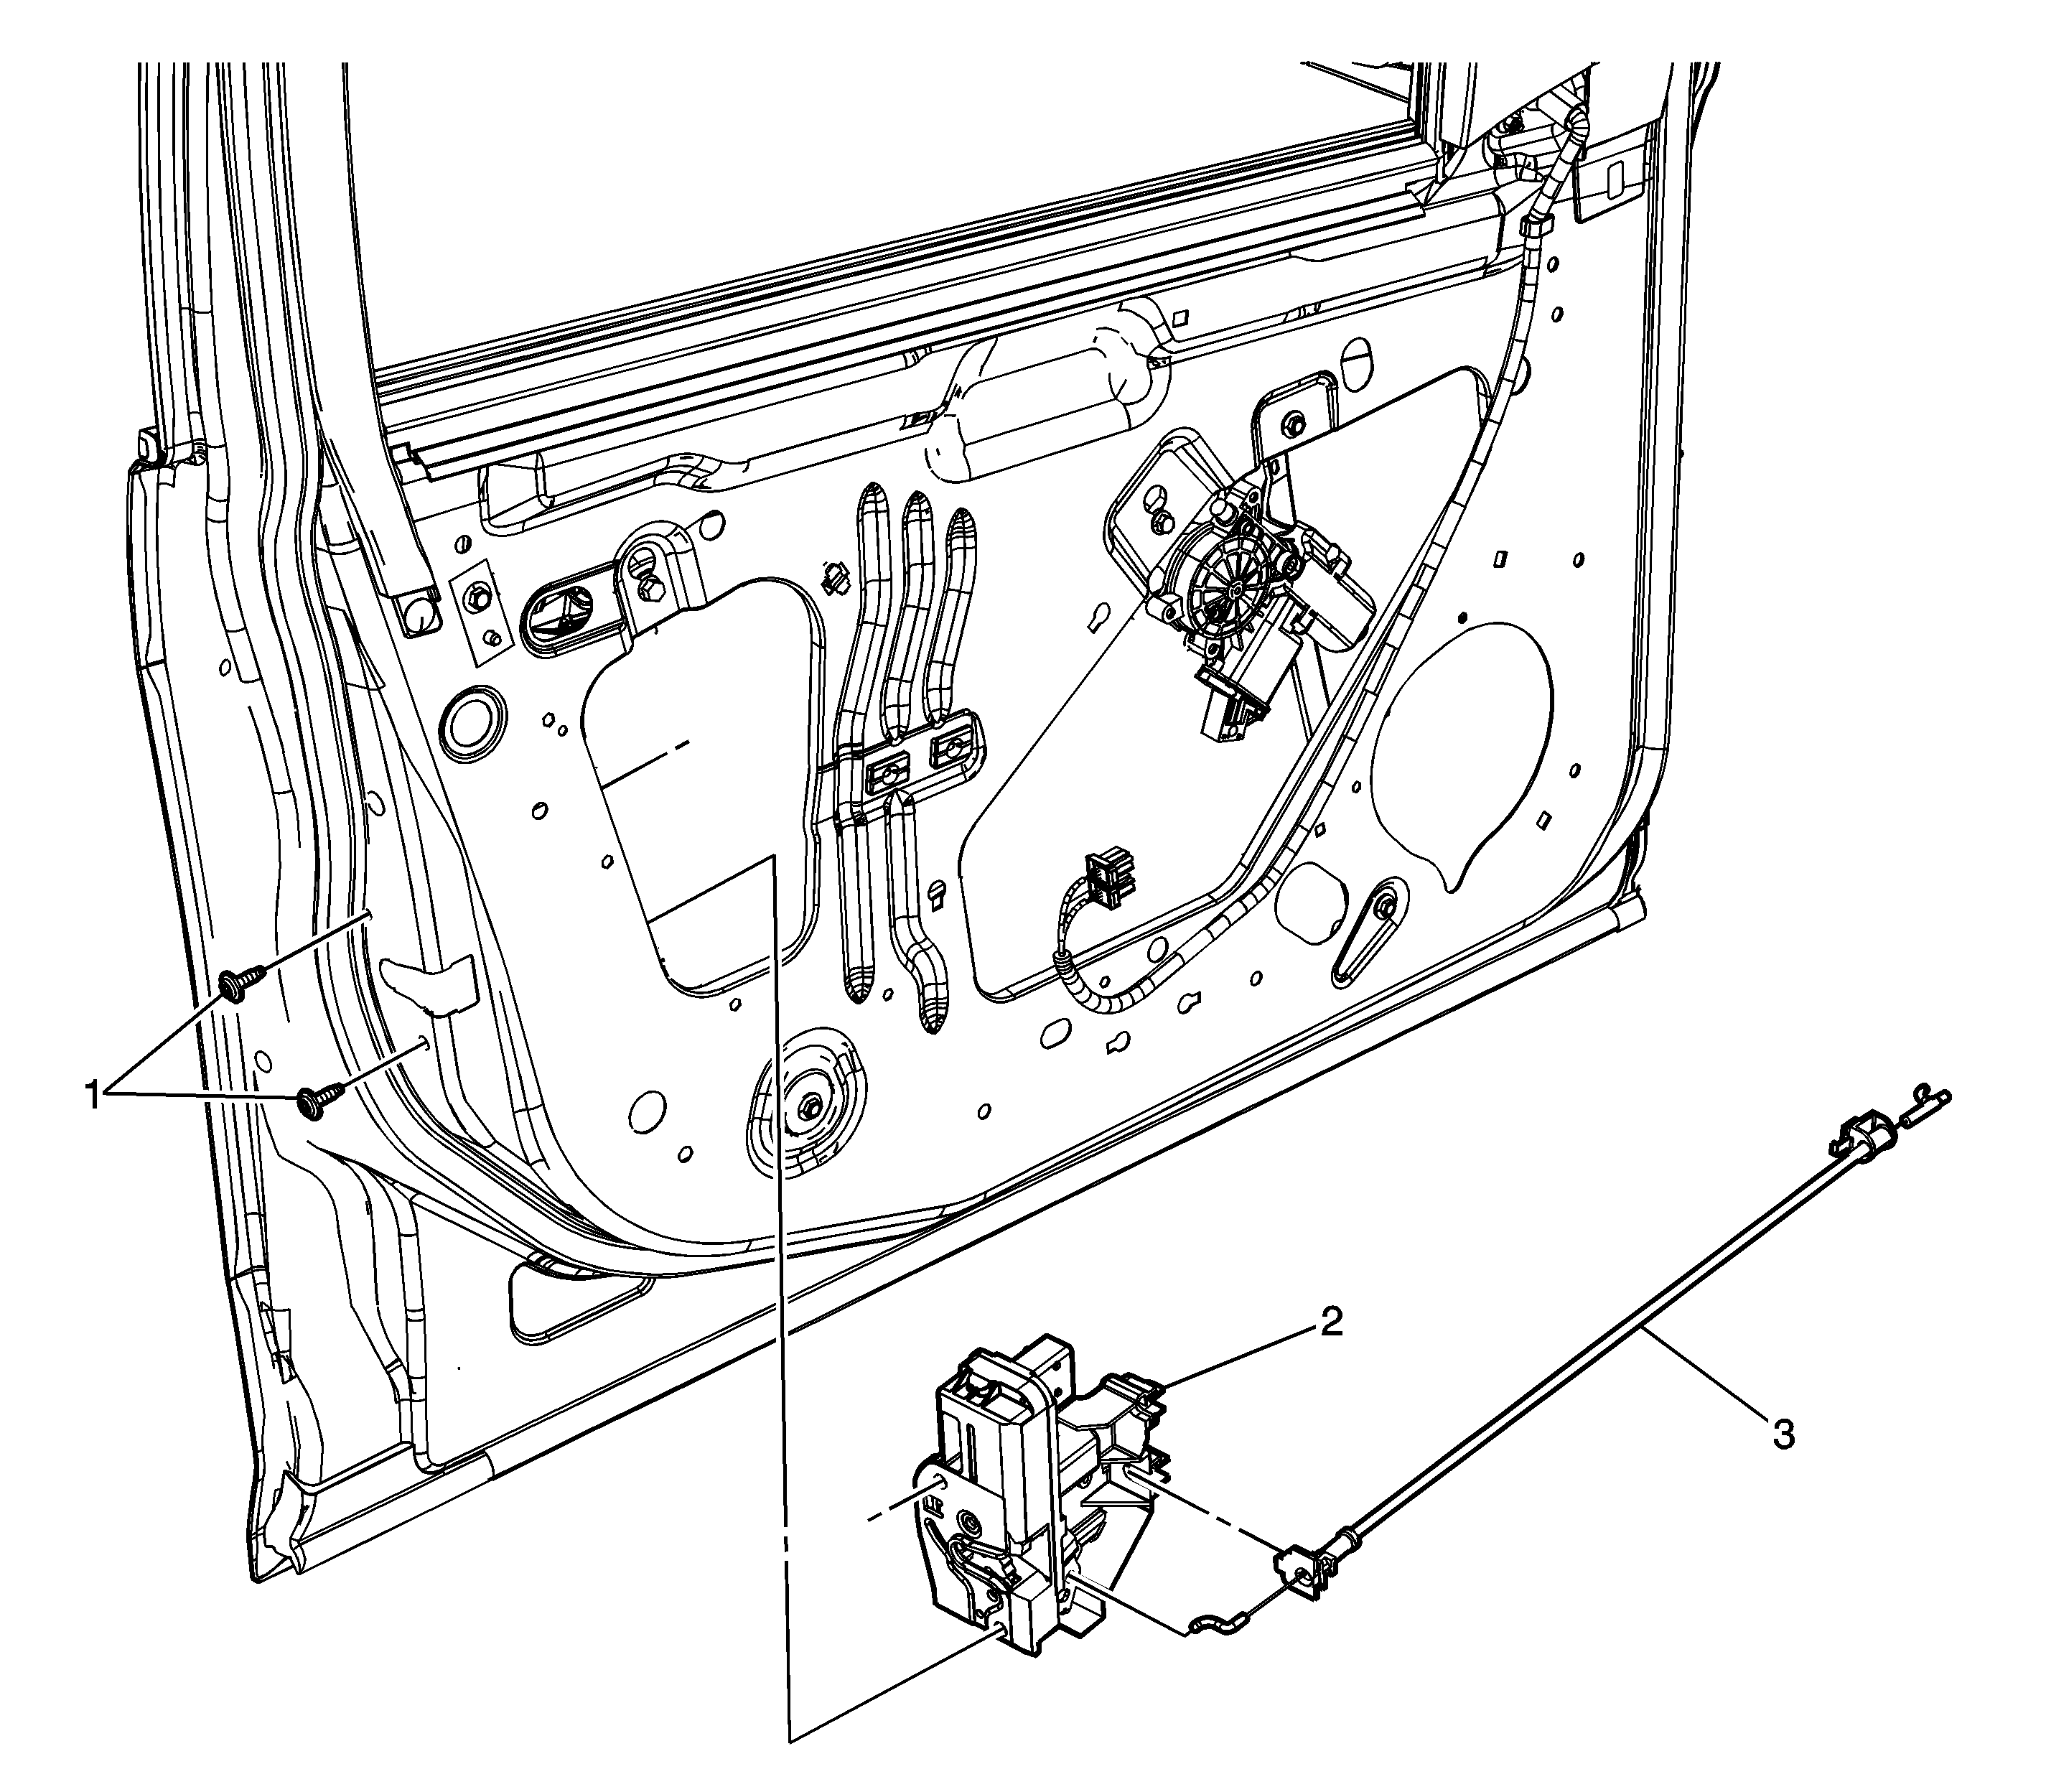
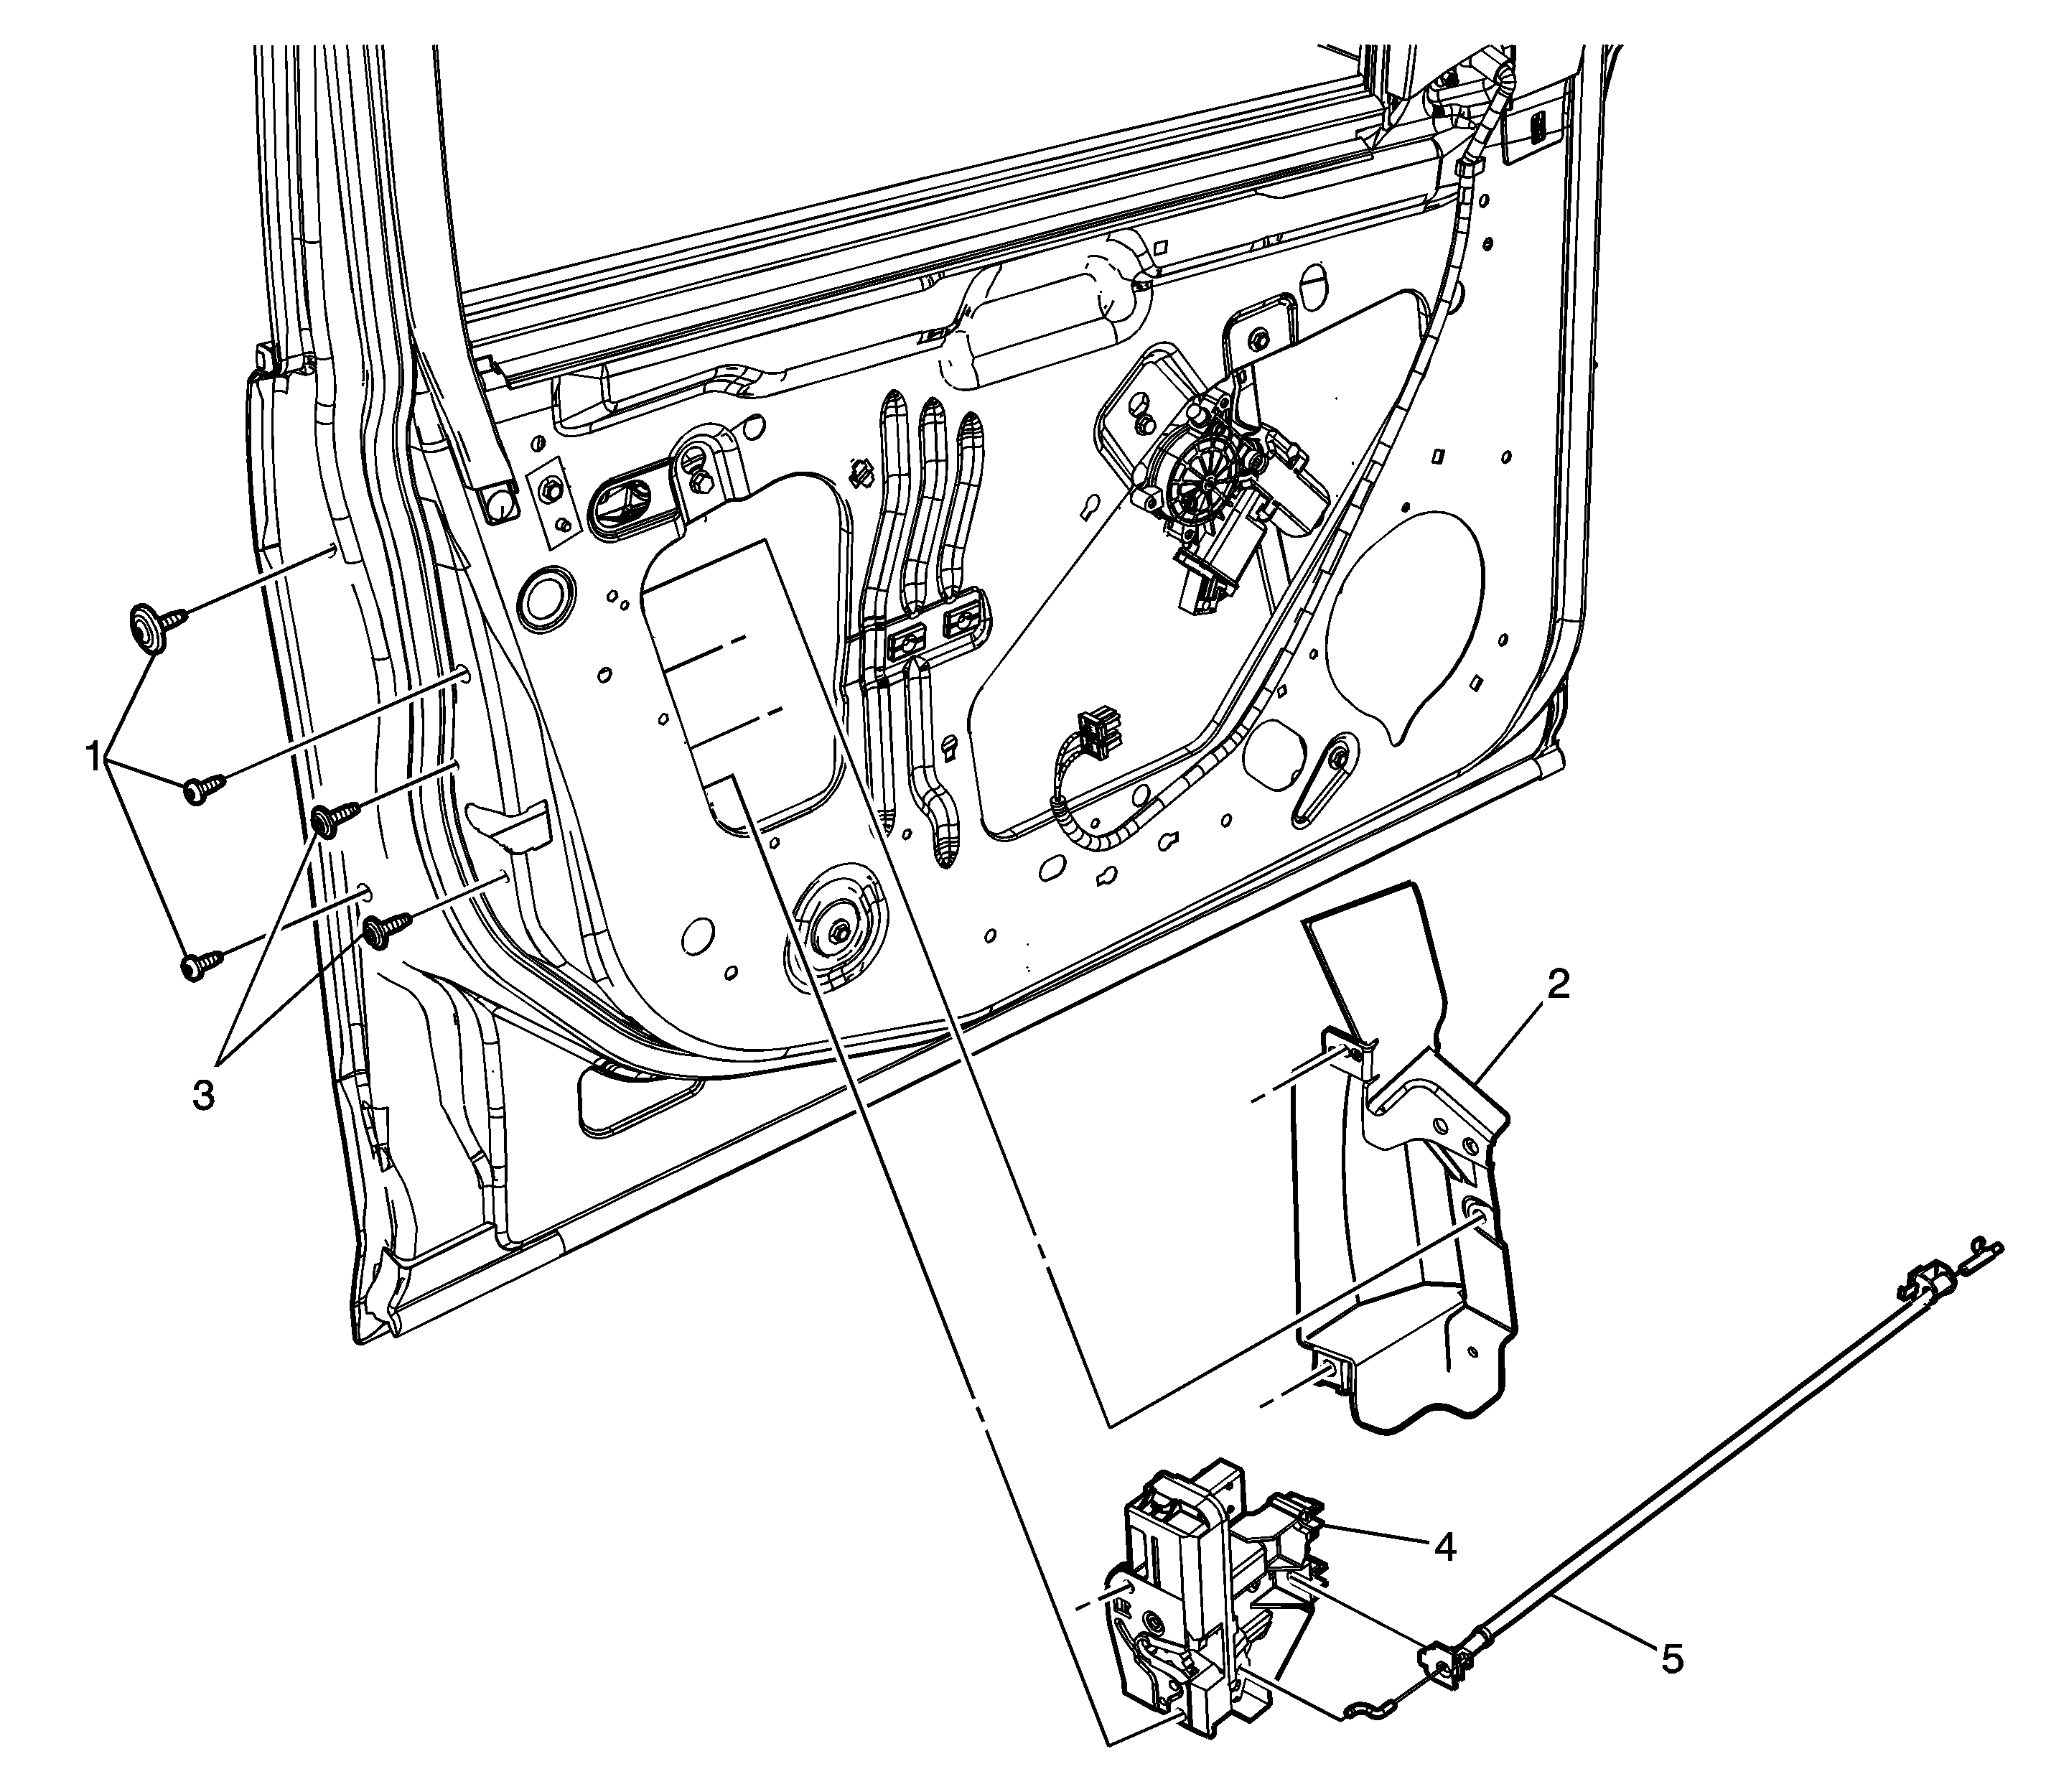
Callout
| Component Name
|
|
Notice: Refer to Fastener Notice in the Preface section. Fastener Tightening Specifications: Refer to
Fastener Tightening Specifications
.
|
Front Side Door Lock Assembly Replacement
Preliminary Procedures
- Remove the front side door trim panel. Refer to
Front Side Door Trim Panel Replacement
.
- Remove the front side door water deflector. Refer to
Front Side Door Water Deflector and Check Link Replacement
.
|
1
| Screw, Front Side Door Lock (Qty: 2)
Tighten
9 N·m (80 lb in) |
2
| Lock Assembly, Front Side Door
Tip
- Raise the window to the full up position.
- The following items will need to be disconnected for removal and reconnected for installation:
| • | Outside handle lock rod by opening the clip |
| • | Lock assembly electrical connector |
- Remove the lock assembly from the door with the inside handle cable assembly attached.
|
Front Side Door Inside Handle Cable Assembly Replacement
Preliminary Procedures
- Remove the front side door trim panel. Refer to
Front Side Door Trim Panel Replacement
.
- Remove the front side door water deflector. Refer to
Front Side Door Water Deflector and Check Link Replacement
.
|
1
| Screw, Front Side Door Lock (Qty: 2)
Tighten
9 N·m (80 lb in) |
2
| Lock Assembly, Front Side Door
Tip
- Raise the window to the full up position.
- The following items will need to be disconnected for removal and reconnected for installation:
| • | Outside handle lock rod by opening the clip |
| • | Lock assembly electrical connector |
- Remove the lock assembly from the door with the inside handle cable assembly attached.
|
3
| Cable Assembly, Front Side Door Inside Handle
|
Callout
| Component Name
|
|
Notice: Refer to Fastener Notice in the Preface section. Fastener Tightening Specifications: Refer to
Fastener Tightening Specifications
.
|
Front Side Door Lock Cover Assembly Replacement
Preliminary Procedures
- Remove the front side door trim panel. Refer to
Front Side Door Trim Panel Replacement
.
- Remove the front side door water deflector. Refer to
Front Side Door Water Deflector and Check Link Replacement
.
|
1
| Screw, Front Side Door Lock Cover (Qty: 3)
Tighten
5 N·m (44 lb in) |
2
| Cover Assembly, Front Side Door Lock
|
Front Side Door Lock Assembly Replacement
Preliminary Procedures
- Remove the front side door trim panel. Refer to
Front Side Door Trim Panel Replacement
.
- Remove the front side door water deflector. Refer to
Front Side Door Water Deflector and Check Link Replacement
.
|
1
| Screw, Front Side Door Lock Cover (Qty: 3)
Tighten
5 N·m (44 lb in) |
2
| Cover Assembly, Front Side Door Lock
|
3
| Screw, Front Side Door Lock (Qty: 2)
Tighten
9 N·m (80 lb in) |
4
| Lock Assembly, Front Side Door
Tip
- Raise the window to the full up position.
- The following items will need to be disconnected for removal and reconnected for installation:
| • | Outside handle lock rod by opening the clip |
| • | Lock assembly electrical connector |
- Remove the lock assembly from the door with the inside handle cable assembly attached.
|
Front Side Door Inside Handle Cable Assembly Replacement
Preliminary Procedures
- Remove the front side door trim panel. Refer to
Front Side Door Trim Panel Replacement
.
- Remove the front side door water deflector. Refer to
Front Side Door Water Deflector and Check Link Replacement
.
|
1
| Screw, Front Side Door Lock Cover (Qty: 3)
Tighten
5 N·m (44 lb in) |
2
| Cover Assembly, Front Side Door Lock
|
3
| Screw, Front Side Door Lock (Qty: 2)
Tighten
9 N·m (80 lb in) |
4
| Lock Assembly, Front Side Door
Tip
- Raise the window to the full up position.
- The following items will need to be disconnected for removal and reconnected for installation:
| • | Outside handle lock rod by opening the clip |
| • | Lock assembly electrical connector |
- Remove the lock assembly from the door with the inside handle cable assembly attached.
|
5
| Cable Assembly, Front Side Door Inside Handle
|


