This system can play different types of media formats: DVD - Video, DVD - Video (DTS), DVD - Audio, CD - Digital Audio (CD - DA), CD-DA (DTS), CD - Text, CD - Extra, MP3 - CD, CDR, and CDRW. The system may also play DVD - R and DVD - RW type discs depending on the writing software used. The system will play DTS and Dolby tracks in surround sound.
If playing a CD-R the sound quality may be reduced due to CD-R quality, the method of recording, the quality of the music that has been recorded, and the way the CD-R has been handled. There may be an increase in skipping, difficulty in finding tracks, and/or difficulty in loading and ejecting. If these problems occur, check the bottom surface of the CD. If the surface of the CD is damaged, such as cracked, broken, or scratched, the CD will not play properly. If the surface of the CD is soiled, see "Care of Your CDs" in the Index of your vehicle's owner manual.
If there is no apparent damage, try a known good CD.
Notice: If a label is added to a CD, or more than one CD is inserted into the slot at a time, or an attempt is made to play scratched or damaged CDs, the CD player could be damaged. While using the CD player, use only CDs in good condition without any label, load one CD at a time, and keep the CD player and the loading slot free of foreign materials, liquids, and debris.
Do not add any label to a CD, it could get caught in the CD player. If a CD is recorded on a personal computer and a description label is needed, try labeling the top of the recorded CD with a soft marker instead.
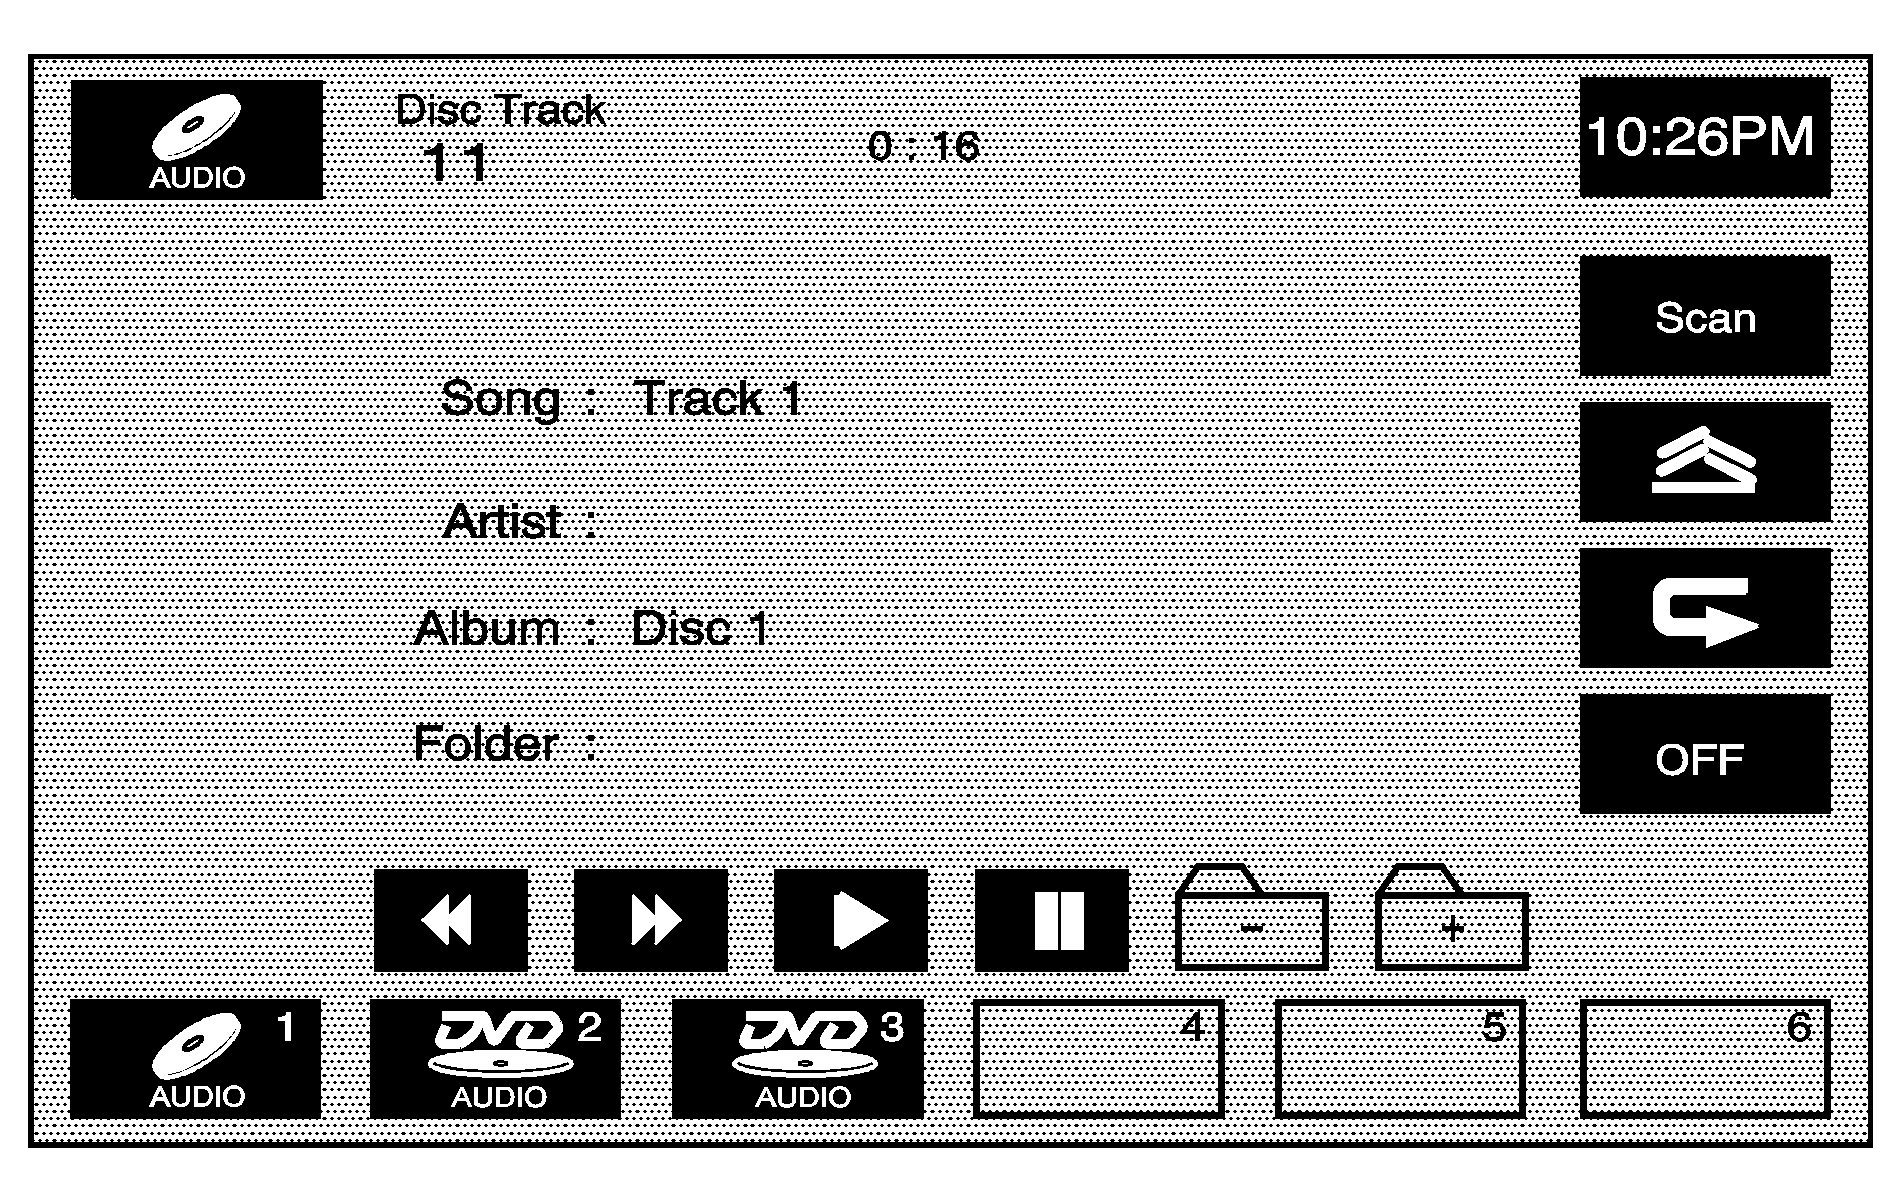
With the six-disc CD/DVD changer, you can play up to six audio CDs, MP3s, DTS discs, audio DVDs, or video DVD discs continuously.
(Load): To load one disc, do the following:- Press the load hard key and follow the screen message displayed.
- Select the slot number, 1-6, to load the disc into. If a slot is not selected, the system will load the first available slot.
- When the screen displays "Insert Disc (number)", insert the disc partway into the slot, label side up. The system will pull it in and start playing. The system will display the type of disc inserted, DVD - Video, Audio for CD/DTS, MP3 for MP3 CDs, or DVD - Audio.
To load multiple discs, do the following:
- Press and hold the load hard key.
- When the screen displays "Insert Disc (number)", load the disc partway into the slot, label side up. The system will pull it in.
- Once a CD is loaded, the system will display "Insert Disc (number)" again. Load the next disc. Repeat this procedure for each disc. The player takes up to six disc(s), do not try to load more than six. The system will not display the disc types when loading all, until the discs have been read by the system.
Once all discs have been inserted, the system will start playing the last loaded disc.
If no CD or DVD is loaded in the CD/DVD changer and you press the SRCE hard key a "No disc loaded" error message will be displayed.
Select the Cancel screen button, when available, to stop the loading process and to start playing the last loaded disc.
- Press the eject hard key.
- Select the slot number, 1-6, to eject the disc.
- The system will display "Ejecting Disc" and then eject the disc.
If a selection is not made, the system will eject the disc from the current slot. If the disc is not removed from the slot, the system will pull it back in after 10 seconds and start playing it.
To eject all discs at once, press and hold the eject hard key. The system will display the disc number being ejected.
Playing an Audio CD

The numbered screen buttons, 1 through 6, represent the order of the discs loaded in the changer. If there are only two discs loaded, only screen buttons 1 and 2 will be available.
(Play): Select this screen button or press one of the available screen buttons, 1 through 6, to begin playing that disc. There will be a 12 to 15 second delay while the CD is read, before it begins to play.(Reverse): Press and hold this screen button to reverse through the current track. If reverse past the current track, the system will go to the previous track on the disc.
(Fast forward): Press and hold this screen button to fast forward through the current track. If fast forward past the current track, the system will go to the next track on the disc.
(Pause): Select this screen button to pause play. Select this button again to resume play.
Scan: Select the Scan screen button to toggle between the following scan options:
SCAN (Scan One Disc): If this symbol appears on the display after pressing the Scan screen button, the system will play the first 10 seconds of each track on the current playing disc. Select the OFF screen button to stop scanning. When the system has scanned through all of the tracks, the system will automatically stop scanning.
SCAN (Scan All Disc): If this symbol appears on the display after pressing the Scan screen button, the system will play the first 10 seconds of each track on all of the loaded discs of the same media type. Select the OFF screen button to stop scanning. When the system has scanned through all of the discs, the system will automatically stop scanning.
(Random): Select the random screen button to toggle between the following random options:
RND (Random One Disc): If this symbol appears on the display after pressing the random screen button, the system will play the tracks on the selected disc, in random, rather than sequential, order. Select the OFF screen button to turn off random play.
RND (Random All Discs): If this symbol appears on the display after pressing the random screen button, the system will play the tracks on all of the loaded discs, in random, rather than sequential, order This function randoms all discs of the same media type. Select the OFF screen button to turn off random play.
(Repeat): Select the repeat screen button to toggle between the following repeat options:
RPT (Repeat Track): If this symbol appears on the display after pressing the repeat screen button, the system will repeat the track currently playing. Select the OFF screen button to turn off repeat play.
RPT (Repeat Disc): If this symbol appears on the display after pressing the repeat screen button, the system will repeat all of the tracks on the disc currently playing. Select the OFF screen button to turn off repeat play.
OFF: Select this screen button to stop the scan, random, or repeat functions.
(Seek Key): Press the up arrow to seek to the next track on a disc. If playing the last track, pressing the up arrow will seek to the first track of the next disc with the same media type or go to the first track of the selected disc. Press the down arrow to go to the beginning of the current track or to the previous track on a disc. If playing the first track, pressing the down arrow will seek to the last track on the selected disc.
Using an MP3
MP3 Format
When creating an MP3 disc, the following is a list of guidelines. If the customer does not follow these guidelines when recording a CD-R(W), the CD may not play.
| • | Sampling rate: 16 kHz, 22.05 kHz, 24 kHz, 32 kHz, and 44.1 kHz. |
| • | Bit rates supported: 32, 40, 48, 56, 64, 80, 96, 112, 128, 160, 192, 224, 256, and 320 kbps. |
| • | ID3 tag information is displayed by the radio if it is available. The radio supports ID3 tag information v1.0 or v1.1. The radio will display a filename, song name, artist name, album name, and directory name. |
| • | Maximum 32 characters, including spaces, in a file or folder name. |
| • | Maximum number of folders is 253 with a maximum hierarchy of eight folders. |
| • | Create a folder structure that makes it easy to find songs while driving. Organize songs by albums using one folder for each album. Each folder or album should contain 18 songs or less. |
| • | It is recommended that there is a maximum of 192 files on a disc. |
| • | The files can be recorded on a CD-R or CD-RW with a maximum capacity of 700MB. |
| • | DVD with MP3 are not playable on this system. |
| • | The radio will play a mixed mode CD-R/RW, a disc recorded with both *.cda and *.mp3 files. |
Playing an MP3
If playing a CD-R the sound quality may be reduced due to CD-R quality, the method of recording, the quality of the music that has been recorded, and the way the CD-R has been handled. There may be an increase in skipping, difficulty in finding tracks, and/or difficulty in loading and ejecting. If these problems occur, check the bottom surface of the CD. If the surface of the CD is damaged, such as cracked, broken, or scratched, the CD will not play properly. If the surface of the CD is soiled, see "Care of Your CDs" in the Index of your vehicle's owner manual.
If there is no apparent damage, try a known good CD.
Notice: If a label is added to a CD, or more than one CD is inserted into the slot at a time, or an attempt is made to play scratched or damaged CDs, the CD player could be damaged. While using the CD player, use only CDs in good condition without any label, load one CD at a time, and keep the CD player and the loading slot free of foreign materials, liquids, and debris.
Do not add any label to a CD, it could get caught in the CD player. If a CD is recorded on a personal computer and a description label is needed, try labeling the top of the recorded CD with a soft marker instead.
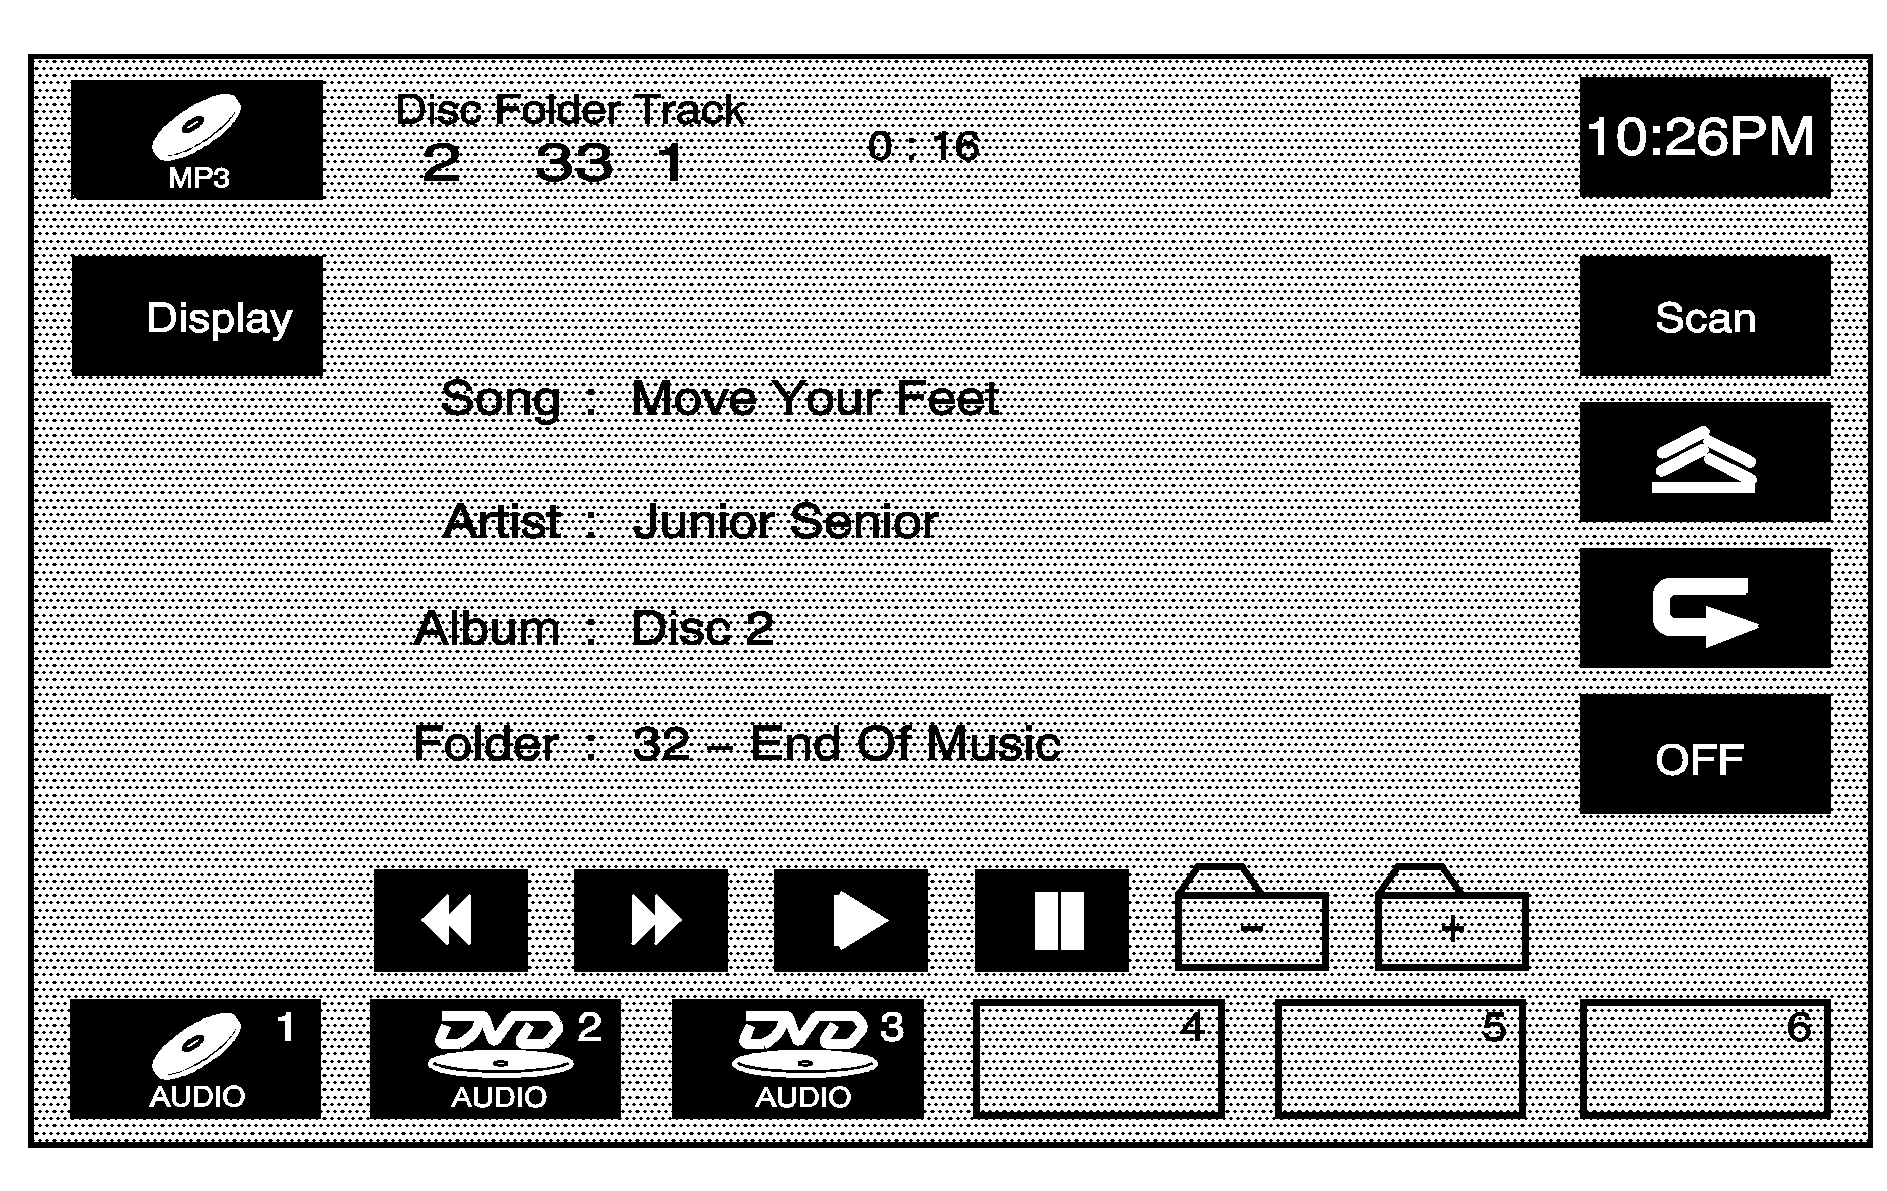
(Play): Select this screen button or press one of the available screen buttons, 1 through 6, to begin playing that disc. There will be a 12 to 15 second delay while the CD is read, before it begins to play.
Display: Select this screen button to display the MP3 play list. Use the up/down arrows to scroll through the list. Select the folder or track to play. While in this menu, you can use the scan, random, and repeat functions. Press Display again to go back to the main screen.
(Root Directory): Select this screen button to go to the root directory, if available, on the MP3 disc. While in this mode, you can select a specific folder to play.
HOME: Select this screen button to allow you to go to the Home folder. This is the first folder on the disc.
(Reverse): Press and hold this screen button to reverse through the current track.
(Fast forward): Press and hold this screen button to fast forward through the current track.
(Pause): Select this screen button to pause play. Select this button or the play button to resume play.
- (Previous folder): Select this screen button to go to the previous folder.
+ (Next folder): Select this screen button to go to the next folder.
Scan: Select the Scan screen button to toggle between the following scan options:
SCAN (Scan Folder): If this symbol appears on the display after pressing the Scan screen button, the system will play the first 10 seconds of each track, in each folder, on the current playing disc. Select the OFF screen button to stop scanning. When the system has scanned through all of the tracks, the system will automatically stop scanning.
SCAN (Scan One Disc): If this symbol appears on the display after pressing the Scan screen button, the system will play the first 10 seconds of each track on the current playing disc. Select the OFF screen button to stop scanning. When the system has scanned through all of the tracks, the system will automatically stop scanning.
SCAN (Scan All Disc): If this symbol appears on the display after pressing the Scan screen button, the system will play the first 10 seconds of each track on all of the loaded discs of the same media type. Select the OFF screen button to stop scanning. When the system has scanned through all of the discs, the system will automatically stop scanning.
(Random): Select the random screen button to toggle between the following random options:
RND (Random One Folder): If this symbol appears on the display after pressing the random screen button, the system will play the tracks, in the current folder, on the current playing disc, in random, rather than sequential, order. Select the OFF screen button to turn off random play.
RND (Random All Folders): If this symbol appears on the display after pressing the random screen button, the system will play the tracks, in all folders, on the current playing disc, in random, rather than sequential, order. Select the OFF screen button to turn off random play.
RND (Random All Discs): If this symbol appears on the display after pressing the random screen button, the system will play the tracks on all of the loaded discs, in random, rather than sequential, order This function randoms all discs of the same media type. Select the OFF screen button to turn off random play.
(Repeat): Select the repeat screen button to toggle between the following repeat options:
RPT (Repeat Track): If this symbol appears on the display after pressing the repeat screen button, the system will repeat the track currently playing. Select the OFF screen button to turn off repeat play.
RPT (Repeat Folder): If this symbol appears on the display after pressing the repeat screen button, the system will repeat the folder currently playing. Select the OFF screen button to turn off repeat play.
RPT (Repeat Disc): If this symbol appears on the display after pressing the repeat screen button, the system will repeat all of the tracks on the disc currently playing. Select the OFF screen button to turn off repeat play.
OFF: Select this screen button to turn off the scan, random, or repeat functions.
Combined Disc: This system will also play a combined disc which contains CD-DA and MP3 types of media. Use the CD screen button to switch between MP3 and CD-DA tracks when playing a combined disc.
(Seek Key): Press the up arrow to seek to the next track on a disc. If playing the last track, pressing the up arrow will seek to the first track of the next disc with the same media type or go to the first track of the selected disc. Press the down arrow to go to the beginning of the current track or to the previous track on a disc. If playing the first track, pressing the down arrow will seek to the last track on the selected disc.
Playing an Audio or Video DVD
When an audio or video DVD has been loaded, the following screen will appear. Some features do not function for both audio and video DVDs.
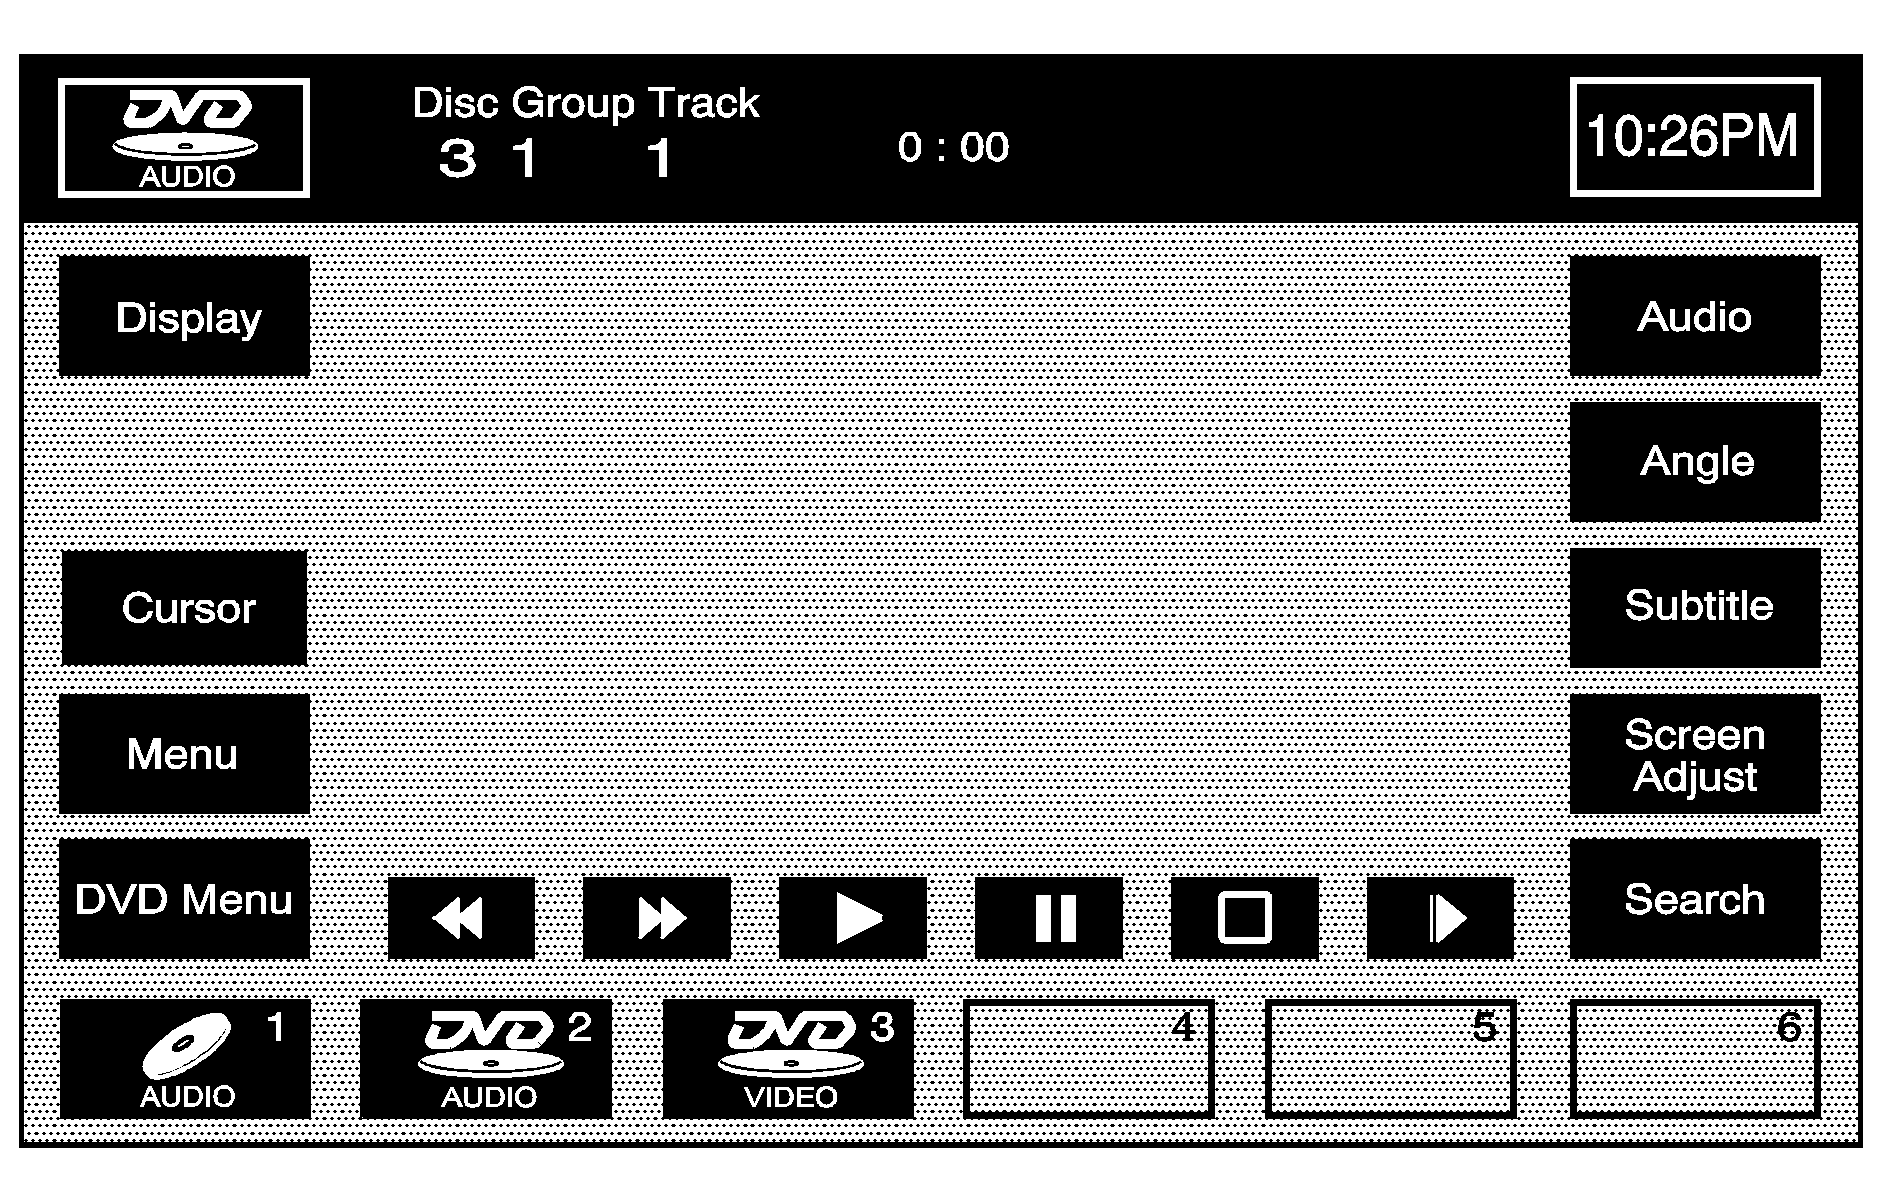
To get the best sound quality from an audio DVD, the current group that is playing may need to be changed. Audio DVDs are usually set up with multiple copies of the album on the disc, called groups. Group 1 may play the album in PPCM audio and Group 2 may play the album in Dolby Surround Sound.
To switch these groups, do the following:
- Put the vehicle in PARK (P).
- Access the DVD/CD menu screen.
- Select the Search screen button.
- Input the number of the group into the numeric keypad.
- Select the Enter screen button.
- Press the (audio adjust) hard key.
- Select the Multi-channel screen button, if it is not already highlighted.
If the DTS or Dolby logo is shown on the status bar, but the Multi-channel screen button is grayed out, the group may contain two audio streams (one is stereo source and the other is surround source, DTS or Dolby) in one group. In this case, user needs to switch audio streams by pressing the Audio screen button on the DVD/CD screen. Press the (audio adjust) hard key to check if the Multi-channel screen button is selected. This button will only be selectable when playing DTS or Dolby tracks in surround sound.
Menu: Select this screen button to access the DVD's menu options. Depending on the type of DVD you are using, this screen button may or may not be available.DVD Menu: Select this screen button to access the video DVD menu. DVD must be playing to select this feature. While watching a video DVD or playing an audio DVD, touch anywhere on the screen to remove all screen button functions from the display. Touch anywhere on the screen again to display the screen buttons.
Audio: Select this screen button to change the audio language heard, English or French. DVD must be playing to select this feature. This may not be available on all DVDs.
Angle: Select this screen button to adjust the viewing angle of the DVD. Some DVDs allow you to change the camera angle. This may not be available on all DVDs.
Subtitle: Select this screen button to play back the video with subtitles. Select English, French, or Off. DVD must be playing to select this feature. This may not be available on all DVDs.
Search: Select this screen button to search through a DVD by Title/Group, or Chapter/Track. Touch Keypad to access the numeric keypad used to enter data in these searches.
To use the search button, do the following:
- Select the Search screen button from the DVD-Video or DVD-Audio screen.
- Select the Keypad screen button to access a numeric keypad to enter the title/group or chapter/track number.
- Select the OK screen button and the system will go to the specified title/group or chapter/track.
- Select the Search screen button to exit the search feature.
(Play): Select the play screen button to begin playing the currently selected disc.
(Pause): Select the pause screen button to pause the currently playing disc. Select this button again or the play button to resume play.
(Stop): Select the stop screen button to stop playing the disc.
(Frame Advance): Select this screen button to play the disc in slow motion.
Display Menu
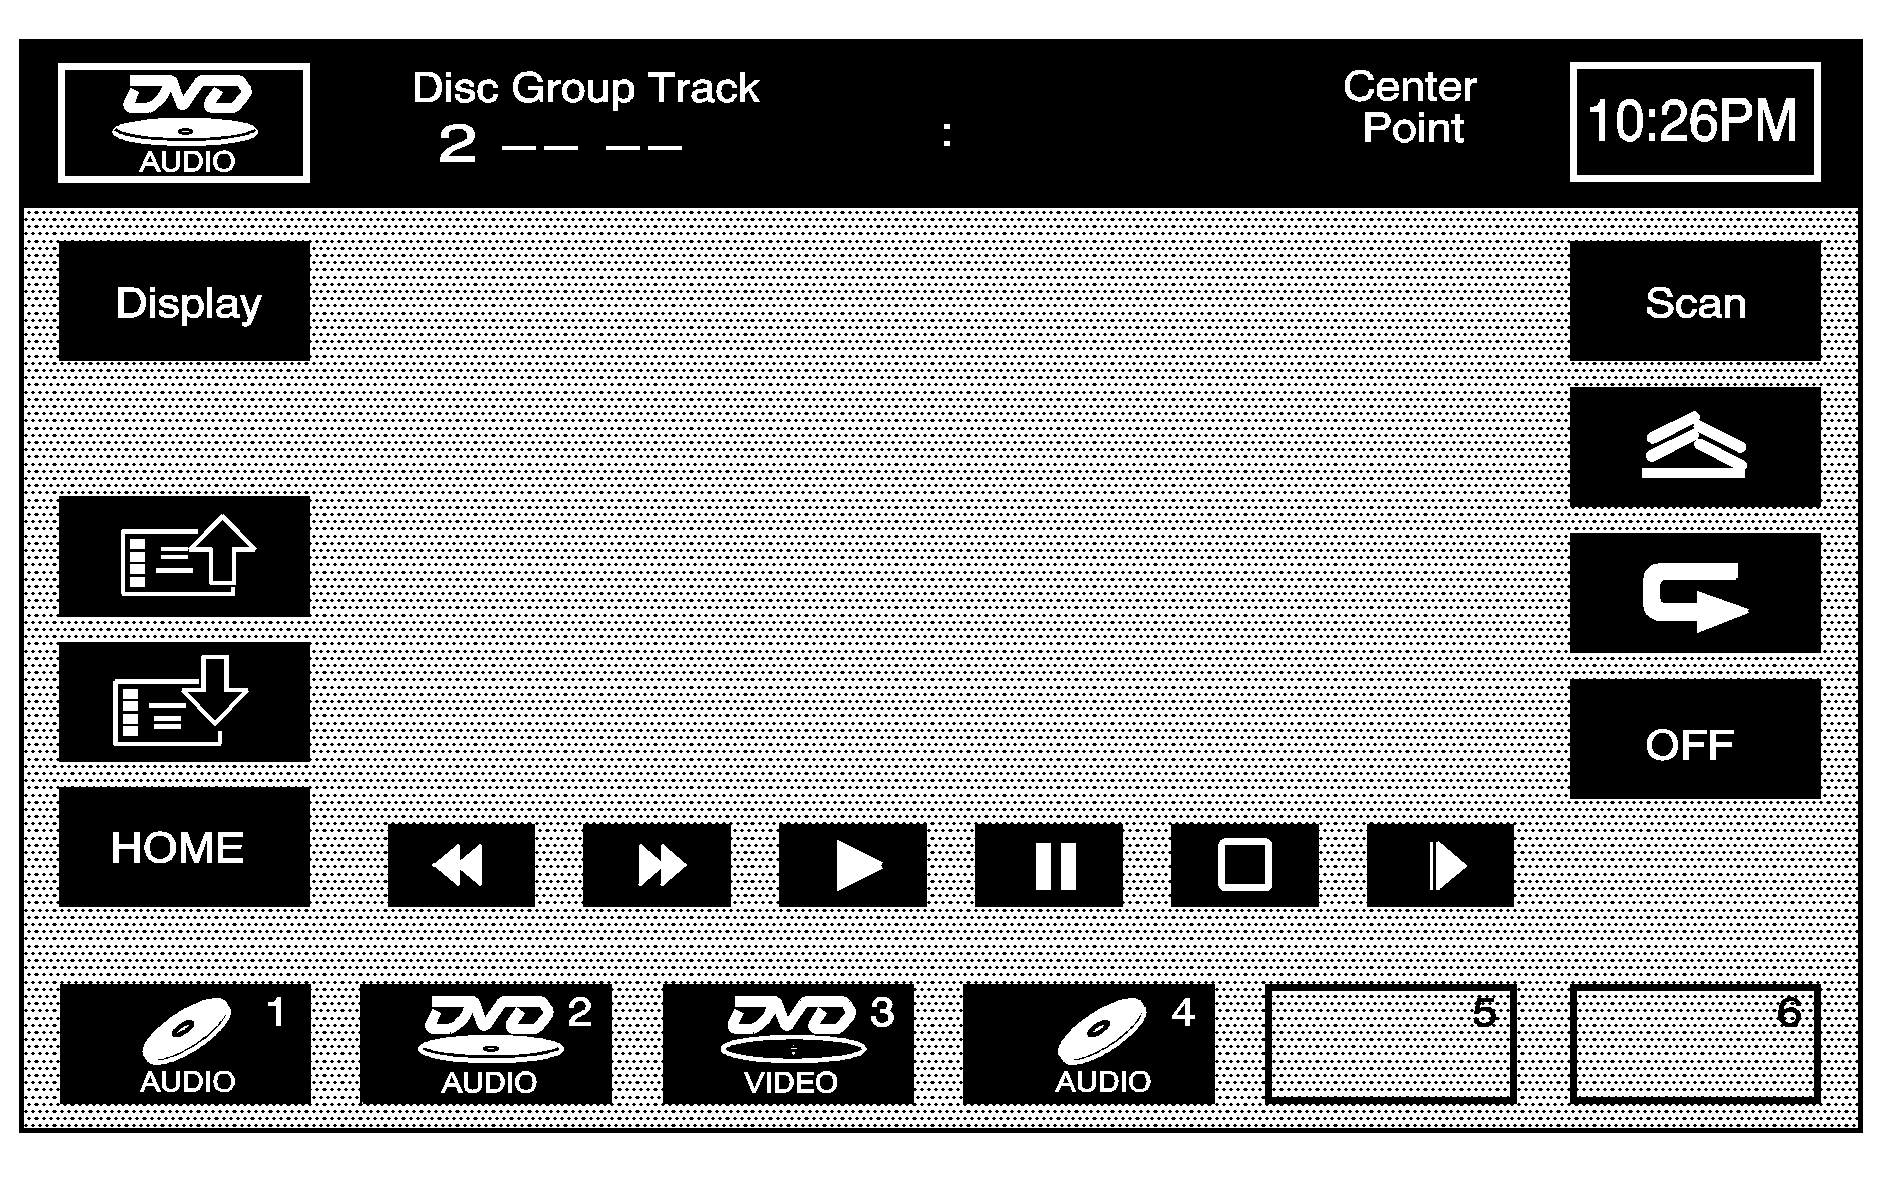
Display: Select this screen button to access more audio/video DVD options.
(Page Up): Select the page up symbol to scroll up through the pages of an audio DVD. The function of this screen button depends on the disc inserted.
(Page Down): Select the page down symbol to scroll down through the pages of an audio DVD. The function of this screen button depends on the disc inserted.
HOME: Select this screen button to take you back to the home page of the DVD disc.
Scan: Select the Scan screen button to hear the first 10 seconds of each track, in the current group, on the selected disc. Select the OFF screen button to stop scanning. Scanning will stop when the system has scanned through all of the tracks. This function is available for DVD audio only.
(Random Track): Select this screen button to hear the tracks, in the current group, on the selected disc, in random, rather than sequential, order. Select the OFF screen button to turn off random play. This function is available for DVD audio only.
(Repeat): Select this screen button to repeat the current track. Select this screen button again to repeat the current playing group on the disc. Select the OFF screen button to turn off repeat play. This function is available for DVD audio only.
OFF: Select this screen button to turn off the scan, random, and repeat functions.
(Seek Key): Press the up arrow hard key to go to the next track in the current group. If you are in the last track, the system will go to the first track of the next group. If you are in the last track of the last group, the system will display an error message in the upper right corner of the screen. Press the down arrow hard key to go back to the beginning of the current track. Press the down arrow hard key again to go to the previous track in the current group. If you are in the first track of the current group, pressing this hard key will take you to the last track of the previous group. If you are in the first track of the first group, the system will display an error message in the upper right corner of the screen.
Cursor Menu
Cursor: Select this screen button to access the left, right, up, and down cursors on the screen. The cursors allow you to navigate through menu options on the screen.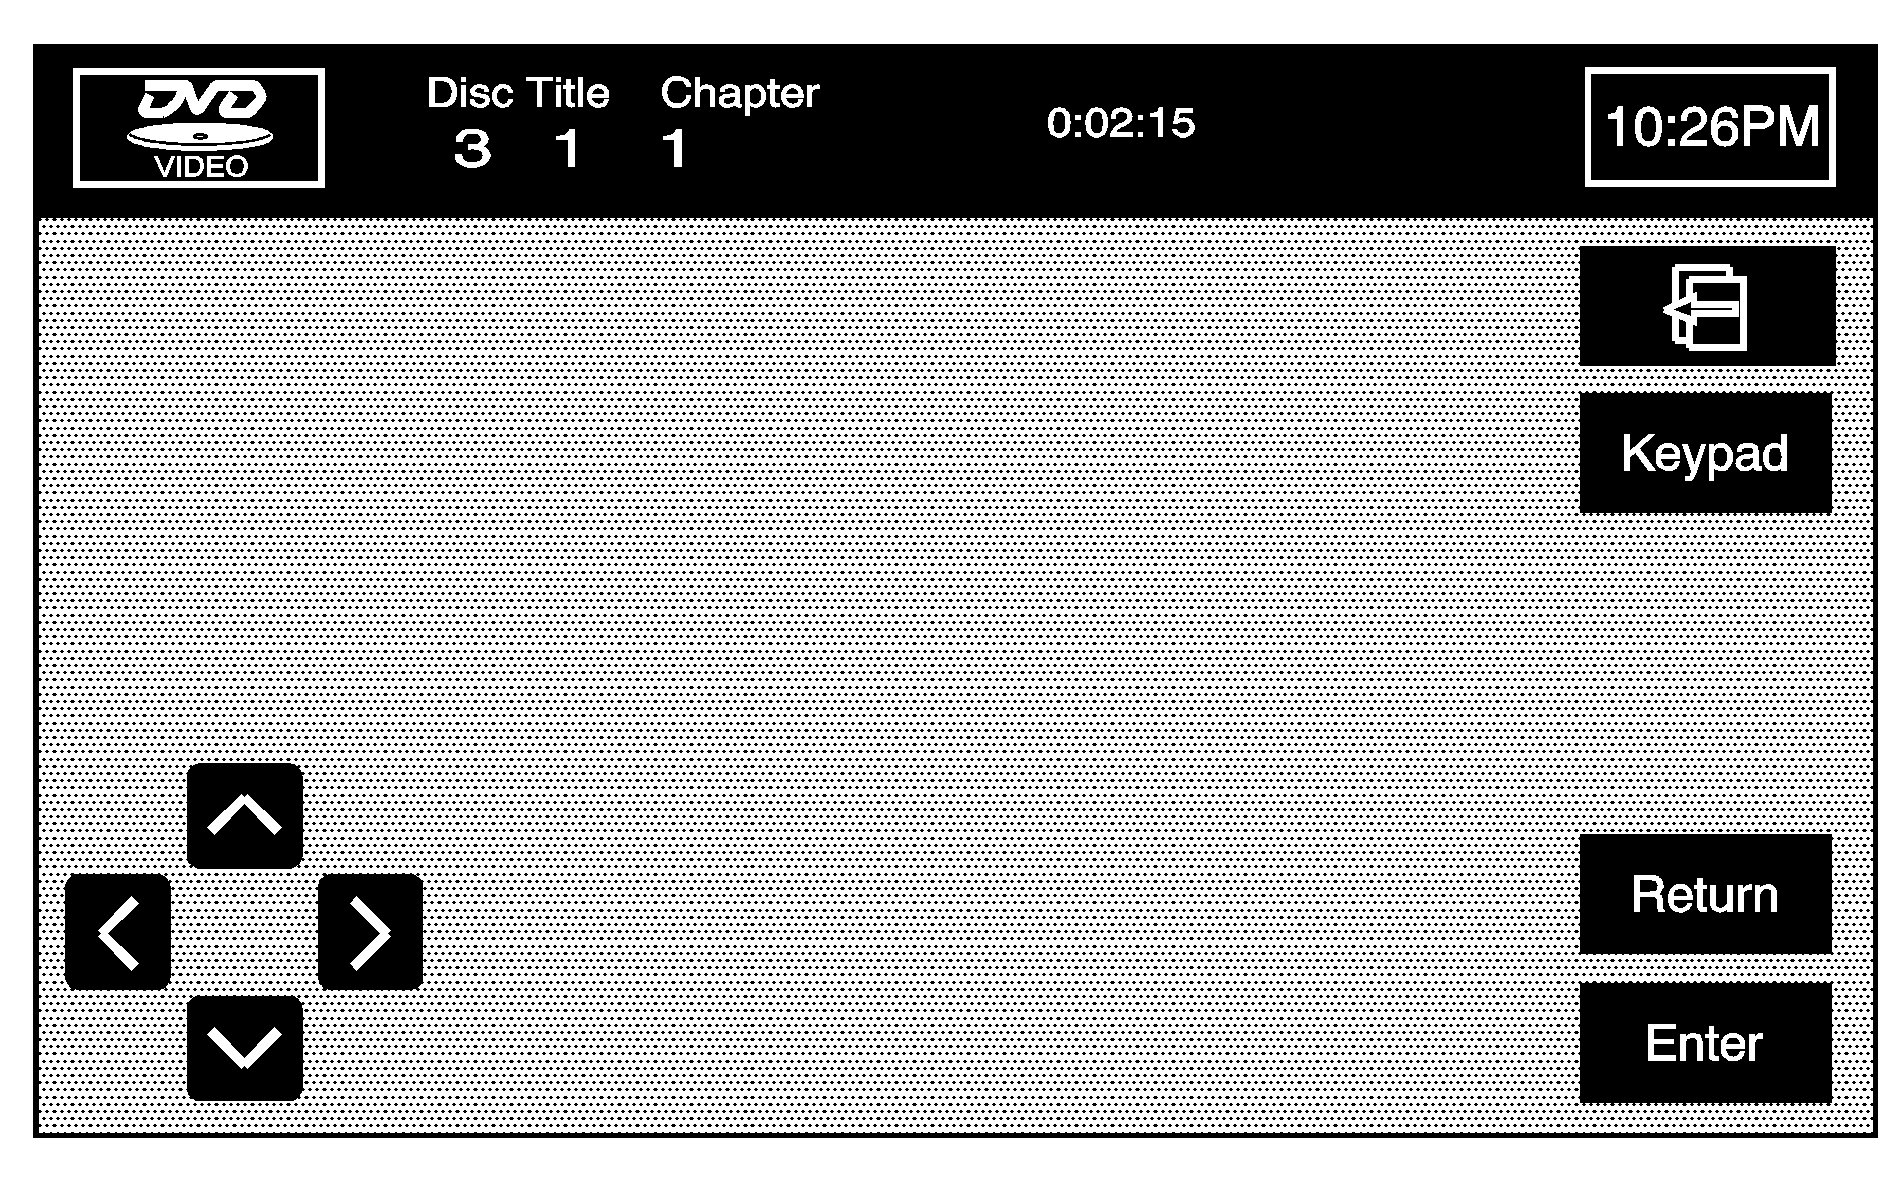
, , , (Cursor Arrows): Select these cursor screen buttons when you need to scroll through a list of DVD items, such as track names, menu options, or scene selection. Then touch Enter to set your selection.
Keypad: Select this button and a number keypad will appear. Input the track number, press enter, and the system will play the track.
(Back)/ Return: Select either button to return to the previous screen.
Screen Adjust Menu
Screen Adjust: Select this screen button to access the audio/video DVD screen adjust menu.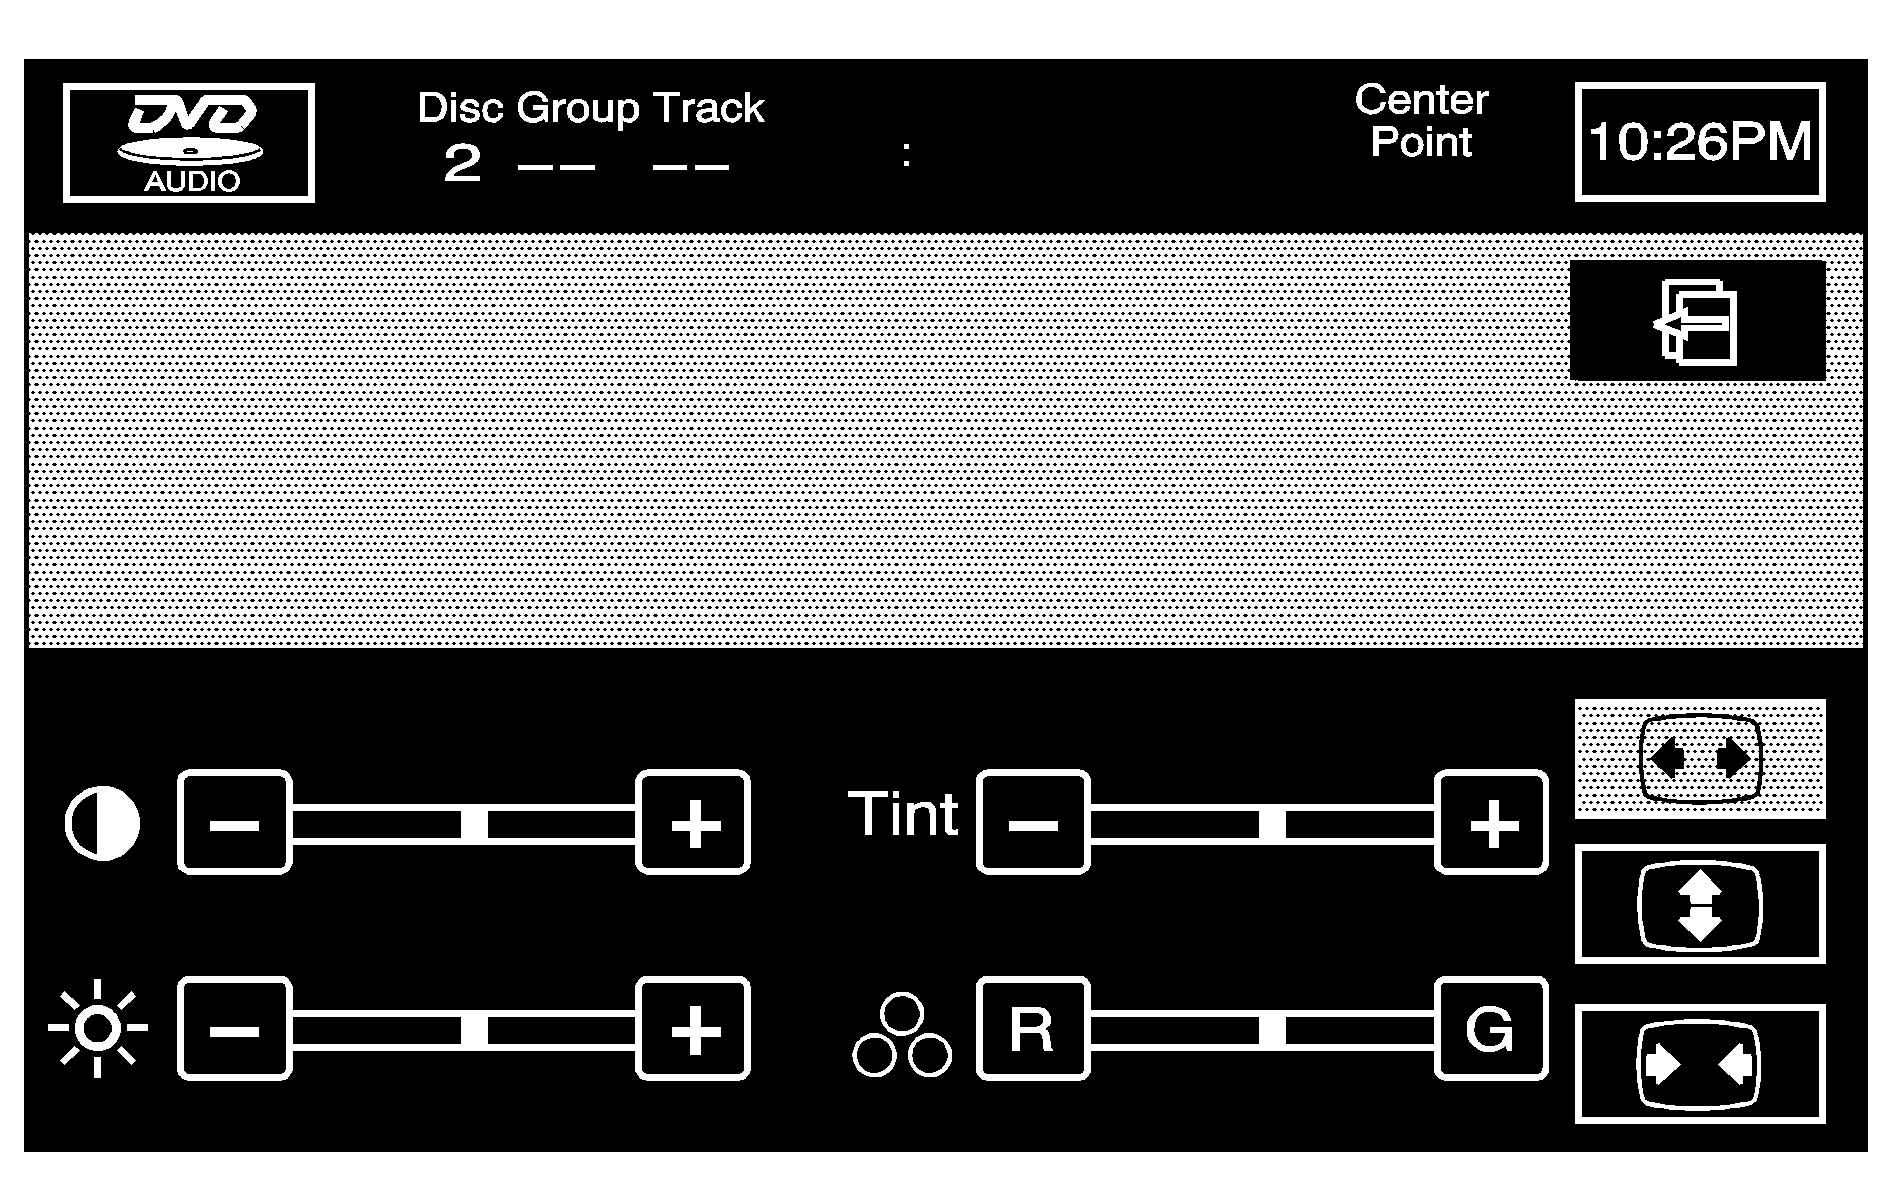
(Contrast): Select the plus (+) or minus (-) signs next to this symbol to increase or decrease the contrast.
(Brightness): Select the plus (+) or minus (-) signs next to this symbol to increase or decrease the brightness.
Tint: Select the plus (+) or minus (-) signs next to this symbol to increase or decrease the screen tint.
(Color): Select the R (red) or G (green) next to this symbol to increase or adjust the color of the screen.
(Widescreen): Select this screen button to view a video DVD in widescreen format.
(Full Screen): Select this screen button to view a video DVD in full screen format.
(Normal Screen): Select this screen button to view a video DVD in normal screen size.
Six-Disc DVD Changer Errors
Although the DVD or CD you are playing meets regulation requirements, there are circumstances that may cause the disc to not play correctly. Some of those circumstances may include the recording conditions of the disc, the disc condition, and the pick up circumstances of the player.
If using the system in extremely low or high temperatures, the video playback may become distorted.
Because of some types of compression techniques used during recording MP3 discs, the sound quality of the discs can be inferior. This is not caused by the audio system.
