For 1990-2009 cars only
Engine Coolant Thermostat Replacement LY7
Removal Procedure
- Partially drain the cooling system. Refer to Cooling System Draining and Filling.
- Remove the upper intake manifold with the lower intake manifold. Refer to Lower Intake Manifold Replacement.
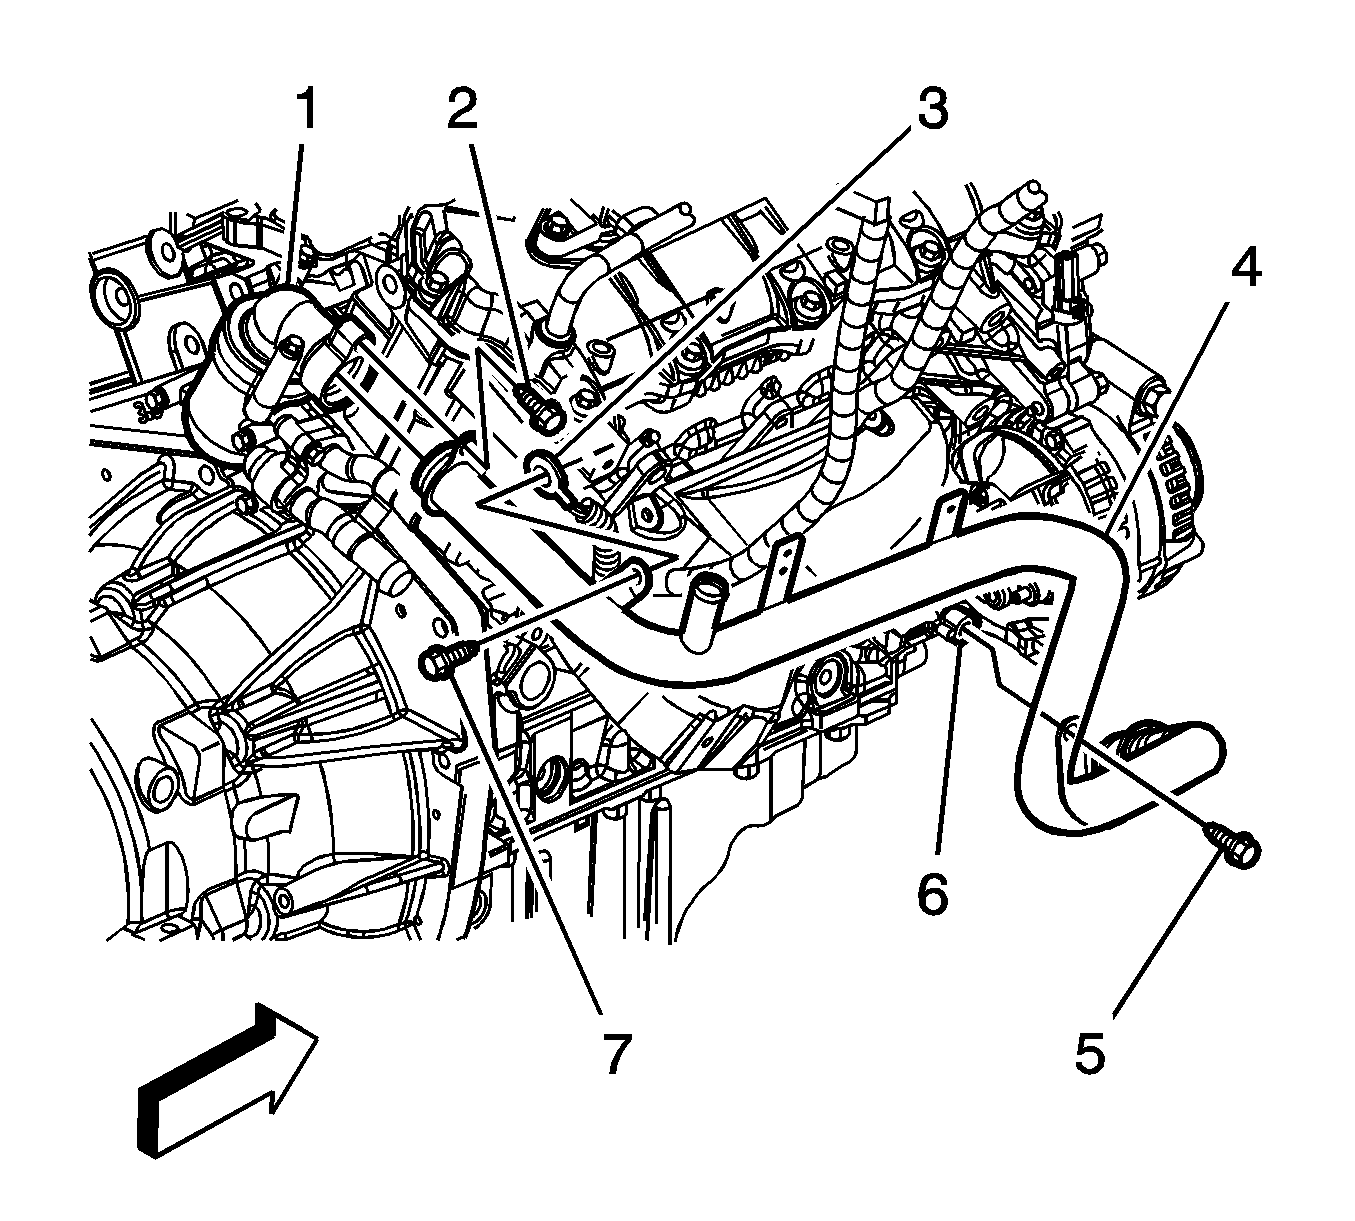
- Disconnect the surge tank hose from the thermostat.
- Remove the coolant pipe/thermostat housing bolt (2).
- Remove the coolant pipe upper bolt (7).
- Remove the coolant inlet pipe (4) from the thermostat.
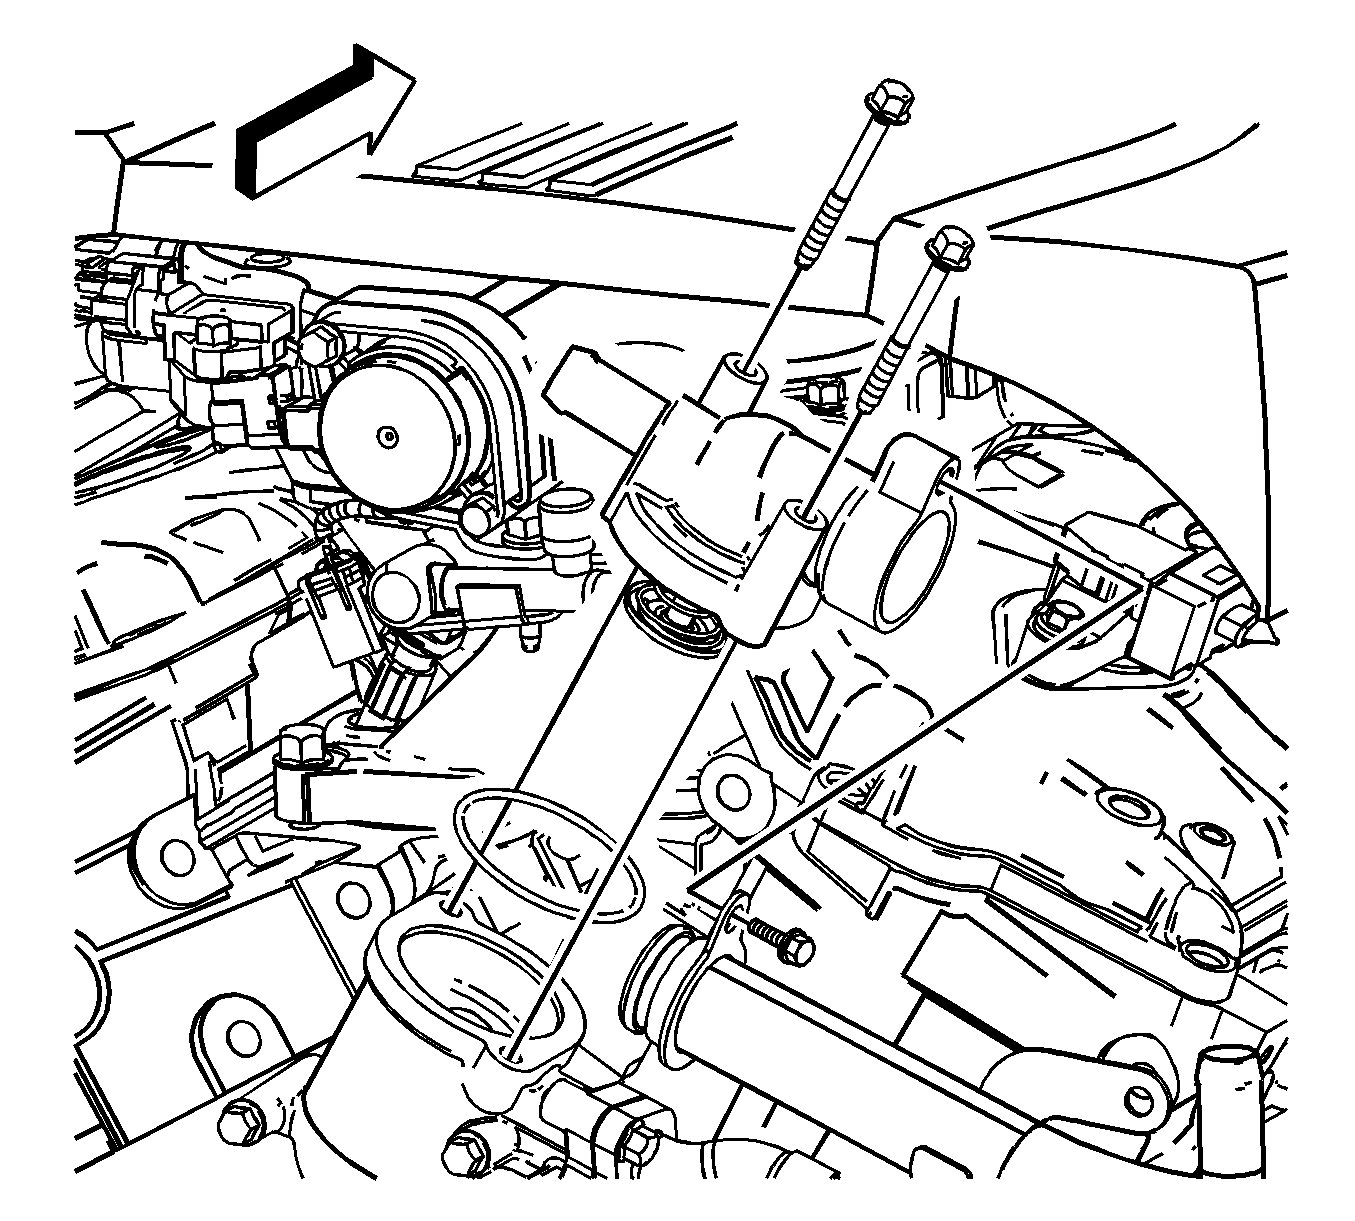
- Remove the thermostat bolts.
- Remove the thermostat and discard the thermostat seal.
Note: Do NOT separate the upper and lower intake manifolds.
Installation Procedure
- Install the thermostat with a NEW thermostat seal.
- Install the thermostat bolts and tighten to 10 N·m (89 lb in).
- Install the coolant pipe (4), NEW seal, and fasteners (2 and 7). Refer to Engine Coolant Inlet Pipe Replacement.
- Install the surge tank hose to the thermostat.
- Install the upper intake manifold with the lower intake manifold. Refer to Lower Intake Manifold Replacement.
- Fill the cooling system. Refer to Cooling System Draining and Filling.

Caution: Refer to Fastener Caution in the Preface section.

Engine Coolant Thermostat Replacement V6
Removal Procedure
- Partially drain the cooling system. Refer to Cooling System Draining and Filling.
- Remove the upper intake manifold. Refer to Intake Manifold Replacement.
- Disconnect the surge tank outlet pipe from the thermostat. Refer to Radiator Surge Tank Outlet Hose/Pipe Replacement.
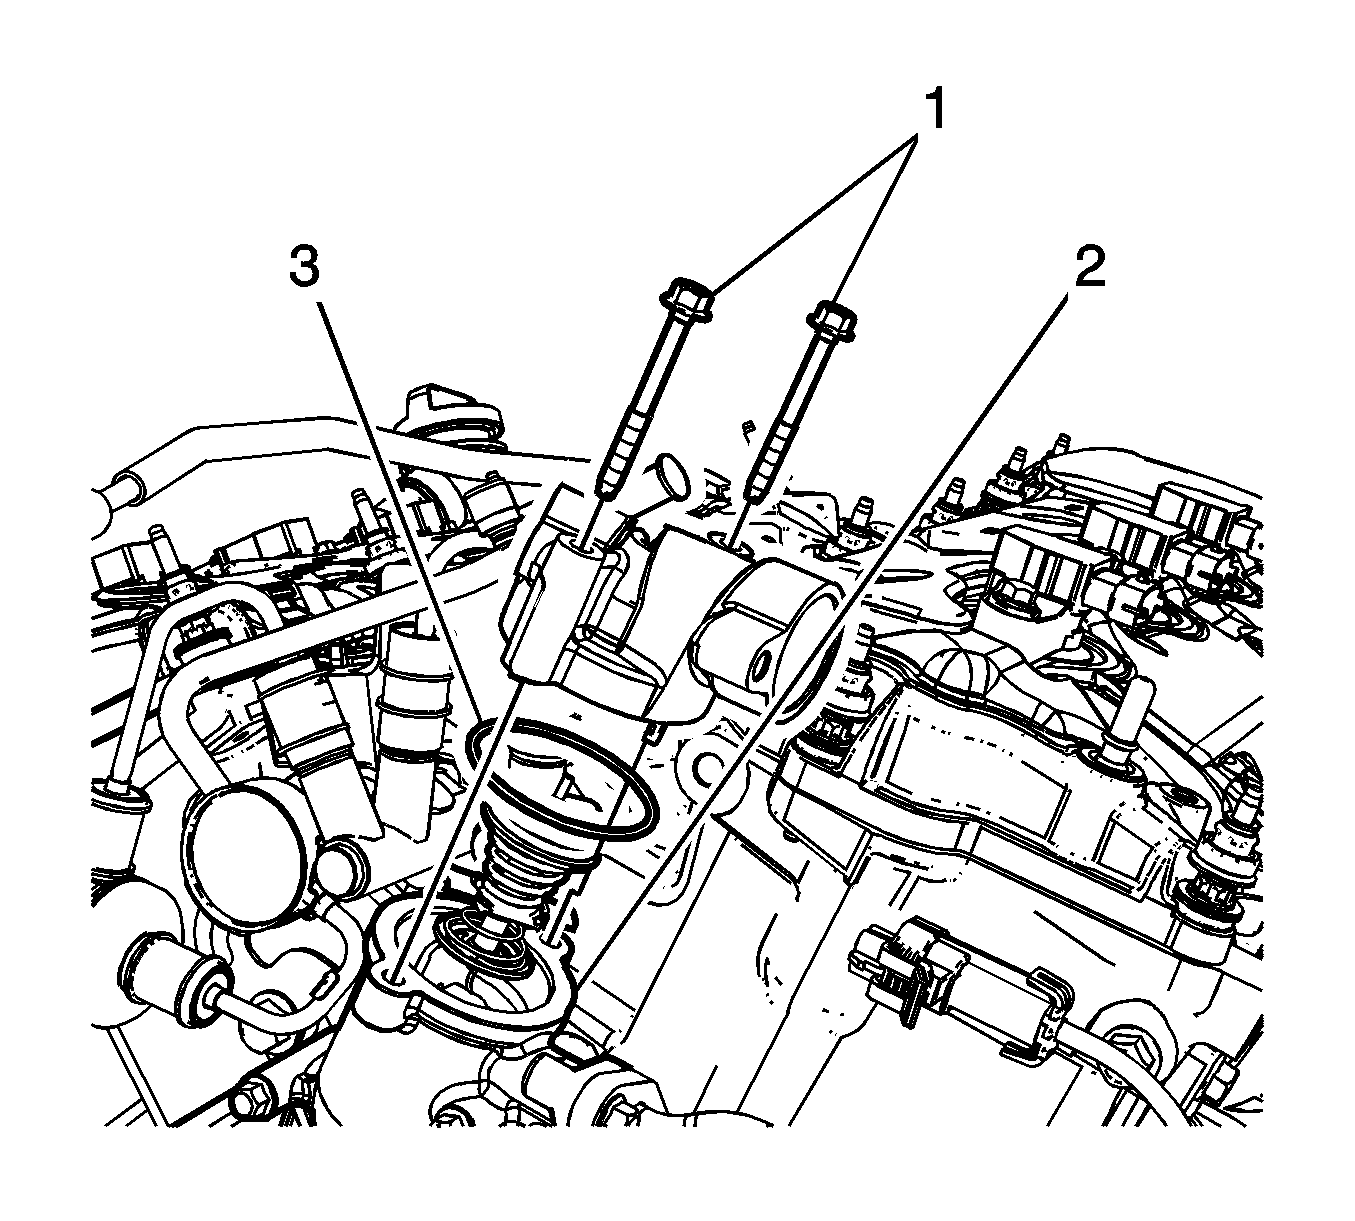
- Remove the coolant pipe/thermostat housing bolt (2).
- Remove the coolant pipe upper bolt (7).
- Remove the coolant inlet pipe (4) from the thermostat.
- Remove the thermostat bolts (1).
- Remove the thermostat (2) and discard the thermostat seal (3).

Installation Procedure
- Install the thermostat (2) with a NEW thermostat seal (3).
- Install the thermostat bolts (1) and tighten to 10 N·m (89 lb in).
- Install the coolant pipe (4), NEW seal, and fasteners (2 and 7). Refer to Engine Coolant Inlet Pipe Replacement.
- Connect the surge tank outlet pipe to the thermostat. Refer to Radiator Surge Tank Outlet Hose/Pipe Replacement.
- Install the upper intake manifold. Refer to Intake Manifold Replacement.
- Fill the cooling system. Refer to Cooling System Draining and Filling.

Caution: Refer to Fastener Caution in the Preface section.

Engine Coolant Thermostat Replacement LC3
Removal Procedure
- Drain the cooling system. Refer to Cooling System Draining and Filling.
- Remove the air cleaner outlet duct. Refer to Air Cleaner Outlet Duct Replacement.
- Remove the radiator hose from the thermostat housing. Refer to Radiator Outlet Hose Replacement.
- Remove the heater hose from the thermostat housing. Refer to Heater Outlet Hose Replacement.
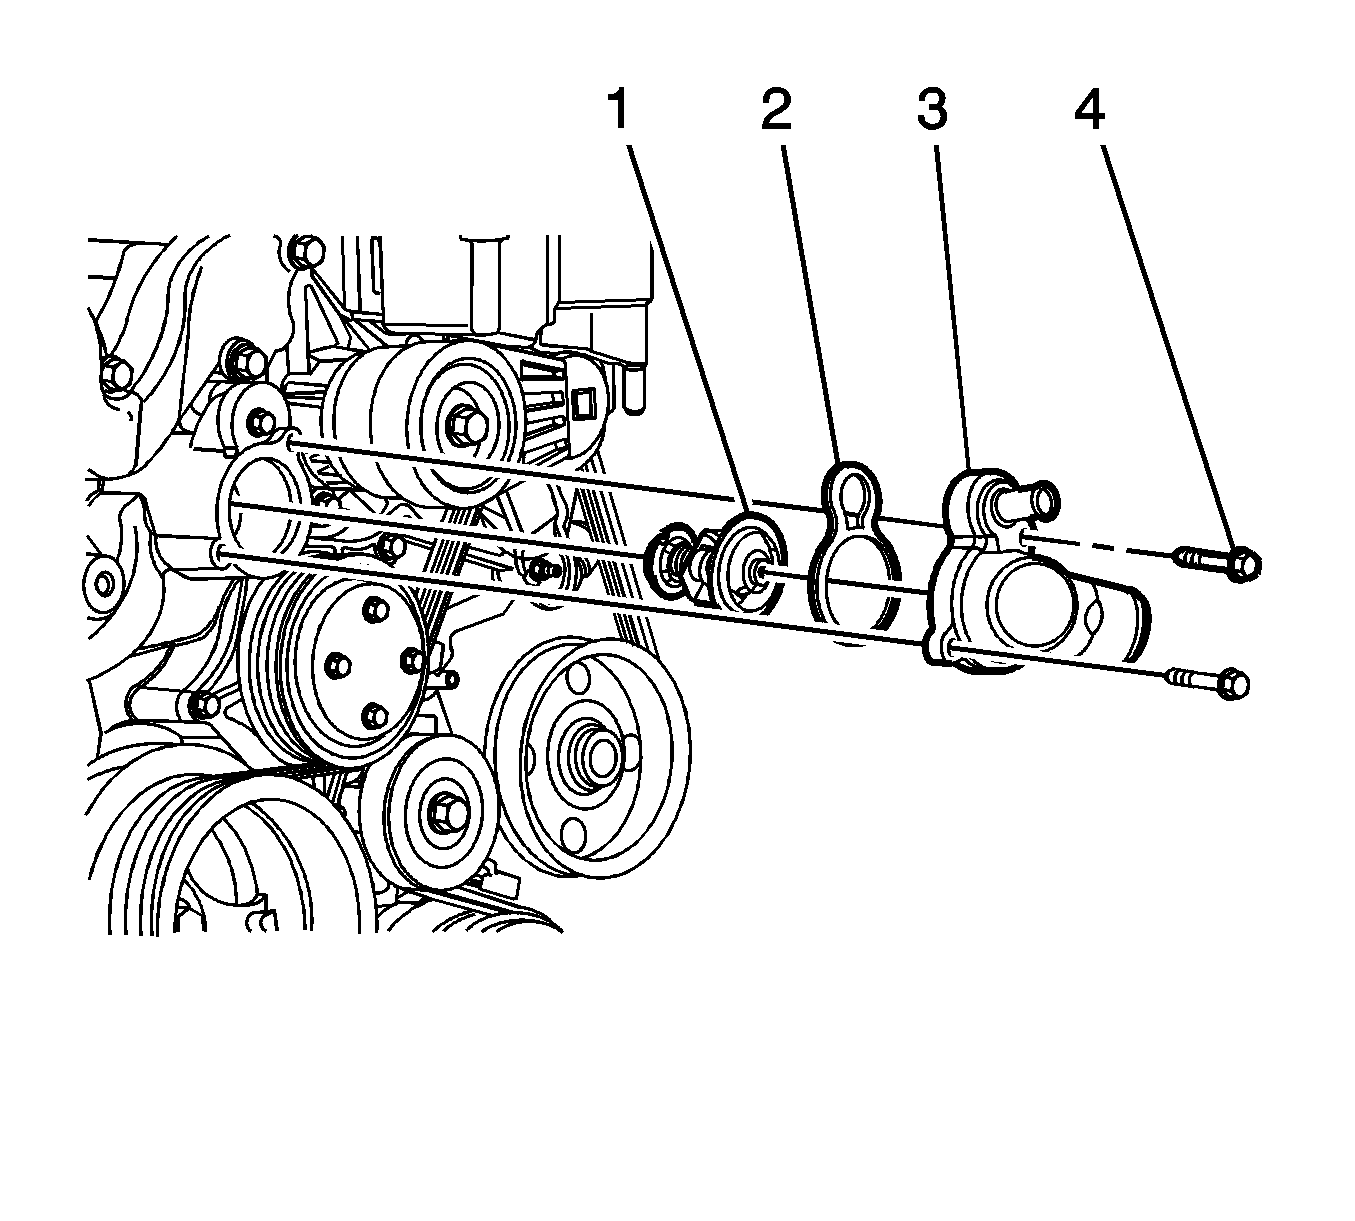
- Remove the thermostat housing bolts (4).
- Remove the thermostat housing (3) with thermostat (1), from the water housing.
- Remove and discard the seal ring (2).
- Remove the thermostat from the thermostat housing.
Installation Procedure
- Clean the thermostat housing and water housing sealing surfaces.
- Install the thermostat (1) to the thermostat housing (3).
- Install the NEW seal (2) to the thermostat housing.
- Install the thermostat housing (3) with the thermostat (1) and the seal (2) to the water housing.
- Install the thermostat housing bolts (4) and tighten to 10 N·m (89 lb in).
- Install the heater hose to the thermostat housing. Refer to Heater Outlet Hose Replacement.
- Install the radiator hose to the thermostat housing. Refer to Radiator Outlet Hose Replacement.
- Install the air cleaner outlet duct. Refer to Air Cleaner Outlet Duct Replacement.
- Fill the cooling system. Refer to Cooling System Draining and Filling.

Caution: Refer to Fastener Caution in the Preface section.
Engine Coolant Thermostat Replacement LH2
Removal Procedure
- Drain the cooling system. Refer to Cooling System Draining and Filling.
- Remove the air cleaner outlet duct. Refer to Air Cleaner Outlet Duct Replacement.
- Remove the radiator hose from the thermostat housing. Refer to Radiator Outlet Hose Replacement.
- Remove the heater hose from the thermostat housing. Refer to Heater Outlet Hose Replacement.
- Remove the thermostat housing bolts.
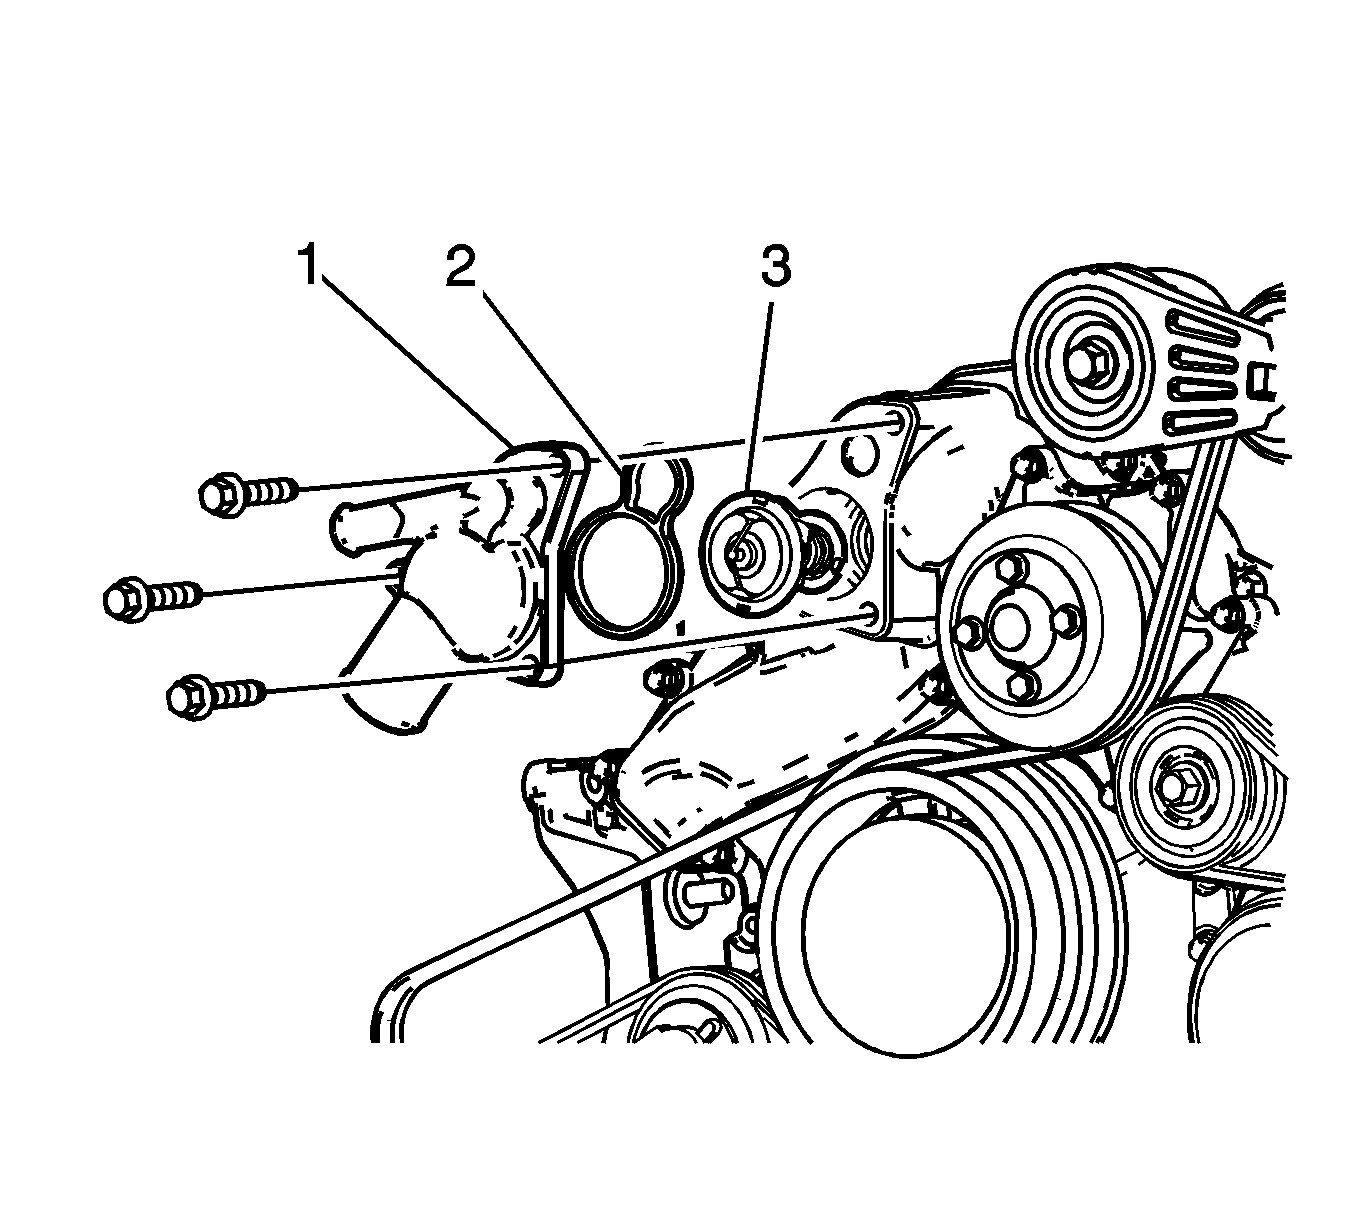
- Remove the thermostat housing (1) with thermostat (3), from the water housing.
- Remove and discard the seal ring (2).
- Remove the thermostat from the thermostat housing.
Installation Procedure
- Clean the thermostat housing and water housing sealing surfaces.
- Install the new thermostat to the thermostat housing.
- Install the NEW seal (2) to the thermostat housing.
- Install the thermostat housing (1) with the thermostat (3) and the seal (2) to the water housing.
- Install the thermostat housing bolts and tighten to 10 N·m (89 lb in).
- Install the heater hose to the thermostat housing. Refer to Heater Outlet Hose Replacement.
- Install the radiator hose to the thermostat housing. Refer to Radiator Outlet Hose Replacement.
- Install the air cleaner outlet duct. Refer to Air Cleaner Outlet Duct Replacement.
- Fill the cooling system. Refer to Cooling System Draining and Filling.

Caution: Refer to Fastener Caution in the Preface section.
