Brake Intermediate Hose Replacement JE5, JL9
Removal Procedure
- Raise and support the vehicle. Refer to Lifting and Jacking the Vehicle.
- Remove the right rear tire and wheel assembly. Refer to Tire and Wheel Removal and Installation.
- Clean all dirt and foreign material from the brake hose and the brake pipe fittings.
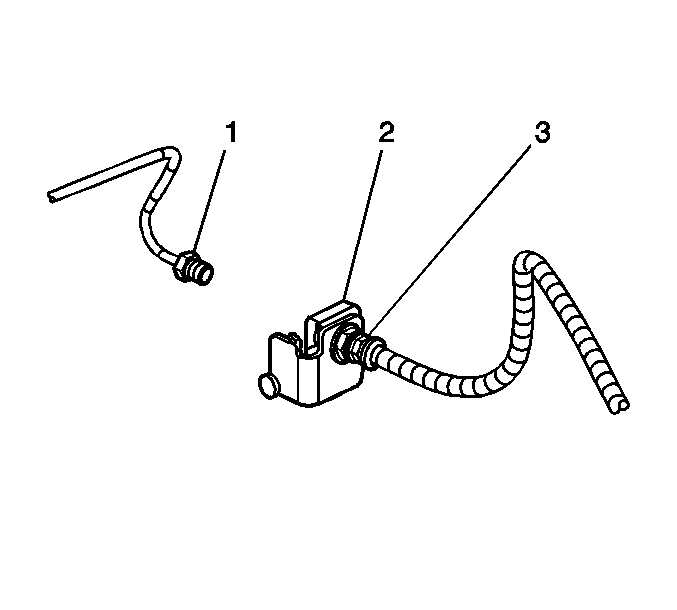
- Disconnect the crossover brake pipe fitting (1) from the intermediate brake hose assembly (3).
- Using a flat-bladed tool, remove the brake hose retainer (2) from the rear frame bracket.
- Disconnect the brake pipe fittings from the intermediate brake hose assembly.
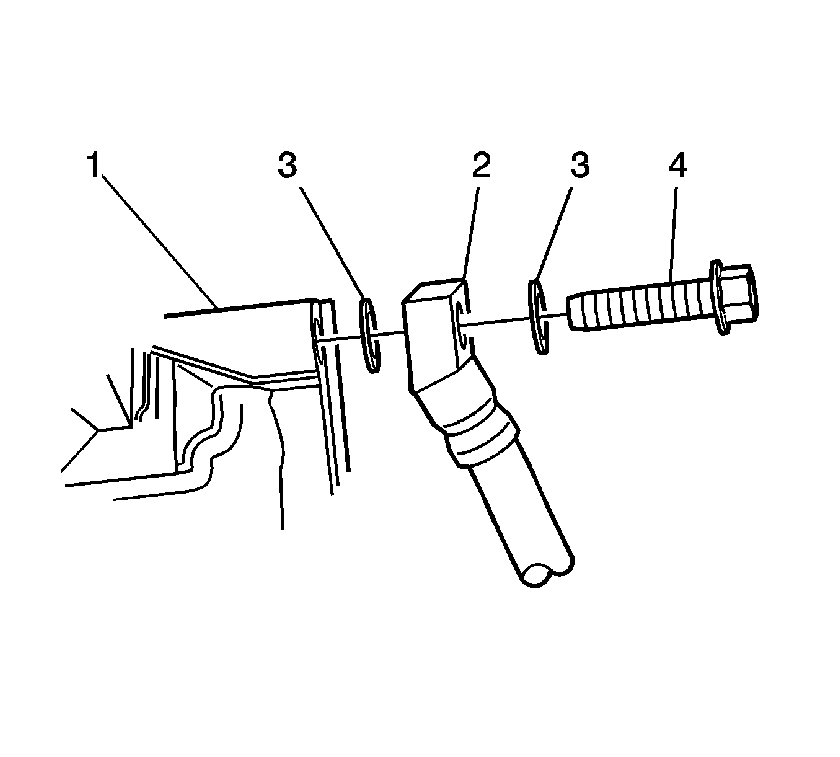
- Disconnect the brake hose fitting bolt (4) from the brake caliper (1).
- Disconnect the brake hose from the brake caliper.
- Place a shop towel on a hard surface.
- Tap the threaded end of the brake hose fitting bolt on the shop towel to remove the gaskets (3) from the bolt (4)
- Remove and discard the 2 copper brake hose gaskets (3). These gaskets may be stuck to the brake caliper and/or the brake hose end (2).
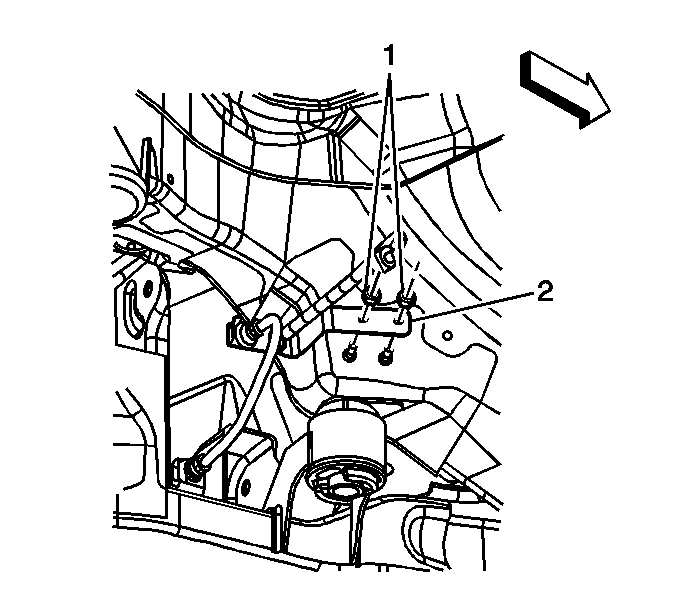
- Remove the intermediate brake hose assembly mounting nuts (1) from the studs.
- Remove the intermediate brake hose assembly (2) from the vehicle.
Note: The intermediate brake hose assembly is serviced as an assembly.

Cap the brake pipe fitting to prevent brake fluid loss and contamination.
Cap the brake pipe fittings to prevent brake fluid loss and contamination.

Plug the brake caliper inlet port to prevent brake fluid loss and contamination.

Installation Procedure
- Install the intermediate brake hose assembly (2) to the mounting studs.
- Install the intermediate brake hose assembly mounting nuts (1) to the mounting studs and tighten to 14 N·m (124 lb in).
- Remove the caps from the (2) intermediate brake pipe fittings.
- Connect the 2 brake pipe fittings to the intermediate brake hose assembly.
- Remove the plug from the brake caliper inlet port.
- Assemble the brake hose (2), the NEW copper brake hose gaskets (3), and the brake hose fitting bolt (4) to the brake hose.
- Install the brake hose fitting bolt to the brake caliper (1) and tighten to 50 N·m (37 lb ft).
- Remove the cap from the crossover brake pipe fitting.
- Install the brake hose retainer (2) to the rear frame bracket.
- Connect the crossover brake pipe fitting (1) to the intermediate brake hose assembly (3) and tighten to 18 N·m (13 lb ft).
- Bleed the hydraulic brake system. Refer to Hydraulic Brake System Bleeding.
- Install the tire and wheel assembly. Refer to Tire and Wheel Removal and Installation.
- Lower the vehicle.

Caution: Make sure the brake hose is not twisted or kinked after installation. Damage to the hose could result.
Caution: Refer to Fastener Caution in the Preface section.

Note: Install NEW copper brake hose gaskets.

Brake Intermediate Hose Replacement J56
Removal Procedure
- Raise and support the vehicle. Refer to Lifting and Jacking the Vehicle.
- Remove the right rear tire and wheel assembly. Refer to Tire and Wheel Removal and Installation.
- Clean all dirt and foreign material from the brake hose and the brake pipe fittings.
- Disconnect the crossover brake pipe fitting (1) from the intermediate brake hose assembly (3).
- Using a flat-bladed tool, remove the brake hose retainer (2) from the rear frame bracket.
- Disconnect the brake pipe fittings from the intermediate brake hose assembly.
- Disconnect the brake hose fitting bolt (4) from the brake caliper (1).
- Disconnect the brake hose from the brake caliper.
- Place a shop towel on a hard surface.
- Tap the threaded end of the brake hose fitting bolt on the shop towel to remove the gaskets (3) from the bolt (4)
- Remove and discard the 2 copper brake hose gaskets (3). These gaskets may be stuck to the brake caliper and/or the brake hose end (2).
- Remove the intermediate brake hose assembly mounting nuts (1) from the studs.
- Remove the intermediate brake hose assembly (2) from the vehicle.
Note: The intermediate brake hose assembly is serviced as an assembly.

Cap the brake pipe fitting to prevent brake fluid loss and contamination.
Cap the brake pipe fittings to prevent brake fluid loss and contamination.

Plug the brake caliper inlet port to prevent brake fluid loss and contamination.

Installation Procedure
- Install the intermediate brake hose assembly (2) to the mounting studs.
- Install the intermediate brake hose assembly mounting nuts (1) to the mounting studs and tighten to 14 N·m (124 lb in).
- Remove the caps from the (2) intermediate brake pipe fittings.
- Connect the 2 brake pipe fittings to the intermediate brake hose assembly.
- Remove the plug from the brake caliper inlet port.
- Assemble the brake hose (2), the NEW copper brake hose gaskets (3), and the brake hose fitting bolt (4) to the brake hose.
- Install the brake hose fitting bolt to the brake caliper (1) and tighten to 34 N·m (25 lb ft).
- Remove the cap from the crossover brake pipe fitting.
- Install the brake hose retainer (2) to the rear frame bracket.
- Connect the crossover brake pipe fitting (1) to the intermediate brake hose assembly (3) and tighten to 18 N·m (13 lb ft).
- Bleed the hydraulic brake system. Refer to Hydraulic Brake System Bleeding.
- Install the tire and wheel assembly. Refer to Tire and Wheel Removal and Installation.
- Lower the vehicle.

Caution: Make sure the brake hose is not twisted or kinked after installation. Damage to the hose could result.
Caution: Refer to Fastener Caution in the Preface section.

Note: Install NEW copper brake hose gaskets.

