SUNROOF MODULE DRAIN HOSE REPLACEMENT & INSTALLATION

ASTROROOF MODULE DRAIN HOSE REPLACEMENT PROCEDURE UPDATE FOR 1980-81 CARS
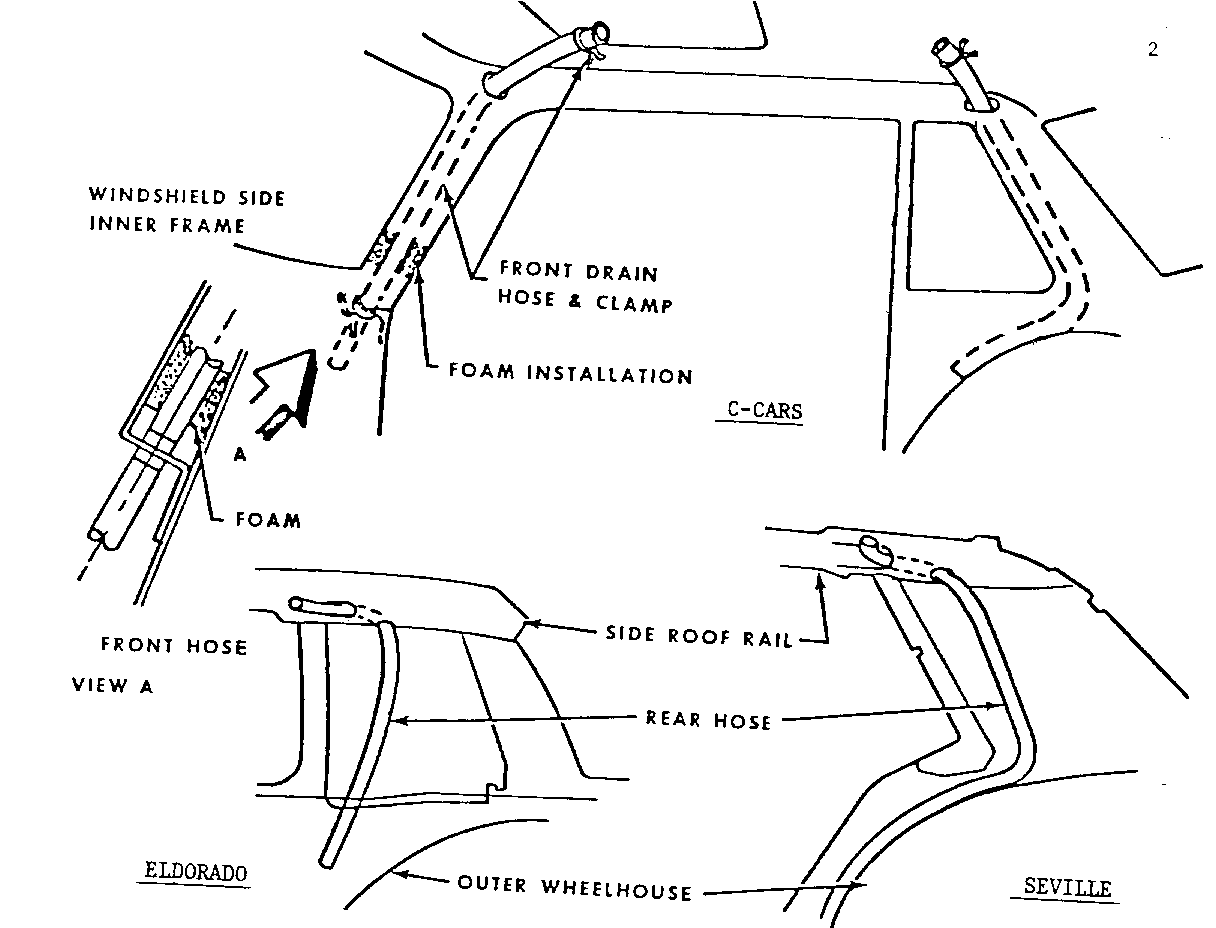
To remove and replace a front or rear astroroof module drain hose on 1980-81 astroroof styles, the following updated procedure should be utilized. Front Astroroof Module Drain Hose Removal and Installation (Illustration on Reverse Side)
The following procedure pertains to one side of the vehicle but is applicable for either the right or left side.
1. Remove the astroroof finishing lace and pull out the headlining from the tuck-type retainer halfway around the astroroof opening on the side of the vehicle being serviced.
2. Remove the sunshade.
3. Remove the headlining side rail garnish, windshield pillar and loosen half of the windshield upper garnish moldings.
4. On C-car four-door styles, remove seat belt shoulder strap upper guide trim cover and attaching bolt, then remove center pillar trim. On Sevilles, remove the upper center pillar trim cap.
5. To provide for headlining clearance, remove the forward two side rail garnish molding clips. Working through the astroroof opening, between the headlining and the roof, use pointed nose pliers to relieve hose clamp and remove hose from module drain tube.
7. Open front door and tape a flexible wire to the lower end of the drain hose located at the upper portion of the front body hinge pillar.
8. With flexible wire securely attached to the drain hose, pull hose up and out of the windshield pillar through the astroroof opening to allow the flexible wire to be positioned through the windshield pillar.
9. Tape new hose to flexible wire at the top of the windshield pillar between the headlining and roof.
10. Pull the flexible wire downward at the front body hinge pillar to position the drain hose in the windshield pillar.
11. Secure the new hose to the drain tube outlet with hose clamp and rotate ends of hose clamp to face outboard.
12. Check hose for kinks which could restrict removal of water from astroroof module.
13. Install all previously removed parts by reversing removal procedure.
Rear Astroroof Module Drain Hose Removal and Installation (Illustration on Reverse Side)
The following procedure pertains to one side of the vehicle but is applicable for either the right or left side.
1. Remove the astroroof finishing lace and pull out the headlining from the tuck-type retainer halfway around the astroroof opening on the side of the vehicle being worked on.
2. Remove the side rail and rear window garnish moldings.
3. On C-car four-door styles, remove the seat belt shoulder strap upper guide trim cover and attaching bolt, then remove center pillar trim. On Sevilles, remove the upper center pillar trim cap.
4. Remove upper sail and upper quarter trim. For trim removal instructions, see 6-5 of the 1980 Fisher Body Service Manual.
5. On Eldorados, remove the upper quarter inner access panel.
6. Carefully lower headlining at side and rear and release drain hose clamp using pointed nose pliers.
7. Remove drain hose from astroroof module drain tube.
8. Pull drain hose upward enough to allow access to the lower end of hose at the front of the wheelhouse (see drawing above) and securely tape a flexible wire to drain hose.
9. To remove hose and position wire, pull top end of hose up through the quarter sail panel and roof side rail. Disconnect hose from wire.
10. Tape new hose to wire and pull down on wire to install drain hose through hole in upper roof side rail and sail panel.
11. Secure new nose to drain tube outlet with hose clamp. Rotate ends of hose clamp to face outboard.
12. Using a flashlight check hose for kinks and proper routing, as shown in illustration above, by removing the lock pillar relief valve and visually inspecting the hose routing.
13. Install all previously removed parts by reversing removal procedure.
For warranty purposes, use Operation No. B-2852-53, Hose Astroroof Drain, R&R or Replace, Front or Rear, at a revised time of 0.5 hour.

General Motors bulletins are intended for use by professional technicians, not a "do-it-yourselfer". They are written to inform those technicians of conditions that may occur on some vehicles, or to provide information that could assist in the proper service of a vehicle. Properly trained technicians have the equipment, tools, safety instructions and know-how to do a job properly and safely. If a condition is described, do not assume that the bulletin applies to your vehicle, or that your vehicle will have that condition. See a General Motors dealer servicing your brand of General Motors vehicle for information on whether your vehicle may benefit from the information.
