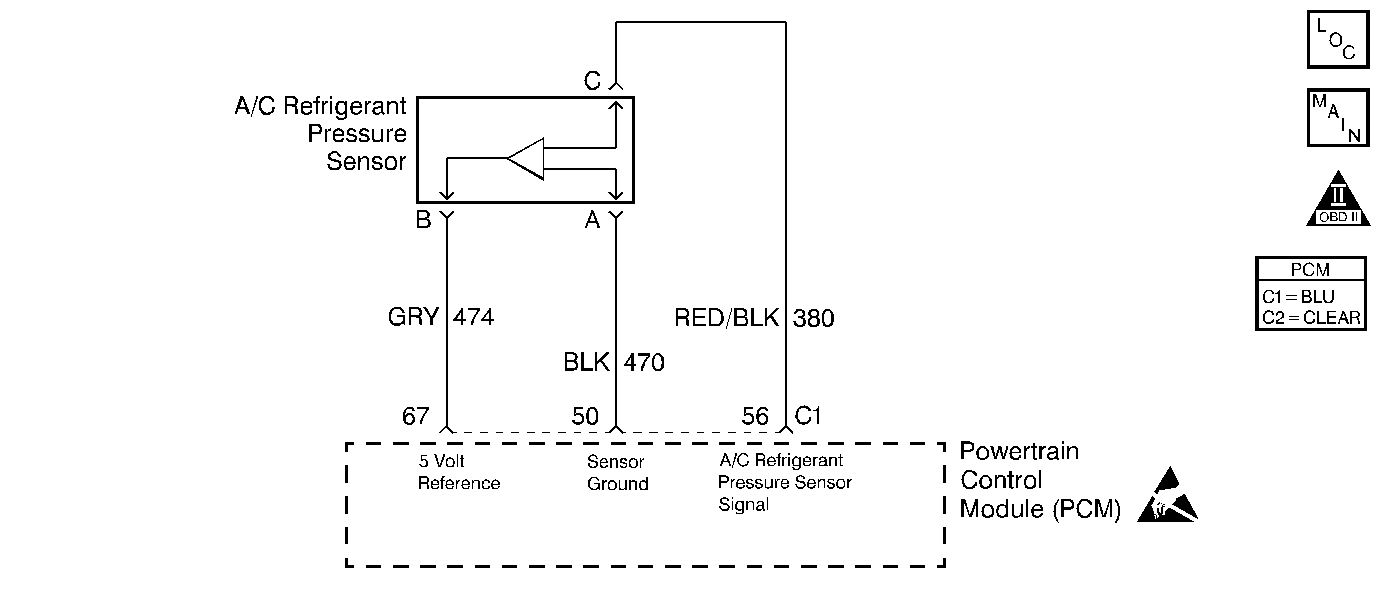
Circuit Description
The A/C Refrigerant Pressure sensor is a sensor that changes resistance based upon refrigerant pressure. The PCM provides a 5 volt reference and ground. The A/C refigerant sensor signal varies between ground and 5 volts as refrigerant pressure varies. As A/C refrigerant pressure increases, voltage increases. As A/C refrigerant pressure decreases, voltage decreases. If the A/C pressure sensor signal goes high such as when the signal line is shorted to voltage or the A/C pressure sensor is shorted internally, DTC P0533 will set.
Conditions for Running the DTC
Engine running.
Conditions for Setting the DTC
The A/C refrigerant pressure sensor reading has been 5.00 volts or higher.
Action Taken When the DTC Sets
| • | The Malfunction Indicator Lamp (MIL) will not illuminate. |
| • | No message will be displayed. |
Conditions for Clearing the MIL/DTC
| • | A History DTC will clear after forty consecutive warm-up cycles with no failures of any non-emission related diagnostic test. |
| • | A Last Test Failed (current) DTC will clear when the diagnostic runs and does not fail. |
| • | Use a scan tool to clear DTCs. |
| • | Interrupting PCM battery voltage may or may not clear DTCs. This practice is not recommended. Refer to Clearing Diagnostic Trouble Codes in PCM Description and Operation. |
Test Description
Number(s) below refer to the step number(s) on the Diagnostic Table.
-
If the A/C refrigerant pressure sensor value is greater than 5.0 volts, a A/C refrigerant pressure sensor circuit problem must be present.
-
If A/C refrigerant pressure value is less than 0.10 volts, the fault is the A/C refrigerant pressure sensor or the reference voltage is higher than 5.06 volts.
-
A high voltage reading on the 5 volt reference circuit could be caused by a short to voltage on another 5 volt reference circuit, some 5V Ref. circuits are shared inside the PCM, or battery voltage bleeding onto the 5 volt reference circuit as in a defective Linear EGR Valve.
Step | Action | Value(s) | Yes | No |
|---|---|---|---|---|
1 | Did you perform the Powertrain On-Board Diagnostic (OBD) System Check? | -- | ||
Does the scan tool display the value specified? | 5 volts | Fault not present | ||
Disconnect the A/C refrigerant pressure sensor. Is the A/C refrigerant pressure sensor value less than the value specified? | 0.10 volts | |||
4 | Using DMM J 39200 measure the voltage to ground at A/C refrigerant pressure sensor connector terminal B. Is the voltage higher than the value specified? | 5.03 volts | ||
5 | Using DMM J 39200 measure the voltage to ground at A/C refrigerant pressure sensor connector terminal C. Is the voltage higher than the value specified? | 0.5 volts | ||
6 | Repair short to voltage on A/C refrigerant pressure Sensor Signal circuit. Is the repair complete? | -- | Go to Powertrain Control Module Diagnosis for Verify Repair | -- |
Repair the short to voltage on the 5 Volt Reference circuit. Refer to Test Descriptions. Is the repair complete? | -- | Go to Powertrain Control Module Diagnosis for Verify Repair | -- | |
8 |
Was terminal contact repaired? | -- | Go to Powertrain Control Module Diagnosis for Verify Repair | |
9 | Replace the A/C refrigerant pressure sensor. Go to Air Conditioning (A/C) Refrigerant Pressure Sensor Replacement for repair instructions. Is the replacement complete? | -- | Go to Powertrain Control Module Diagnosis for Verify Repair | -- |
10 |
Was terminal contact repaired? | -- | Go to Powertrain Control Module Diagnosis for Verify Repair | |
11 | Replace the PCM. Refer to Powertrain Control Module Replacement . Is the replacement complete? | -- | Go to Powertrain Control Module Diagnosis for Verify Repair | -- |
