Navigation Audio System for Cadillac XLR 2007
Notice: Before adding any sound equipment to the vehicle, such as an audio system, CD player, CB radio, mobile telephone, or two-way radio, make sure that it can be added by checking with your dealer/retailer. Also, check federal rules covering mobile radio and telephone units. If sound equipment can be added, it is very important to do it properly. Added sound equipment can interfere with the operation of the vehicle's engine, radio, or other systems, and even damage them. The vehicle's systems can interfere with the operation of sound equipment that has been added.
Your vehicle has a feature called Retained Accessory Power (RAP). With RAP, the audio system can be played even after the ignition is turned off. See Retained Accessory Power (RAP) for more information.
The audio system is operated using navigation system menus. The audio menus are explained in this section.
Main Audio Menu
/ (Audio/Adjust): Press this key to view the main audio screen.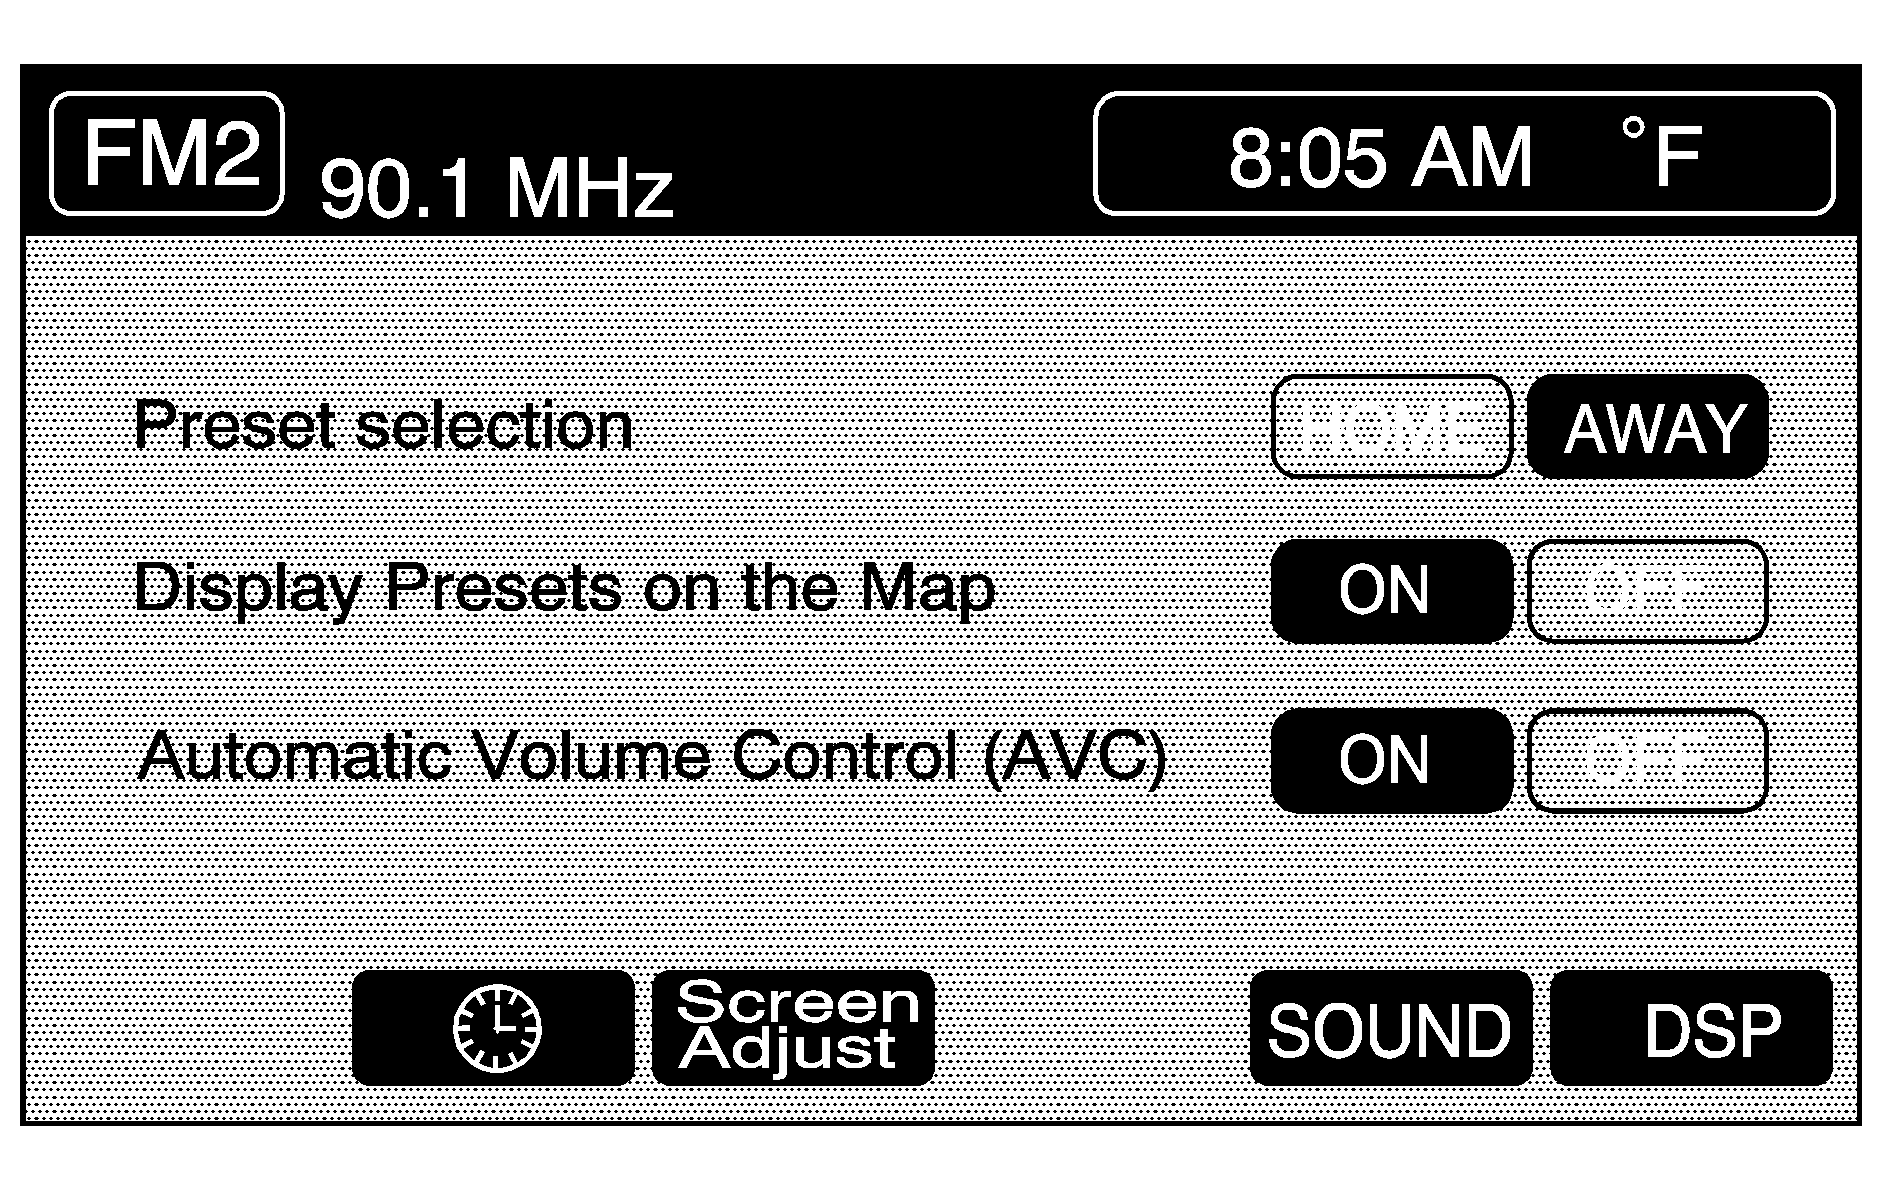
Preset Selection: Here you can program the audio system's presets to recall your home settings by touching HOME. You can also recall the presets you use when traveling to another area by touching AWAY. See "Preset Station Menu" later in this section for more information on how to store preset stations. The Home and Away feature is not available for the XM™ Satellite Radio source, if equipped.
Display Presets on the Map: With this feature on, your audio system presets for the current audio source will be displayed on the left of the map screen. Touch ON to turn this feature on. You may also choose to turn this feature off. With this feature on, you can recall your preset radio stations from the map screen. You cannot store preset stations from the map screen. You must do this from the audio screen. See "Preset Station Menu" later in this section for more information on storing presets.
Automatic Volume Control (AVC): The system has Bose AudioPilot® noise compensation technology. AudioPilot® monitors the level of noise in the vehicle and automatically increases or decreases the level of audio to keep it audible above the noise. To use AudioPilot®, press the ON screen button. To turn it off, press the OFF screen button. This feature is most effective at lower volume settings where background noise can affect how well you hear the music being played through your vehicle's audio system. At higher volume settings, where the music is much louder than the background noise, there may be little or no adjustments by AudioPilot®. For more information on AudioPilot®, visit www.bose.com/audiopilot.
[block ] (Clock): Touch this screen button to get to the CLOCK ADJUST menu. See "Clock Adjust Menu" later in this section for more information.
SCREEN ADJUST: To adjust the brightness or contrast of the screen, touch SCREEN ADJUST to display the screen adjust menu. See "Screen Adjust Menu" later in this section for more information.
SOUND: Touch this screen button to access the Sound menu. See "Sound Menu" later in this section for more information.
DSP (Digital Signal Processing): Touch this screen button to access the DSP menu. See "Adjusting the Speakers" later in this section for more information.
Clock Adjust Menu
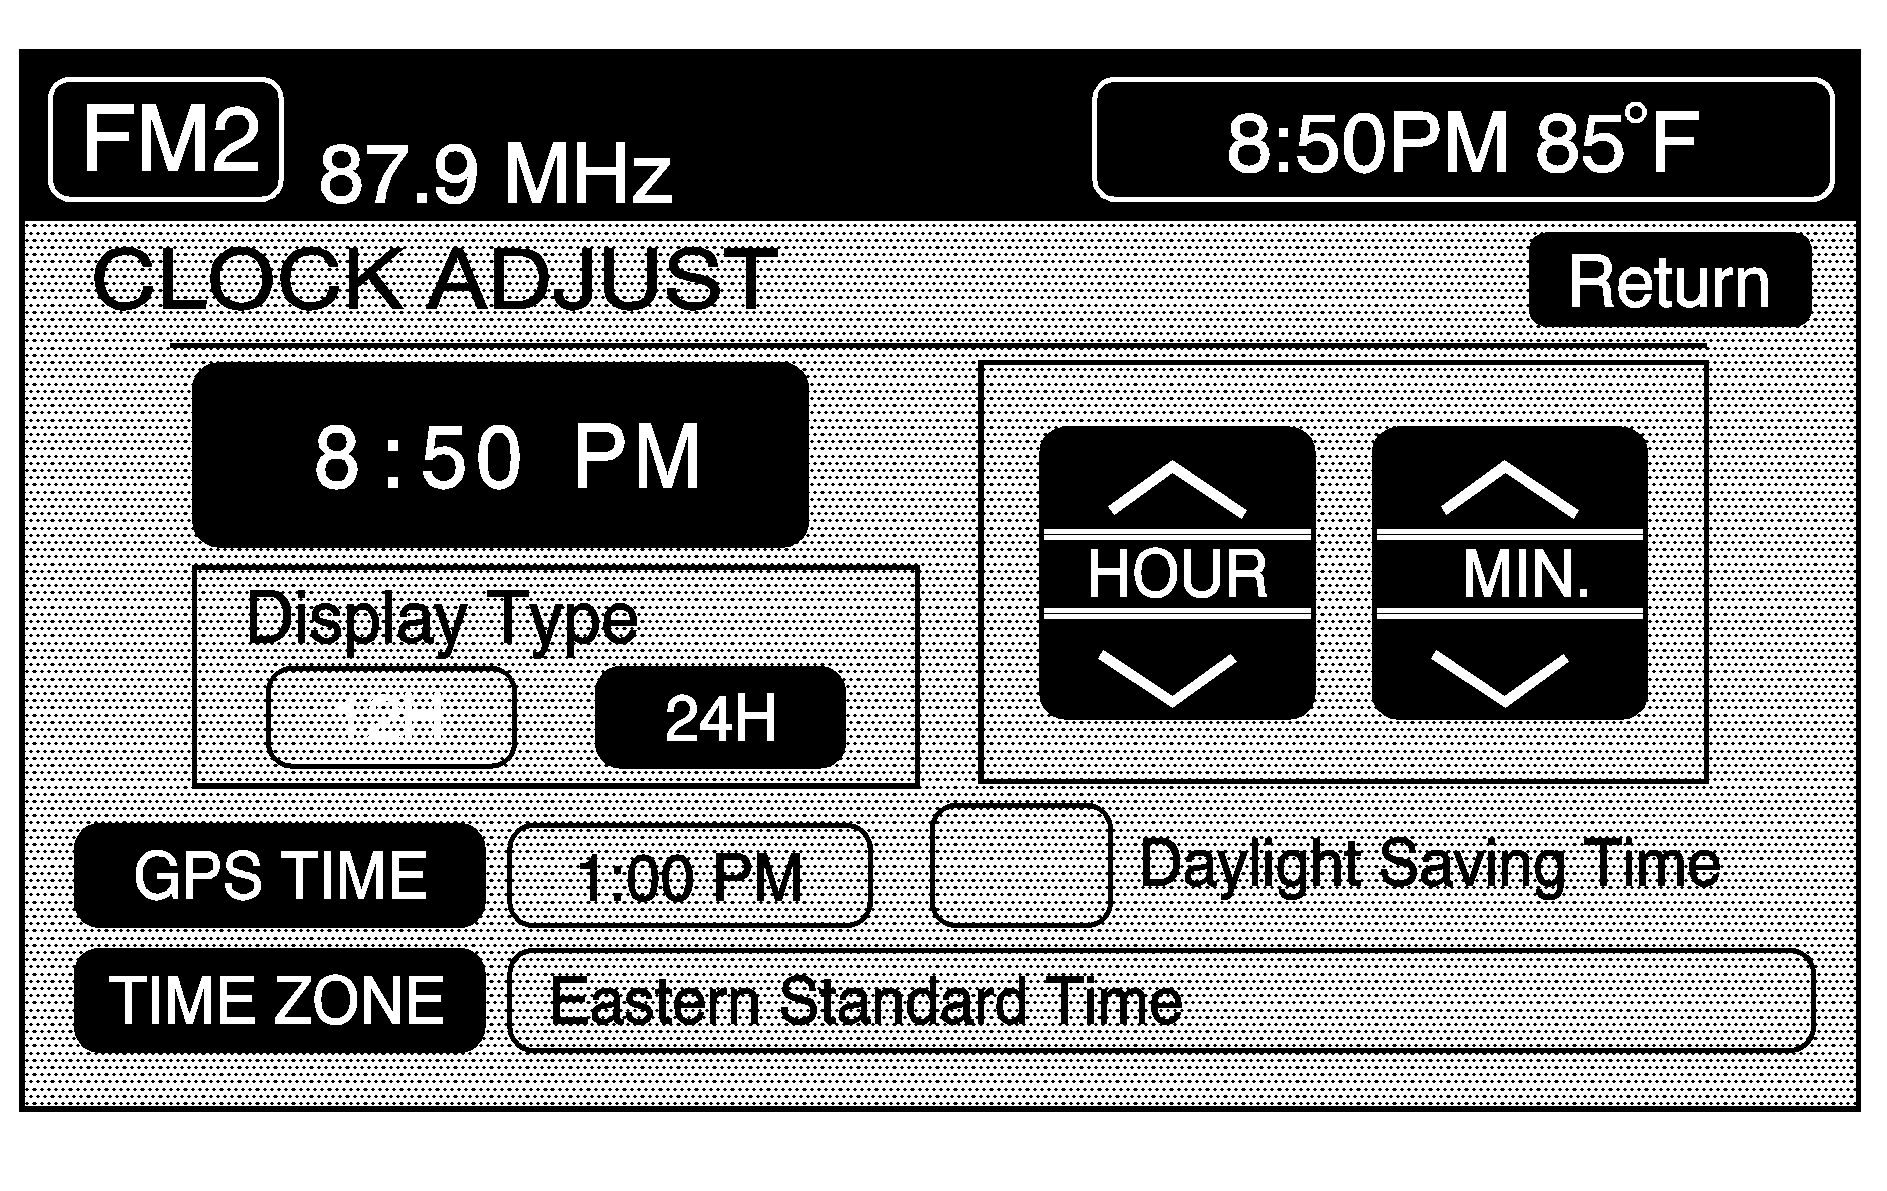
The following options are available from this menu:
HOUR/MIN.: Touch the up or down arrows to increase or decrease the hour or minutes. If you touch and hold one of the arrows, the numbers will advance quickly.12H/24H: Touch 12H to set the clock in standard time or 24H to set the clock in military time.
GPS TIME: The current GPS time will be displayed to the right of this screen button. Touch GPS TIME to set the navigation system time to match current GPS time. If the seconds for the present minute are greater than thirty when GPS TIME is selected, the clock will round up to the next minute.
Daylight Saving Time: Touch this screen button to increase the time setting by one hour. Then touch GPS TIME to save the new setting. If the screen button is light blue, the daylight savings time feature is on. If the button is dark blue, the daylight savings time feature is off.
TIME ZONE: The selected time zone will appear to the right of this screen button. Touch this screen button to toggle between time zones and select the desired one. The time of the selected zone will be displayed to the right of the GPS TIME screen button. To set the clock to the new setting, touch GPS TIME. If the system is not receiving GPS information, you can still set the time manually as described above but the GPS time and Daylight Saving Time features will not be available. Touch Return to go back to the previous menu.
Screen Adjust Menu
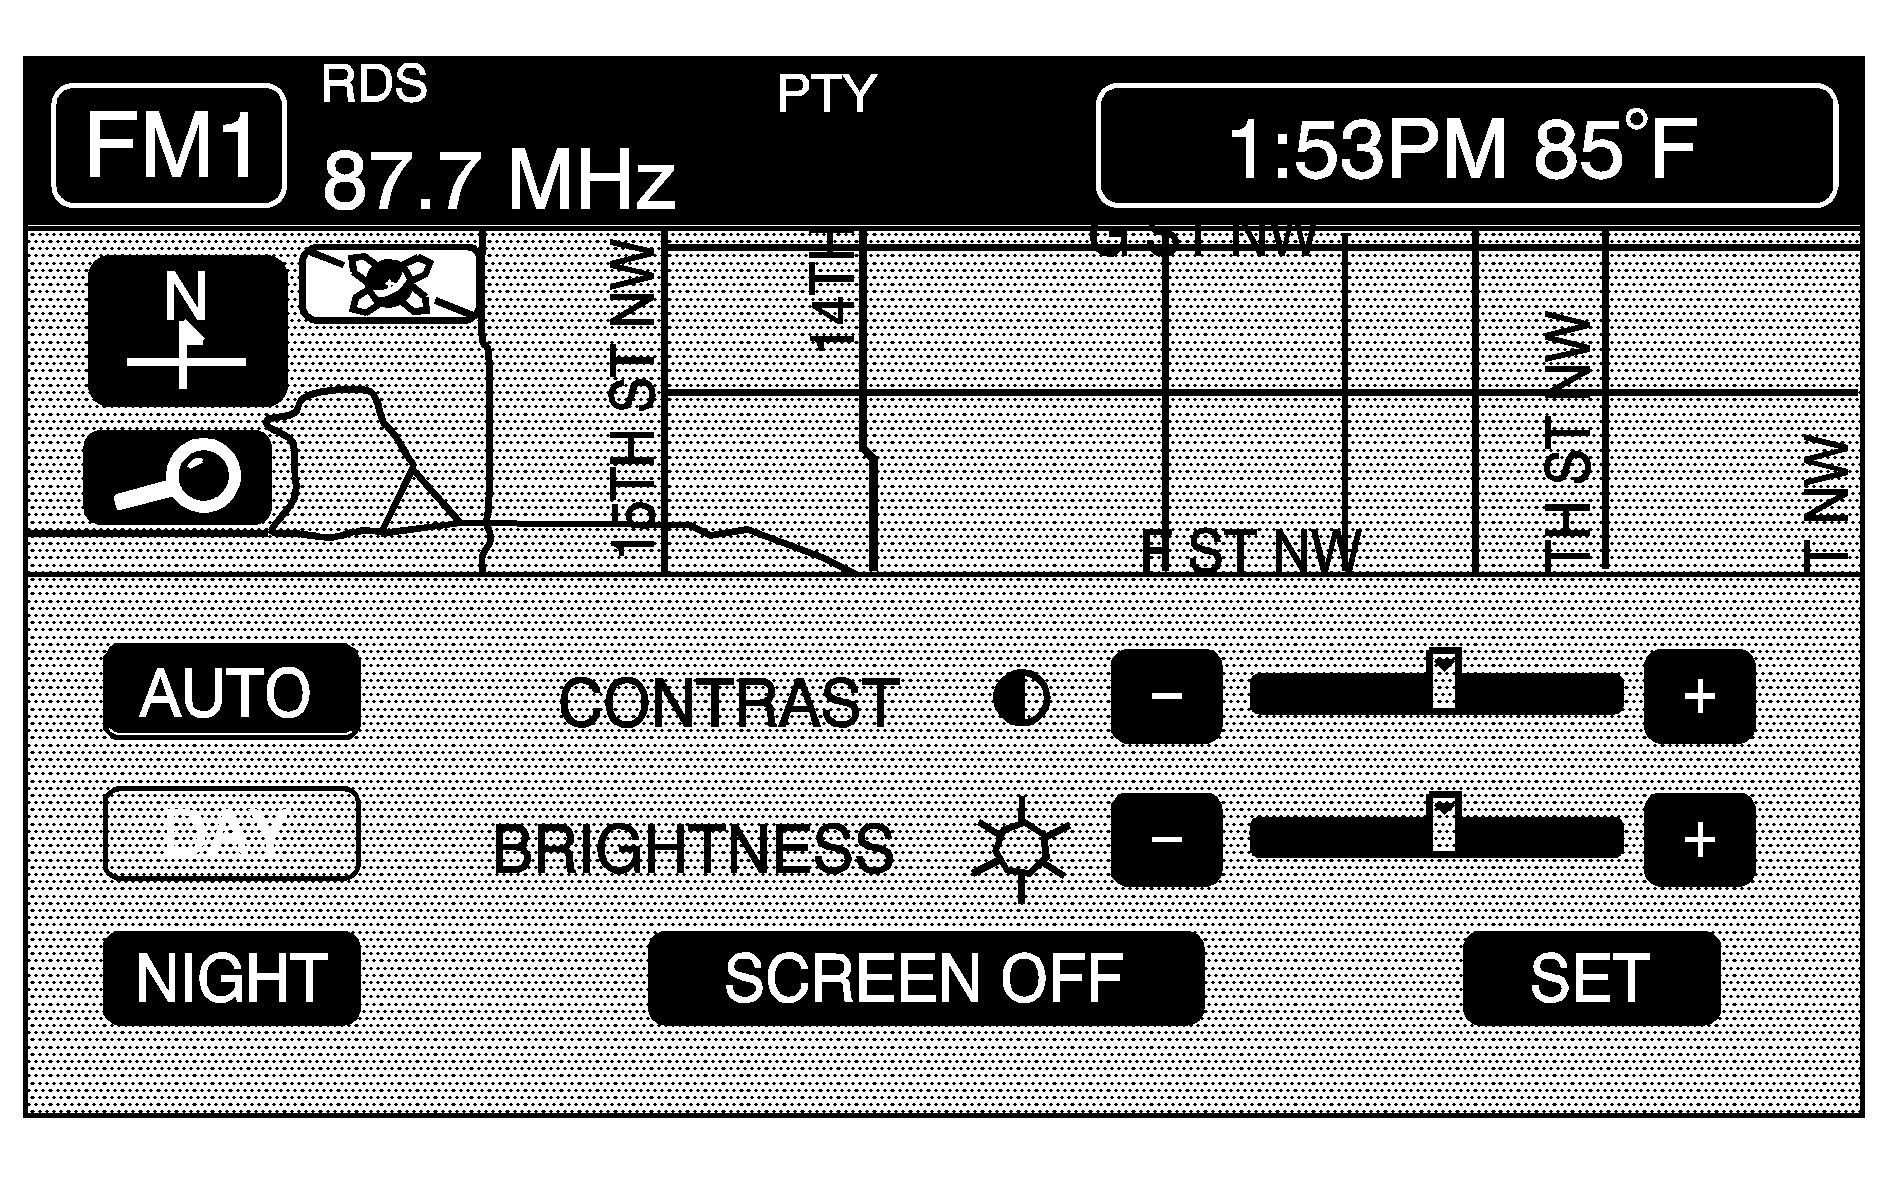
The following options are available from this menu:
(Contrast): Touch the plus (+) or minus (-) signs to adjust the contrast of the screen. You will see the screen change. Touch SET to confirm the setting.[sung ](Brightness): Touch the plus (+) or minus (-) signs to adjust the brightness of the screen. You will see the screen change. Touch SET to confirm the setting.
AUTO: This setting automatically adjusts the contrast and brightness of the screen depending on exterior lighting conditions.
DAY: This setting leaves the screen in day mode. Day mode is best suited for daylight conditions.
NIGHT: This setting leaves the screen in night mode. Night mode is best suited for nighttime conditions.
SCREEN OFF: Touch SCREEN OFF to turn off the screen. Press any hard key to turn the screen back on.
SET: Touch SET to save your choices and exit the CLOCK ADJUST menu.
Language
Your vehicle has been set for the English language. If you wish to change the language, you must do so through the Driver Information Center (DIC). See Driver Information Center (DIC) for more information.
If the language is changed from English, a majority of the voice guidance prompts and screen text will change to the selected language. Remember, the menu screens will not match word-for-word as they appear in this manual.
Playing the Radio
PWR-VOL (Power-Volume): Press this knob to turn the audio and navigation systems on and off. Turn the knob to increase or decrease the volume to the audio system.TUNE/SEEK : Press the up or down arrow to go to the next or previous station and stay there.
BAND: Press this key to switch between AM, FM1, FM2, XM1, XM 2, or WX, if equipped. If you are on a map screen and press this key, the screen will not change but the audio source will.
Finding a Station
FM1 audio source shown, other sources similar
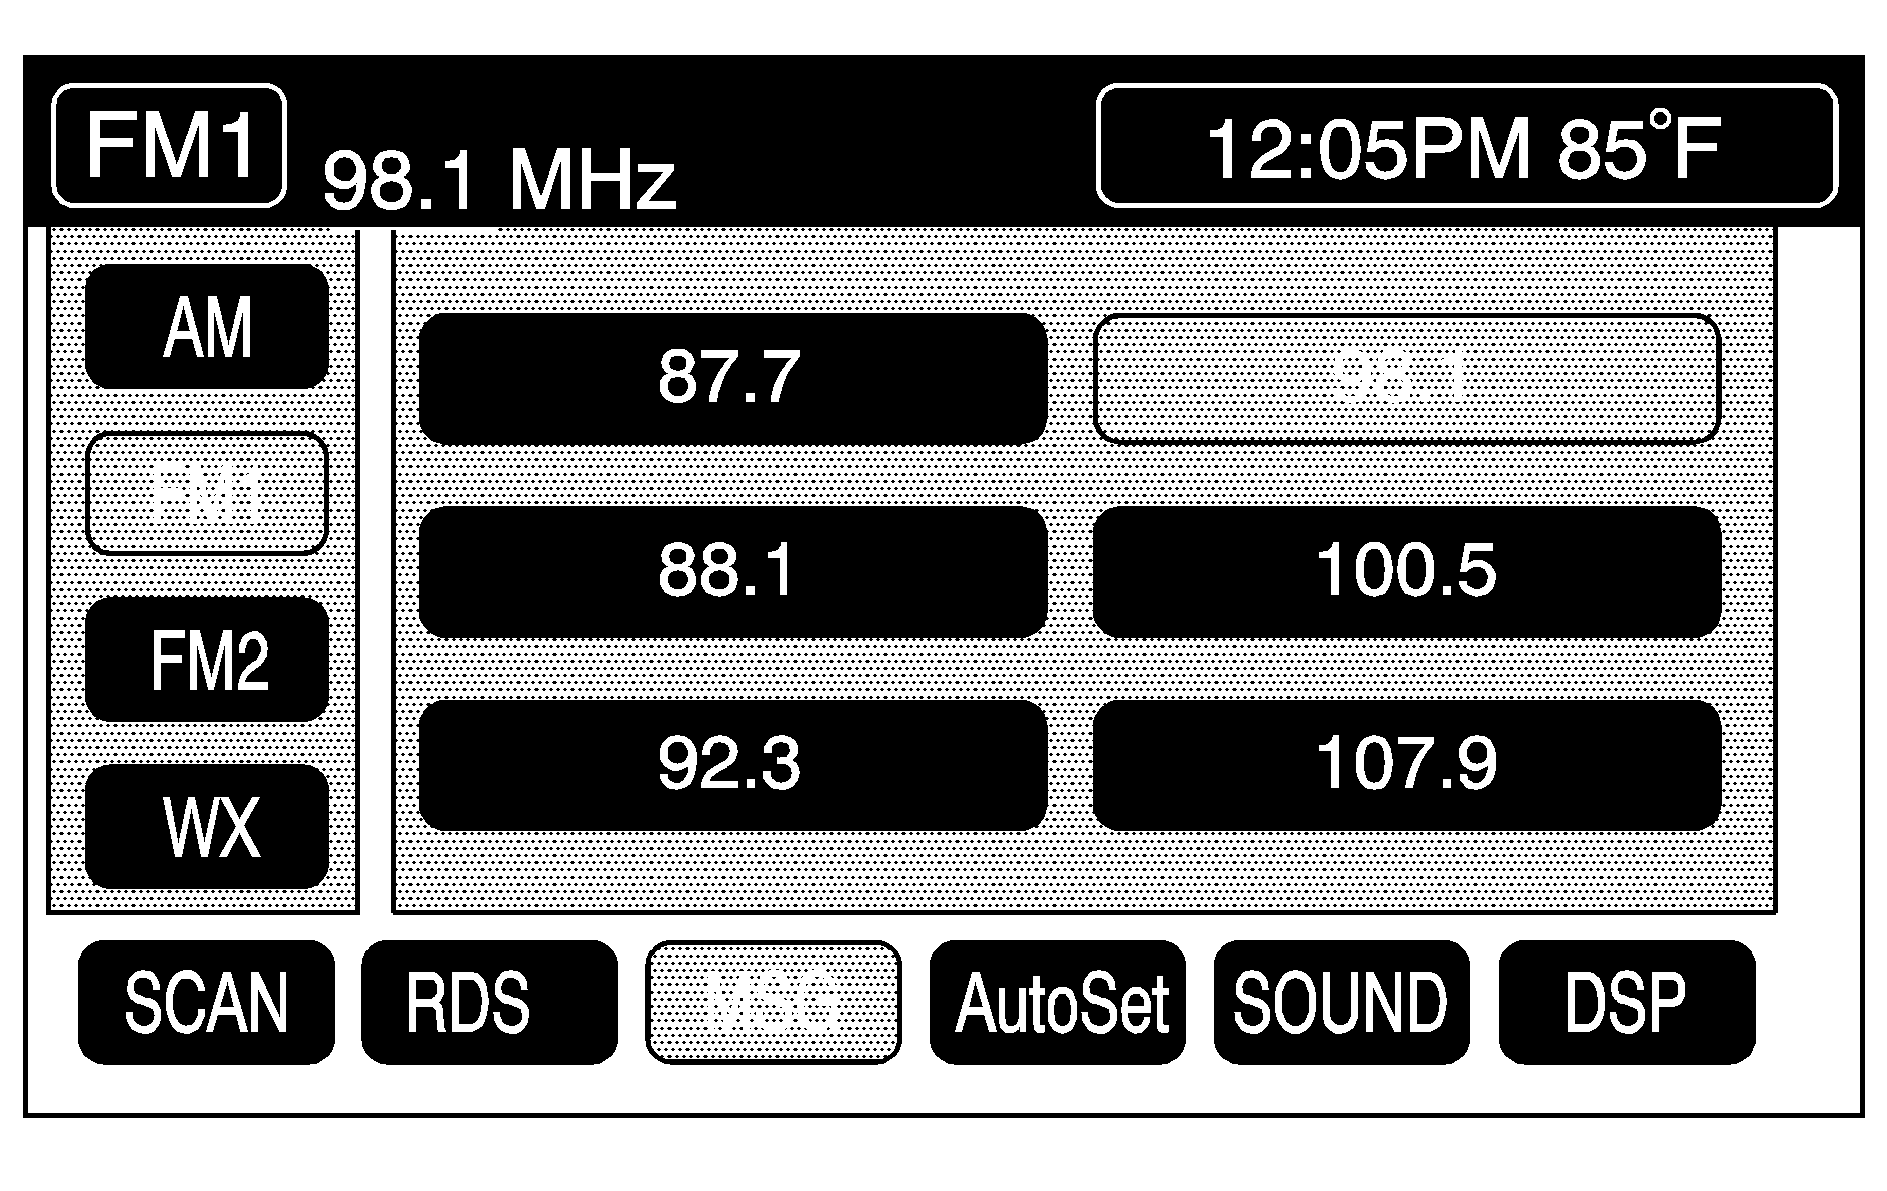
Press the BAND key to switch between AM, FM1, FM2, XM1, XM2, or WX, if equipped. Touch the desired audio source to select it.
Preset Station Menu
Up to 36 stations, 6 AM, 6 FM 1, 6 FM 2, 6 XM 1, 6 XM 2, and 6 WX, if equipped, can be programmed for home and for away. To store presets, do the following:
- Turn the audio system on.
- Touch AM, FM, XM, or WX, if equipped, to display the desired source. The preset station menu will appear.
- Tune to the desired station by using the TUNE/SEEK arrows.
- Touch SOUND to set the bass, mid-range, treble, and DSP for your preset, if desired. See "Sound Menu" later in this section for more information.
- Touch and hold one of the six numbered preset buttons for more than two seconds until you hear a beep.
- Repeat the steps for each preset and source.
RDS (Radio Data System): See "Radio Data System (RDS)" later in this section for more information.
MSG (Message): See "Radio Data System (RDS)" later in this section for more information.
AutoSet: Touch AutoSet to replace currently stored preset stations with the strongest stations available in the immediate area. Touch AutoSet again to return to the original preset stations.
SOUND: See "Sound Menu" following for more information.
DSP: See "Adjusting the Speakers" later in this section for more information.
Sound Menu
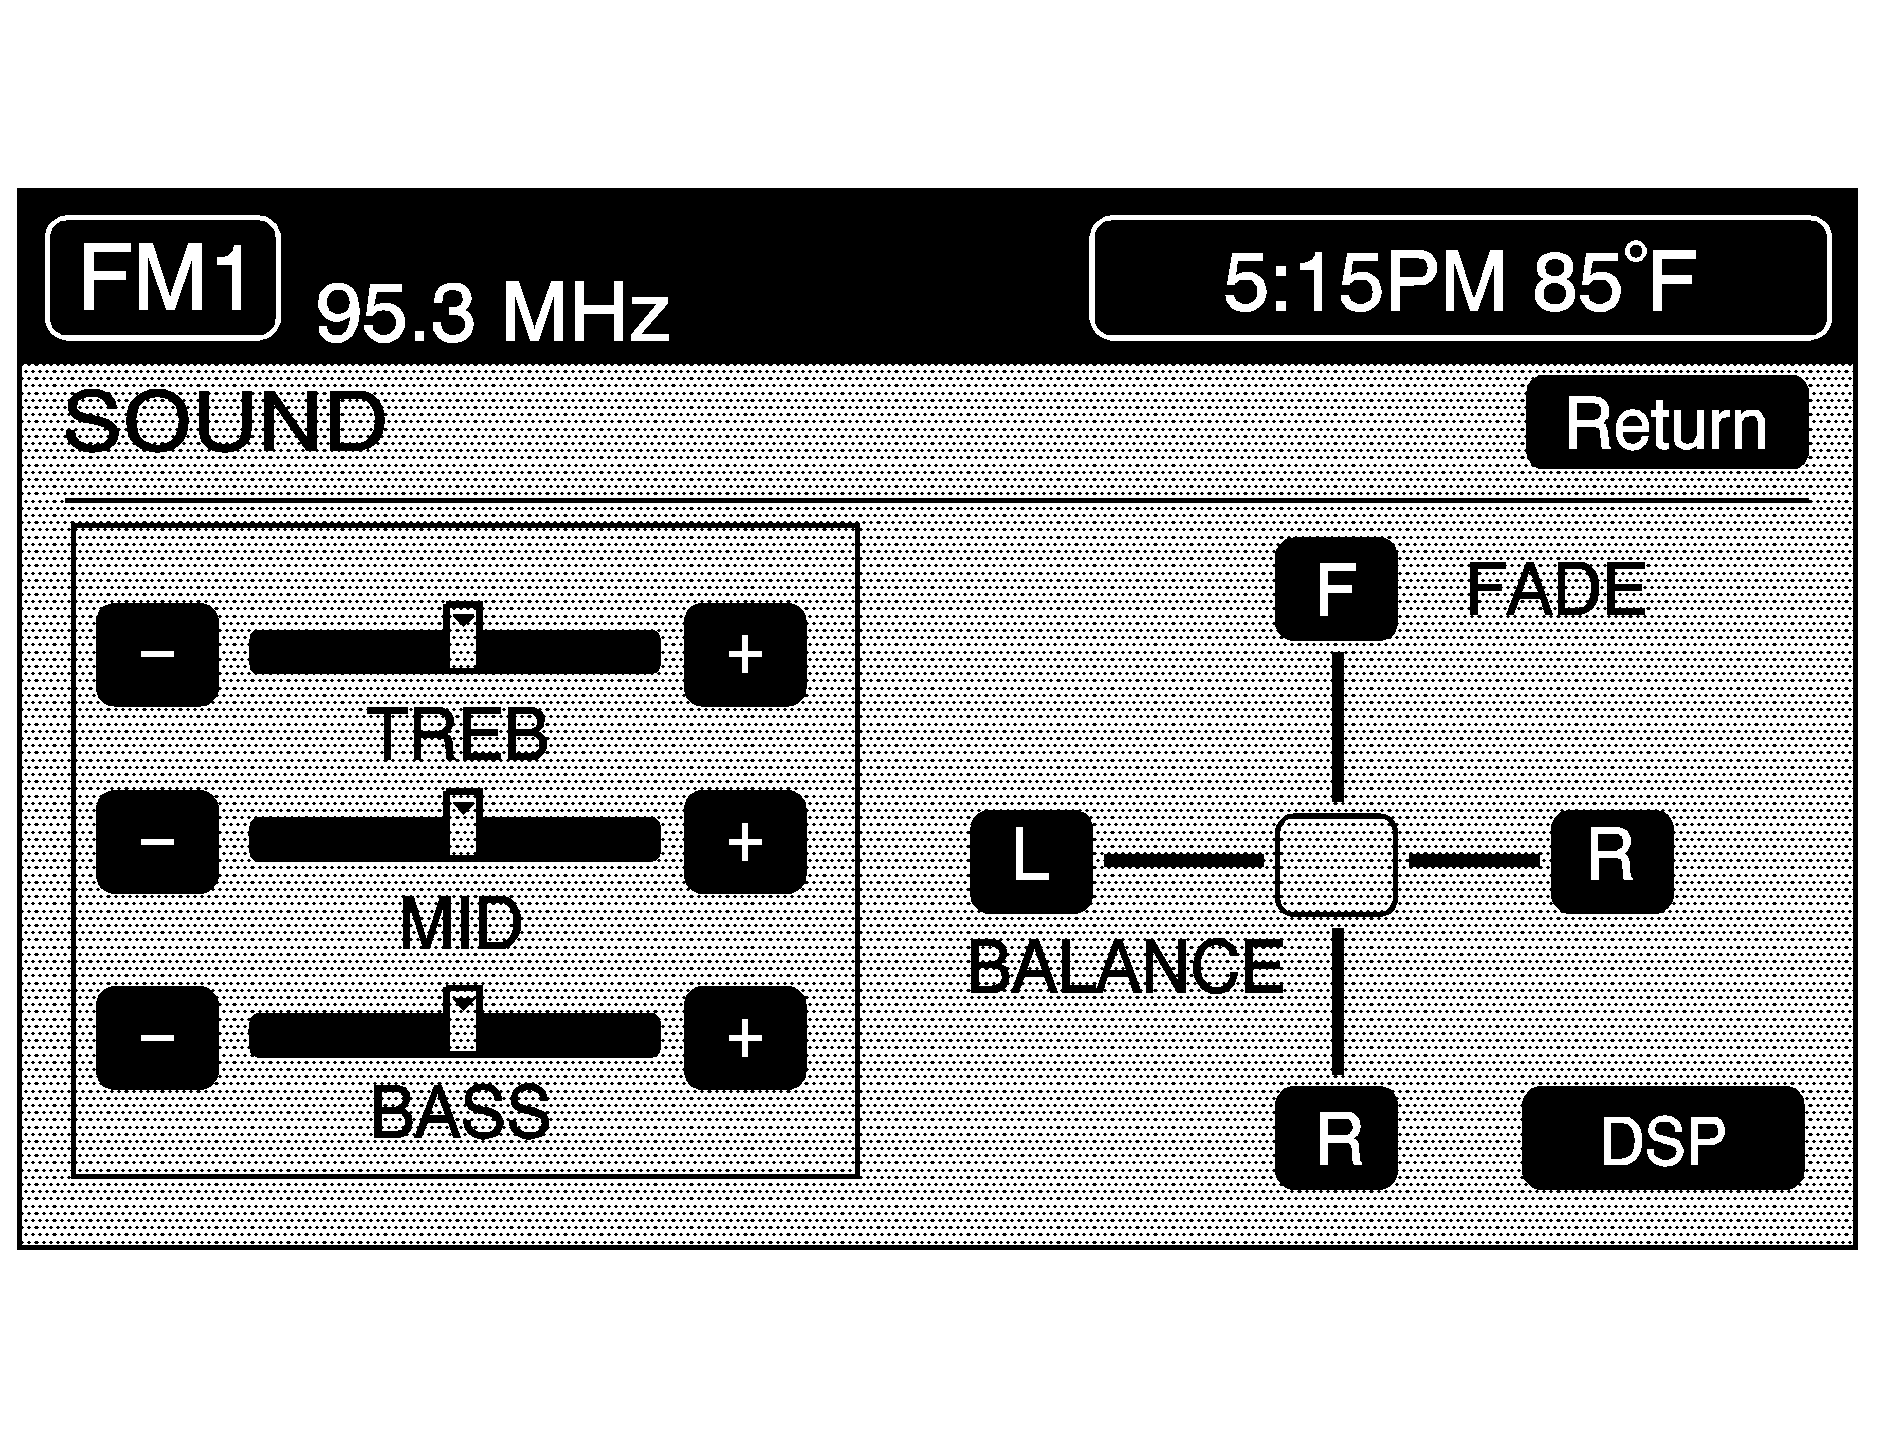
Touch SOUND at the bottom of the main audio screen, source menu, or DSP menu to change the tone, DSP, if equipped, fade, and balance for all sources. The audio system has a separate setting for these features for each source preset. However, the audio system keeps one fade and one balance setting for all audio sources.
To adjust sound settings, do the following:
- Touch the plus (+) or minus (-) signs to adjust treble, mid-range, and bass.
- Touch the L for left or R for right to adjust the balance of the speakers.
- Touch the F for front or R for rear to adjust the fade of the speakers.
- Touch DSP to adjust your DSP, if equipped. See "Adjusting the Speakers" later in this section for more information.
After adjustments are made, touch any source screen button. This will take you back to the preset station menu. Whenever you touch that screen button, the previously stored information you have entered for each preset station will be recalled.
To adjust the tone for each preset, do the following:
- Press the BAND key.
- Touch AM, FM1, FM2, XM1, XM2, or WX, if equipped, to access the desired preset screen.
- Touch SOUND.
- Touch the plus (+) or minus (-) signs to adjust treble, mid-range, and bass.
- Touch Return to exit. This will take you to the preset station menu.
- Touch and hold one of the six preset screen buttons for more than two seconds until you hear a beep.
- Repeat the steps for additional presets.
Whenever you touch that preset for less than two seconds, the station and previously stored information you have entered for each preset station will be recalled.
Adjusting the Speakers
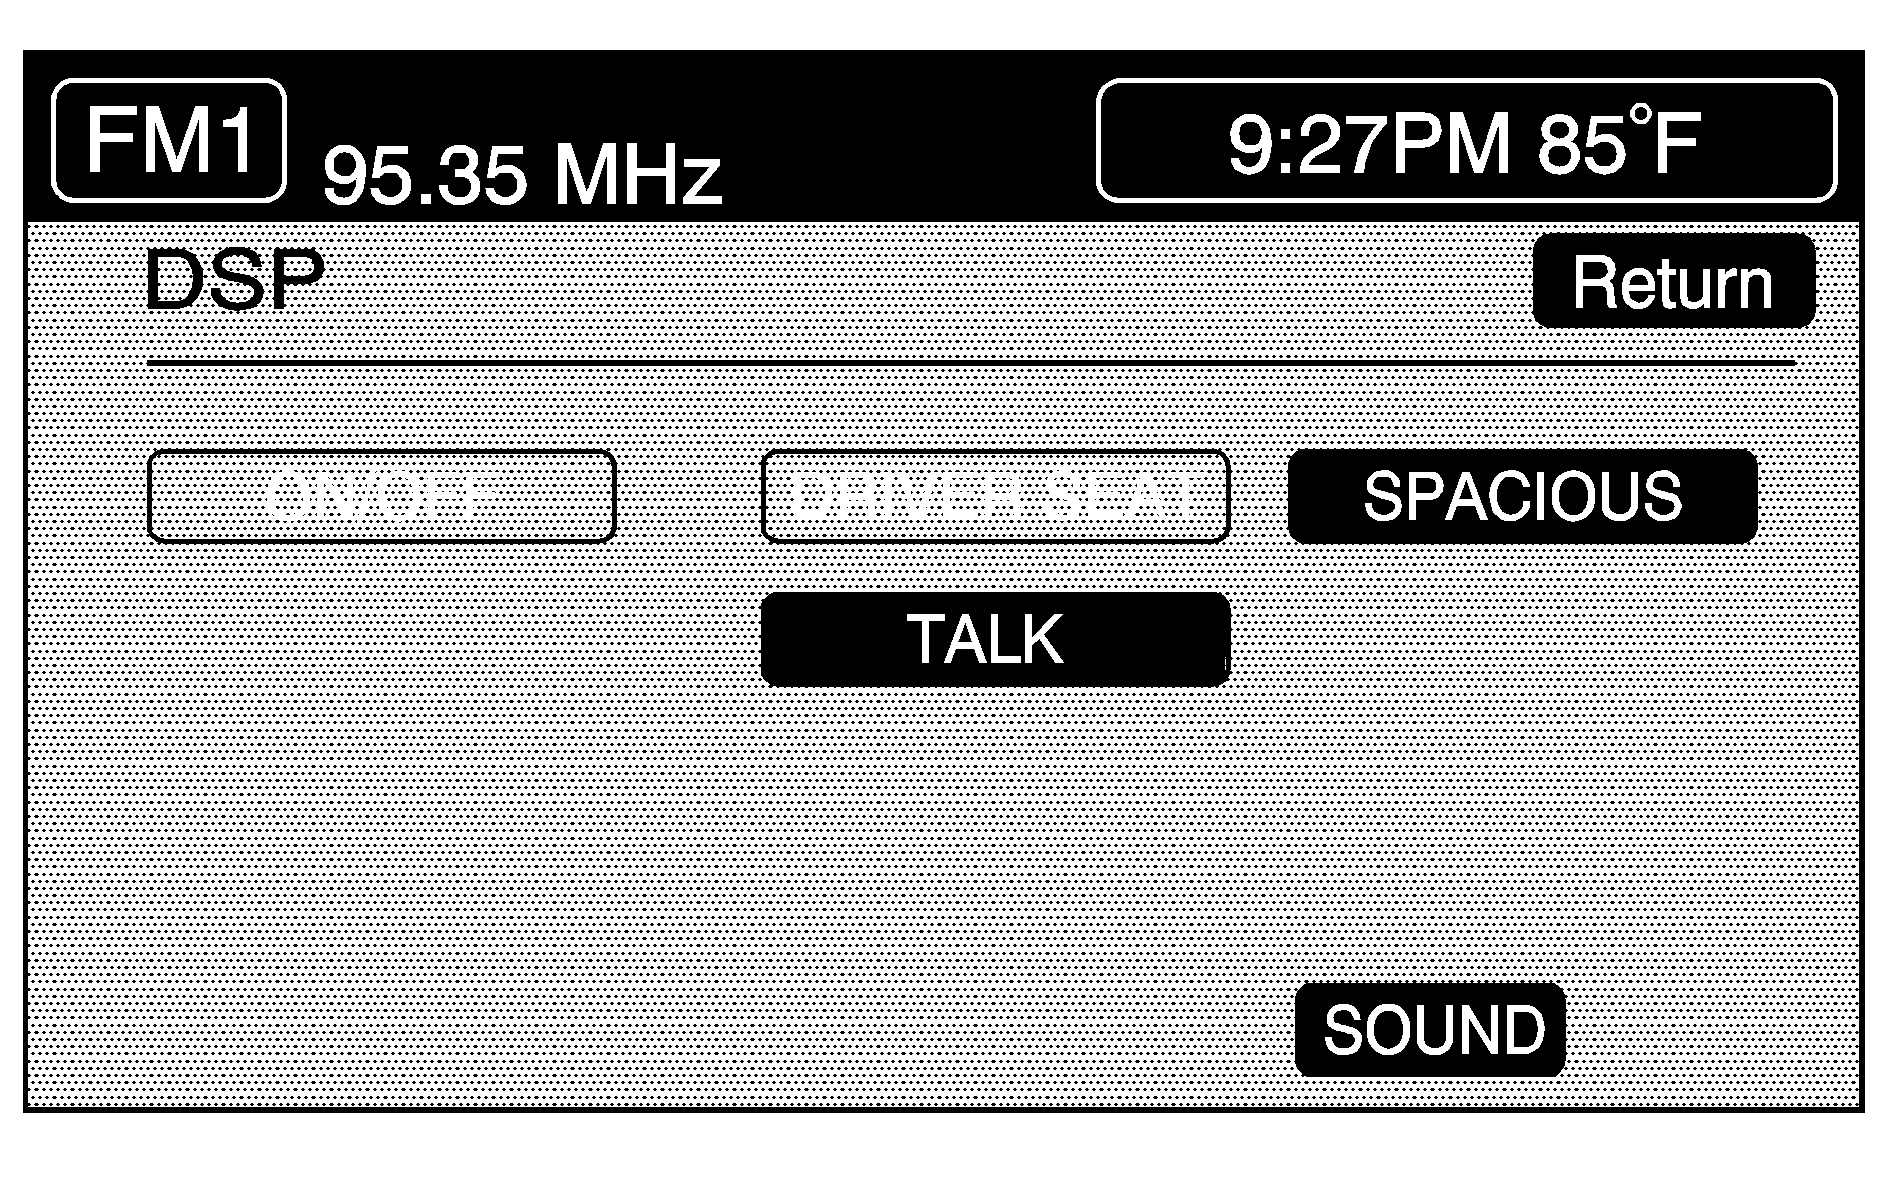
DSP (Digital Signal Processing): The DSP feature is used to provide a choice of four different listening experiences. DSP can be used while listening to the audio system or the CD player. The audio system can store separate DSP settings for each source and preset station, except WX, which is always set to TALK. To save DSP settings for your preset stations, use the SOUND menu or touch DSP from the preset station menu to access the DSP menu. See "Sound Menu" listed previously in this section for more information.
Touch DSP to change the following options:
ON/OFF: Touch ON/OFF to turn DSP on and off.DRIVER SEAT: Touch this button to adjust the audio to give the driver the best possible sound quality.
TALK: TALK makes spoken words sound very clear. Touch this button when listening to non-musical material such as news, talk shows, and sports broadcasts.
SPACIOUS: Touch this button to make the listening space seem larger.
SOUND: Touch SOUND to access the Sound menu. See "Sound Menu" listed previously in this section for more information.
Radio Data Systems (RDS)
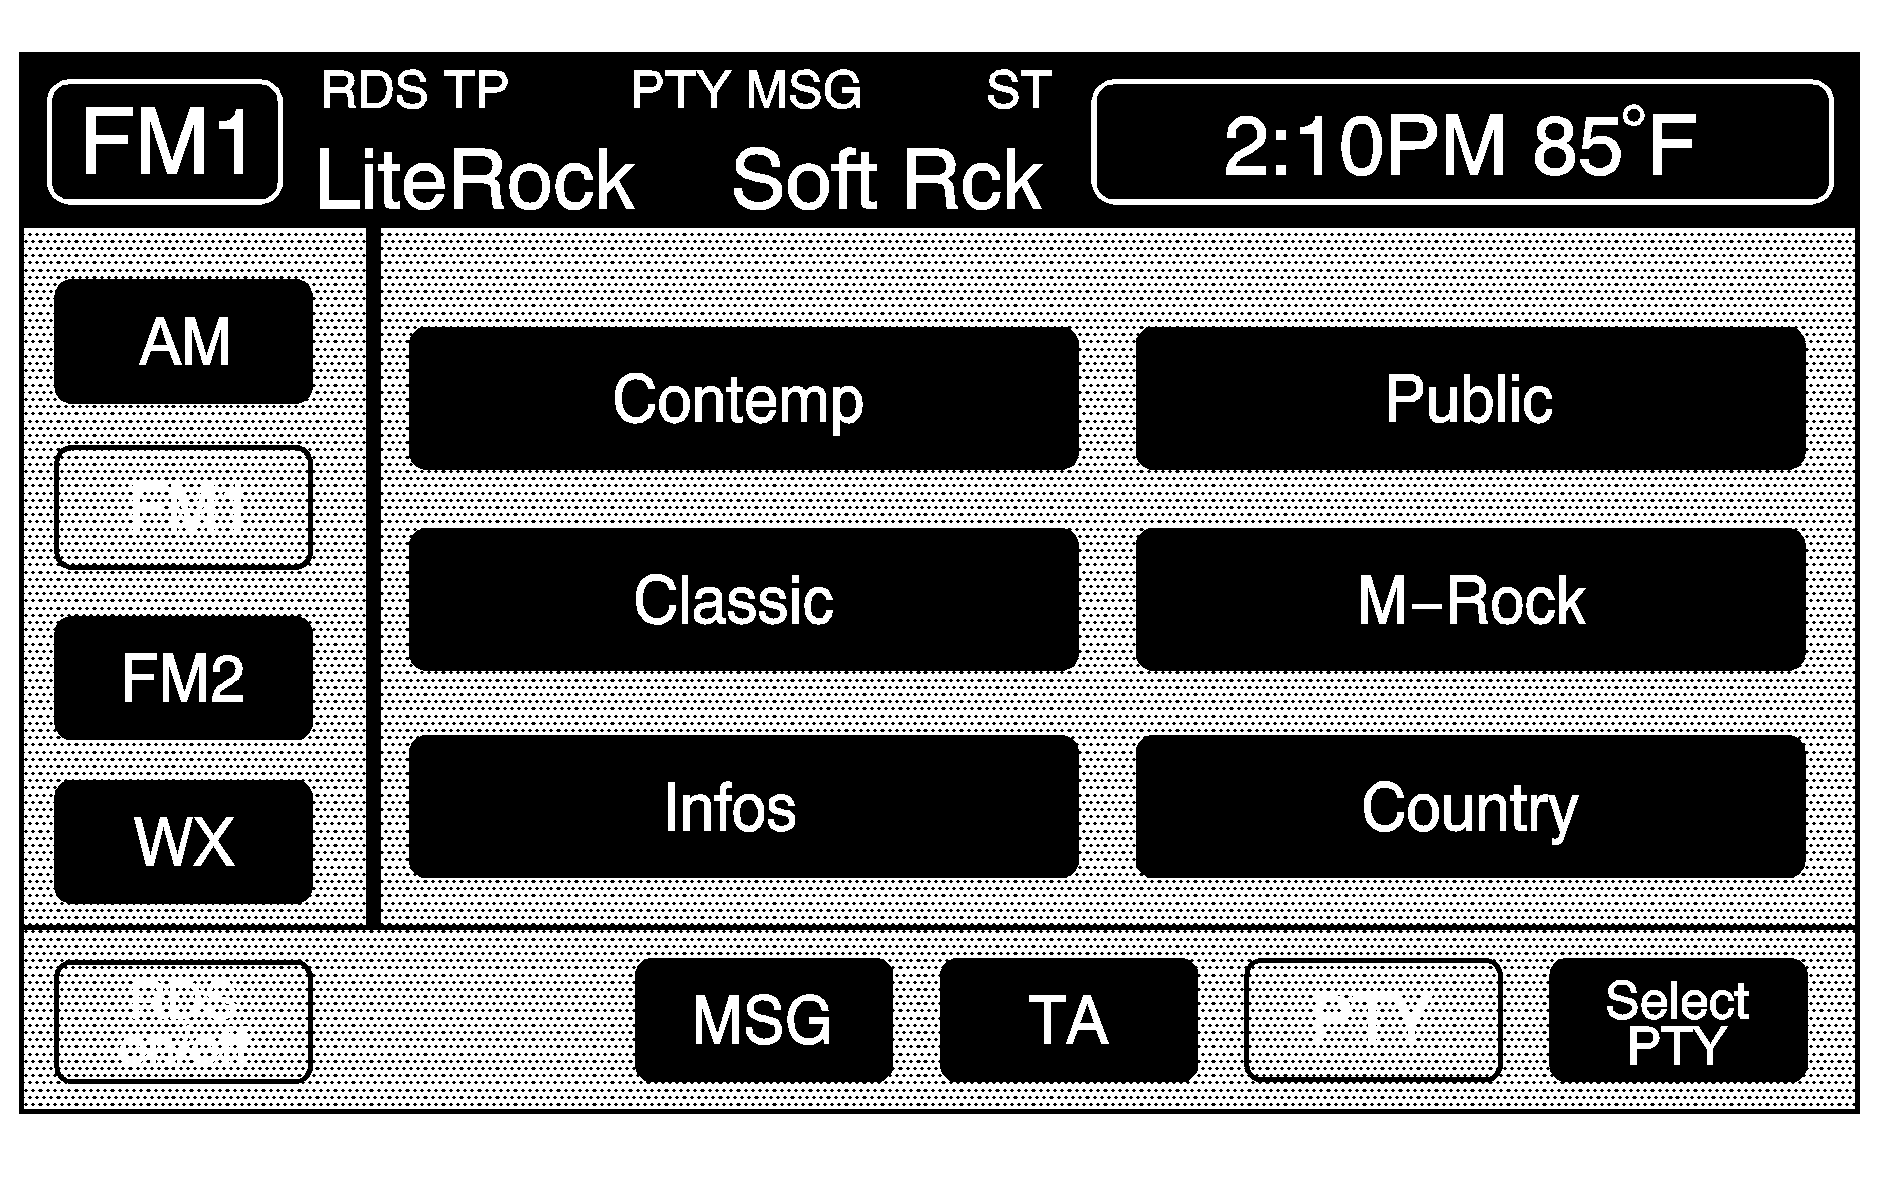
The audio system has a Radio Data System (RDS). RDS features are available for use only on FM stations that broadcast RDS information. With RDS, the radio can do the following:
| • | Seek to stations broadcasting the selected type of programming |
| • | Receive announcements concerning local and national emergencies |
| • | Display messages from radio stations |
| • | Seek to stations with traffic announcements |
If you are tuned to a station broadcasting RDS information, the station's Program Service (PS) and Program Type (PTY) will replace the station's frequency on the status line at the top of the display. After about five seconds, if available, the PTY will be replaced on the display by the station's PTY name. The PTY and PTY name may be the same or different.
If the audio system is tuned to a station that is not broadcasting RDS information, the station's frequency will remain on the display. While RDS is on, the audio system will search for a stronger station in the network if a station gets too weak for listening.
The RDS feature relies upon receiving specific information from RDS stations. These features will only work when RDS information is available.
TA (Traffic): Touch TA to receive traffic announcements. The audio system will turn on the TA display. TA will appear on the display if the current station broadcasts traffic announcements. You may also receive traffic announcements from stations in the network related to the current station. If the current station does not broadcast traffic announcements, the audio system will seek to a station which will. When the audio system finds a station which broadcasts traffic announcements, it will stop. If no station is found, TA will turn off. While a traffic announcement plays, the audio system uses TA volume. To increase TA volume, touch the VOL button on your steering wheel or use the VOL up or down buttons during the announcement. See "Voice Guidance Volume Settings" under Setup Menu for more information. When a traffic announcement comes on the current radio station or a related network station, you will hear it even if the volume is muted or a CD is playing. If the audio system tunes to a related network station for a traffic announcement, it will return to the original station when the announcement is finished. If the CD player was being used, the CD will stay in the player and resume play at the point where it stopped. Touch RDS followed by TA again to turn TA off.MSG (Message): When RDS is on, if the current station has a message, MSG will appear on the display. Touch MSG from the preset menu to view the message. If the whole message does not appear on the display, parts of the message will appear every three seconds until the message is completed. Once the complete message has been displayed, MSG will disappear from the display until another new message is received. MSG will remain available to allow you to display the entire message again.
PTY: PTY allows you to seek only stations with types of programs you want to listen to. This button is used to turn on and off Program Type (PTY) features. With RDS on, touch RDS, followed by PTY. The PTY display will turn on. Touch RDS followed by this button again to turn the PTY display off.
Select PTY (Select Program Type): With RDS and PTY on, touch RDS, then SEL PTY. The PTY menu will appear. Use the up and down arrows to select a PTY. Touch your PTY selection and the system will return you to the screen with the preset stations shown. See Steps 1 through 7 under "Preset Station Menu" to store the selected PTYs. The selected PTY is then stored on the preset. You can now touch the PTY preset to recall your settings. When the PTY display is on, press TUNE/SEEK and SCAN to find radio stations of the PTY selected. The last PTY selected will be used for seek and scan modes. If a station with the selected PTY is not found, NONE FOUND will appear on the display. If both PTY and TA are on, the audio system will search for stations with traffic announcements and the selected PTY.
PTY (Program Type) Presets: The six presets let you return to your favorite PTYs. These presets have factory PTY preset stations. See "RDS Program Type (PTY) Selections" later in this section. You can set up to 12 PTYs, 6 FM 1 and 6 FM2. To save a PTY preset, do the following:
- Touch FM1 or FM2.
- Touch RDS to enter the RDS menu.
- Touch RDS ON/OFF to turn RDS on.
- Touch PTY.
- Touch SEL PTY and select the desired PTY from the list.
- Touch and hold one of the six presets for more than two seconds until you hear a beep. Whenever you touch that numbered preset for less than two seconds, the PTY you set will return.
- Repeat the steps for each preset.
Once you have stored a PTY for each of your preset stations, you can recall a PTY preset by touching the preset station for less than two seconds. Then use TUNE/SEEK or SCAN to locate a station for that PTY selection.
ALERT: This type of announcement warns of national or local emergencies. You will not be able to turn off alert announcements. Alert announcements will come on even if RDS mode is turned off. ALERT appears on the display when an alert announcement plays. The audio system uses TA volume during these announcements. To increase volume, touch the VOL button on your steering wheel or use the VOL up and down buttons during the announcement. See "Voice Guidance Volume Settings" under Setup Menu for more information. When an alert announcement comes on the tuned radio station or a related network station, you will hear it even if the volume is muted or a CD is playing. If the audio system tunes to a related network station for an alert announcement, it will return to the original station when the announcement is finished. If the CD player is playing, the player will stop for the announcement and resume when the announcement is finished.XM™ Satellite Radio Service
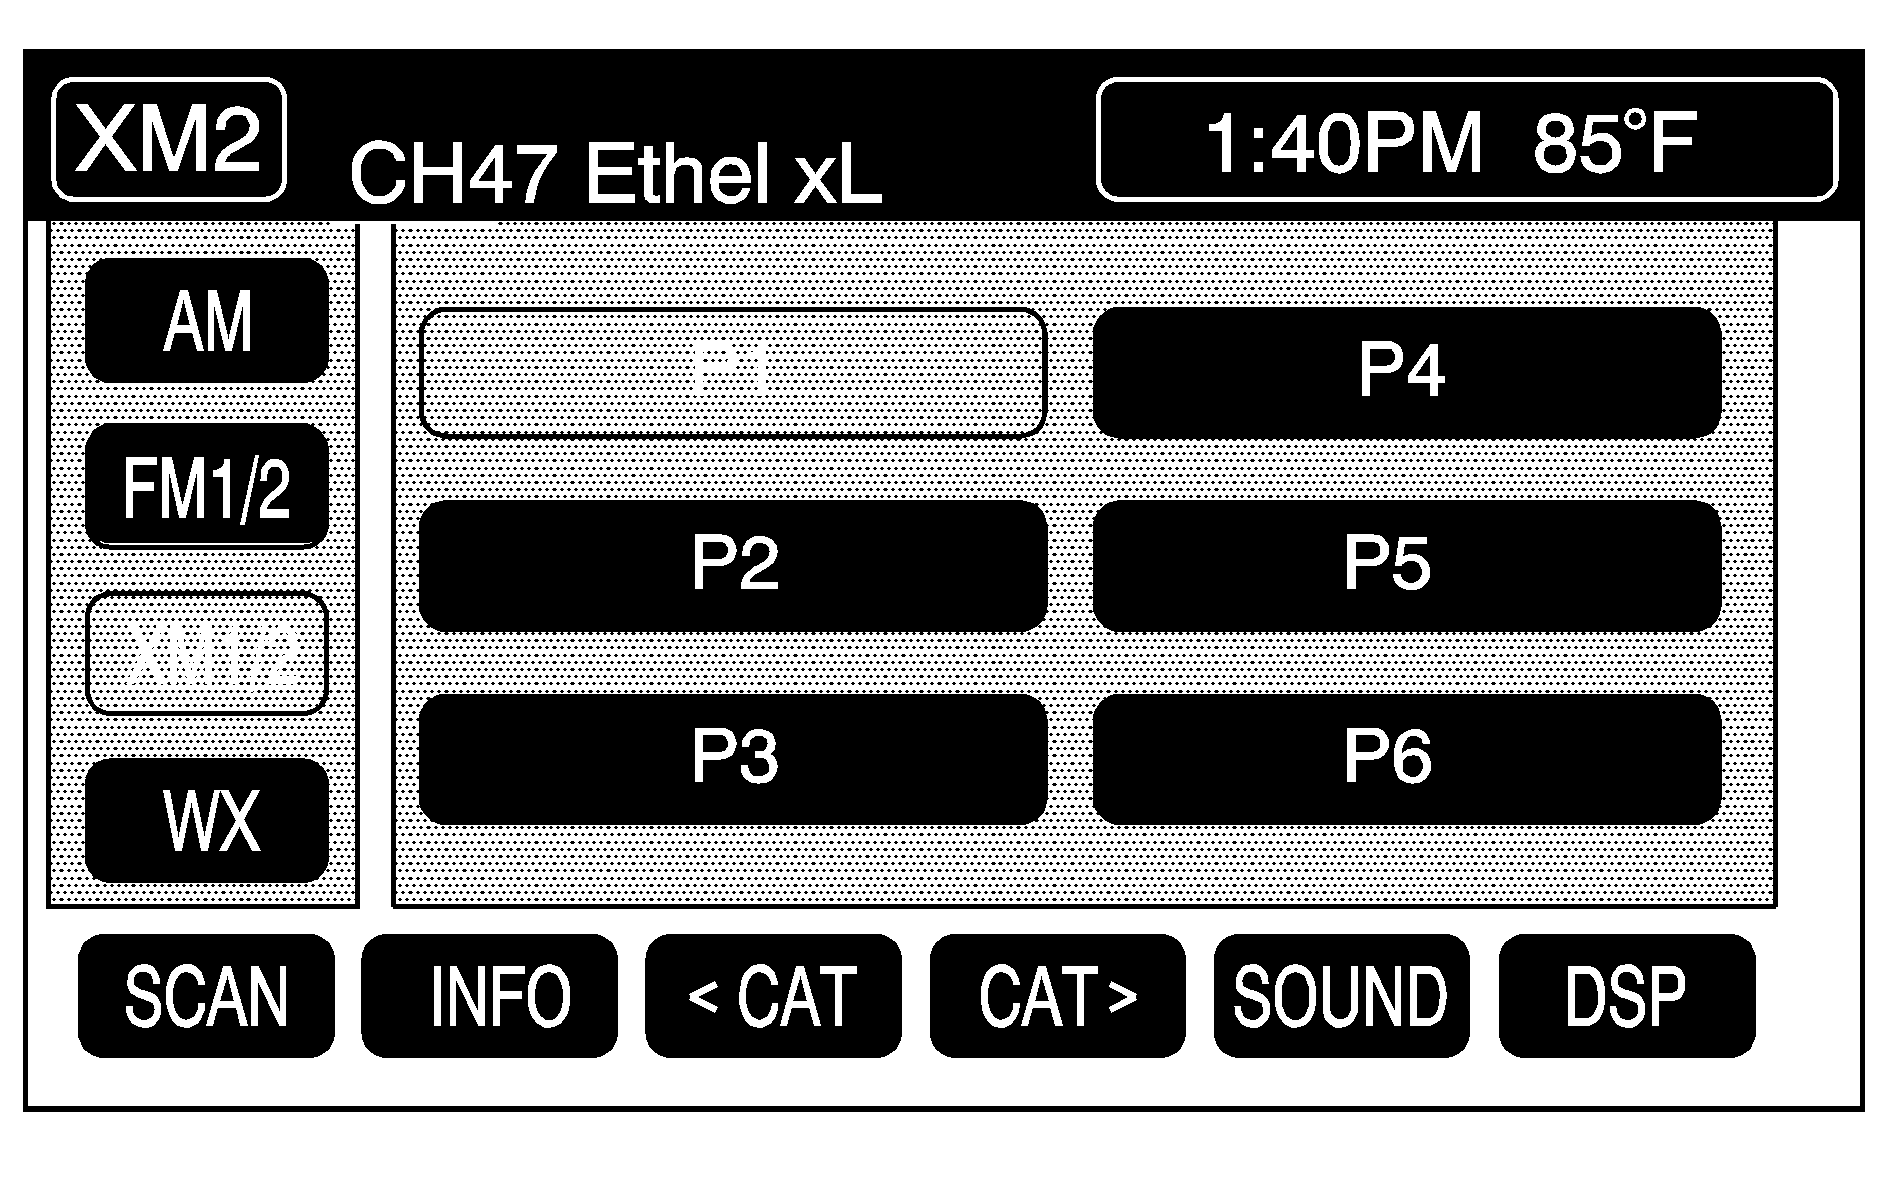
XM™ is a satellite radio service that is based in the 48 contiguous United States and in Canada. XM™ offers a large variety of coast-to-coast channels including music, news, sports, talk/weather (U.S. subscribers), and children's programming. XM™ provides digital quality audio and text information that includes the channel name and number, song title, and artist name. A service fee is required in order to receive the XM™ service. For more information, contact XM™; in the U.S. at www.xmradio.com or call 1-800-852-XMXM (9696) or in Canada at www.xmradio.ca or call 1-877-GET-XMSR (438-9677).
INFO (Information): Touch INFO while in XM™ mode to retrieve various pieces of information related to the current song or channel. By touching INFO, you may retrieve four different categories of information: Artist Name/Feature, Song/Program Title, Channel Category, and other Additional Information that may be broadcast on that channel. Additional Information messages may only be available at certain times or on certain programs. If an Additional Information message is being broadcast on the tuned channel, INFO will appear on the display. Each of the four information types may have multiple pages of text. To reach a category, touch INFO repeatedly until the desired type is displayed. If there are multiple pages of text for the information selected type, the radio will automatically display all the pages for that type at a rate of about one page every three seconds before timing out and returning to the default display. You may override this feature by touching INFO to review all of the pages at your own pace.XL (Explicit Language Channels): XL on the radio display, after the channel name, indicates content with explicit language. These channels, or any others, can be blocked at a customer's request, by calling; in the U.S. 1-800-852-XMXM (9696) or in Canada 1-877-GET-XMSR (438-9677).
Setting Program Type (PTY) Preset Stations
CAT (Category): Press the arrows to select a category.Once the desired category is displayed, press TUNE/SEEK to select the category and take you to the category's first station. If you want to go to another station within that category, press TUNE/SEEK once.
Touch and hold one of the desired P1-P6 presets to store the selected station as a preset. If PTY times out and is no longer on the display, start again.
SCAN: Use this button to scan through the channels within a category or scan through the preset stations. To scan through the channels in a category, do the following:- Select a category by using the category arrows.
- Once the desired category is displayed, touch SCAN. The radio will begin scanning within the chosen category.
- Touch SCAN again to stop scanning.
To scan through your preset stations, touch and hold SCAN. Touch SCAN again to stop scanning.
XM Radio Messages
Radio Display Message | Condition | Action Required |
|---|---|---|
XM Updating | Updating encryption code | The encryption code in the receiver is being updated, and no action is required. This process should take no longer than 30 seconds. |
No XM Signal | Loss of signal | The system is functioning correctly, but the vehicle is in a location that is blocking the XM signal. When you move into an open area, the signal should return. |
Loading XM | Acquiring channel audio (after 4 second delay) | The audio system is acquiring and processing audio and text data. No action is needed. This message should disappear shortly. |
Channel Off Air | Channel not in service | This channel is not currently in service. Tune to another channel. |
Channel Unavail | Channel no longer available | This previously assigned channel is no longer assigned. Tune to another channel. If this channel was one of the presets, choose another channel for that preset button. |
No Info | Artist Name/Feature, Song Title, CAT not available | No artist, song title, and/or category information is available at this time on this channel. The system is working properly. |
Not Found | No channel available for the chosen category | There are no channels available for the category you selected. The system is working properly. |
No Information | No Text/Informational message available | No text or informational messages are available at this time on this channel. The system is working properly. |
XM Theftlocked | Theft lock active | The XM receiver in the vehicle may have previously been in another vehicle. For security purposes, XM receivers cannot be swapped between vehicles. If this message is received after having your vehicle serviced, check with your dealer/retailer. |
XM Radio ID | Radio ID label (channel 0) | If tuned to channel 0, this message will alternate with the XM Radio eight digit radio ID label. This label is needed to activate the service. |
Unknown | Radio ID not known (should only be if hardware failure) | If this message is received when tuned to channel 0, you may have a receiver fault. Consult with your dealer/retailer. |
Check XM Receivr | Hardware failure | If this message does not clear within a short period of time, the receiver may have a fault. Consult with your dealer/retailer. |
