Important: Before performing any panel adjustment procedures, refer to Folding Top Clearance Gap Specifications .
Important: Before making adjustments to the up/down position of the front folding top panel, determine which panel needs the adjustment and for what reason.
• When the front folding top panel is closed and latched, if the panel is too high or too low relative to the windshield header, adjust the position of the panel by adding or removing shims beneath the folding top location pins. Refer to
Folding Top Front Locating Pin Adjustment
. • When the front folding top panel is closed and latched, if the panel is too high or too low relative to the rear folding top panel, adjust the position of the front panel by adding or removing shims from the folding top panel link. Refer to the Front
Panel to Rear Panel Adjustment Procedure below. • During the closing cycle, if the locating pins are striking the locating pin receivers either too high or too low, adjust the up/down position of the upper pivot link bracket on the rear folding top panel link. Refer to the Pin Approach Angle Adjustment
Procedure below.
Fore/Aft and Cross Car Adjustment Procedure
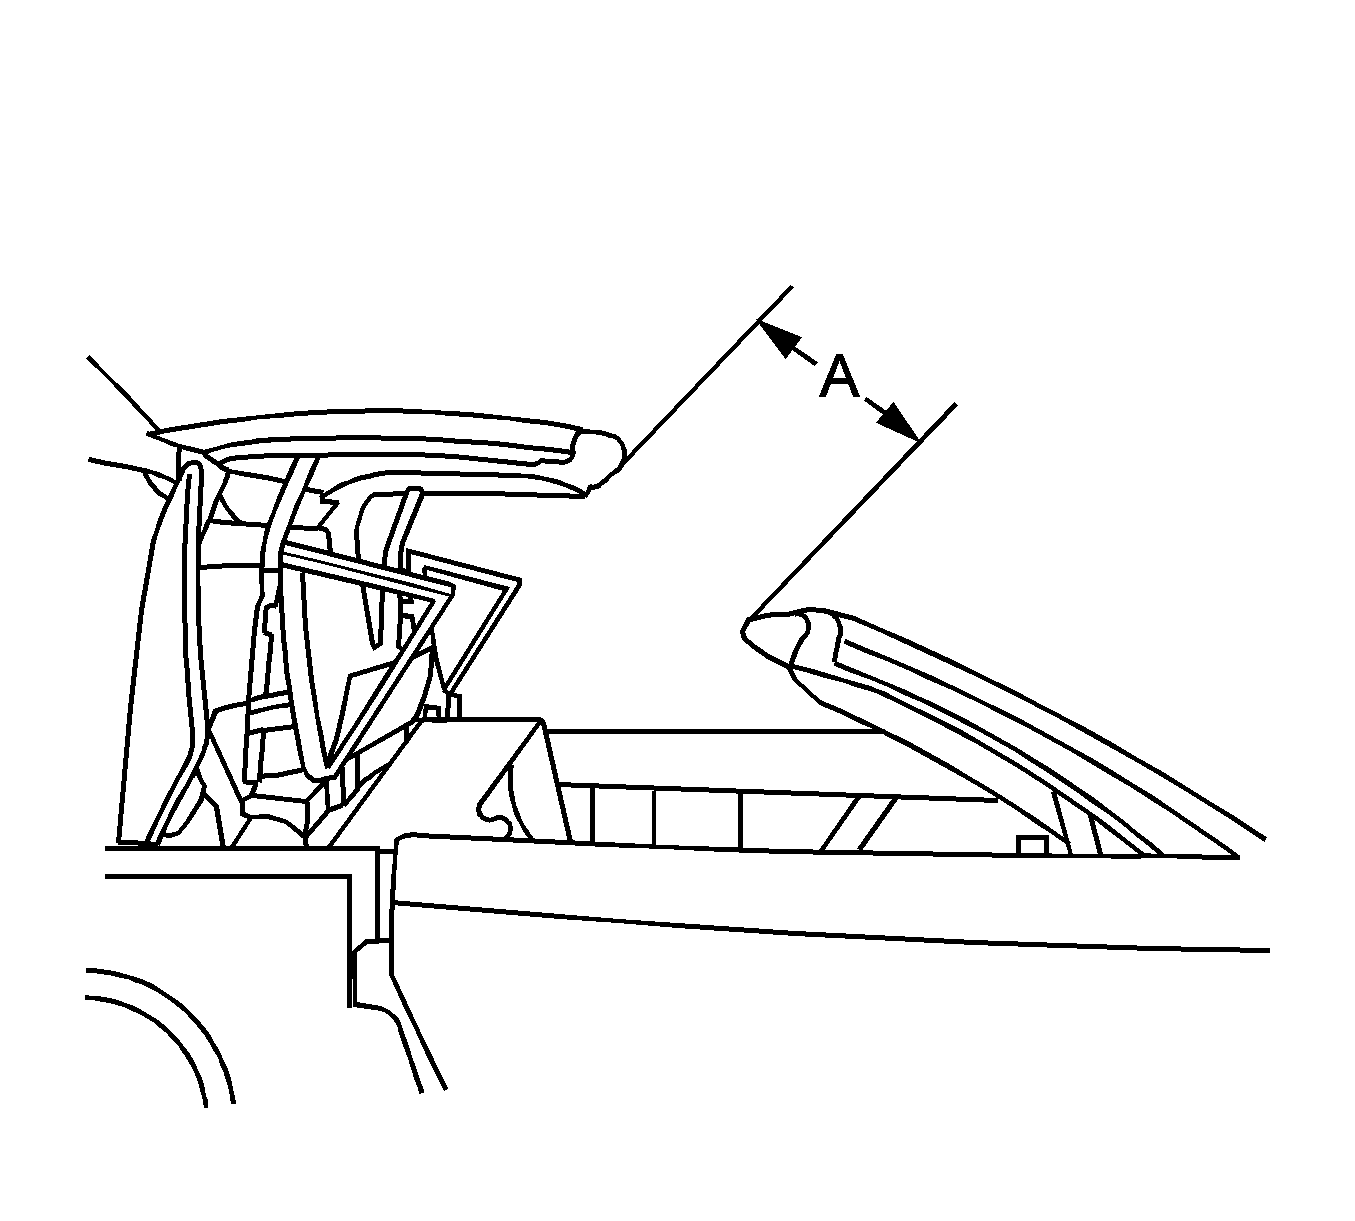
- Manually open the folding top as shown in the illustration. Refer to Folding Top Manual Operation .
- Place a protective covering over the interior of the vehicle and the adjacent body panels.
- Remove the headliner. Refer to Folding Top Headlining Trim Panel Replacement .
- Loosen the bolts (1) from the folding top panel.
- Apply LOCTITE™ Blue, GM P/N 12345382 (Canadian P/N 10953489) or equivalent to the bolts.
- Adjust the panel as necessary.
- Manually close the folding top. Refer to Folding Top Manual Operation .
- Verify that the folding top panel is aligned properly. Refer to Folding Top Clearance Gap Specifications .
- Repeat the adjustment procedure as necessary. If you cannot align the folding top panel using this procedure, adjust the locating pins. Refer to Folding Top Front Locating Pin Adjustment .
- Remove the protective covering.
- Cycle the folding top under power through one complete cycle in both directions.
- Inspect the folding top for proper operation. Refer to Power Folding Top Description and Operation .
- Install the headliner. Refer to Folding Top Headlining Trim Panel Replacement .

The distance (A) from the windshield header to the leading edge of the folding top panel is 400 mm (15.75 in).

Notice: Refer to Fastener Notice in the Preface section.
Tighten
Tighten the bolts to 18 N·m (13 lb ft).
Front Panel to Rear Panel Adjustment Procedure
- Manually open the folding top as shown in the illustration. Refer to Folding Top Manual Operation .
- Place a protective covering over the interior of the vehicle and the adjacent body panels.
- Remove the headliner. Refer to Folding Top Headlining Trim Panel Replacement .
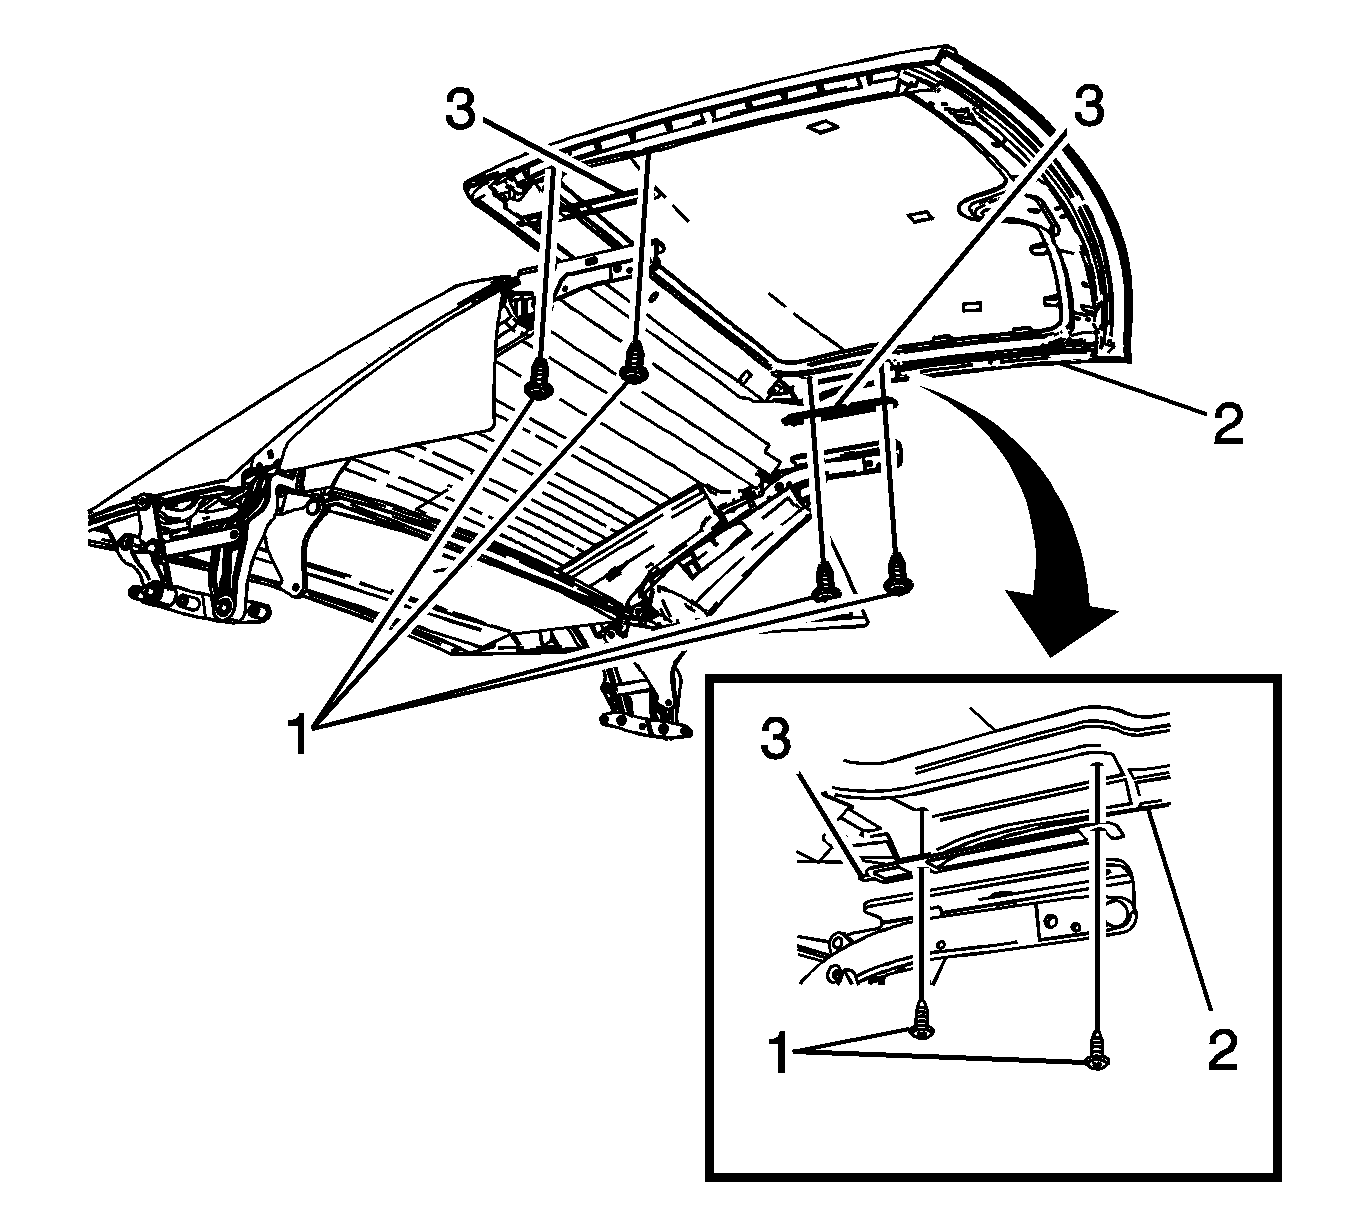
- Loosen the bolts (1) from the folding top panel (2).
- Note the number and location of any shims (3) that may be present.
- Apply LOCTITE™ Blue, GM P/N 12345382 (Canadian P/N 10953489) or equivalent to the bolts.
- With the aid of an assistant, add or remove shims to obtain the necessary alignment.
- Manually close the folding top. Refer to Folding Top Manual Operation .
- Adjust the folding top location pins as necessary. Refer to Folding Top Front Locating Pin Adjustment .
- Verify that the folding top panel is properly aligned. Refer to Folding Top Clearance Gap Specifications .
- Repeat the adjustment procedure as necessary.
- Remove the protective covering.
- Cycle the folding top under power through one complete cycle in both directions.
- Inspect the folding top for proper operation. Refer to Power Folding Top Description and Operation .
- Install the headliner. Refer to Folding Top Headlining Trim Panel Replacement .

The distance (A) from the windshield header to the leading edge of the folding top panel is 400 mm (15.75 in).

Notice: Refer to Fastener Notice in the Preface section.
Tighten
Tighten the bolts to 18 N·m (13 lb ft).
Pin Approach Angle Adjustment Procedure
- Manually open the folding top as shown in the illustration. Refer to Folding Top Manual Operation .
- Place a protective covering over the interior of the vehicle and the adjacent body panels.
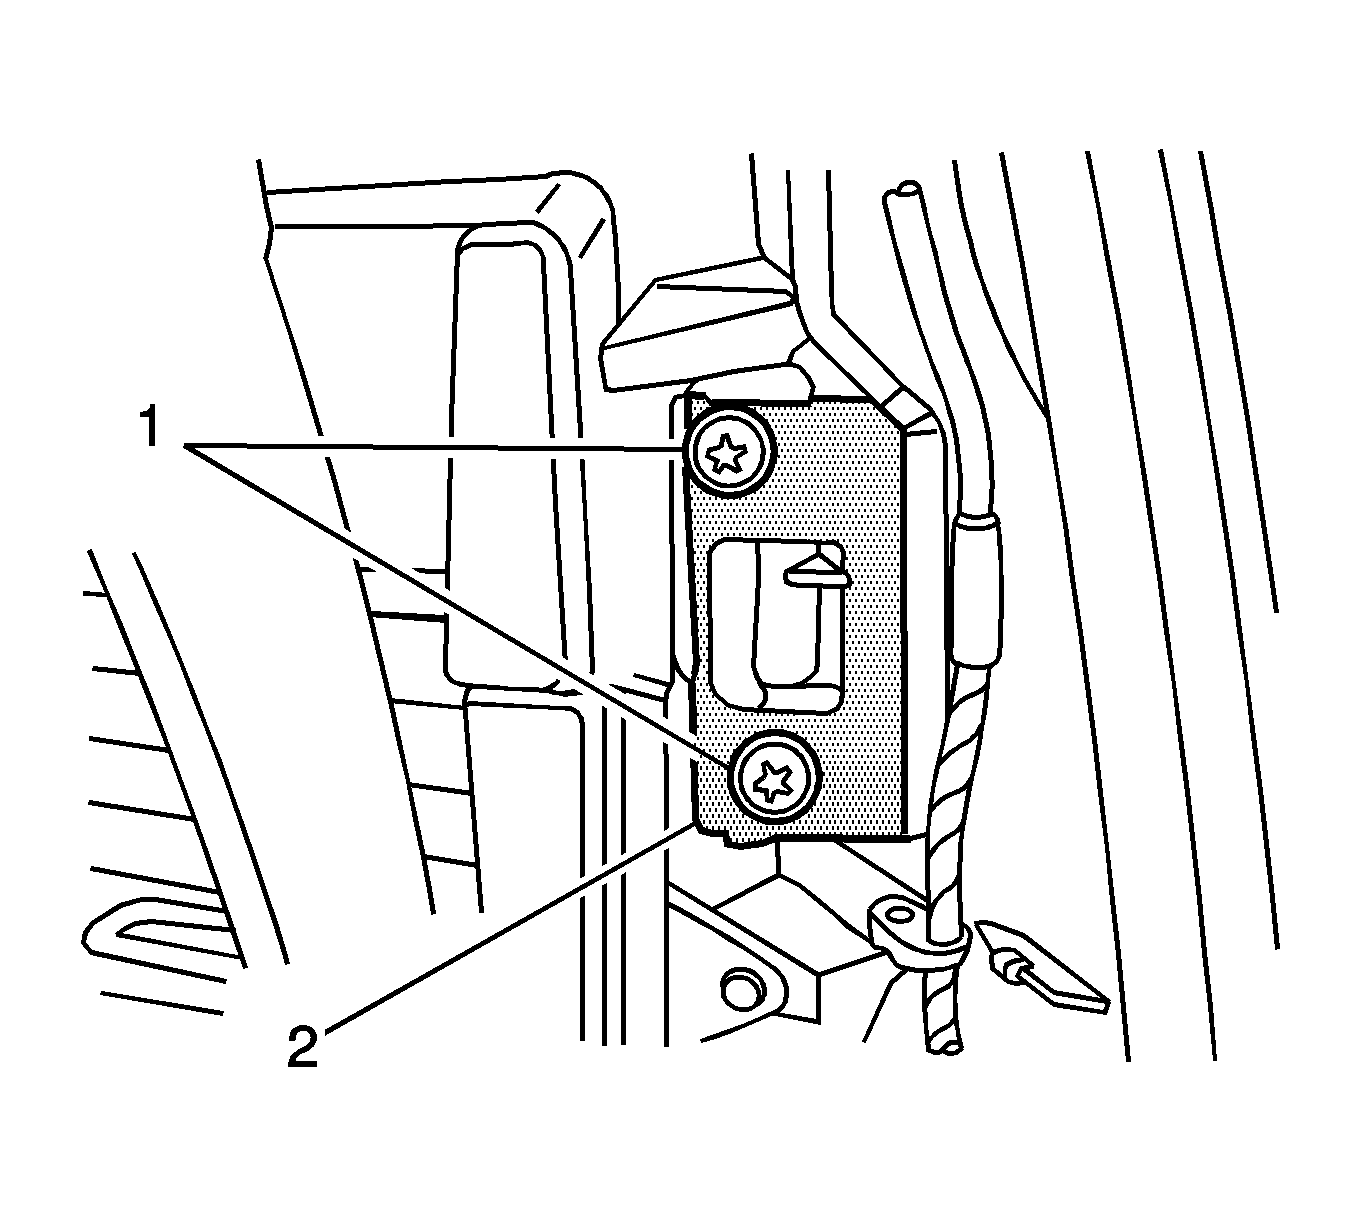
- Using a grease pencil, mark the location of the bolts (1) to the upper pivot link bracket (2).
- With the aid of an assistant supporting the position of the folding top, loosen the bolts (1).
- With the aid of an assistant, adjust the rear panel position relative to the upper pivot link bracket.
- Manually close the folding top. Refer to Folding Top Manual Operation .
- Adjust the folding top location pins as necessary. Refer to Folding Top Front Locating Pin Adjustment .
- Verify that the folding top panel is properly aligned. Refer to Folding Top Clearance Gap Specifications .
- Repeat the adjustment procedure as necessary.
- Remove the protective covering.
- Cycle the folding top under power through one complete cycle in both directions.
- Inspect the folding top for proper operation. Refer to Power Folding Top Description and Operation .
- Install the headliner. Refer to Folding Top Headlining Trim Panel Replacement .

The distance (A) from the windshield header to the leading edge of the folding top panel is 400 mm (15.75 in).

Notice: Refer to Fastener Notice in the Preface section.
Important: A small adjustment at the bracket results in a large change of the pin approach angle to the pin receiver.
Tighten
Tighten the bolts to 18 N·m (13 lb ft).
