HIGH DOOR EFFORT OPEN/CLOSE (FINESSE PROCEDURES)

Subject: HIGH HANDLE EFFORT SLIDING DOOR (FINESSE PROCEDURES)
Model and Year: 1985-91 M/L VAN
Some of the above vehicles may exhibit a higher than optimum sliding door effort. This may be the result of one of the following conditions.
Important: Before proceeding to repair procedures, lubricate all tracks and rollers with GM P/N 1052497 or equivalent and retest for condition.
Conditions
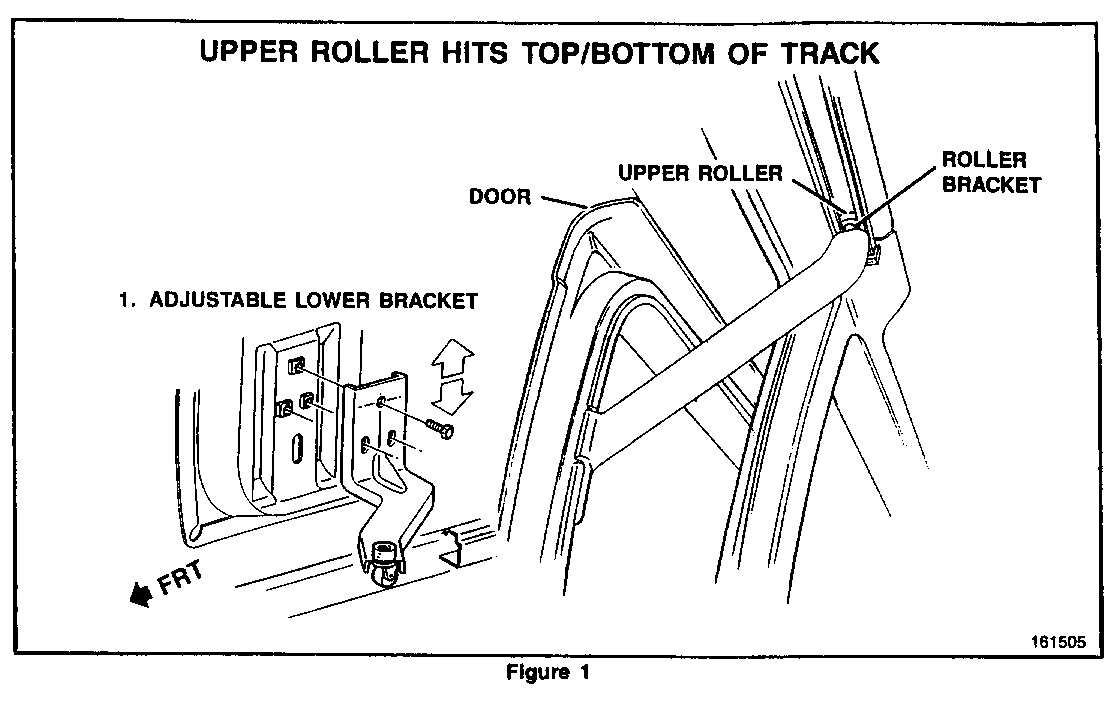
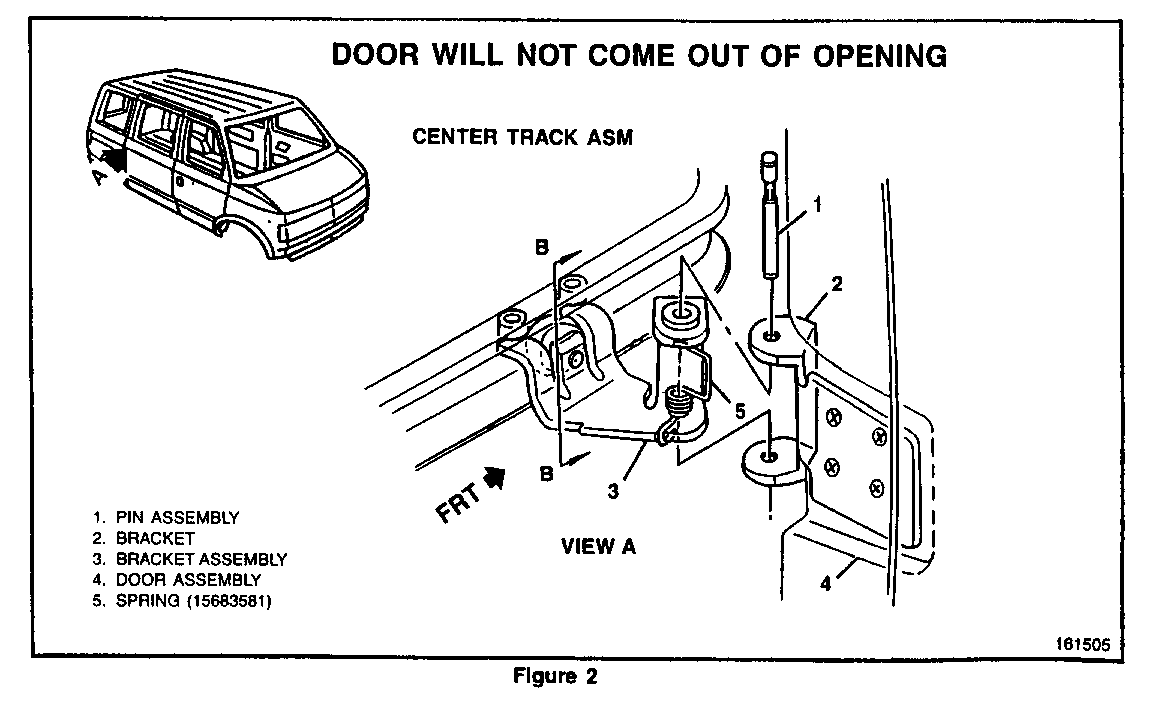
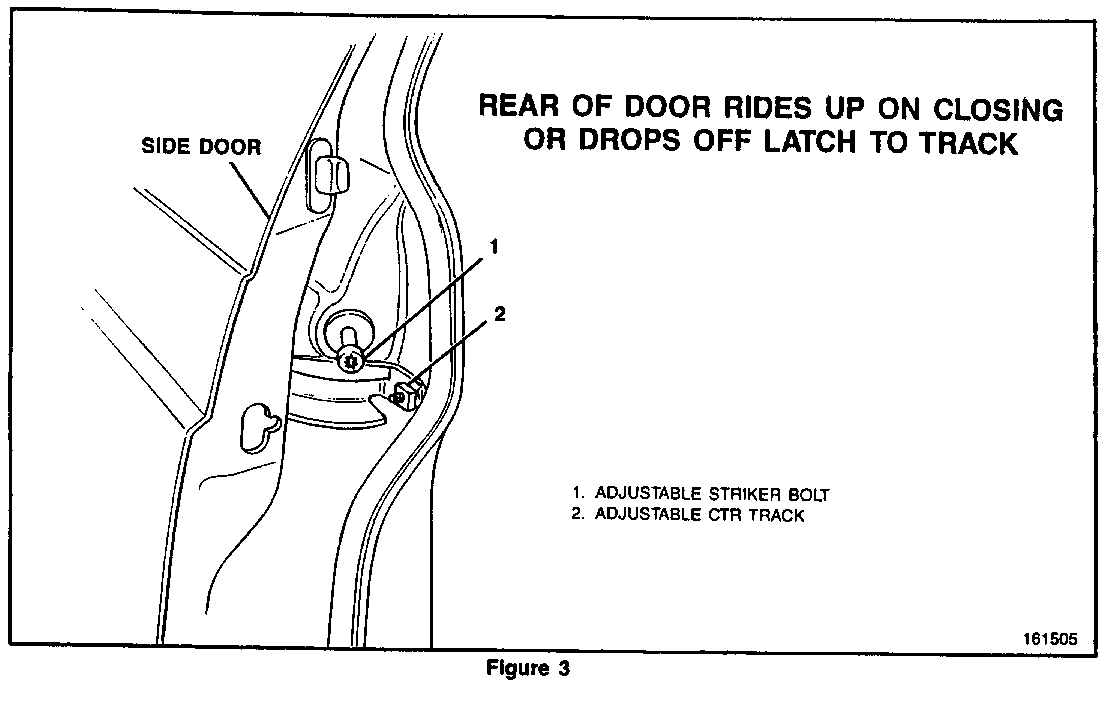
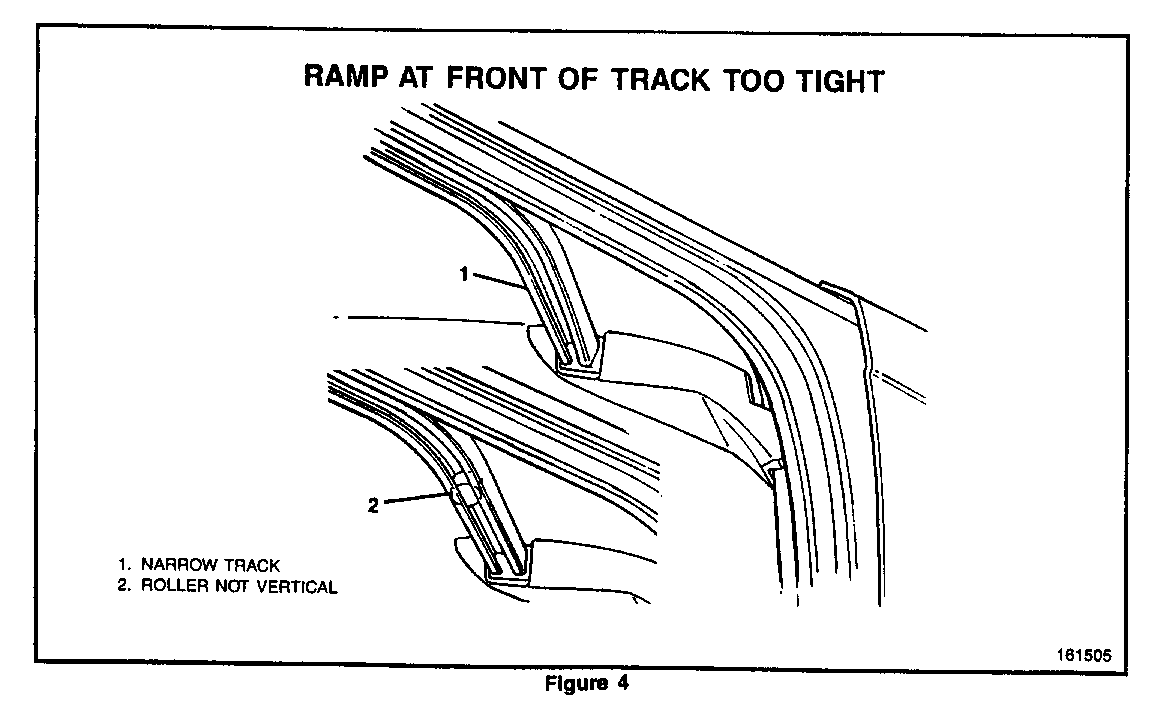
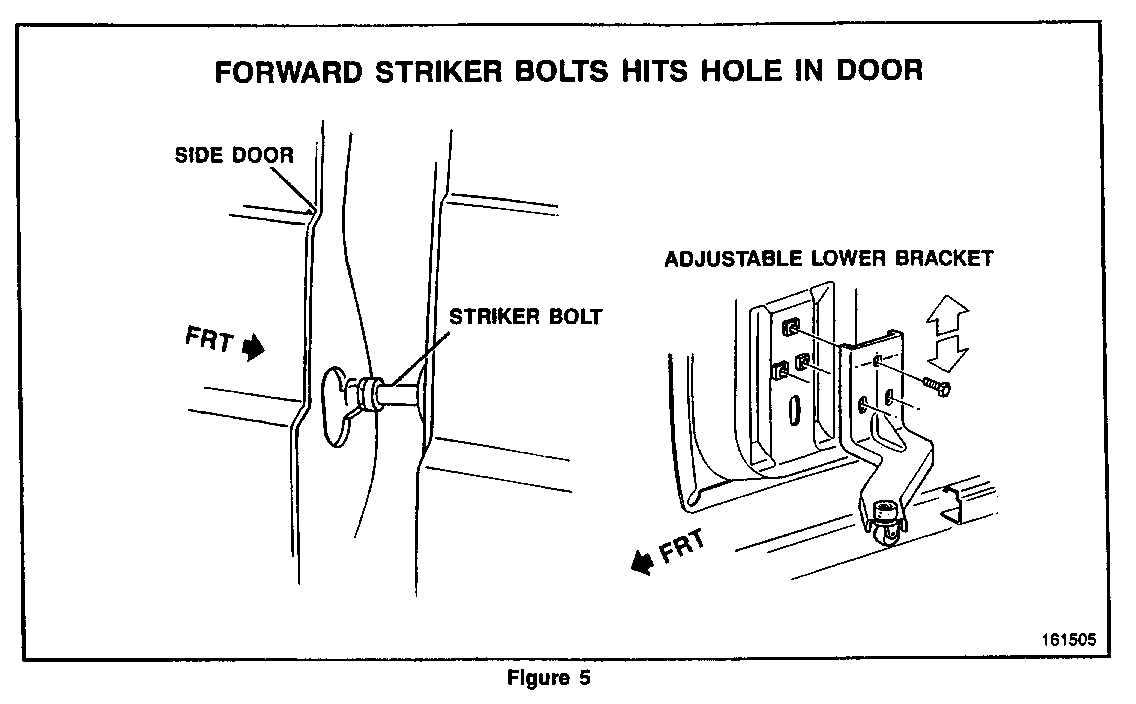
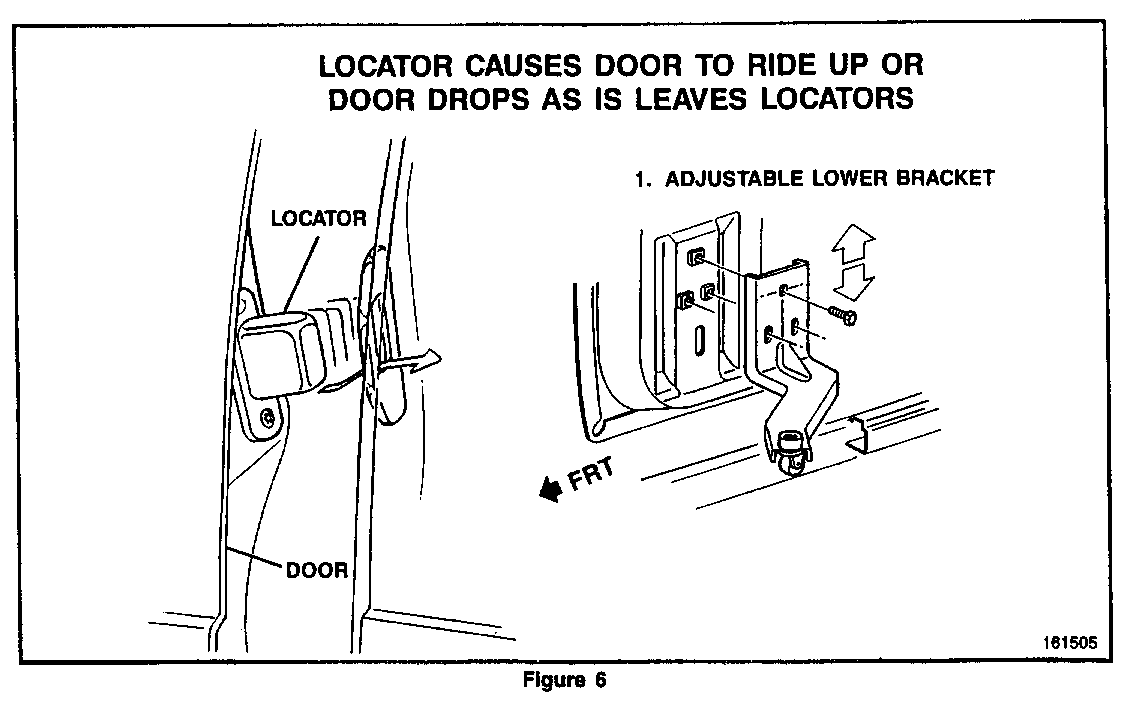
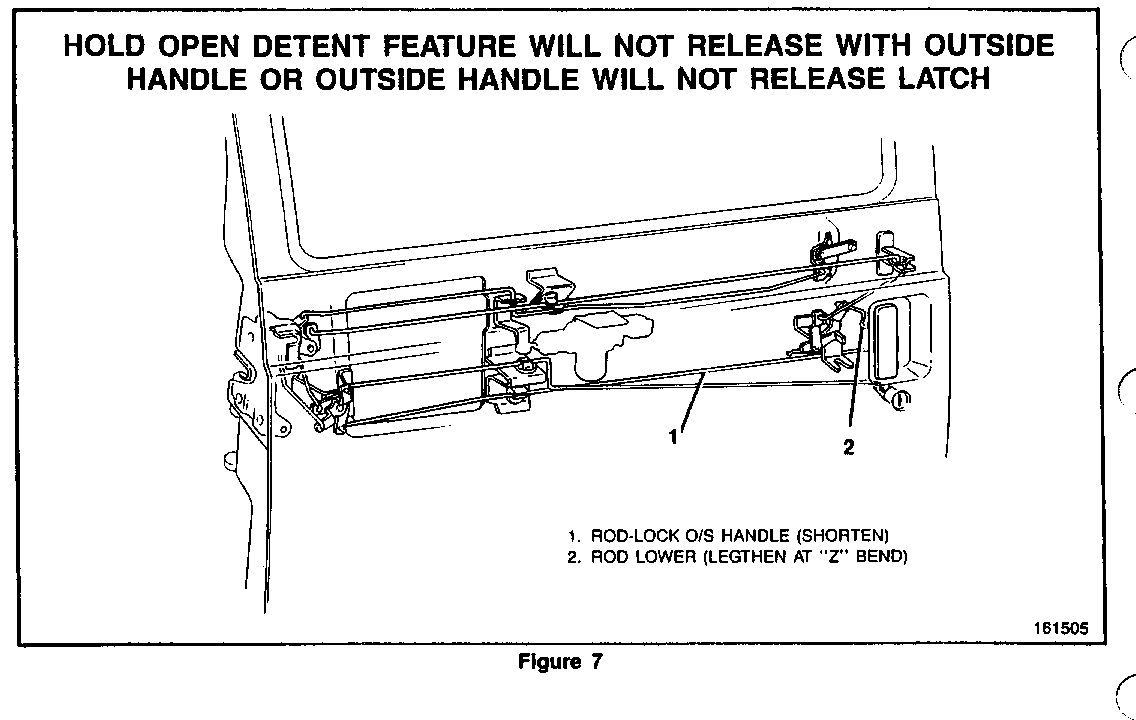
1. Upper roller hits top/bottom of track (Figure 1). 2. Door will not come out of opening/high handle effort (Figure 2). 3. Rear of door rides up on closing or drops off latch to track (Figure 3). 4. Ramp at front of track too tight (Figure 4). 5. Forward striker bolt hits hole in door (Figure 5). 6. Locator causes door to ride up or door drops off as it leaves the locator (Figure 6). 7. Hold open detent feature will not release with outside handle (Figure 7). 8. Outside handle will not release latch (Figure 7).
SERVICE PROCEDURES:
Note: Refer to section 10A1-Doors in the appropriate service manual for assistance in performing the following service procedures.
1. To repair condition 1, loosen the bottom forward corner of the door trim panel to gain access to the lower bracket and adjust the lower bracket downward/upward as required. If lower bracket has been fully adjusted, then remove the upper roller trim panel and finesse the roller bracket as required (Figure 1).
2. To repair condition 2, apply silicone grease GM 12345579 or equivalent to the door opening weatherstrip. This will prevent the door from sticking to the weatherstrip (Figure 2). If condition persists, install spring GM P/N 15683581 to the center roller bracket hinge pin to assist the door out of the opening.
- Support the door with a floor jack or equivalent.
- Remove bottom 2 door lock assembly screws and loosen the top door lock assembly screw. Swing the door lock assembly out of the way.
- Squeeze the hinge pin retainer and push the pin upward from the bracket assembly to allow clearance to insert the spring.
- Install spring on the bracket assembly. Replace pin through the center of the spring making sure that the retainer on the center roller bracket hinge pin is completely engaged below the bushing.
- Reinstall and tighten the door assembly screws.
3. To repair condition 3, adjust the rear striker bolt downward/upward as required. If condition persists, then remove the right side quarter trim panel and adjust the center roller track downward/upward as required (Figure 3).
Note: The door striker should not be removed.
4. To repair condition 4, inspect roller track for damage at the front. If track is narrower than the roller, finesse the track until the track accommodates the roller (Figure 4).
If track is not vertical, finesse the roller track until a vertical plane is achieved and the roller rides smoothly.
5. To repair condition 5, loosen the bottom forward corner of the door trim panel to gain access to the lower bracket and adjust upward/downward as required. If condition persists finesse the door striker upward/downward as required (Figure 5).
6. To repair condition 6, loosen the bottom door trim panel to gain access to the lower bracket and adjust upward/downward as required (Figure 6).
7. To repair condition 7, finesse the door handle hold open door rod at the z-bend to increase the length of the rod. This will allow the hold open to engage at an earlier point (Figure 7).
8. To repair condition 8, remove the ash tray (passenger van) and or the trim panel (cargo van) if equipped and finesse the door lock rod until the slack has been removed. This will allow the door handle to engage at an earlier point (Figure 7).
SERVICE PARTS INFORMATION:
Part Number Description ----------- ------------ 12345579 Grease 15683581 Spring
Use the most applicable Labour Operation and Time from the Canadian Labour Time Guide.
General Motors bulletins are intended for use by professional technicians, not a "do-it-yourselfer". They are written to inform those technicians of conditions that may occur on some vehicles, or to provide information that could assist in the proper service of a vehicle. Properly trained technicians have the equipment, tools, safety instructions and know-how to do a job properly and safely. If a condition is described, do not assume that the bulletin applies to your vehicle, or that your vehicle will have that condition. See a General Motors dealer servicing your brand of General Motors vehicle for information on whether your vehicle may benefit from the information.
