AM RADIO INTERFERENCE/STATIC ADDITION OF RADIO GROUND KIT

SUBJECT: AM RADIO INTERFERENCE OR STATIC (ADDITION OF RADIO GROUND KIT)
VEHICLES AFFECTED: 1985-1991 M/L VANS
Some 1985-91 M/L vans may experience ignition static, popping and or a whine noise on AM radio.
To repair this condition it will be necessary to ground the engine cover to frame assembly, using an engine ground cover kit P/N 15665468.
For 1989 and prior vehicles the engine cover should be grounded using braided mesh ground strap (P/N 06287160) or equivalent and the rivet and washer provided in service kit. A flat washer may be necessary to install the braided mesh ground strap to the cover. This washer is listed in the parts information below and is not a part of the service kit. The service kit has been incorporated into 1992 production vehicles.
If condition remains it may also be necessary ground the radio antenna at the coaxial connector.
SERVICE PROCEDURE:
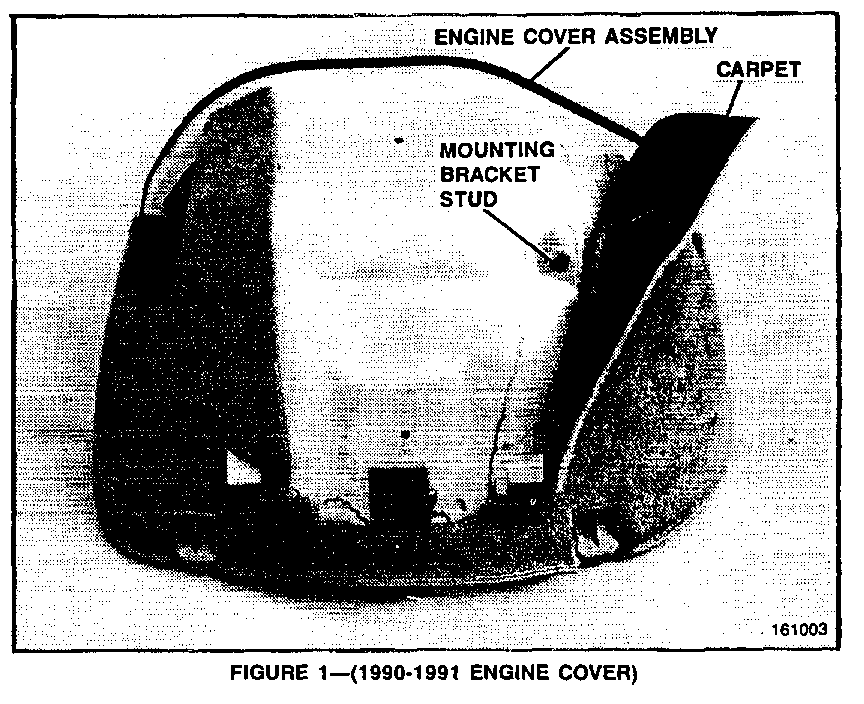
1990-1991 vehicle
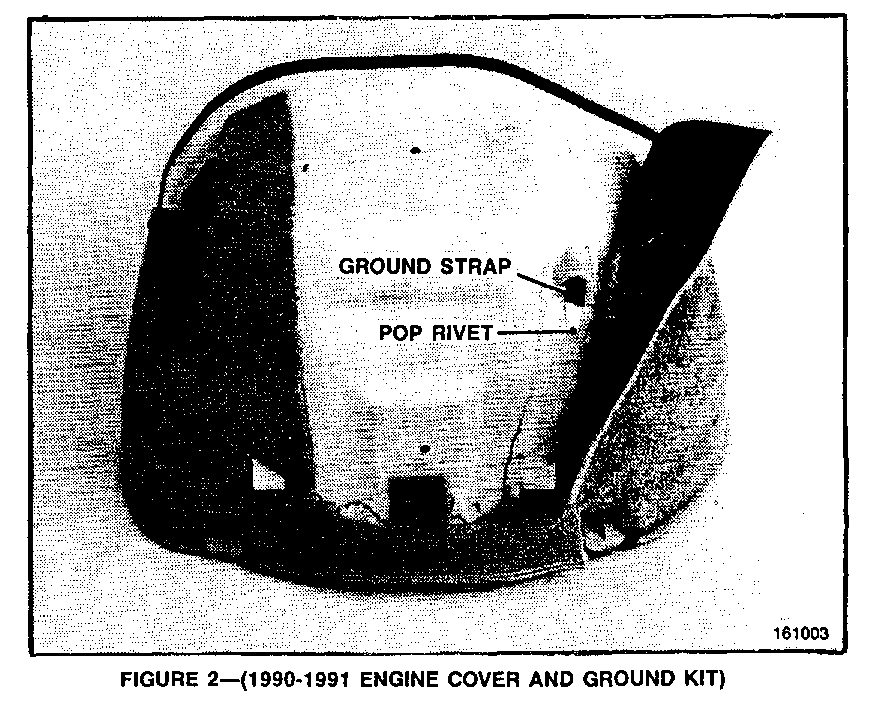
1. Remove the engine cover from the vehicle. 2. Pull the carpet back from the cover so that the mounting bracket stud is exposed Refer to Figure 1. 3. Install the engine cover ground kit (P/N 15665468) to the engine cover Refer to Figure 2.
- Place the strap provided in the engine cover ground kit on the engine cover mounting bracket stud, while making sure that the U shaped side is facing upward. Mark the engine cover where the rivet should go Refer to figures 1 and 2.
- Drill a 7/64 hole to accommodate the rivet provided in the kit.
- With the ground strap in place, position the rivet through the ground strap and the engine cover.
- Place the raised washer provided in the engine cover ground kit on the aluminum side of the engine cover, and centre the washer over the rivet. Press the washer into the insulation with your thumb or equivalent, while making sure the raised side of the washer is facing the aluminum side of the engine cover.
Important: To achieve a good ground, the raised side of the washer provided in the service kit must face the aluminum.
4. Secure the ground strap to the engine cover by installing the pop rivet using a standard pop rivet tool or equivalent.
5. Verify that a good ground exists.
6. Install the engine cover to the vehicle.
For 1985-1989 vehicles
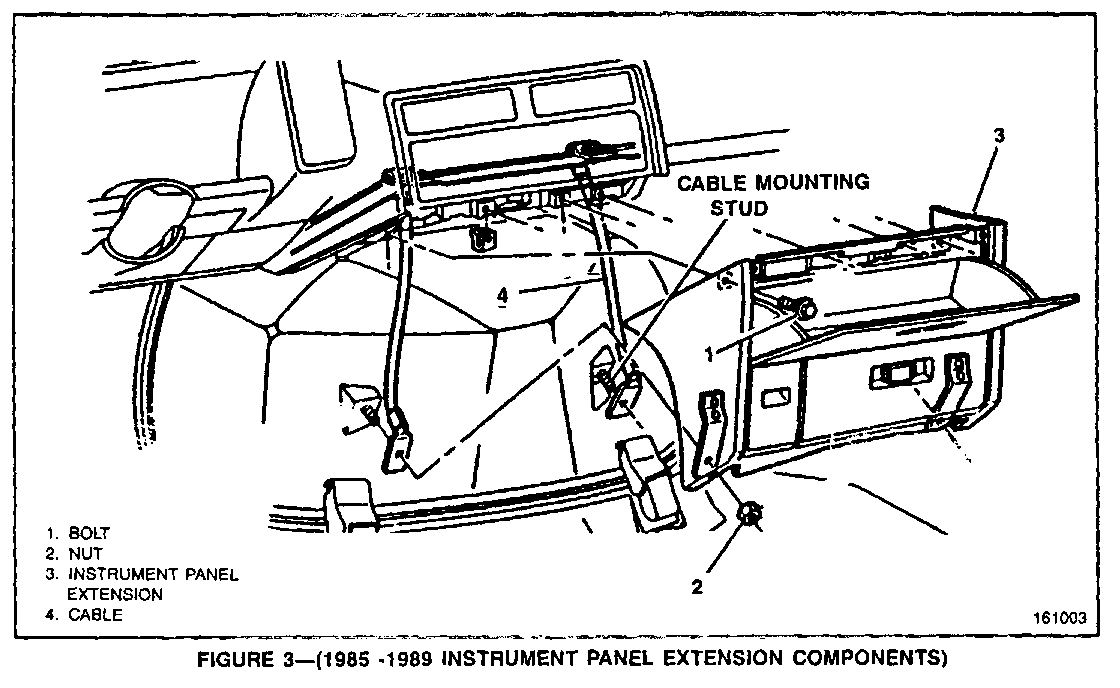
1. Remove the lower instrument panel extension if equipped.
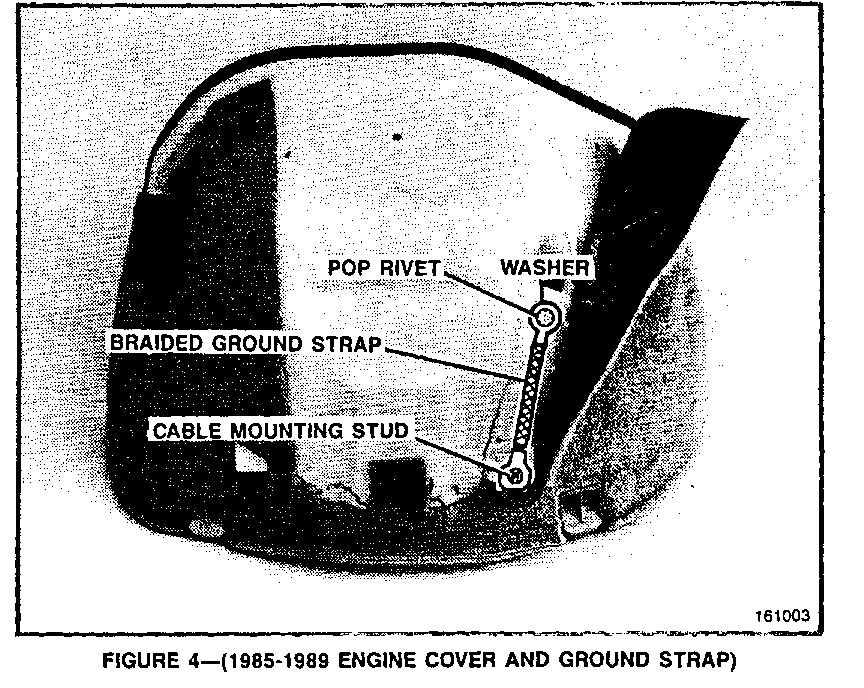
2. Pull the carpet back to expose the right hand cable mounting stud. Refer to Figures 3 and 4.
3. Install a braided mesh ground strap or equivalent to the the engine ground cover using the washer and rivet provided in the service kit. A 10 inch (254 mm) braided mesh ground strap (P/N 06287160) and a washer (P/N 15684753) will also be necessary for installation.
- Measure and mark 4 inches directly above the right cable mounting stud Refer to Figure 4.
- Drill an 7/64 hole to accommodate the rivet.
- Install the rivet through the washer (P/N 15684753), braided mesh ground strap (P/N 06287160) in that order and through the engine cover.
- Place the raised washer provided in the service kit over the rivet, while making sure that the raised end is facing the aluminum.
Important: To achieve a good ground, the raised edge of the washer provided in the kit must face the aluminum.
4. Secure the braided mesh ground strap to the engine cover with a standard pop rivet tool or equivalent.
5. Place the engine cover on the vehicle (do not fasten).
6. Attach the free end of the braided mesh ground strap to the right hand cable mounting stud, install cable, and tighten nut.
7. Verify that a good ground exists.
8. Fasten the engine cover to the vehicle.
1985-1991 vehicle.
If condition persists ground the antenna at the coaxial cable.
1. Remove the RH instrument panel filler panel. 2. Locate the antenna coaxial connection and visually check the cable for corrosion/good connection at the mating area. Replace if necessary. 3. Wrap the antenna coaxial connector with aluminum tape. While taping, add a braided ground strap and allow one end to remain free. Take the free end and ground to a suitable chassis ground. 4. Verify that a good ground exists. 5. Install the instrument panel filler panel.
Note: Check the base of the antenna to verify that is tight and free from corrosion. If corrosion exists, remove or replace as required.
Check the base antenna screws to verify that they are metal. Plastic coated screws will not provide the necessary ground.
SERVICE PARTS INFORMATION
Part Number Description ------------ ----------------------- 15665468 Engine Cover Ground Kit (Ground Strap, Pop Rivet, Raised Washer) 06287160 Braided Mesh Ground Strap (10 inches long) 15684753 Flat Washer
Use the most applicable Labour Operation and Time from the Canadian Labour Time Guide.
General Motors bulletins are intended for use by professional technicians, not a "do-it-yourselfer". They are written to inform those technicians of conditions that may occur on some vehicles, or to provide information that could assist in the proper service of a vehicle. Properly trained technicians have the equipment, tools, safety instructions and know-how to do a job properly and safely. If a condition is described, do not assume that the bulletin applies to your vehicle, or that your vehicle will have that condition. See a General Motors dealer servicing your brand of General Motors vehicle for information on whether your vehicle may benefit from the information.
