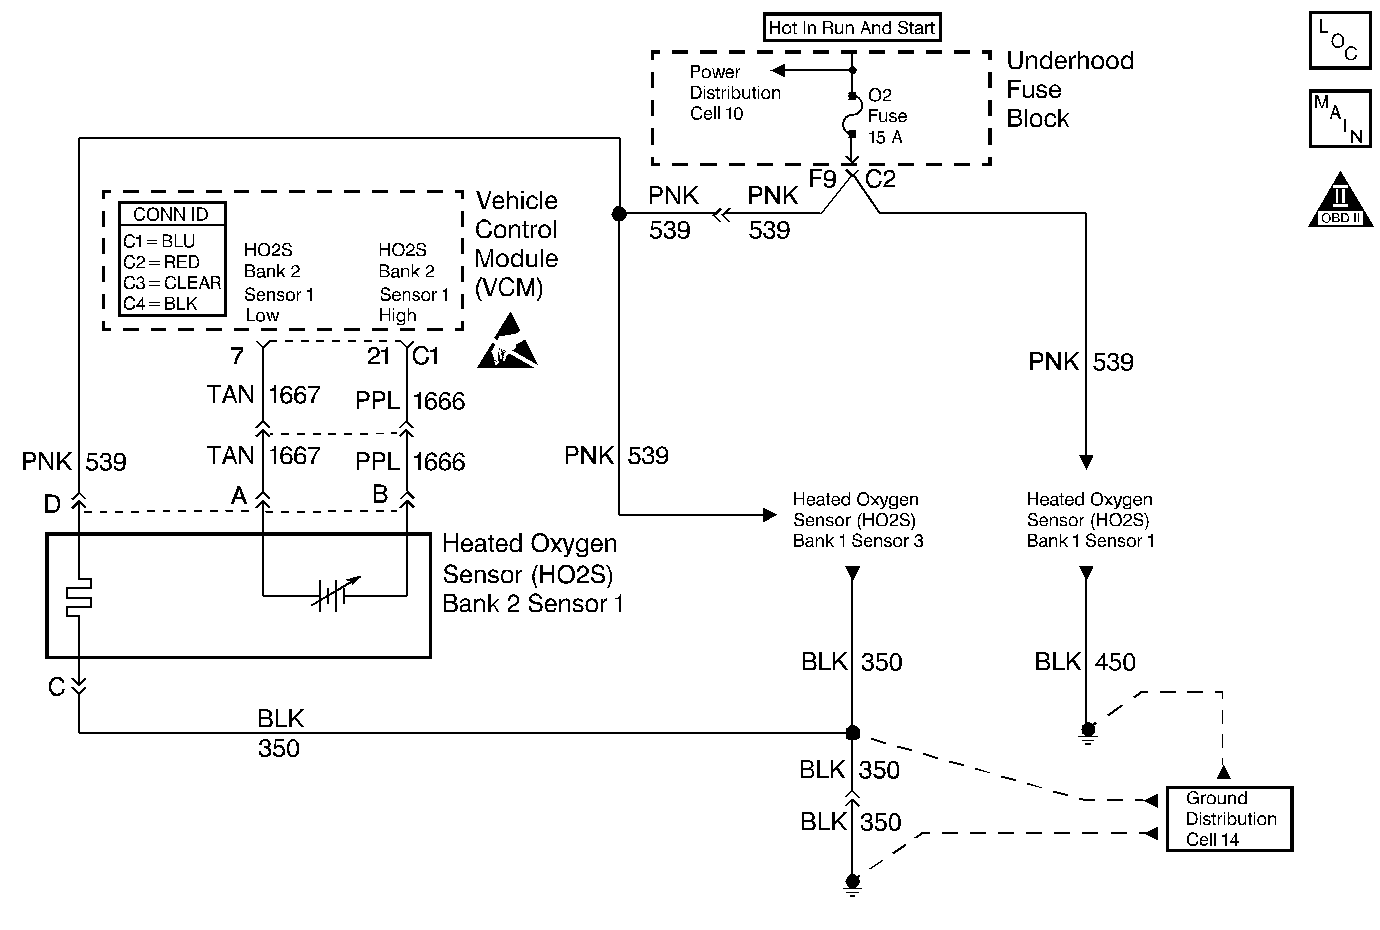
Circuit Description
In order to provide the best possible combination of driveability, fuel economy, and emission control, the vehicle uses a Closed Loop air and fuel metering system. While in Closed Loop, the vehicle control module (VCM) monitors the oxygen sensor signal voltage. The VCM adjusts the fuel delivery based on a signal voltage. The long and Short Term fuel values, which a scan tool can monitor, indicates a change made to the fuel delivery. Ideal fuel trim values are around 0 percent (128 counts). If the oxygen sensor signal indicates a lean condition, the VCM adds fuel. This results in fuel trim values above 0 percent. If the oxygen sensor detects a rich condition, the fuel trim values will read below 0 percent. This indicates that the VCM is reducing the amount of fuel delivered. The VCM sets this DTC when an excessively lean condition is detected.
Conditions for Running the DTC
| • | No active oxygen sensor DTCs |
| • | No active throttle position (TP) sensor DTCs |
| • | No active manifold absolute pressure (MAP) sensor DTCs |
| • | No active exhaust gas recirculation (EGR) sensor DTCs |
| • | No active evaporative emissions (EVAP) system DTCs |
| • | No active engine coolant temperature (ECT) sensor DTCs |
| • | No active mass air flow (MAF) sensor DTCs |
| • | No active intake air temperature (IAT) sensor DTCs |
| • | No active vehicle speed sensor (VSS) DTCs |
| • | No active misfire DTCs |
| • | The throttle position is more than 70 percent. |
| • | The engine speed is between 575 and 4,000 RPM. |
| • | The barometric pressure (BARO) is more than 70 kPa. |
| • | The ECT is between 75°C and 114°C (167°F- 237°F). |
| • | The MAP is between 22 and 85 kPa. |
| • | The IAT is between - 8°C and 76°C (46 - 169°F). |
| • | The MAF is between 3 and 85 g/s. |
| • | The vehicle speed above 136 km (85 mph). |
Conditions for Setting the DTC
The average of the Short Term FT values over a period of 120 seconds indicates that a lean condition is present.
Action Taken When the DTC Sets
Important: To complete a trip cycle for the fuel trim diagnostic, the fuel trim diagnostic test must enable and run according to the above enable criteria and the conditions for setting. A trip is not considered complete until the fuel trim diagnostic has run by the VCM.
When the current DTC initially sets, a software flag indicating an emissions related fault sets for 3 trips. The flag will clear provided the lean condition is no longer present. However, if the VCM detects the conditions for setting the current DTC during a trip while the flag is still set, the VCM illuminates the malfunction indicator lamp (MIL). The MIL remains illuminated during all of the subsequent trips until the DTC has been cleared by service or the lean condition has not been detected and the conditions for checking the fuel trim have been met for 3 consecutive trips.
Conditions for Clearing the MIL or DTC
| • | The control module turns OFF the MIL after 3 consecutive drive trips when the test has run and passed. |
| • | A history DTC will clear if no fault conditions have been detected for 40 warm-up cycles. A warm-up cycle occurs when the coolant temperature has risen 22°C (40°F) from the startup coolant temperature and the engine coolant reaches a temperature that is more than 70°C (158°F) during the same ignition cycle. |
| • | Use a scan tool in order to clear the DTCs. |
Diagnostic Aids
If using the diagnostic tables does not isolate the problem, try monitoring the Long Term FT and fuel trim cell while operating the vehicle under various loads. This may isolate the condition which caused the setting of the current DTC.
A condition that causes the DTC P0300 may also set the current DTC. Conversely an extremely lean condition which sets the current DTC can cause a misfire at idle and the DTC P0300 to set. If the cause of the current DTC cannot be determined and the DTC P0300 is also set, refer to DTC P0300 Engine Misfire Detected .
Typical Fuel Trim Values
Control Module Leaning Fuel | No Adj. | Control Module Enriching Fuel | ||
|---|---|---|---|---|
Max. Lean | DTC sets | -- | DTC sets | Max. Rich |
-25% | -14% | 0% | +20% | +25% |
The fuel trim values table indicates the typical fuel adjustment values as displayed on a scan tool. Negative values, or a rich condition, indicates that the injector pulse width is being decreased in order to lean out the fuel mixture. Positive values, or a lean condition, indicates that the injector pulse width is being increased in order to richen the fuel mixture.
Test Description
The numbers below refer to step numbers on the diagnostic table.
Step | Action | Values | Yes | No | ||||||||||||||||||||||
|---|---|---|---|---|---|---|---|---|---|---|---|---|---|---|---|---|---|---|---|---|---|---|---|---|---|---|
1 | Did you perform the Powertrain On-Board Diagnostic (OBD) System Check? | -- | ||||||||||||||||||||||||
|
Important: If any DTCs are set, except P0174 and P0171, refer to those DTCs before proceeding with this diagnostic.
Is the Long Term FT bank 2 value more than the specified value? | 20 % | |||||||||||||||||||||||||
3 |
Does the scan tool indicate that this diagnostic failed this ignition? | -- | Go to Diagnostic Aids | |||||||||||||||||||||||
4 | Is DTC P0171 also set? | -- | ||||||||||||||||||||||||
Visually and physically inspect for the following conditions:
Was a problem found in any of the above areas? | -- | |||||||||||||||||||||||||
6 | Visually and physically inspect for the following conditions:
Was a problem found in any of the above areas? | -- | ||||||||||||||||||||||||
7 |
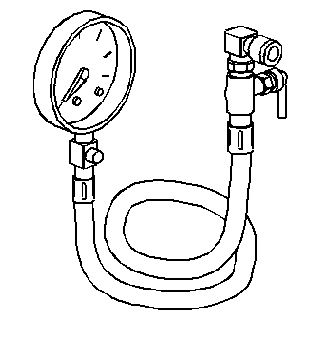
Caution: Wrap a shop towel around the fuel pressure connection in order to reduce the risk of fire and personal injury. The towel will absorb any fuel leakage that occurs during the connection of the fuel pressure gage. Place the towel in an approved container when the connection of the fuel pressure gage is complete. Caution: The fuel pump will operate for 2 seconds after you have turned off the ignition. Make sure that all the fuel pipes and fittings are securely fastened in order to prevent personal injury. Does pressure hold within the specified range? | 379-413 kPa (55-60 psi) | ||||||||||||||||||||||||
8 |
Is the fuel pressure within the specified range? | 379-413 kPa (55 60 psi) | ||||||||||||||||||||||||
9 | Perform the Fuel Injector Balance Test. Refer to Fuel Injector Balance Test with Tech 2 . Was an injector problem found? | -- | ||||||||||||||||||||||||
10 |
The Long Term FT bank 2 should decrease below the specified value. Does the Long Term FT bank 2 value decrease to less than the specified value? | 20 % | ||||||||||||||||||||||||
11 |
The Long Trim FT bank 2 should decrease below the specified value Does the Long Term FT bank 2 value decrease to less than the specified value? | 20 % | ||||||||||||||||||||||||
12 | The lean condition is not present. Does a driveability symptom still exists? | -- | Go to Diagnostic Aids | |||||||||||||||||||||||
13 | Perform the Fuel System Diagnosis. Refer to Fuel System Diagnosis . Is the action complete? | -- | -- | |||||||||||||||||||||||
14 |
Does the scan tool indicate that this diagnostic Ran and passed? | -- | ||||||||||||||||||||||||
15 | Does the scan tool display any additional undiagnosed DTCs? | -- | Go to the applicable DTC table | System OK |
