Removal Procedure
- Disconnect the negative battery cable.
- Disable the SIR system. Refer to Disabling the SIR System in SIR.
- Remove the instrument panel extension. Refer to Instrument Panel Extension Replacement .
- Remove the engine cover. Refer to Engine Cover Replacement in Interior Trim.
- Remove the left side cowl trim panel retaining screws.
- Remove the left side cowl trim panel.
- Remove the driver's knee bolster. Refer to Driver Knee Bolster Replacement .
- Remove the steering column harness connector:
- Lower the steering column. Refer to Steering Column Replacement in Steering Wheel and Column - Standard or Steering Column Replacement in Steering Wheel and Column - Tilt .
- Remove the passenger's knee bolster. Refer to Passenger Knee Bolster Replacement .
- Remove the right side cowl trim panel screws.
- Remove the right side cowl trim panel.
- Remove the power door lock delay relay and the power relay from the right cowl side panel after the trim is removed.
- Remove the battery. Refer to Battery Replacement in Engine Electrical.
- Remove the bolts that retain the cover to the bulkhead connector.
- Remove the bulkhead connector.
- Disconnect the electrical connector from the cruise control.
- Remove the data link screws.
- Remove the Mini-Fuse® panel from the cowl.
- Remove the convenience center.
- Disconnect the block connector from the steering column.
- Disconnect the brake switch electrical connector.
- Remove the drivers seat to remove the carrier through the door. Refer to Bucket Seat Replacement in Seats.
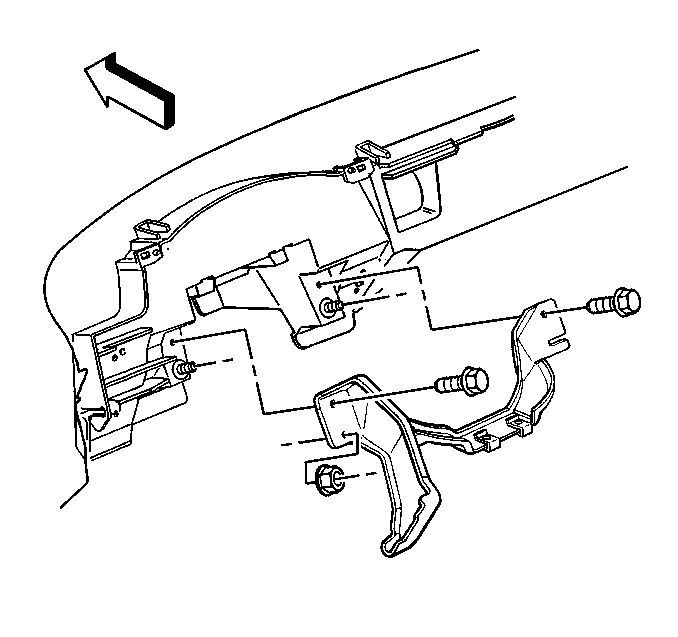
- Remove the bolts to the steering column bracket.
- Remove the air distributor duct. Refer to Air Distributor Duct Replacement in Heating, Ventilation and Air Conditioning.
- Disconnect the wiring from the left side of the relieve harness out of the vehicle.
- Remove the door trim plate.
- Pull the carpet back to access SDM module.
- Remove the SDM module from the vehicle.
- Disconnect the white bulk head connector from the left side.
- Remove the instrument panel cluster trim. Refer to Instrument Cluster Trim Panel Replacement .
- Remove the radio. Refer to Radio Replacement in Entertainment.
- Remove the heater control. Refer to Control Assembly Bulb Replacement in Heating, Ventilation and Air Conditioning.
- Remove the instrument panel cluster Refer to Instrument Cluster Replacement .
- Remove the power door lock relay from steering column.
- Remove the heater core cover that retain the screws and the cover.
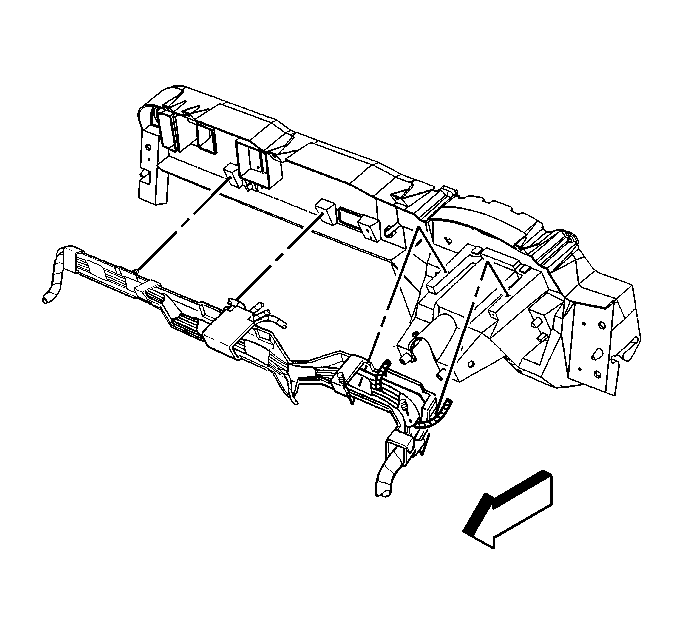
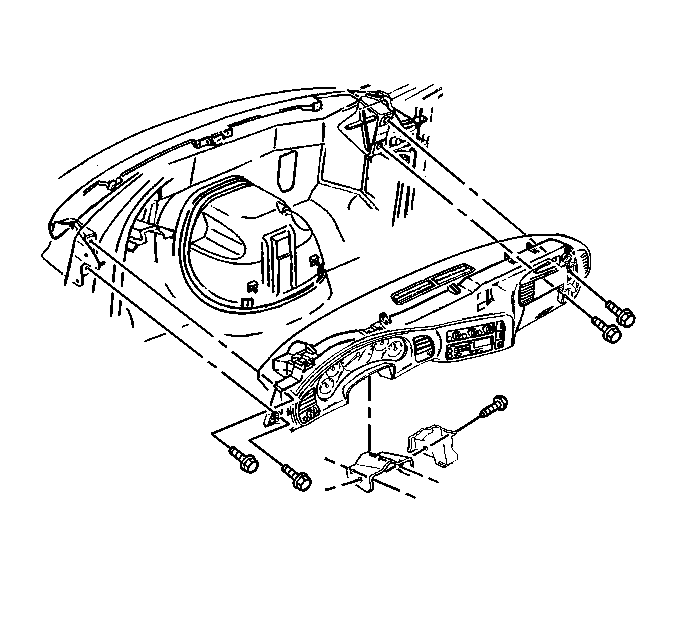
- Remove the two bolts on the left and the right sides of the instrument panel that retain the instrument panel carrier to the carrier support assemblies.
- Slide the instrument panel away from the cowl.
- Remove the instrument panel harness from the instrument panel.
- Lift the slide instrument panel up and off the pivot points.
Caution: Unless directed otherwise, the ignition and start switch must be in the OFF or LOCK position, and all electrical loads must be OFF before servicing any electrical component. Disconnect the negative battery cable to prevent an electrical spark should a tool or equipment come in contact with an exposed electrical terminal. Failure to follow these precautions may result in personal injury and/or damage to the vehicle or its components.
| 8.1. | Remove the single bolt retainer in the center of the connector. |
| 8.2. | Release the upper and the lower clip retainers. |
Important: Do not remove the column. Use only the steps needed in order to lower the column for clearance.
Installation Procedure
- Install the instrument panel onto the pivot points.
- Slide the instrument panel towards the cowl.
- Install the instrument panel harness to the instrument panel.
- Install the two bolts on the left and the right sides of the instrument panel that retain the instrument panel carrier to the carrier support assemblies.
- Install the heater core cover screws.
- Install the power door lock relay from steering column.
- Install the instrument panel cluster. Refer to Instrument Cluster Replacement .
- Install the heater control. Refer to Control Assembly Replacement in Heating, Ventilation and Air Conditioning.
- Install the radio. Refer to Radio Replacement in Entertainment.
- Install the instrument panel cluster trim. Refer to Instrument Cluster Trim Panel Replacement .
- Connect the white bulkhead connector to the left side.
- Install the SDM module from the vehicle.
- Refit the carpet to cover the SDM module.
- Install the door trim plate.
- Connect the wiring to the left side of the relieve harness out of the vehicle.
- Install the air distributor duct. Refer to Air Distributor Duct Replacement in Heating, Ventilation and Air Conditioning.
- Install the bolts to the steering column lower bracket.
- Install the drivers seat. Refer to Bucket Seat Replacement in Seats.
- Connect the brake switch electrical connector.
- Connect the block connector to the steering column.
- Install the convenience center.
- Install the Mini-Fuse® panel to the cowl.
- Install the data link screws.
- Connect the cruise control electrical connector.
- Install the bulkhead connector.
- Install the bolts that retain the wiring harness connectors to the bulkhead connector.
- Install the battery. Refer to Battery Replacement in Engine Electrical.
- Install the power door lock delay relay and the power relay at the right side cowl trim panel.
- Install the passenger's knee bolster. Refer to Passenger Knee Bolster Replacement .
- Install the right side cowl trim panel.
- Install the right side cowl trim panel retaining screws.
- Raise the steering column. Refer to Steering Column Replacement in Steering Wheel and Column - Standard or Steering Column Replacement in Steering Wheel and Column - Tilt.
- Install the steering column harness connector:
- Install the driver's knee bolster. Refer to Driver Knee Bolster Replacement .
- Install the left side cowl trim panel.
- Install the left side cowl trim panel retaining screws.
- Install the engine cover. Refer to Engine Cover Replacement .
- Install the instrument panel extension. Refer to Instrument Panel Extension Replacement .
- Enable the SIR system. Refer to Enabling the SIR System in SIR.
- Connect the negative battery cable.
Notice: Use the correct fastener in the correct location. Replacement fasteners must be the correct part number for that application. Fasteners requiring replacement or fasteners requiring the use of thread locking compound or sealant are identified in the service procedure. Do not use paints, lubricants, or corrosion inhibitors on fasteners or fastener joint surfaces unless specified. These coatings affect fastener torque and joint clamping force and may damage the fastener. Use the correct tightening sequence and specifications when installing fasteners in order to avoid damage to parts and systems.
Tighten
Tighten the two bolts on the left and the right
sides of the instrument panel to 45 N·m (33 lb ft).
Tighten
Tighten the heater core cover screws to 2 N·m
(18 lb in).
Tighten
Tighten the bolts to the steering column lower bracket
to 25 N·m (118 lb ft).
Tighten
Tighten the data link screws to 2 N·m
(18 lb in).
Tighten
Tighten the screws that retain the wiring harness
connectors to the bulkhead connector to 2 N·m (18 lb in).
Tighten
Tighten the right side cowl trim panel retaining
screws to 2 N·m (18 lb in).
| 33.1. | Snap the upper and the lower clip retainers into place. |
| 33.2. | Install the single bolt retainer in the center of the connector. |
Tighten
Tighten the single bolt retainer in the center of
the connector to 2 N·m (18 lb in).
Tighten
Tighten the left side cowl trim panel retaining
screws to 2 N·m (18 lb in).
Caution: Unless directed otherwise, the ignition and start switch must be in the OFF or LOCK position, and all electrical loads must be OFF before servicing any electrical component. Disconnect the negative battery cable to prevent an electrical spark should a tool or equipment come in contact with an exposed electrical terminal. Failure to follow these precautions may result in personal injury and/or damage to the vehicle or its components.
